OPERATION EN
9
In 9006246 (11
−
2011)
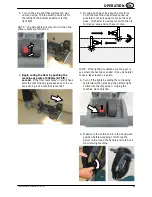
5. Turn on the side light that will face the wet
uncured edge. The top switch position is for
the left light, the bottom position is for the
right light.
NOTE: The side lights will only turn on when the
primary lights are turned on.
6. Begin curing the floor by pushing the
machine at a rate of 230 mm (0.75 ft) /
second. If the floor feels tacky on your shoes
after the machine has just passed over it, you
are pushing it at a rate that is too fast.
7. Overlap each pass by about 50 mm (2 in).
Push the machine in as straight a line as
possible to make it easier to make the next
pass. It is better to overlap too much than to
to miss an area and not have it cured.
NOTE: If the lighting conditions are too poor to
see where the last pass ended, it may be helpful
to use a laser level as a guide.
8. Turn off the lights by sliding the red locking
tab forward, then pressing the primary light
switch into the off position. Unplug the
machine when finished.
9. Make sure the cord hook is in the downward
position before wrapping cord. Wrap the
power cord around the handle and cord hook
when storing machine.

