

1
2
Power Up
3
Log In & Configure Networking
QSG_InfoVue_11_24_V4
To install the InfoVue Standard or Pro Player in a rack, use the ears to bolt the server
in place.
Install in a Rack
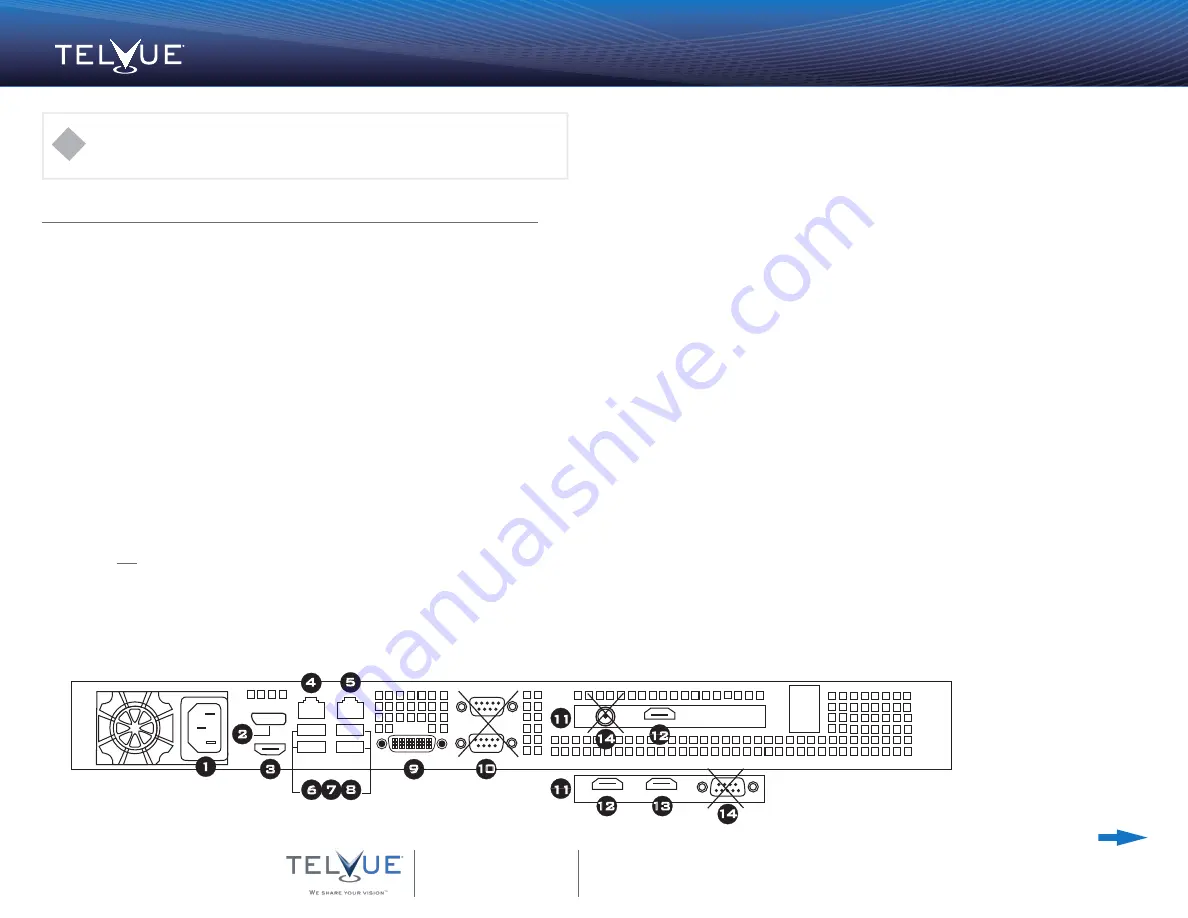
Power
Display Port
(DP)
Display HDMI Out
Ethernet [0]
Ethernet [1]
Mouse
Keyboard
USB
DVI
Serial Ports (not used)
Capture Card (Pro-only)
HDMI Input
Monitor HDMI Out
(pass-through input)
(not used)
1.
2.
3.
4.
5.
6.
7.
8.
9.
10.
11.
12.
13.
14.
1
2
3
4
5
6 7 8
10
9
Back Side of InfoVue Player
ii. Attach USB keyboard & mouse
1. Press Ctrl+Alt+Del to bring up the Windows login window.
2. Log off the existing login.
3. Log in as user “config” with password “config”.
iii. Assign static IP to eth0 - Management.
1. Double click the desktop icon “Network”:
a. Choose “Change adapter settings” (left side)
b. Double click on eth0 - Management.
c. Select Properties.
d. Choose Internet Protocol Version 4 (TCP/IPv4).
e. Click the properties button.
f. Choose “Use the following IP address” and fill in your network
specific values.
iv. Once IP configuration is completed, double click the Restart InfoVue Player icon on
the desktop to reboot the InfoVue Player.
v. Now you can access the Web UI from a web browser. Login to the InfoVue Web
User Interface at: http://(your IP address from previous step) with
the default
Username: admin and Password: admin
Refer to the online user instructions on
how to use the Web UI
for other configuration and
encoder streaming settings.
http://telvue.com/knowledgebase/infovue-pro-configuration-ui/
Turn the page for additional steps.
The following instructions are for launching a TelVue InfoVue system including configuring the
InfoVue Standard Player, InfoVue Pro Player (capture card models), and the InfoVue Stick Player.
!
Set up the InfoVue Standard or Pro Player
16000 Horizon Way
Suite 100
Mount Laurel, NJ 08054
800.885.8886
Email:
Online Resources:
www.telvue.com/infovue
Getting Started
TelVue
®
InfoVue™
There are two ways to configure networking:
a. WEB UI - requires ethernet cable, and an additional computer.
i. Assign IP address values to a network port on your computer:
1. IP 192.168.0.101
2. Net Mask: 255.255.255.0
ii. Connect ethernet cable between your computer and the eth1 port on InfoVue.
iii. Access the Web UI from a web browser, using the URL:
http://192.168.0.242.
(This is the factory-assigned IP address for the InfoVue Player.)
iv. Login with the default Username: admin and Password: admin
v. Set the IP Address and Configure Networking via the Config --> Network page.
b.
DESKTOP CONSOLE - requires keyboard & mouse, and HDMI monitor.
i. Plug the InfoVue Player Display HDMI Output (#3) into a Monitor or TV.
Power up the InfoVue Player.
14
13
12
4
Configure InfoVue Pro for Encoding (IP Output)
Plug the InfoVue Pro Player Display HDMI Output (#3) into the HDMI Input (#12) with
provided HDMI cable. Set up encoding from the Web UI. Note this applies to
InfoVue Pro Players only, InfoVue Standard Players do not support Encoding.
12
14
Alternative Capture Card
11
11


