Copyright
○
c 2005-2006
All Rights Reserved
Mobile Digital Video Recorder with
Advertisement/ Multimedia
Playback
Instruction Manual
Page 1: ...Copyright c 2005 2006 All Rights Reserved Mobile Digital Video Recorder with Advertisement Multimedia Playback Instruction Manual...
Page 2: ...Shut down 19 IV MDR system layout 21 IV 1 Multimedia Management 21 A Advertisement 21 B Music 22 C Movie 23 IV 2 Playback Management 24 A Search Normal Recorded Playback 24 B Search Event Recorded Pl...
Page 3: ...MDR Manual 2...
Page 4: ...ideo only z Automatic timer to resume the live display if the unit is idle for user defined timings z MPEG 4 video compression for high quality low storage recording and playback z User selectable set...
Page 5: ...ground cable to the vehicle correctly to complete the power circuit g Install the MDR in a dry location shielded from direct contact with excessive humidity and moisture rain or other sources of liqu...
Page 6: ...and wire connectors Voltmeter II 4 MDR Product Views Front View Rear View without connections Assembled Chassis Details Height 4 9 cm 1 93 inch Width 17 9 cm 7 04 inch Depth 24 5 cm 9 64 inch Weight...
Page 7: ...MDR Manual 6 II 5 MDR Dimension 17 9 cm 17 5 cm 24 5 cm 4 9 cm 4 6 cm...
Page 8: ...ms for each unit a MDR Recording Module and Mounting Assembly b DB37 bridal AV input Sensor connectors Inertia sensor connector c DB25 bridal AV output VGA connector RS232 RS485 Control panel connecto...
Page 9: ...ovide sufficient ventilation with a minimum of 6 inches cooling clearance to ensure proper operating temperature for the unit Vibration If necessary provide additional shock mounting to prevent damage...
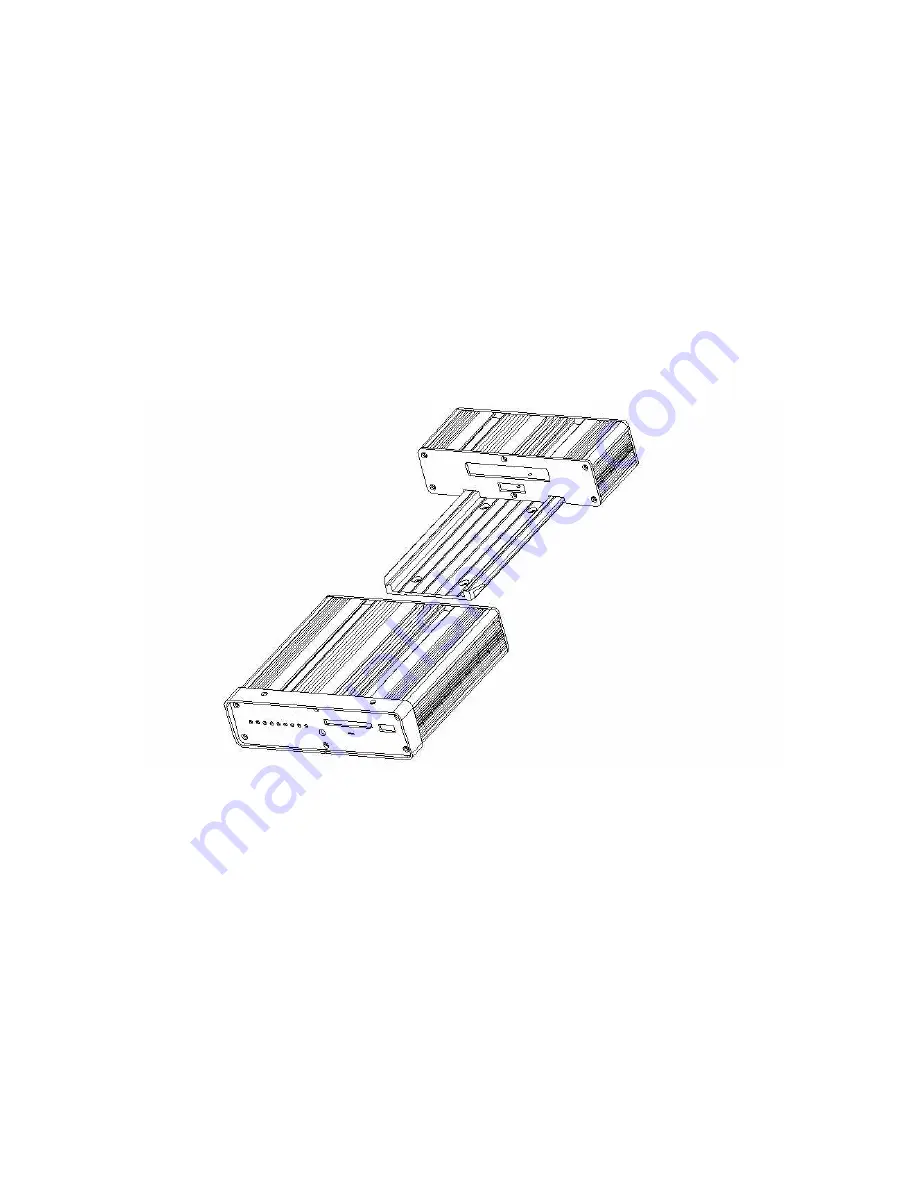
Page 10: ...int in the vehicle Make all connections to the rear of the mounting assembly Place the mounting assembly and permanently attach to the supporting structure using screws Slide the recording module on t...
Page 11: ...stallation Layout Note This is a sample I O Schematic Sensors are not reserved for any device Sensors can be connected to any external device in any order The label in the setup differentiates the sen...
Page 12: ...Description INPUT Red Positive wire Should be connected to the positive terminal of the battery INPUT GROUND Black Negative ground wire Should be connected to the negative terminal of the battery SIG...
Page 13: ...ensor 4 0 12V Sen 4 Red Sensor 5 0 12V Sen 5 Red Sensor 6 0 12V Sen 6 Red Sensor 7 0 12V Sen 7 Red Sensor 8 0 12V Sen V Yellow Speed capture A D Blue Enable the Analog to Digital input for Sensor 1 to...
Page 14: ...satellite to receive the signals When the negotiation is completed a graphical icon at the live display shows the availability of GPS z If the negotiation fails an X is marked on the graphical icon sh...
Page 15: ...er using USB port CF CF card status LED ON indicates that CF card is inserted and the data is accessible LNotice when the ALM on caused by video loss or trigger High Speed Limit sensor require login a...
Page 16: ...h purpose Terminal Block A Power INPUT and OUTPUT Connections Terminal Block B DB37 Audio Video Signal Inputs Sensors connections Inertia connection Terminal Block C DB25 Audio Video Signal outputs VG...
Page 17: ...output or a regular monitor VGA Numeric Input Keys Use the numbers to input values in the system setup screen or switch through the channels in live and playback Plus and Minus is used to increase se...
Page 18: ...IN LOCK or SETUP key to enter the user setup POWER The Power button can reset the DVR in to sleep mode unit will stop recording while in the sleep mode VGA Switch the output mode to VGA VIDEO Switch b...
Page 19: ...if audio is recorded or multimedia playback PREV Decrease volume while playback if audio is recorded or multimedia playback REW Rewinds the video while playback X2 and X 4 modes available FWD Fast fo...
Page 20: ...ings are programmed to display administrative view on VGA monitor If MDR is connected on the Video output 1 press the VIDEO button on the IR to switch to composite monitor output Please see a list of...
Page 21: ...ollows Fig 1 0 Security only version MDR comes with the Security only version by factory default To update the DVR with the Multimedia version please advice your sales associate There is no hardware u...
Page 22: ...While the advertising is playing the Handheld IR navigation keys increases decreases the volume Press will pause the advertising clips Pressing the key will resume the playback Press EXIT return to t...
Page 23: ...ress EXIT return to the music menu Delete the file Select the file to delete and press the right direction key Select NO and press ENTER to cancel delete operation Select YES and press ENTER to delete...
Page 24: ...direction key Select NO and press ENTER to cancel delete operation Select YES and press ENTER to delete the file you have selected Note that once the file is deleted it cannot be recovered Press EXIT...
Page 25: ...ording available to MDR Using the numeric keypad of the handheld IR controller or keys to increase the values fill the appropriate data Year Range is 2000 to 2099 Only the last 2 digits of the year ar...
Page 26: ...eo for 10 seconds User can also switch channels of video by pressing the desired number of channel on the handheld IR numeric Keypad User can start to download the video on a CF card while viewing the...
Page 27: ...OR METER SPEED REAR PANIC DDOOR Page Down Page Down Page Down Page Up Page Up Page Up Fig 2 1 While the video is playing back pressing Enter on the IR will show the associated text on the channel and...
Page 28: ...ontroller to scroll through the list of items on the left column Press ENTER to select the option The setting area will appear on the right column Press the RIGHT ARROW key to switch to the data entry...
Page 29: ...ss ENTER to advance days Time Sync The system allow have the time synchronizing via by either GPS or NTP While selecting the GPS the device must have GPS connection and GPS signal must be have well re...
Page 30: ...mings The available selections are 15 minutes 30 minutes 45 minutes and 60 minutes Idle Time Idle time is used to revert back to the live cameras view if there is no activity from the Handheld IR The...
Page 31: ...ng power from the vehicle battery Shutdown Delay Allow the system continuous running when vehicle turn off ignition signal OFF it provide up to 24 hours delay shutdown It allows the system perform z C...
Page 32: ...MDR Manual 31 C Video Type Select the appropriate camera signal type Select between NTSC US or PAL International standards of video recording Scroll to APPLY and press ENTER to save the new settings...
Page 33: ...owing conditions are met System Diagnostics when some system problem occurs such as Hard disk failure no space for Hard disk etc Camera Failure due to video input signal loss Sensor Trigger External s...
Page 34: ...gh a sensor input the unit automatically starts to record up to the user selected frames second on all cameras z User can select between the timings before and after the event for high frame rate reco...
Page 35: ...ved for the new recording z When the overwrite feature is OFF recording will stop when the HDD is full z You must erase all the recordings using the Setting HDD Format to resume recording Scroll to AP...
Page 36: ...from Format HDD Formats the unit Hard Disk Drive Format Compact Flash CF Card Formats the CF Card When START had been pressed there are confirmation required from operator select YES to proceed the h...
Page 37: ...ing START on this setting will erase all recorded video on the unit or the data on CF card Press ARROW keys to either choose START reformatting the disk or choose RETURN without formatting Press ENTER...
Page 38: ...Name While using the CMS Central Management System software require assigned the domain address to allow MDR can point to this destination Port While using the Client software or CMS Central Manageme...
Page 39: ...ress ENTER to switch between YES and NO c Press the down ARROW key to highlight the User password entry line Enter the desired password and confirm The password must be EIGHT NUMBERS long Use the NUME...
Page 40: ...and re enter line Scroll to APPLY and press ENTER to save the new settings L Notice The password would be corresponding to remote access software which including CMS Client software auto download pro...
Page 41: ...fault Setup User ARROW keys to switch between YES and NO Selecting YES will restore the default factory settings Warning Once the default setup had been loading all the user setting had been delete an...
Page 42: ...way 192 168 0 1 Security Yes Driver Info Company Name XYZ Vehicle Number 123 Driver Name ABC Camera Camera 1 Label No Label Quality 1 Audio No Camera 2 Label No Label Quality 1 Audio No Camera 3 Label...
Page 43: ...the chapter labeled as Hard Disk File Structure towards the end of the manual HOST MODE Using the ENTER Key on the handheld IR select the HOST MODE The HOST MODE allows an external USB jump drive to...
Page 44: ...me Vehicle Number and Driver Name Use ARROW keys to select the option for modification Press ENTER at the highlighted line The screen will pop up a text entry keyboard Use Arrows to choose characters...
Page 45: ...ers max Image Quality Press ENTER to enter the recording quality 1 is the highest quality Audio Rec Enable Disable for the audio record for each camera channel when there are no audio input and should...
Page 46: ...ENTER to switch between ON and OFF to embed time date in the video Output Mode MDR is capable of displaying multimedia advertising when the unit is powered on User can select the option of displaying...
Page 47: ...schedule Type Press ENTER to change the type of the recording mode Con Continuous recording MBR Motion Based Recording SEN Sensor Trigger Based Recording M S MBR and SEN Recording Schedule 1 2 Press...
Page 48: ...p Choose the EVENT tab and press enter to access the following menu There are 2 option under this item Sensor and Motion Detect V 4 1 Sensor Menu Name Press ENTER on the Name field to display the virt...
Page 49: ...peedometer z Browse between the settings of GPS or speedometer from the list z Please note that the GPS antenna should be connected to MDR to receive satellite signals for speed z For more information...
Page 50: ...Totally with 192 blocks on screen z Press ENTER to make the block in Green color as active block and select the block with direction keys z Re press ENTER to trigger off to make as transparent z Press...
Page 51: ...lco07 Pelco08 Pelco09 Pelco10 Pelco11 Pelco12 Pelco13 Pelco14 Pelco15 If no corresponding protocol in here please contact with local distributor we can provide the technical support to add the special...
Page 52: ...it might need to used when there are any technical question and user require to refer this information to technical support staff Hard Disk Information This will show that the built in Hard disk forma...
Page 53: ...e Select YES and press Enter This will clear the log file from the unit Select NO to cancel to clear the log file All Logs select this option to clear both Event Log and Advert Log file simultaneously...
Page 54: ...card a Insert a CF card into the CF slot of your Windows PC Drive letter appears b Using Windows Explorer format the CF card as FAT32 format All the data will be permanently erased from the CF card c...
Page 55: ...technical label upright and any graphics label on the face down Operate CF Card If there are any video recorded files on the CF card this option allow to play back the recordings Select the Operate C...
Page 56: ...MDR unit and follow the Change Setup Option Operate CF Card Copy Setup Change Setup Advertisement Movie Music Please wait while the setup is backing up Change Setup This option allows changing the se...
Page 57: ...avi Size 20 172KB Press right key to delete file Page Down Page Down Page Down Page Up Page Up Page Up NOTE When copying the advertising contents to the CF card using Windows PC create a folder called...
Page 58: ...the advertisement playback history by DVR this contains playback time interval number Use log viewer application to open this file provide by Movie List of the movie file Supported format MPEG4 MPEG2...
Page 59: ...ort located at the back of docking station 2 Once connected properly and placed outside the vehicle facing towards the sky you will find the GPS icon display on the surveillance screen as shown 3 The...
Page 60: ...GND Ground 24 GND Ground 11 GND Ground 25 GND Ground 12 GND Ground 26 GND Ground 13 GND Ground 27 SENSOR IN0 Sensor 1 DB37 14 GND Ground 28 SENSOR IN1 Sensor 2 PIN Connection PIN Connection 1 H Video...