Basic installation procedure
Connect a monitor
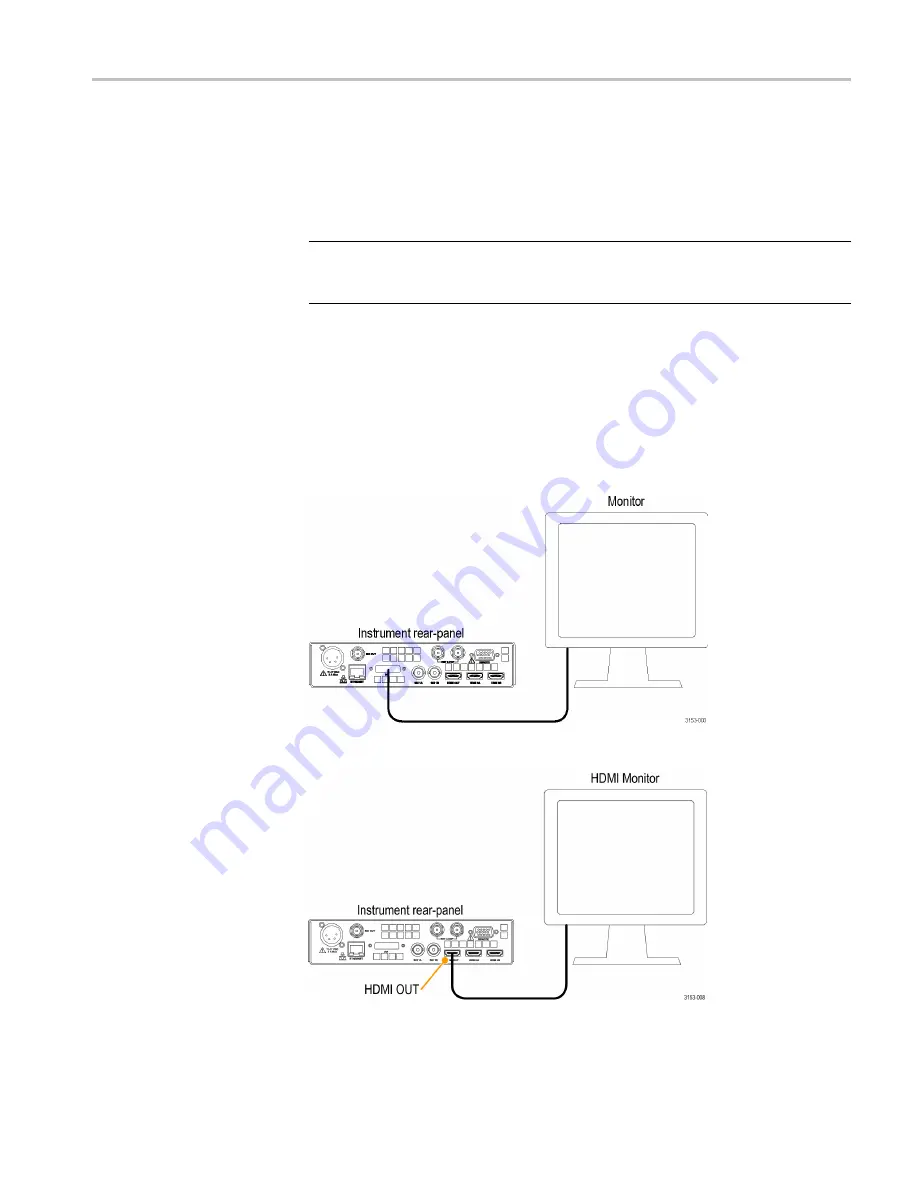
This instrument requires an external monitor connected to the
DVI
connector to
monitor the instrument displays. If you want to view an image of the HDMI input,
connect an HDMI monitor using the
HDMI OUT
connector.
NOTE.
An HDCP compliant monitor is required in order to view an image for
HDCP compliant inputs, otherwise the screen may be blank. Also, the SDI output
will not be available when HDCP content is present on the HDMI input.
1.
Connect a monitor to the
DVI
connector. If you want to view an image of the
HDMI input, connect an HDMI monitor using the
HDMI OUT
connector.
2.
Connect the appropriate power cord to the monitor and then to a power source.
3.
Turn on the monitor. You will not see a waveform until you have connected a
signal to the instrument and turned on the power. (See page 16,
Power-on and Power-off procedure
Figure 1: Connecting a monitor to the instrument through the DVI connector
Figure 2: Connecting a monitor to the instrument through the HDMI OUT connector
WVR5250 Installation and Safety Instructions
15
Summary of Contents for WVR5250
Page 1: ...xx WVR5250 Waveform Rasterizer Installation and Safety ZZZ Instructions P071315300 071 3153 00...
Page 2: ......
Page 28: ...EMC 22 WVR5250 Installation and Safety Instructions...
Page 32: ...AC AC 26 WVR5250 Installation and Safety Instructions...
Page 33: ...DANGER WARNING CAUTION WVR5250 Installation and Safety Instructions 27...
Page 36: ...AC 50 Hz 60 Hz AC100 240 V 10 30 WVR5250 Installation and Safety Instructions...
Page 42: ...31 40 31 36 WVR5250 Installation and Safety Instructions...
Page 44: ...SDI 1 CD SDI 38 WVR5250 Installation and Safety Instructions...
Page 45: ...HDMI HDMI 1 HDMI 3D HDMI REF 1 1 75 WVR5250 Installation and Safety Instructions 39...
Page 50: ...Input CONFIG 44 WVR5250 Installation and Safety Instructions...
Page 52: ...UL CSA A0 A1 A2 A3 A5 A6 A10 A11 A12 A99 1 1 46 WVR5250 Installation and Safety Instructions...
Page 54: ...48 WVR5250 Installation and Safety Instructions...
Page 55: ...DANGER WARNING CAUTION WVR5250 Installation and Safety Instructions 49...
Page 58: ...50 60 Hz 100 240 VAC 10 52 WVR5250 Installation and Safety Instructions...
Page 64: ...53 40 53 58 WVR5250 Installation and Safety Instructions...
Page 66: ...SDI CD SDI 60 WVR5250 Installation and Safety Instructions...
Page 67: ...HDMI HDMI HDMI 3D HDMI REF 75 WVR5250 Installation and Safety Instructions 61...
Page 69: ...50 60 Hz 100 240 46 22 WVR5250 1 2 1 2 WVR5250 Installation and Safety Instructions 63...
Page 72: ...66 WVR5250 Installation and Safety Instructions...
Page 74: ...UL CSA A0 A1 A2 A3 A5 A6 A10 A11 A12 A99 1 1 68 WVR5250 Installation and Safety Instructions...
Page 76: ...70 WVR5250 Installation and Safety Instructions...
Page 77: ...DANGER WARNING CAUTION WVR5250 Installation and Safety Instructions 71...
Page 80: ...RoHS 2011 65 22 2017 74 WVR5250 Installation and Safety Instructions...
Page 81: ...50 60 100 240 10 WVR5250 Installation and Safety Instructions 75...
Page 86: ...REMOTE REMOTE LTC REMOTE REMOTE 15 D 80 WVR5250 Installation and Safety Instructions...
Page 89: ...76 40 C 76 WVR5250 Installation and Safety Instructions 83...
Page 91: ...8 HDMI OUT SDI WVR5250 Installation and Safety Instructions 85...
Page 92: ...SDI HDMI HDMI 3D HDMI 86 WVR5250 Installation and Safety Instructions...
Page 93: ...REF 75 WVR5250 Installation and Safety Instructions 87...
Page 95: ...50 60 100 240 68 22 WVR5250 1 2 1 2 WVR5250 Installation and Safety Instructions 89...
Page 98: ...RGB YPbPr Configuration Configuration CONFIG 92 WVR5250 Installation and Safety Instructions...


