background image

JOG NOW : Service & maintenance manual  - rev. 5.1 


Page 7.45 

7.22.2. 


D

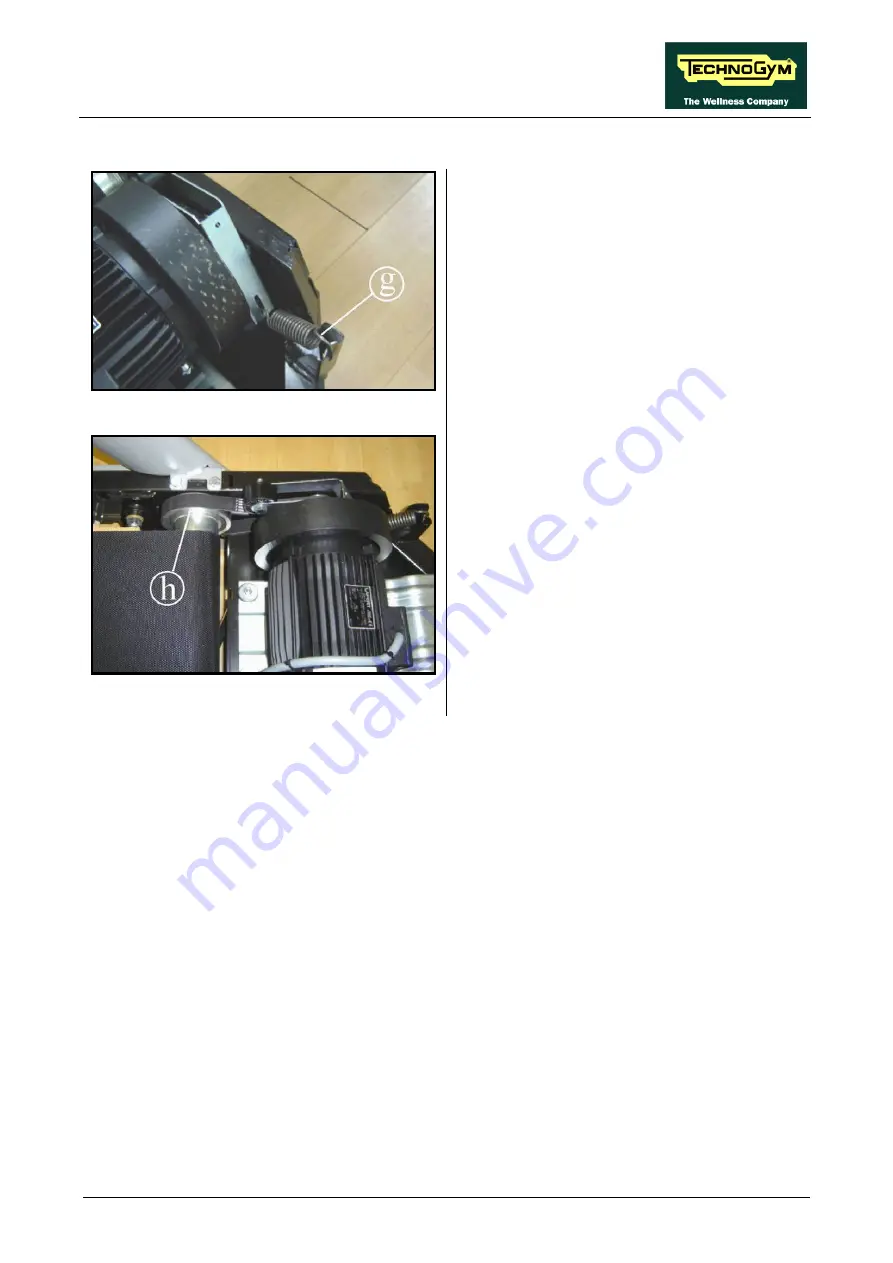
ISASSEMBLING THE MOTOR DRIVE BELT AND MOTOR ROLLER


Figure 7.22-3 

Carry out the procedure described in paragraph: 

7.13. “Disassembling the motor guard”. 


1.


Release the spring 

(g)

 of the belt tensioning 

mechanism. 


Figure 7.22-4 

2.


Disengage the motor drive belt from the 

pulley 

(h)

 on the front roller. 


3.


Remove the driving roller, extracting it from 

the top on the right side and pulling it out 

axially from the left. 


4.


Remove the motor drive belt from the motor 

pulley

 (h)


To reassemble the components removed, carry 

out the above steps in reverse order.


Summary of Contents for Jog Now Excite+ 500

Page 1: ...J JO OG G N No ow w E X C I T E REV 5 1 ...

Page 2: ......

Page 3: ...ES PRESENT NOTE The information contained in this document is subject to change without notice Technogym does not guarantee this documentation in any way Technogym shall not be held responsible for any errors contained in this manual and declines all liability for accidents or damages resulting from the supply characteristics or use of this manual This document contains proprietary information tha...

Page 4: ...JOG NOW Excite Service maintenance manual rev 5 1 ...

Page 5: ...ALE MET CE LED 2 10 2 9 3 2 ALE MET CE VISIO 2 10 2 9 4 Driver ALE MET CE 200 240V 2 11 2 9 4 1 ALE MET CE LED 2 11 2 9 4 2 ALE MET CE VISIO 2 11 2 9 5 Kit Alto 2 12 2 9 5 1 LED 500 Display ARM Board 2 12 2 9 5 2 LED 700 Display ARM Board 2 13 2 9 5 3 VISIO Display CPU Board 2 14 2 10 CABLES 2 15 2 10 1 CBQ cables 2 15 2 10 2 TRM cables 2 15 2 10 3 AUTOTRAnSFORMER cable 2 15 2 10 4 CU cables 2 16 ...

Page 6: ...4 TREAD BELT MOTOR DRIVE 3 16 3 14 1 Mechanics 3 16 3 14 2 Controls 3 16 3 14 3 The signals involved 3 17 3 15 ELEVATION MOTOR DRIVE 3 18 3 15 1 Mechanics 3 18 3 15 2 Control 3 18 3 15 3 Reset procedure 3 19 3 15 4 The signals involved 3 20 3 16 EMERGENCY STOP SIGNAL MANAGEMENT 3 21 3 16 1 Control logic 3 21 3 16 2 The signals involved 3 22 4 ACCESSORIES 4 1 4 1 CARDIO THEATER CONNECTION 4 1 4 2 P...

Page 7: ... IS INCORRECT 6 35 6 15 1 Chest Belt 6 35 6 15 2 Hand Sensor 6 39 7 PART DISASSEMBLY 7 1 7 1 DISASSEMBLING THE DISPLAY 7 1 7 1 1 LED Display 500 and 700 7 1 7 1 2 VISIO Display 700Visio 7 2 7 2 DISASSEMBLING THE DISPLAY BOARD AND COMPONENTS 7 3 7 2 1 LED Diasplay ARM Board 7 3 7 2 2 VISIO 15 Display CPU Board 7 4 7 2 2 1 Wireless board A 7 5 7 2 2 2 Tuner DVB T board B 7 7 7 2 2 3 Tuner board ATSC...

Page 8: ...8 1 8 1 1 Tensioning a new tread belt 8 1 8 1 2 Tensioning a used tread belt 8 2 8 2 CENTRING THE TREAD BELT 8 3 8 3 POSIZIONE MICRO DI FINE CORSA 8 4 8 4 THE MACHINE IS NOT FLAT 8 5 9 MACHINE CONFIGURATION 9 1 9 1 USER MENU CONFIGURATION LED MODELS 9 1 9 1 1 Language 9 2 9 1 2 Distance 9 2 9 1 3 Maximum exercise time 9 2 9 1 4 Pause time 9 2 9 1 5 Cool Down time 9 3 9 1 6 Default age 9 3 9 1 7 De...

Page 9: ...assembly of the tread belt components 11 3 11 2 2 Checking the assembly of the guards 11 3 11 3 START UP CHECK 11 3 11 4 LIST OF CRITICAL SPARE PARTS 11 4 12 SCHEDULED MAINTENANCE 12 1 12 1 ORDINARY MAINTENANCE OPERATION 12 2 12 1 1 Setting up the operation Daily 12 2 12 1 2 External cleaning operations Daily 12 2 12 1 3 Internal cleaning operations Monthly 12 2 12 1 4 Checking the Emergency stop ...

Page 10: ...JOG NOW Excite Service maintenance manual rev 5 1 Page vi Page intentionally left blank ...

Page 11: ...TION non observance may cause damage to the machine Information about the operation in progress Observation about the operation in progress 1 2 RECOMMENDATIONS Technogym recommends the following steps for planning repair procedures Carefully evaluate the customer s description of the machine malfunction and ask all the necessary questions to clarify the symptoms of the problem Clearly diagnose the...

Page 12: ...s of the recommended brands 3 Use special tools where specified 4 Consult the Technical Newsletters which may contain more up to date information on adjusts and maintenance than those contained in this manual 5 Before starting the repair procedure make sure that the recommended tools are available and in good condition 6 For the procedures described in this manual use only the specified tools The ...

Page 13: ...cription Key to values 1 2 Line type DA Excite 3 Machine type K JOG Now 4 Model 2 500 3 700 5 Type of power supply 1 100 120V MET CE 2 200 240V MET CE E 200 240V CE U 90 265V AT UL M Medical Device CE 6 Type of Display L LED C VISIO W VisioWEB 7 Integrated accessories N None T Wellness System I iPod USB A iPod USB WS 8 9 Colour of the frame AL Silver AN Anthracite 10 11 Colour of upholstery 00 Non...

Page 14: ...eans a change in the product code Specifically the last character of the product code will be characterised based on the options shown in the table below 16th Character Product code Main country of use Plug standard Type of packaging A Australia A S NZS 3112 Overseas B Brazil NBR 14136 Overseas C China CPC S CCC Overseas D South Africa SANS 164 2 Overseas E Europe EC EEC 7 16 European F USA UL 250...

Page 15: ...follows Characters Description key to values 1 2 3 4 5 6 Product type DAK JOG Now Excite 2 500 3 700 1 100 120V MET CE 2 200 240V MET CE E 200 240V CE U 90 265V AT UL M Medical Device CE L LED C VISIO W VisioWEB 7 8 Year of production 10 2010 9 10 11 12 13 14 Progressive 000001 For example a possible product code would be DAK31W10000001 2 3 COLOUR OPTIONS ...

Page 16: ...Power engine 2 5 HP AC 1 8KWatt Energy consumption 2200Watt Stand By consumption LED ALE MET CE 200 240V 31Watt 31Watt Stand By consumption LED ALE MET CE 100 120V 36 9Watt 36 9Watt Stand By consumption VISIO ALE MET CE 200 240V 72 7Watt Stand By consumption VISIO ALE MET CE 100 120V 78 5Watt Max user weight 220kg 485lbs Speed Km h 0 4 18km h 0 11 2mph Incline 0 15 1 Calorie Coach YES Runner detec...

Page 17: ...English USA English Italian German Spanish French Dutch Portuguese Japanese Chinese Russian Turkish Danish 93 42 CEE certification NO SI 500MD 2 6 MECHANICAL CHARACTERISTICS MECHANICAL CHARACTERISTICS Length mm in 2100 mm 83 Width mm in 859 mm 34 Height mm in 1481 mm 58 3 Weight Kg lbs 164 Kg 361 5 lbs Running surface Width mm in 510 mm 20 Running surface depth mm in 1510 mm 59 4 Running surface H...

Page 18: ...ual rev 5 1 Page 2 6 2 6 2 PACKING DIMENSIONS EUROPE AND OVERSEAS 2 7 AMBIENT SPECIFICATIONS Temperature Operating from 10 to 25 C Storage from 10 to 70 C Humidity Operating from 20 to 90 non condensing Storage from 20 to 90 non condensing ...

Page 19: ...7 EN55022 2007 class A EN61000 3 2 2002 EN61000 3 3 1997 EN60601 1 EN60601 1 2 EN957 1 EN957 6 Class SB FCC15 FCC15 Electrical safety regulations EN60335 1 2008 UL1647 UL60601 1 FCC15 Mechanical safety regulations EN957 1 2006 EN957 6 2003 Directives 2006 42 CE 2004 108 CE 2006 95 CE Moreover Electrical isolation class Class I Protection rating IP20 ...

Page 20: ... together Display and Driver depending on the model these 2 parties accept the various configurations described below 2 9 1 KIT BASSO 2 9 1 1 ALE MET CE Display LED ALE MET CE 200 240V ALE MET CE 100 120V Display VISIO ALE MET CE 200 240V ALE MET CE 100 120V CU378 CU139 2 9 1 2 AT UL Display LED AT UL 100 240V CU133 Display VISIO CU379 ...

Page 21: ...ER BOARD POWER SUPPLY SOCKET CU143 CU143 IN2 IN1 4 1 L N CU143 5 2 CU177 FE OUT1 OUT2 CU144 CU156 DISPLAY LED CU133 powered CU145 2 9 2 2 AT UL VISIO DRIVER BOX LIMIT SWITCH MOTOR ELEVATION MOTOR POWER SUPPLY BOX ON OFF SWITCH C I R C U I T B R E A K E R VAC C I R C U I T B R E A K E R FILTER BOARD POWER SUPPLY SOCKET CU143 CU143 IN2 IN1 4 1 L N CU143 5 2 CU177 FE OUT1 OUT2 DISPLAY VISIO CU144 POW...

Page 22: ...143 IN2 IN1 4 1 L N CU143 5 2 CU177 FE CU145 OUT1 OUT2 DISPLAY LED H SINK XP1 CU139 powered CU144 CU156 C0605 TRM 54 FE A FE CN CN 2 9 3 2 ALE MET CE VISIO DRIVER BOX DRIVER BOARD J8 LIMIT SWITCH Motor ELEVATION Motor Fan cover POWER SUPPLY BOX ON OFF SWITCH C I R C U I T B R E A K E R VAC C I R C U I T B R E A K E R FILTER BOARD J3A J4 J5 J7 J2 J1 RESISTENCE COVER XS1 Fan POWER SUPPLY SOCKET CU14...

Page 23: ...CKET CU143 CU143 IN2 IN1 4 1 L N CU143 5 2 CU177 FE CU145 OUT1 OUT2 DISPLAY LED H SINK XP1 CU139 powered CU144 CU156 C0605 T RM 54 2 9 4 2 ALE MET CE VISIO DRIVER BOX DRIVER BOARD J8 MICRO FINE CORSA MOTORE MOTORE PENDENZA Fan cover POWER SUPPLY BOX ON OFF SWITCH C I R C U I T B R E A K E R VAC C I R C U I T B R E A K E R FILTER BOARD J3A J4 J5 J7 J2 J1 RESISTANCE COVER XS1 Fan POWER SUPPLY SOCKET...

Page 24: ...5 1 Page 2 12 2 9 5 KIT ALTO 2 9 5 1 LED 500 Display ARM Board EMERGENCY BUTTON DISPLAY ARM BOARD KEYBOARD HR Cardio Receiver CN7 CN9 CN1 CN5 CN8 MICRO CU141 MICRO CU377 CN6 RJ45 NC C C NC LOW KIT CU132 Dual TGS Reader CBQ 32 Patch conn CN4 HD4 HD1 ...

Page 25: ... Board EMERGENCY BUTTON DISPLAY ARM BOARD keyboard HR HS Cardio Receiver CN7 CN9 CN1 CN5 CN8 MICRO LOWER SENSOR L UPPER SENSOR R UPPER SENSOR L LOWER SENSOR R inMotion BOARD CU135 CU136 MICRO CU377 CU137 CN6 RJ45 HD4 HD3 2 HD1 NC C C NC CU132 Dual TGS Reader CBQ 32 Patch conn CN4 LOW KIT ...

Page 26: ...N2 CN3 J6 JP10 Audio Video Connectors Board C SAFE CN27 CN19 CN4 CN17 CN22 HS HR CARDIO RECEIVER LOWER SENSOR R LOWER SENSOR L UPPER SENSOR L UPPER SENSOR R CU136 CN34 CN29 CN25 USB CBQ 32 CU132 Dual TGS Reader USB CN14 iPOD DOCKING STATION CU331 CN26 CN40 J13 CU308 CU328 FLAT WB670 CU375 HD4 HD1 HD3 2 CU327 CU376 CU135 CU333 FE CU387 CU381 CN4 Power Supply LAN EMERGENCY BUTTON MICRO MICRO CU377 N...

Page 27: ...rown 1 5 TX Blue 2 9 GND Black 6 2 10 2 TRM CABLES TRM 54 Limit Switch cable ALE AT UL Driver Limit Switch ALE AT UL Driver J8 Signal Colour Limit Switch 3 Contact White Fast on 8 Reference Brown Fast on 2 10 3 AUTOTRANSFORMER CABLE AUTOTRANSFORMER cable Autotransformer Power supply box ALE Driver Autotransformer Signal Power Supply box ALE Driver J1 Cable internally connected PHASE 110Vac Power S...

Page 28: ...L Driver J3 J4 1 GND 12Vdc Black 2 2 n c 3 D 485 Black 7 4 D 485 Black 8 5 12Vdc Red 6 11 6 GND 485 Black 6 7 EXT Emergency Orange 9 8 Emergency restoration Purple 10 n c 1 GND 5Vdc White 3 12 Sensing 5Vdc White 4 3 n c 5 12Vdc Isolated Red 6 11 5Vdc Gray 7 8 Sensing 5Vdc Gray 8 7 GND 12Vdc Isolated White 12 3 Cardio Receiver HD1 Signal Colour FRAME Fast on GND Yellow Green Fast on On the J3 conne...

Page 29: ...Cardio Receiver Hand Sensor L R HR HS Cardio Receiver HD3 2 Signal Colour Hand Sensor L Hand Sensor R Up Down Up Down 1 Right hand signal input Black fast on 2 Right hand contact ref Black fast on 3 Shield GND Black 4 Left hand signal input Black fast on 5 Left hand contact ref Black fast on CU137 Ready to Run InMotion Cable ARM CPU Board InMotion Board ARM Board CN1 CPU Board CN34 Signal Colour I...

Page 30: ...ange 9 8 Emergency restoration Purple 10 Cardio Receiver HD1 Signal Colour FRAME Fast on GND Yellow Green Fast on CU141 Cardio Receiver cable LED only ARM Board HR Cardio Receiver ARM Board CN9 Signal Colour HR Cardio Receiver HD4 1 5Vdc Power Supply Brown 2 2 OUT Impulse White 4 5 5Vdc Reference Green 1 Fast on GND Black CU145 Power Supply cable Filter Board Patch conn Filter Board OUT1 OUT2 Sign...

Page 31: ...White Brown 7 8 LAN Signal Brown 8 TUNER Board J6 Signal Colour Anterior lower frame 1 Antenna signal Black 1 CU308 User USB port cable VISIO only CPU Board USB Port CPU Board CN14 Signal Colour USB Port 1 5Vdc Red 1 2 USB White 2 3 USB Black 3 4 GND Green 4 5 Shield Blue 5 CU318 Jog Excite signal cable Power Supply ON OFF Switch Driver Patch conn 2 Signal Colour Driver J1 Power Supply 1 PHASE Bro...

Page 32: ...tore Blue 10 11 n c 12 485 TXD RXD Brown 1 Display Ground Signal Colour Receiver Ground Frame Ground Fast on GND Yellow Green Fast on Fast on CU379 VISIO Display Power Supply AT UL CPU Board AT UL Driver CPU Board CN17 Signal Colour Driver AT UL External Power Supply J3 J4 1 n c 2 GND 12V Grey 2 3 n c 4 Emergency EXT White 9 5 GND 12V EST Black 1 6 485 TXD RXD Brown 8 7 12V Orange 6 8 n c 9 12 EST...

Page 33: ...ow 1 7 GND Blue 30 8 Ztxn1 Black 9 9 Ztxp1 Red 7 10 GND Black 24 11 Ztxn2 Black 15 12 Ztxp2 Grey 13 13 GND Red 17 14 Ztxcn Black 27 15 Ztxcp White 25 CU328 LCD Inverter cable VISIO only CPU Board LCD Inverter CPU Board CN1 Signal Colour LCD Inverter CN1 11 12Vdc entry Power Supply Black 1 1 GND Black 2 4 ON OFF Black 3 3 GND Black 4 12 12Vdc Black 5 2 Save lamp Black 6 5 GND Black 2 10 12Vdc Black...

Page 34: ...Black 5 11 Gnd audio L Black 4 12 Audio L signal Black 3 13 Audio R signal Black 2 14 Gnd audio R Black 1 CU333 Headphone Jack audio cable VISIO only CPU Board Headphone Jack CPU Board CN14 Signal Colour USB Port 2 Out_R Green 4 4 Shield Yellow 5 1 GND Red 2 3 Out_L Black 1 CU375 AUDIO VIDEO signal cable VISIO only CPU Board AUDIO VIDEO Connectors Board CPU Board CN6 Signal Colour AUDIO VIDEO Conn...

Page 35: ...USB White 3 4 USB Brown 4 5 GND Shield Black 5 6 GND Black 6 7 GND Nero 7 8 Af_ bvdc_csafe Blue 8 9 Af_ bvdc_csafe Blue 9 10 Rxd1_in Red 10 11 Rxd1_in Yellow 11 12 Cts1_in Gray 12 13 GND Black 13 14 GND Black 14 CU377 Emergency cable ARM CPU Board Micro 1 Hardware Micro 2 Software CPU Board CN22 ARM Board CN8 Signal Colour Micro 1 HW Micro 2 SW 1 SW Emergency White CN02 2 GND_DIG Brown CN05 3 HW E...

Page 36: ...JOG NOW Excite Service maintenance manual rev 5 1 Page 2 24 Page intentionally left blank ...

Page 37: ...OR L Capacitive TOUCH SCREEN HAND SENSOR R WIRELESS BOARD TUNER BOARD iPod Doking Station Connectors Board Dual TGS reader LCD Inverter inMotion BOARD DRIVER BOX DRIVER BOARD J8 LIMIT SWITCH MOTOR ELEVATION MOTOR Fan cover POWER SUPPLY BOX J3A J4 J5 J7 J2 J1 RESISTANCE COVER XS1 Fan H SINK XP1 CU378 powered POWER SUPPLY VISIO Only Patch Conn 2 FE A 110V Only FE CU378 VISIO CU139 LED ...

Page 38: ...ND SENSOR R WIRELESS BOARD TUNER BOARD iPod Doking Station Dual TGS Reader LCD Inverter inMotion BOARD Connectors Board DRIVER BOX LIMIT SWITCH MOTOR ELEVATION MOTOR POWER SUPPLY BOX POWER SUPPLY VISIO only DRIVER BOARD POWER BOARD J8 XPWR Fan 24VDC J3 J4 J5 J7 J2 J1 RESISTANCE XR1 XR2 JF XPWR XU2 XU2 XU1 XU1 Fan 24VDC XV1 Patch Conn CU379 VISIO CU133 LED ...

Page 39: ...eceiver 500 LED HS HR receiver 700 LED C safe board Emergency button Optional Dual TGS reader Distributes the voltages received from the low kit driver Exchanges over the RS 485 serial link to the driver box commands for controlling the belt and elevation motors Exchanges over the RS 485 serial link to the driver box commands for controlling emergency signals Controls the LEDs and the 7 segment di...

Page 40: ...nalogue tuner Board LAN network board integrated Wireless network Board Emergency button HS HR Cardio Receiver Audio Video external device Connectors Board Headphone Jack C Safe integrated Service USB port integrated Optional Dual TGS Reader User USB port iPod docking station Distributes the voltages received from the low kit driver Exchanges over the RS 485 serial link to the driver box commands ...

Page 41: ...d radio channels The data is then sent to the CPU Board where it is processed and managed in order to correctly display it on the LCD Display LED name Colour Description D4 RED ON if the power supply reaches the board OFF if the power supply does not reach the board FLASHING if loading starting the SW in the first seconds after it switch on During the firmware upload In case of HW SW malfunctionin...

Page 42: ...twork The advantage of Wi Fi is the absence of cables but this is also a limitation in terms of protection against interference disturbance performance the stability of service and bandwidth may be intermittent and security vulnerability to attacks by hackers Where possible it is in any case preferable to use the wired network The possibility of using Wi Fi also depends greatly on the type of serv...

Page 43: ...e display has one jack for connecting headphones The jack is connected on a stereo output of the CPU Board 3 3 8 C SAFE BOARD INTEGRATED It a function that allows the connection using an appropriate cable for connecting other devices such as external PC suitably programmed to control the machine speed level of difficulty etc 3 3 9 SERVICE USB PORT INTEGRATED It is used to connect USB keys for upda...

Page 44: ...th gen iPod Classic iPod mini iPod Nano iPod Touch iPhone 3 4 1 1 Client USB port This is an additional port which can be installed on the VISIO Display and makes available a USB port for connecting to external devices The user can connect USB devices for playing a vast range of multimedia files including mp3 wma wav wmv MPEG2 MPEG4 DivX XVID jpg 3 4 1 2 Dual TGS reader It s the device which allow...

Page 45: ...used by the user when exercising The Board receives the 5Vdc power supply from the Display Board The Receiver Board communicate with the Display Board in a positive logic mode When the Board is in stand by the signal is 5Vdc as soon the Board receives a reliable source of heart rate signal change to 0Vdc and then for each heartbeat detected generates a pulse going back to 5Vdc The Display Board ca...

Page 46: ...0Vdc with a 30msec width signal 3 6 C SAFE BOARD This board makes available a communication port on 1 externally accessible connector which can be used for interfacing compatible C Safe devices such as the Cardio Theater readers This connector is situated on the back of the display These connectors can also be interfaced using a special cable to an external PC for programming the FLASH EEPROM 3 7 ...

Page 47: ... thermal signal reaches the driver as a NC external input signal When this contact opens the driver generates an alarm It is equipped with a high inertia flywheel to permit more gradual deceleration of the tread belt in the event of a power outage or emergency stop ATTENTION dangerous voltages are present at the motor and flywheel The tread belt motor power see at the paragraph 2 5 Technical speci...

Page 48: ...mands for viewing and configuring the inverter parameters it exchanges over the RS 485 serial link to the Display Board the commands for viewing the errors logged by the inverter From the outside the following indicator LEDs are visible LED NAME COLOUR DESCRIPTION H6 GREEN 5Vdc if ON proper functioning H3 GREEN 12Vdc if ON proper functioning H4 GREEN 24Vdc if ON proper functioning H5 BLUE 400Vdc i...

Page 49: ...ides a supplementary 12V line required for operation of the VISIO which in particular uses it for powering the lights of the LCD ATTENTION If the LCD lights fail to illuminate one reason could be that this supplementary power supply is not supplied or is not working and thus in its turn fails to supply the LCD 3 13 AUTOTRANSFORMER Only for 110Vac version It is a toroidal Autotransformer placed on ...

Page 50: ...d the error signals pertaining to the tread belt and elevation motors it exchanges over the RS 485 serial link to the CPU ARM board the commands for viewing and configuring the inverter parameters it exchanges over the RS 485 serial link to the CPU ARM board the commands for viewing the errors logged by the inverter Receives the mains voltage at its inputs and outputs the DC supply voltages for th...

Page 51: ... second and then goes OFF EN_UP VERDE if ON indicates that the motor has received the supply voltage for movement in the upward direction EN_DOWN ROSSO if ON indicates that the motor has received the supply voltage for movement in the downward direction TACHO VERDE functioning of elevation motor encoder if blinking indicates that the board is receiving the pulses from the encoder DWN_SW VERDE stat...

Page 52: ... 485 CN17 J5 J5 J13A To actuate the motor the CPU board communicates with the driver via the RS 485 serial link Based on the commands received the Driver drives the motor by applying a variable frequency sinusoidal voltage the frequency determines the speed of rotation of the motor and hence the linear tread belt speed During its movement the driver continually checks the motor by monitoring its c...

Page 53: ...signal exchanged between the driver and the CPU board VAC Signal with variable frequency This is the variable alternating voltage signal output by the driver connector J5 to supply the motor Increasing the frequency of this signal increases the motor speed The frequency of the sinusoidal supply voltage sent by the driver to the motor can be viewed on the display using the inverter manual test desc...

Page 54: ...isplacement of the rod and hence of the machine incline The direction of rotation of the motor determines whether the machine moves up or down 3 15 2 CONTROL The control block diagram is as follows Display Board Driver Motor Hall sensor RS 485 CN17 Pulses Limit switch Vdc J13A J7 J7 J8 To actuate the motor the CPU Board communicates via the RS 485 serial link with the ALE Drive Depending on the co...

Page 55: ...o closed when the elevation motor moves upward by a distance of 2 Then The drive stops functioning with error code EdC The machine displays the ELEVATION ERROR message and interrupts the exercise The parameter Par 07 is switched to 1 to disable the elevation function At this point the machine will only allow movements of the tread belt motor but not of the elevation motor To re instate operation o...

Page 56: ...uare wave signal with frequency 50 Hz T 20 msec and 50 duty cycle generated by the Hall sensor when the elevation motor moves This signal enters the driver pins 6 and 4 of connector J7 and provides the feedback of the motor movement This signal alternates between a low value of 0Vdc and a high value of 5Vdc When measured with a multimeter this signal is at either 0 or 5Vdc when the motor is stoppe...

Page 57: ...ency Key Contact CN17 J3A When the user press the emergency stop device the NC contacts is opened changing the state of the two signals output by them to the CPU Each of the two micro switch outputs a distinct signal interpreted as follows one is an SW Emergency signal and one is an HW Emergency signal The two signals are managed as follows SW Emergency The CPU board detects the emergency conditio...

Page 58: ...sage MACHINE BLOCKED COM 3 16 2 THE SIGNALS INVOLVED The machine uses the following control signals Emergency contact This is the NC contact provided by the 2 micro switch actuated when the emergency stop button is pressed This contact becomes open when the emergency stop device is detached The signal enters the CPU Board through connector CN22 pins 1 and 2 RS 485 Signal This is a digital signal e...

Page 59: ...ine can be connected to the Cardio Theater by means of the RJ45 connector on the C Safe board The Cardio Theater unit must be provided with a power cable having the following pin out RJ45 Connector Signal 5 5Vdc 7 Ground ATTENTION for the numbering of the pins on RJ45 connector please refer to the diagram below ...

Page 60: ...must be wired as follows ATTENTION for the numbering of the pins on RJ45 connector please refer to the diagram below When programming the machine sometimes it is necessary to fit plug into the free RJ 45 port on the back of the display to avoid any type of interference during the operation The wiring diagram of the RJ 45 plug is as follows Programming cable and plug can be ordered using the code R...

Page 61: ...al characteristic They are briefly detailed below 1 On machines with VISIOWEB display it is possible for the user browsing and use internet services during the training session 2 VISIOWEB has been developed on Linux instead of Windows CE used for VISIO This difference can not be noticed by the final user because on both the product versions there is the same user interface and just few steps of th...

Page 62: ...tallation instructions The table below gives the codes of the kits to be chosen according to the TV standard used in the installation country VISIO UPGRADE KIT CODE JOG Now DVB T A0000522 D JOG Now ATSC A0000522 A JOG Now ISDB T A0000522 I Table 4 1 CAUTION At the end of the Upgrade steps of Standard Setting as described in the relevant paragraph of the Service menu 4 5 ACCESSORISE ACCESSORISE COD...

Page 63: ...age lines household appliances etc or medical equipment Each machine must have a dedicated supply line 5 The socket outlet and other devices on the dedicated line should be appropriately sized for the required load 16A 6 The socket outlets must be earthed 7 No multiple connections are permitted on the earth and or the neutral cables 8 The ratio between the length and cross section ratio of the cab...

Page 64: ...ards and backwards It is recommended not to raise the equipment so as not to damage the anterior guard Given the weight of the equipment we recommend 2 person be involved in lifting it ATTENTION For moving it is recommended to grab the frame and not the lateral guards After every moving check if the equipment is on flat adjust the left foot as indicated at the paragraph 8 4 The machine is not flat...

Page 65: ...n 6 Plug the mains lead into the wall outlet 5 4 FIRST POWER ON After completing the installation procedure the machine is ready to be powered up To turn on the machine simply toggle the on off switch from the 0 position to the 1 position During power up the machine resets the incline After completing the power on reset the machine goes into standby awaiting a keyboard command 5 5 TO CHECK THE COR...

Page 66: ...ge 5 4 5 6 SPECIFICATIONS AND ANTENNA REQUIREMENTS All the information about the minimum requirements concerning the antenna signal are detailed in the proper manual Electrical and antenna requirements you can find and download into the Technogym Direct ...

Page 67: ... ACTION must be carried out It typically contains a description of the ACTION necessary to resolve the problem Therefore after executing the specified ACTION 1 Check whether the problem has been resolved 2 If the problem persists it is recommended to resume the troubleshooting procedure from the point before the action was carried out Note Clarification of the operation in progress or that will be...

Page 68: ...ssword without the numeric keypad enter one digit at a time using the and keys to change the value and the GOAL keys to scroll to the next character At this point there are two options available Tech Config Troubleshooting Press to access the troubleshooting menu which is structured as shown in the figure below TROUBLESHOOTING MANUAL TEST MAN INVERTER TEST MAN UPDOWN TEST MAN KEYBOARD TEST I2C Dev...

Page 69: ...fully EEPROM Error press Enter to continue Signifies that the display board is having problems communicating with its memories 6 1 1 2 Up Down Test The Up Down test checks whether the number of pulses output by the encoder corresponds to the values of the Up Down table stored in the low kit During the test the machine incline is moved from 0 to 15 for 700 models and from 0 to 18 for 900 models and...

Page 70: ...M test Using the and speed keys select the desired test item and confirm by pressing ENTER The test can have two outcomes Test Successful press Enter to continue This means that the test was completed successfully i e that serial communications on the selected port are correct COMx Error press Enter to continue This means that the outcome of the test was negative the message will specify COM1 in t...

Page 71: ...ments of the tread belt motor The values displayed are Tread belt motor drive frequency x100 Current x10 Voltage During the test it is possible to change the speed using the and speed keys to see the change in the values of frequency current and voltage 6 1 2 3 Man UpDown Test The manual UpDown test displays the values output by the elevation motor drive during machine incline movements The values...

Page 72: ...uipment is inStand By as showninthefigurebelow A new display will appear from which you can gain access to the various configuration menus by entering the password on the number keyboard Enter the password 2501 and press the ENTER key to confirm or EXIT to quit By selecting the key which is highlighted in red you will gain access to the TROUBLESHOOTING menu For the following menu please refer to t...

Page 73: ...ing the main voltage to the inlet socket of the machine and or check the circuit brakers THE DISPLAY FAILS TO ILLUMINATE NO YES NO YES 1 2 Are the 2 LEDs of 5 Vdc and 12Vdc on the driver on Replace the display board Replace the driver NO YES 3 5 Is the main voltage to the input of the driver YES 4 Check the cables NO ONLY 110Vac VERSION SI Is the 220Vac voltage to the output of the Autotransformer...

Page 74: ...r probes across the live and neutral pins on the same connector The measured voltage should be approximately 220Vac 110Vac 2 Check if LED 1 and 2 5Vdc and 12Vdc on the ARM board are on 3 Check if LED H6 and H3 5Vdc and 12Vdc ALE driver or LED H2 and H3 AT UL driver are on 4 Check if on connector J1 there is approximately 220Vac 110Vac between pin 1 and 2 of the driver box 5 Check the continuity of...

Page 75: ...f ective A Does the wall outlet supply the correct voltage Is the power supply cable OK Are the LED on the CPU board lit on Plug the machine into a working electrical outlet Replace thecable THE DISPLAY STAYS OFF NO YES NO YES YES NO 1 Are the Circuit Bracker engage Engage the Circuit Bracker YES NO Continued on following page ...

Page 76: ...ntenance manual rev 5 1 Page 6 10 Replace the LCD Inverter Does the problempersist NO Defective LCD Inverter YES Replace the LCD Does the problem persists YES Replace the CPU Board A NO Defective LCD Continued on following page ...

Page 77: ...place the ON OFF switch Check if the power supply is connected and provide the 12Vdc 4 Connect and or replace the power supply Replace the power supply box NO YES Check if the ALE driver provide the 12Vdc 6 Connect and or replace the power supply YES ALE driver def ective NO ONLY 110Vac VERSION SI Is the 220Vac voltage to the output of the Autotransformer 5 Replace the autotransf ormer NO YES ...

Page 78: ...the continuity of the CU145 and CU318 cables by referring to paragraph 2 10 Cables and replace what s defective 4 Check if there is the 12Vdc voltage at the input of the driver box on J1 connector 5 Check if the 220Vac are at the output of autotransformer in direction of the Driver on J1 connector 6 Check if there is the 12Vdc voltage at the output of the driver box on pin 2 and 7 of CU378 cable A...

Page 79: ...ter in the VISIO manual 6 4 NO AUDIO SOUND Only for VISIO models For the following menu please refer to the relevant chapter in the VISIO manual 6 5 NO TV PICTURE Only for VISIO models For the following menu please refer to the relevant chapter in the VISIO manual 6 6 THE RADIO DOES NOT PLAY Only for VISIO models For the following menu please refer to the relevant chapter in the VISIO manual ...

Page 80: ...e files uploaded on the iPod Check the audio connection system NO Replace the Docking station board 2 3 YES Check the iPod cable connection Is the iPod detected by the machine OK YES Is the voltage at the input of the docking station correct Replace the docking station board YES 5 NO 6 NO A Update the iPod SW version Has been the device enabled from the proper function in the user menu Enable the ...

Page 81: ... the VISIO interface 3 Carry out the troubleshooting procedure 6 4 No audio sound 4 To update the iPod SW you just need to connect to iTunes and it automatically upgrades to the last version 5 Enable the iPod control as detailed in the relevant paragraph of the User menu 6 The CU331 cable has identical connectors on either end then it can sometimes be connected the wrong way round 7 Place the test...

Page 82: ... To In order to reinstate normal operation simply press any key If communication between the upper and lower assemblies is not immediately re established the message will remain on the display while the machine continues trying for 30 seconds after which the THE EQUIPMENT IS BLOCKED message will appear The machine keeps count of the attempts to reinstate communication by incrementing the COM FAULT...

Page 83: ...the upper and lower kit in particular Check that the wiring of the various cables is not damaged in particular the cables of the emergency signal and of the reset by referring to paragraph 2 9 try replacing each of the circuit boards in turn CPU ARM board and driver box and check whether the communication works If the outcome of the test is OK move on to step 2 2 Access the item check the error co...

Page 84: ...ning belt Check the running deck Check the fans low kit driver 02 2 OC OVERCURRENT even if only temporary on the inverter output Check the running deck low kit driver Check P409 torque 100 115 03 3 UU UNDERVOLTAGE condition due to an even temporary drop in line voltage Bad power distribution line of 110 220 Vac Voltage NOT constant 04 4 OU OVERVOLTAGE Voltage NOT constant Braking resistor 05 5 ST ...

Page 85: ...iver fan for at least 5 sec low kit driver internal fan 22 22 IMV INVERTER POWER SUPPLY This error is generated if a voltage 156 VAC for at least 1 sec when the AC motor is working or for at least 10 sec when AC motor is not working 23 23 SHC SHORT CIRCUIT Is generated in the event of a short circuit between a motor phase and earth Check the belt motor 24 24 OHS OVERHEATING of the dissipater senso...

Page 86: ...he tread belt motor Replace the Driver Check if the IPA409 parameter is correctly 2 Follow the procedure step by step to correctly diagnose the problem Take particular care with the checks highlighted by circled numbers which are described in detail below 1 Check parameter IPA409 as detailed in the table at the paragraph 9 4 3 Inverter 2 Disconnect the cable from the motor and place a tester acros...

Page 87: ...sage may be caused by a malfunction of the travel limit microswitch If the microswitch breaks during use the machine will enable an upward elevation movement in an attempt to open the microswitch contact If the microswitch fails to open after a predefined number of pulses the machine generates an elevation error and halts the movement 3 The error message may be caused by a misalignment of the HALL...

Page 88: ...machine The elevation changes elevation enabled YES Is the limit switch working properly YES Check that during the movement the pulse signals are present on the J7 connector of the Driver Replace the Driver and set again the P09 15 NO Check if the tension reaches the elevation motor during the reset procedure NO Replace the elevation motor and set again the P09 15 YES Replace the Driver and set th...

Page 89: ...setting is enabling as detailed in in the relevant paragraph of the Service menu 2 Open the Driver cover plate and press manually the limit switch When the limit switch is pressed DWN SW has to be ON while has to be OFF if released 3 Place the tester probes across pins 6 and 4 of connector J7 on Driver board The measured value should be approximately 2 5Vdc If an oscilloscope is available it is po...

Page 90: ... the voltage at the input to the TGS reader correct Is the voltage at the output to the DisplayBoard correct Replace cable CBQ 32 and or CU132 1 2 YES NO YES Replace the DisplayBoard NO A Is the serial communication link between the DisplayBoard and the TGS reader OK Replace the TGS reader Is the communication linkbetween the DisplayBoard and the TGS reader OK TGS reader defective 3 3 YES NO YES R...

Page 91: ...detail below 1 In Place the tester probes across pins 1 and 3 of connector CN1 of the TGS reader The measured value should be 12Vdc 2 As for step 1 but across pins 1 and 8 of connector CN19 CPU Board or on the CN7 connector ARM Board 3 Use the serial communications test described at paragraph 6 1 1 5 Serial Ports Test If you replace ARM CPU Board check that its SW version is updated otherwise inst...

Page 92: ...e the quality of the contact between the human skin and the HS plates as hands only just washed or particularly dry acidity of the skin and or a particular body fat mass index For these people it s suggested to wear the chest belt transmitter HS CORRECT USE Grasp both the upper and lower plate avoiding clenching them too hardly Avoid washing the hands using soaps that can dry the skin too much The...

Page 93: ...NO YES Check if the 5Vdc are at the output of the ARM CPUBoard Are them present Receiver Board defective Replace 2 YES NO NO YES A Check if the SW and the gruonding of Receiver Board The problem persist 3 Replace the connectoring cables between the High Kit and LowKit YES Check if using a chest belt that you are sure it s ok it works properly The problem persists OK NO Continued on following page ...

Page 94: ...tenance manual rev 5 1 Page 6 28 Check the SW and the grounding of the Receiver Board The problem persists Receiver Board defective Replace A YES NO Check the connecting cable between High Kit and Low Kit Its OK OK 4 NO OK YES 3 ...

Page 95: ...eiver Board measuring the resistance value between a The fast on on the HR HS Receiver Board and the ground node on the power entry module b The ground node of the power entry module and the main wall socket The measured value should be approximately lower than 1Ω Ohm Check finally the grounding of the main wall socket measuring that the following voltages are present P N phase neutral 220Vac 110V...

Page 96: ...SIGNAL Chest Belt Check if the 5Vdc are at the input of the Receiver Board Are present ARM CPU Board defective Replace 1 NO YES Check if the 5Vdc are at the output of ARM CPU Board Are present Receiver Board defective Replace 2 YES NO NO YES A Check the SW and the grounding of Receiver Board Problem persist 3 Replace the connecting cable between High Kit and Low Kit YES Check if using the Hand Sen...

Page 97: ...f the Receiver Board Problem persists Place correctly 3 YES NO Check the properly functining of the Receiver Board Is proper placed OK 4 NO NO YES A Receiver Board defective Replace YES Check if it works properly using a chest belt you are sure it s ok The problem persists Chest Belt defective ...

Page 98: ...ect NEWS section Check the grounding of the HR HS Receiver Board measuring the resistance value between 1 The ground fast on of HR HS Receiver Board and the ground node on the Power supply box of the machine 2 The ground node of the power entry module and the main wall socket The measured value should be approximately lower than 1Ω Ohm Check finally the grounding of the main wall socket measuring ...

Page 99: ...e 5Vdc areatthe outputoftheARM CPUBoard Arethempresent 4 NO Receiver Board defective Replace Check theSWandthegroundin ofReceiver Board Problempersists Placecorreclty 1 YES NO Check theproper functioning oftheReceiver Board Is proper placed OK 2 NO NO YES YES Check if itworks properly using achestbeltyouaresureit s ok Theproblemsolved ChestBelt defective SIReplacetheconnecting cablebetweentheHigh ...

Page 100: ...cording to the EXCITE SW SMART TABLE you can find in TG Direct section 2 Check if the receiver has been correctly mounted on the machine as detail at paragraph 7 6 2 HR Receiver Chest Belt 3 Place the tester probes across pins 1 and 2 on HD4 connector of receiver The measured value should be 5Vdc 4 As at step 3 but on pin 1 and 8 on CN9 connector of CU141 cable ARM Board If you replace CPU ARM Boa...

Page 101: ...GNAL IS INCORRECT Chest belt Are the machines correctly spaced by the required minimum distance Check the Receiver Board has been correctly mounted on the machine Reposition the machines so they are adequately spaced Mount the Receiver Board in the right way NO YES NO Check the Display SW versione and the grounding of the receiver 1 2 Chest belt defective NO NO YES A Check if it works properly usi...

Page 102: ...according to the EXCITE SW SMART TABLE you can find in TG Direct section Check the grounding of the HR HS Receiver Board measuring the resistance value between a The ground fast on of HR HS Receiver Board and the ground node on the Power supply box of the machine b The ground node on the Power supply box of the machine and the main wall socket The measured value should be approximately lower than ...

Page 103: ...Page 6 37 2 Take care of the following diagram to correctly position the machines Figure 6 1 The active area of the transmitter is wider on the lateral side 130cm instead of the front or the back side 90cm Take care of the following diagram Figure 6 2 ...

Page 104: ...xcite as detailed here below You can use one of the following cables ELT 16 0WC00518AB CBQ 28 0WC00390AC or TRM 28 0WC00336AC as connection cable TEST BOX EXCITE RECEIVER LED Connecting cable The circuit lights the LED for each heart beat and or disturbance received in this way it is possible to determine whether there is any interference and identify its sources Do not keep the Test Box Excite to...

Page 105: ... acidity of the skin and or a particular body fat mass index For these people it s suggested to wear the chest belt transmitter HS CORRECT USE Grasp both the upper and lower plate avoiding clenching them too hardly Avoid washing the hands using soaps that can dry the skin too much NO Receiver Board defective Replace THE TELEMETRIC HR SIGNAL IS INCORRECT Hand Sensor Set the priority on the Hand Sen...

Page 106: ...ld be approximately lower than 1Ω Ohm Check finally the grounding of the main wall socket measuring that the following voltages are present P N phase neutral 220Vac 110 Vac P G phase ground 220Vac 110 Vac N G neutral ground 0 Vac 2 Set the HR priority on the receiver board on Hand Sensor by positioning the jumper JP1 on the receiver itself JP1 CLOSED Chest strap priority JP1 OPENED Hand Sensor pri...

Page 107: ...follow turn off the machine and unplug the mains lead from the wall outlet 1 Back off the 2 screws a using a medium Phillips screwdriver Figure 7 1 2 2 Open the display leaving it attached to the machine as shown in the figure 3 Disconnect the connectors highlight in the figure at the side 4 Remove the Display To reassemble the Display follow the above steps in reverse order ...

Page 108: ... 7 1 3 Turn off the machine and unplug the mains lead from the wall outlet 1 Back off the 2 screws a using a medium Phillips screwdriver Figure 7 1 4 2 Unplug the connectors highlight in the figure at the side 3 Remove the Display To reassemble the Display follow the above steps in reverse order ...

Page 109: ...re described in paragraph 7 1 1 LED Display Place the Display on a work bench 1 Unplug the connector highlight in the figure 2 Back off the 5 screws a using a small Phillips screwdriver 3 Remove the Board To reassemble the ARM Board carry out the above steps in reverse order After the reassembling of the board remember to fix the keyboard connector using a drop of hot glue ...

Page 110: ...the procedure described in paragraph 7 1 2 VISIO Place the display on a work bench It is now possible to remove the following components Wireless Board A TUNER Board B LCD Inverter C CPU Board D LCD Touch Screen E Headphone Jack F TGS Board USB port and the shell G iPod Docking Station H Continued on following page ...

Page 111: ...e routing as shown in Figure 7 2 6 Figure 7 2 4 2 Push simultaneously the 2 side tabs outward in the direction of the purple arrows 1 The Wireless Board will automatically lift up Figure 7 2 5 3 Remove the Wireless Board A in the direction of the orange arrow 2 as shown in the figure at the side CAUTION During the reassembly mount the antennas of Figure 7 2 3 on Wireless Board and after the Board ...

Page 112: ...JOG NOW Excite Service maintenance manual rev 5 1 Page 7 6 To reassemble the antenna cables X and Y follow the routing shown below The Dissipater Z is only on the ATSC and ISDB T version Figure 7 2 6 ...

Page 113: ...ff the 3 screws a using a medium Phillips Screwdriver 2 Remove the protection guard of Tuner board b if present Figure 7 2 8 3 Back off the 3 spacers c 4 Lift up the black tab and disconnect the flat cable d 5 Remove the Tuner Board B To reassemble the Tuner Board follows the above steps in the reverse order ...

Page 114: ...Carry out the procedure described in paragraph 7 2 2 2 Tuner DVB T board B at step 4 1 Remove the Tuner board ver ATSC B1 or ver ISDB T B2 Figure 7 2 10 2 Back off the 2 screws a using a medium Phillips Screwdriver 3 Remove the dissipater b To reassemble the Tuner Boards follows the above steps in the reverse order ...

Page 115: ...he connectors highlighted in the Figure 2 Back off the 4 screws a using a medium Phillips Screwdriver 3 Remove the LCD inverter cover b Figure 7 2 12 4 Unplug the 4 connectors highlighted in figure 5 Remove the LCD Inverter board C To reassemble the Tuner Boards follows the above steps in the reverse order ...

Page 116: ...procedure described in paragraph 7 2 2 1 Wireless board A e 7 2 2 2 Tuner DVB T board B 1 Disconnect the connectors highlight in the figure at the side 2 Back off the 9 screws a using a medium Phillips screwdriver 3 Remove the CPU Board D To reassemble the CPU Board carry out the above steps in reverse order ...

Page 117: ...f not previously removed as above indicated 2 Back off the 6 screws b using a medium Phillips screwdriver 3 Remove the plate containing of LCD Figure 7 2 15 4 Carefully overturn the LCD 5 Back off the 2 screws c on both sides using a medium Phillips screwdriver 6 Remove the LCD E from its support plate Figure 7 2 16 7 With carefully remove the Touch Screen d and replace if it is necessary ...

Page 118: ...12 7 2 3 1 Headphone Jack F Figure 7 2 17 1 Unplug the connector highlighted in the figure 2 Back off the 2 screws a using a small Phillips screwdriver 3 Remove the Headphone Jack F To reassemble the Headphone Jack follows the above steps in the reverse order ...

Page 119: ... 2 18 1 Unplug the cable highlight in the figure 2 Back off the 2 screws a using a medium Phillips screwdriver Figure 7 2 19 3 Back off the screw b using a medium Phillips screwdriver and remove the group Figure 7 2 20 4 Back off the 2 screws c using a small Phillips screwdriver 5 Remove the USB port G ...

Page 120: ...ure 7 2 21 1 Lift the Docking Station covering cap up and back off the screw a using a medium Phillips screwdriver Figure 7 2 22 2 Unplug the cable highlighted in the figure and remove the iPod Docking Station H To reassemble the iPod Docking Station follows the above steps in the reverse order ...

Page 121: ...all Phillips screwdriver 2 Remove the connectors board plug b Figure 7 3 2 3 Disconnect the connectors highlighted in the figure and back off the 2 screws to remove the Audio Video connector s board using a small flat screwdriver 4 Remove the Audio Video connector s board c To reassemble the Connectors Board carry out the above steps in reverse order ...

Page 122: ... the board remember to fix the keyboard connector using a drop of hot glue 500 LED Figure 7 4 2 700 LED Figure 7 4 3 2 Use a sharp tool to lift up and detach a corner of the keyboard To assemble a new keyboard 1 Remove the backing film which protects the adhesive 2 Insert the connector in the special slot on the display and connect it to the Display Board 3 Apply the adhesive part starting from th...

Page 123: ...isassembly damages the tracks and keys When reassembling the keyboard make sure that none of the keys are bent or remain pushed in After reassembly the Display check the proper functioning of new keyboard as described at the paragraph Errore L origine riferimento non è stata trovata Errore L origine riferimento non è stata trovata ...

Page 124: ...NOW Excite Service maintenance manual rev 5 1 Page 7 18 7 4 2 VISIO TOUCH SCREEN For the Touch Screen disassembly refer to the Display Board disassembling procedure described at the paragraph 7 2 2 VISIO 15 ...

Page 125: ...he two fast on connectors on the emergency button 4 Back off the 4 screws c using a small Phillips screwdriver 5 Remove the emergency button 6 Back off the 2 screws d using a medium Phillips screwdriver and remove the two microswitches Figure 7 5 3 It is possible to disassemble the emergency button avoiding to disassemble the complete dashboard 7 Back off the 2 screws e using a medium Phillips scr...

Page 126: ...gency button up to step 2 1 Cut the cable tie a remove the adhesive tape b and the nylon bag c Figure 7 6 2 2 Remove the sponge d and unplug the connector e During the reassembly place the coil highlight in figure oriented upwards and toward the user During the reassembly fold the sponge on the Board gently and without pressing Figure 7 6 3 3 Unplug the connector f and the fast on g on the opposit...

Page 127: ...ribed in paragraph 7 6 1 HS HR Receiver Chest Belt Hand Sensor up to step 2 1 Unplug the connector cable a from the receiver Figure 7 6 5 CAUTION During reassembly position the receiver so that the coil is facing up toward the guard f as shown in Figure 7 6 2 To reassemble the HR Receiver carry out the above steps in reverse order ...

Page 128: ...d from the wall outlet For each sensor 1 Back off the 2 screws a using a small Phillips screwdriver Figure 7 7 2 2 Raise the upper and inferior sensor unplug the 2 fast on b and c 3 Remove the 2 sensors During the reassembly be careful to don t press the cables using the two guides highlight in the figure on the side To reassemble the sensors carry out the above steps in reverse order ...

Page 129: ...g covering b from the handlebar Figure 7 8 2 3 Unplug the connector c from the Board 4 Remove the Board d To reassemble the InMotion board carry out the above steps in reverse order Figure 7 8 3 Take care to reassemble it in the correct way The light convector e it s not possible to mount it in the opposite way in order to correctly fix it on the board The InMotion board the upper corner of the bo...

Page 130: ...LATERAL HANDLEBAR Figure 7 9 1 For remove the lateral handlebar 1 Back off the 2 screws a using a medium Phillips screwdriver 2 Remove the lateral handlebar pulling it out from the rear of the machine To reassembly the Lateral Handlebar carry out the above steps in the reverse order ...

Page 131: ...SASSEMBLING THE UPRIGHTS Figure 7 10 1 CAUTION In case of uprights disassembly during the reassembly lock down the screws a using a torque wrench settings on 30Nm Figure 7 10 2 CAUTION During the reassembly lock down the screws b using a torque wrench settings on 45Nm ...

Page 132: ...g the For disassembling the upper dashboard and the central handlebar 1 Back off the 8 screws a using a medium Phillips screwdriver 2 Remove the upper dashboard Figure 7 11 2 3 Back off the 2 screws b using a 6mm hexagonal wrench 4 Remove the central handlebar c paying attention to the Hand Sensor connected cable To reassemble the dashboard and the handlebar carry out the above steps in reverse or...

Page 133: ... Figure 7 12 1 Carry out the procedure described in paragraph 7 1 Disassembling the and 7 11 Disassembling the central handlebar 1 Back off the 4 screws a using a 4mm hexagonal wrench 2 Remove the inferior dashboard To reassembly the inferior dashboard carry out the operation above in the reverse order ...

Page 134: ...cedure easier and turn off the machine and unplug the mains lead from the wall outlet 1 Loosen the 6 screws a using a 4mm hexagonal wrench 2 Remove the motor guard pulling it out from the front side of the machine To reassemble the motor guard carry out the above steps in reverse order During the reassembly leave the screws allow for the reassembly of the motor guard ...

Page 135: ... 7 13 Disassembling the motor guard 1 Disconnect the limit switch cable from the driver box Figure 7 14 2 2 To make the procedure easier turn the machine over on one side as shown in the figure 3 Loosen the 7 screws a using a 4mm hexagonal wrench During the reassembly leave the screws allow for the reassembly of the motor guard Continued on following page ...

Page 136: ...JOG NOW Excite Service maintenance manual rev 5 1 Page 7 30 Figure 7 14 3 4 Remove the lower guard To reassemble the lower guard carry out the above steps in reverse order ...

Page 137: ... of the limit switch cable from the Driver 2 Press on both the sides of the limit switch and pull it out from the lower side of the machine To reassemble the limit switch carry out the above steps in reverse order Figure 7 15 2 Take care to assemble the limit switch in the correct way as in the figure above the fast on 1 has to face toward the REAR SIDE of the machine and the two fast on 2 and 3 t...

Page 138: ...assembling the motor guard 1 Back off the 4 screws a using a medium Phillips screwdriver Figure 7 16 2 2 Unplug the connectors highlight in the figure at the side Power Supply cable Cable connecting High Kit Lower Kit Limit switch cable Ground connection cable Tread belt motor cable Elevation motor cable 3 Remove the Driver Box To reassemble the Lower Kit carry out the above steps in reverse order...

Page 139: ...embling the motor guard 1 Back off the 4 screws a using a medium Phillips screwdriver 2 Disconnect the cables entering the Driver box Power Supply cable Cable connecting High Kit Lower Kit Limit switch cable Ground connection cable Tread belt motor cable Elevation motor cable 3 Remove the Driver Box To reassemble the Lower Kit carry out the above steps in reverse order ...

Page 140: ...he procedure described in paragraph 7 13 Disassembling the motor guard 1 Unplug the power supply cable from the driver box 2 Unplug the ground cable from the frame 3 Back off the 3 screws a using a 4mm hexagonal wrench 4 Remove the power supply box To reassemble the power supply box carry out the above steps in reverse order ...

Page 141: ...elt motor cable on the Driver 3 Back off the 4 nuts b using a 13mm wrench looking down the screws below using a 6mm hexagonal wrench access in from the bottom of the machine 4 Remove the plate and the belt motor To reassemble the tread belt motor carry out the above steps in reverse order CAUTION During the reassembly lock down the screws b using a torque wrench setting on 15Nm CAUTION During the ...

Page 142: ...at fixing the elevation motor to the frame Figure 7 19 2 3 Remove the split pin c and unthread the pin d 4 Remove the elevation motor e To reassemble the elevation motor carry out the above steps in reverse order Figure 7 19 3 CAUTION In case of elevation carriage disassembly during the reassembly lock down the screws f using a torque wrench settings for 50Nm It is possible to disassemble the elev...

Page 143: ...E EXTRA POWER SUPPLY Figure 7 20 1 Carry out the procedure described in paragraph 7 13 Disassembling the motor guard 1 Unplug the connector highlight in the figure from the Power Supply Figure 7 20 2 2 Unplug the elevator microswitch cable from the Driver Continued on following page ...

Page 144: ...sassembling the lower guard Remember to put the cable tie a again while reassembling If you don t have a new one do not cut it but remove using a small flat screwdriver to open the engaging tooth 3 Remove the fixing cable tie a 4 Remove the Power Supply b To reassemble the Power Supply carry out the above steps in reverse order ...

Page 145: ...tandards and safety The machines burn with Autotransformer with this typology from the production from Technogym Figure 7 21 1 Turn off the machine and unplug the mains lead from the wall outlet Carry out the procedure described in paragraph 7 13 Disassembling the motor guard 1 Cut the cable tie that fixes the power cables and ground as highlight in the figure at the side 2 Disconnect the cable hi...

Page 146: ...Carry out the procedure described in paragraph 7 16 1 Disassembling the ALE Driver 5 Cut the cable tie c Figure 7 21 4 6 Slip off the cable d from the autotransformer under the elevation micro with caution During the reassembly replace the cable under the elevation micro as shown in the figure at the side Continued on following page ...

Page 147: ... We suggest making sure the autotransformer cable with an extension to facility the sliding inside of frame Figure 7 21 7 CAUTION Incline the machine on the left side with caution and protecting it from the floor To make safer the machine in this position it is suggested to place some weight on the handlebar closer on the floor 8 Back off the 3 screw g using a 5mm hexagonal wrench Continued on fol...

Page 148: ...p off with caution the cable from the frame in direction of the yellow arrow as shown in the figure at the side 11 Remove the autotransformer i with caution WARNING Pay particular attention during the moving of the autotransformer because it is extremely fragile also a little hit can damage it To reassemble the autotransformer carry out the above steps in reverse order following the note reported ...

Page 149: ... 21 10 1 Fix the Autotransformer at the frame using the 4 fixing screws without locking down 2 Pull the Autotransformer completely towards in the direction of the yellow arrows as shown in the figure above 3 At the end lock down the 4 screws using a 5mm hexagonal wrench ...

Page 150: ... wrench 3 Remove the rear cover by pulling it toward the back Figure 7 22 2 On both side of the equipment 4 Back off the screw c using a 5mm hexagonal wrench 5 Remove the footboard stop d 6 Remove the footboard e by pulling it toward the back 7 Loosen the belt tension by backing off the 2 screws f which act on the rear machine roller using an 8mm hexagonal wrench CAUTION Loosen the screws acting b...

Page 151: ...e motor guard 1 Release the spring g of the belt tensioning mechanism Figure 7 22 4 2 Disengage the motor drive belt from the pulley h on the front roller 3 Remove the driving roller extracting it from the top on the right side and pulling it out axially from the left 4 Remove the motor drive belt from the motor pulley h To reassemble the components removed carry out the above steps in reverse ord...

Page 152: ...e frame of the machine using a 6mm hex wrench 2 Remove the running deck 3 Fully back off the screws which release the tension of the rear roller 4 Remove the rear roller 5 Remove the tread belt CAUTION During the reassembly lock down the screws using a torque wrench settings on 30Nm Figure 7 22 6 CAUTION When reassembling the running deck remember to insert the plastic bushing l on the rear suppor...

Page 153: ...or drive belt 1 Back off the 2 screws 1 that fixing the running deck at the frame using a 10mm hexagonal wrench locking down the nut on the opposite side using a 17mm wrench 2 Remove the running deck and the belt During the reassembly respect the sequence indicated in the figure CAUTION During the reassembly lock down the screw 1 using a torque wrench settings on 30Nm ...

Page 154: ...he above steps in reverse order CAUTION At the end of the procedure check the tension and alignment of the tread belt as detailed at paragraphs 8 1 Tensioning the tread belt and 8 2 Centring the tread belt CAUTION During the reassembly lock down the screws m using a torque wrench settings on 2 5Nm 7 22 4 2 B Typology Figure 7 22 9 1 Back off the 2 screws n using a 3mm hexagonal wrench docking down...

Page 155: ...eference marks spaced exactly 1m apart Figure 8 2 2 Lock down by turns the 2 screws a until the distance between the reference marks increases by 6mm Take care that the roller is always approximately parallel with the one on the front to counteract the tension exerted by the belt on the roller bearings After completing this procedure any further adjustments should be performed using only the left ...

Page 156: ...he 2 screws a until the distance between the two reference marks made previously on the tread belt are once again spaced 1m apart Take care that the roller is always approximately parallel with the one on the front to counteract the tension exerted by the belt on the roller bearings This procedure is normally carried out after replacing the rear or driving roller or in cases where a used tread bel...

Page 157: ... the right or left exclusively by adjusting the left tension screw a 3 Locking down this screw favours shifting of the belt to the right and vice versa The treadmill realigns slowly after some rotation screw or unscrew the bolt or a turn and then check the result before turning it again 4 Gradually increase the speed to 16km h making any small adjustments that are necessary until the tread belt is...

Page 158: ...RO DI FINE CORSA Figure 8 2 1 Loosen the 2 screws a that fixing the limit switch stop plate 2 Adjust the position of the plate so that setting 0 of elevation the distance X from the microswitch and the plate is about 5mm 3 At the end lock down the 2 screws a previously loosened ...

Page 159: ...ines on a not flat surface To level the machine you may adjust the height of the levelling foot as illustrated below Figure 8 3 For the levelling adjustment carry out the operation on the rear RIGHT foot as shown in figure 1 Screw or unscrew the foot a to bring the frame in a flat and stable position 2 At adjustment made lock down the nut b ...

Page 160: ...JOG NOW Excite Service maintenance manual rev 5 1 Page 8 6 Page intentionally left blank ...

Page 161: ...nter one digit at a time using the and keys to change the value and the GOAL keys to scroll to the next character At this point the machine display begins showing the current configuration structured as in the diagram below USER MENU Language MAX time Distance Pause time Default age Default weight TGS Custom mess Up Down Keys HR User Detect Default config Default time SN Format P P Default calorie...

Page 162: ... for the exercise in minutes with values ranging from 1 to 9999 To change the setting when the Display shows MAX TIME xxx Press the ENTER key to modify the parameter when the current value of the parameter starts to blink press the CLEAR key to erase the current value and then enter one digit at a time using the and keys to change the value and the GOAL keys to scroll to the next character The def...

Page 163: ...s ranging from 10 to 99 To change the setting when the LED matrix shows the current setting DEFAULT AGE xx Press the ENTER key to change the parameter the current value of the parameter will start to blink at this point press the CLEAR key to erase the current value and then enter one digit at a time using the and keys to change the value and the GOAL keys to scroll to the next character The defau...

Page 164: ...g when the LED matrix shows the current setting DEFAULT CALORIES xxx Press the ENTER key to change the parameter the current value of the parameter will start to blink at this point press the CLEAR key to erase the current value and then enter one digit at a time using the and keys to change the value and the GOAL keys to scroll to the next character The default value of this parameter is 300 9 1 ...

Page 165: ... so that the machine can only be used with the TGS To change the setting when the LED matrix shows the current one KEYS xxx Press the GOAL keys to select the desired option out of those listed in the table below KEYS ENABLED default DISABLED 9 1 13 MODIFIABLE TARGET HEART RATE It is possible to enable or disable modification of the target heart rate during a constant heart rate exercise To change ...

Page 166: ...eys to select the desired option out of those listed in the table below UP DOWN ENABLED default DISABLED 9 1 16 RESETTING PARAMETERS TO DEFAULT VALUES It is possible to reset the user menu parameters to their default values To select the function when the LED matrix shows DEFAULT CONFIG Press ENTER to confirm the operation use the or speed keys to move to the next or proceeding 9 1 17 FORMAT P P T...

Page 167: ...s septet to IMPERIAL units miles pound the default value for this parameter is 3 mph while the minimum speed is 2 mph At the end of the format procedure hold down the CLEAR key for a few seconds to exit The CLEAR key can be pressed at any time to interrupt the procedure and revert to Stand By mode 9 1 19 SERIAL NUMBER This parameter shows the serial number of the machine SN XXXXX 9 1 20 INMOTION I...

Page 168: ...confirm To enter the password increase or decrease the displayed value using the and keys or use the GOAL keys to scroll through and modify the individual digits At this point there are two options available Tech Config Troubleshooting Press numeric key to access the menu for configuring technical parameters the machine display will begin showing the current configuration structured as in the diag...

Page 169: ... new value Save the changes made by pressing the ENTER key To cancel the operation press the CLEAR key for a few seconds The various parameters are described below 9 2 1 LOW KIT PARAMETER This function provides access to parameters used for modifying certain settings of the lower assembly To access this menu when the display shows LOW KIT PARAM Press ENTER This function is structured as follows LO...

Page 170: ...e the values of the currently displayed parameters to the low kit scroll using the keys until the display shows WRITE TO LOW KIT Press ENTER to write the parameters to the low kit and return to the upper menu level by pressing CLEAR for a few seconds 9 2 1 3 Default setting To load the default parameter values scroll using the effort level keys until the display shows DEFAULT SETTING Press ENTER t...

Page 171: ...0 on off Flag signal receiving Sw Emergency and not receiving Emergency Hw 0 P11 mm roll diameter 74 P12 Numerical constant 100 roller diameter 211 P13 on off Flag posting warning signal AC motor encoder 0 I e P01 kmh 8 10 is the 0 8kmh of start as if the unit was hundreds of meters times P02 100 means the acceleration expressed in kmh sec is 100 100 1 where the 100 is the value of the numerator a...

Page 172: ...tion parameters this function also includes the 3 sub functions described below 9 2 2 1 Read from low kit To read the parameter values from the low kit memory to view them on the display scroll using the keys until the LED display shows READ FROM LOW KIT Press ENTER to read the parameters from the low kit and then return to the upper menu level by pressing CLEAR for a few seconds 9 2 2 2 Write to ...

Page 173: ...or a few seconds To write these parameters to the low kit use the Write to low kit function 9 2 3 OPERATING DATA This function makes it possible to access the machine usage data stored in the low kit To access this menu when the display shows OPERATING DATA Press ENTER This function is structured as follows OPERATING DATA Life Kit H Life AC M WRITE TO LOW KIT READ FROM LOW KIT Life DC M Life Kit L...

Page 174: ...seconds 9 2 3 3 Machine usage data The machine usage data on the display is updated every 10 minutes This means that whenever the machine is switched off any data modified after the last memory update will be lost MESSAGE ON DISPLAY DESCRIPTION Life AC M Minutes x 10 of tread belt motor operation Life DC M Minutes of elevation motor operation Life Kit H Minutes x 10 of operation of the upper assem...

Page 175: ...the 2 sub functions described below 9 2 4 1 Read from low kit To read the errors stored in low kit memory and view them on the display scroll using the keys until the display shows READ FROM LOW KIT Press ENTER to read the errors from the low kit and return to the upper menu level by pressing CLEAR for a few seconds 9 2 4 2 Reset Errors To clear the error history in both the low and high kit memor...

Page 176: ...ion at the error moment Current when the error occurred Speed at the error moment Km h The correspondence between error codes and descriptions is given at paragraph 6 10 driver errors of this manual Use the effort level key to advance to the next error otherwise the message with the details of the current error will continue to reappear 9 2 5 STANDARD SETTINGS This function simultaneously resets t...

Page 177: ...en the LED display shows LOW KIT MENU Press ENTER This function is structured as follows LOW KIT MENU Low Kit Version Config Registers 9 2 6 1 Low kit version This function displays the inverter firmware version To access this menu when the LED display shows LOW KIT VERSION Press ENTER the following message appears H x L x B x Which identifies the firmware version ...

Page 178: ...ress ENTER to load the parameter value the following message will appear VALUE Y Press ENTER to begin editing the parameter value When finished press and the following message will appear WRITE TO LOW KIT Press ENTER to confirm writing the changes to the low kit at the end of this operation the following message reappears ADDRESS X Although the changes made to the parameters come into effect immed...

Page 179: ... shows KEY READER VERS Press ENTER the message that identifies the SW version will appear 9 2 10 MAINS VOLTAGE This function allows the user to choose the proper power supply voltage for the machine To change the selection when the LED matrix shows the current setting MAINS VOLTAGE XXX Press the GOAL keys to select the desired voltage setting from the options available Press ENTER to confirm the c...

Page 180: ...reen in that sequence in Stand By as shown in the figure below A new display will appear from which you can gain access to the various configuration menus by entering the password on the number keyboard Enter the password 2406 and press the ENTER key to confirm or EXIT to quit A menu will then appear which will provide access to the following sub menus For the following menu please refer to the re...

Page 181: ...screen in that sequence in Stand By as shown in the figure below A new display will appear from which you can gain access to the various configuration menus by entering the password on the number keyboard Enter the password 2501 and press the ENTER key to confirm or EXIT to quit A menu will then appear which will provide access to the following sub menus For the following menu please refer to the ...

Page 182: ...larm action 0 P08 10msec Watchdog serial communication 0 P09 1msec DC motor encoder error timeout 1 cnt 100 msec 15 P10 on off Flag signal receiving Sw Emergency and not receiving Emergency Hw 0 P11 mm roll diameter 74 P12 Numerical constant 100 roller diameter 211 P13 on off Flag posting warning signal AC motor encoder 0 I e P01 kmh 8 10 is the 0 8kmh of start as if the unit was hundreds of meter...

Page 183: ...Low Kit the value of the parameter set previously and displayed in the display 9 4 2 2 Register Value This button allows modifying the value of the parameters Press the button On the Display will appear a Numeric Keypad which allows entering and or modifying the numerical value of the parameter Press CLEAR to delete the old value and insert the new one then press CONFIRM to save it After any chang...

Page 184: ... A 8 1208 PID update time 0 A 115 1227 DCMot EncTimeout 250 A 50 1209 PID Prop gain 1 7 DCMot EncTimeout 15 A 51 1210 PID Int tconst 1 150 A 116 1228 Fan command dly 3 A 52 1211 PID Deriv gain 1 0 A 117 1229 ACMot EncToller 50 A 53 1212 PID Prop gain 2 0 0 OFF A 54 1213 PID Int tconst 2 9999 A 118 1230 Check RunnerBand 10 A 55 1214 PID Deriv gain 2 0 A 119 1231 Check RunnerSpd 50 A 56 1215 PID hig...

Page 185: ...ion 2 state 0 D 25 62 Flag status 0 D 352 40 Par port state 0 D 26 63 Actual ENC2 pos 0 D 400 41 PID reference 0 D 27 64 Actual speed from Fenc 0 D 401 42 PID feedback 0 D 30 70 Reserved D 402 43 PID error 0 D 50 10 Heatsink temp 0 D 403 44 PID integr comp 0 D 51 11 Drive OL 0 D 404 45 PID output 0 D 52 12 Motor OL 0 D 800 46 Error 1 0 D 53 13 Brake res OL 0 D 801 47 Error 2 0 D 100 14 Dig inp sta...

Page 186: ...0 328 Ramp resolution 0 F 51 308 Ref 2 channel 0 F 201 329 Acc time 1 3000 F 60 309 MltFrq channel 1 3 F 202 330 Dec time 1 3000 F 61 310 MltFrq channel 2 3 F 203 331 Acc time 2 50 F 100 311 Frequency ref 0 0 F 204 332 Dec time 2 50 F 101 312 Frequency ref 1 0 F 205 333 Acc time 3 50 F 102 313 Frequency ref 2 0 F 206 334 Dec time 3 FS 50 F 103 314 Frequency ref 3 0 F 207 335 Acc time 4 Jog 50 F 10...

Page 187: ...8 I 601 156 Serial link bps 4 I 151 117 Exp DigOut 2 cfg 48 I 602 157 Device address 1 I 200 118 An in 1 Type 1 I 603 158 Ser answer delay 1 I 201 119 An in 1 offset 0 I 604 159 Serial timeout 0 I 202 120 An in 1 gain 100 I 605 160 En timeout alm 1 I 203 121 An in 1 minimum 0 I 700 161 Option 1 type 0 I 204 122 An in 1 filter 1 I 701 162 Option 2 type 0 I 210 123 An in 2 Type 1 I 750 163 SBI addre...

Page 188: ... compensate 90 P 380 466 Autoreset attmps 0 P 101 420 Slip comp filter 3 P 381 467 Autoreset clear 10 P 120 421 Manual boost 30 P 382 468 Autoreset delay 50 P 121 422 Boost factor src 0 P 383 469 Autores flt rly 1 P 122 423 Auto boost en 1 P 400 470 Ext fault mode 0 P 140 424 Magn curr gain 30 P 420 471 Volt reduc mode 0 P 160 425 Osc damping gain 10 P 421 472 V reduction fact 100 P 180 426 SW cla...

Page 189: ...reen in that sequence when the equipment is in Stand By as shown in the figure below A new display will appear from which you can gain access to the various configuration menus by entering the password on the number keyboard In order to access the menu enter the password 2502 and press the ENTER key in order to confirm ESCI in order to quit For the following menu please refer to the relevant chapt...

Page 190: ...JOG NOW Excite Service maintenance manual rev 5 1 Pagina 10 2 Page intentionally left blank ...

Page 191: ...on of the device in compliance with medical regulations 60601 1 and 60601 1 2 Electrical testing of each device manufactured according to the provisions of the aforementioned standards Training of technical staff who perform technical service Use of checked and tested original Technogym spare parts for all service operations CE Declaration of Conformity 11 1 ELECTRICAL SAFETY TEST Based on the ris...

Page 192: ...JOG NOW Excite Service maintenance manual rev 5 1 Pagina 11 2 First of all check the resistance on the tester probes is approximately 0Ω ...

Page 193: ...d so that no part of the machine is left exposed that may cause injury to the user 11 3 START UP CHECK Following installation and after every technical intervention on the machine plug it into a power outlet set the power switch to ON During power up the machine resets the incline After completing the power on reset the machine goes into standby awaiting a keyboard command To check the correct ope...

Page 194: ... critical components is shown in the table below Code Component 0WR00233XX Elevation motor 0WR00500XX Tread belt motor W0004467XX AT MD power supply box 0WK00429XX Display Board 500 0WQ00348XX C Safe Board 0WR00633XX HR Cardio Receiver 0WCU0243XX Power Supply cable LED with AT UL W0006892XX Power Supply Box 16A MED Display Program SW version Note XX Baan Revision YY Language If a critical componen...

Page 195: ... maintenance operation The ORDINARY maintenance operations can be performed by the club manager They do not require any kind of technical knowledge they only consist of simple external cleaning for the purposes of general hygiene EXTRAORDINARY maintenance operation The EXTRAORDINARY maintenance operations have to be performed by a TG qualified technician specially trained by Technogym They consist...

Page 196: ...tion to the tread belt motor and the electronic circuit boards ATTENTION when carrying out these operations be careful not to damage the cables 5 Move the machine and clean the floor underneath using a vacuum cleaner 12 1 4 CHECKING THE EMERGENCY STOP MONTHLY 1 With the machine turned on and moving at a speed of approximately 5 km h trip the emergency stop and check that the machine halts displayi...

Page 197: ...12 2 4 CHECKING THE STATE OF WEAR OF TREAD BELT AND RUNNING DECK 1 Disassemble the rear and driving rollers the running deck and the tread belt 2 Check the state of wear of both the running deck and the tread belt Replace if there are evident signs of wear 3 Using a clean cloth wipe the entire surface of the running deck and the underside of the tread belt 12 2 5 CHECKING THE WEAR OF THE MOTOR ROL...

Page 198: ... anomalies are found call in an authorized Technogym service technician 2 With the machine moving at a speed of approximately 10 km h check the centring of the tread belt Replace if there are evident signs of wear 12 2 10 CHECKING THE WIRING AND CONNECTIONS 1 Open all the machine guards 2 Check the condition of all the cables External conditions Possible rusting of the connectors Electrical contin...

Page 199: ...te User 2406 VisioWEB 2404 Configurazione IP TV IP TV configuration VISIO 2405 Configurazione IP Radio IP Radio configuration VISIO 2406 Configurazione Utente letture Serial Number User Configuration Serial number reading LED VISIO 2407 Sintonizzazione canali Analogici e Digitalli TV Analog and Digital TV channels tuning VISIO 2408 Sintonizzazione canali Analogici e Digitalli Radio Analog and Digi...

Page 200: ...rewdriver Medium Phillips screwdriver Big Phillips screwdriver Small flat Phillips screwdriver Medium flat Phillips screwdriver 13mm wrench 3mm hexagonal wrench 4mm hexagonal wrench 5mm hexagonal wrench 6mm hexagonal wrench 8mm hexagonal wrench Torque wrench You can order a complete set of hexagonal wrenches consisting of 7 pieces 2 2 5 3 4 5 6 and 8 mm The code to be used is R0003677AA Excite Tes...

Page 201: ......

Page 202: ...0SM00668AA UK TECHNOGYM S p A Via Calcinaro 2861 47521 Cesena FC ITALIA Tel 39 0547 56047 Fax 39 0547 650150 E mail service technogym com ...

Reviews: