


6-21
6. DIAG. TEST OPERATION
EO18-33007
A
A
B
B
B
B
C
C
C
C
C
C
D
D
D
B
B
B
B
B
B
A
A
A
A
A
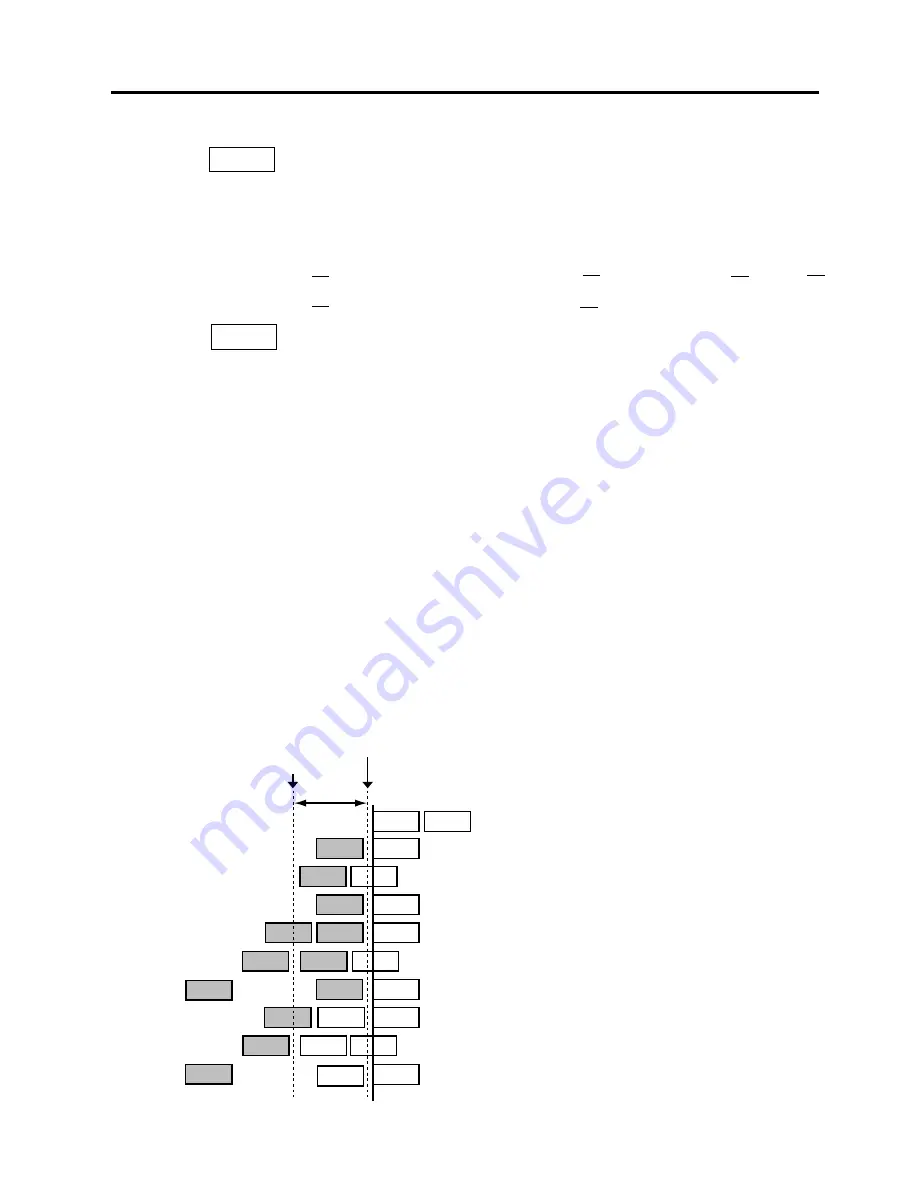
Fig. 6-10
Print Satrt Position
Cut Position
Print Head Position
32.8 mm
>
>
>
>
>
>
6.3 PARAMETER SETTING MODE
■
When using a label with a length of less than 38 mm :
Case 1
Conditions: Issue command [ESC]XS, feed command [ESC]T and eject command
[ESC]IB are received. Label pitch: 38.0 mm or less, with cut, feed gap sensor, cut position
fine adjustment value
–
10 mm or less, and issue mode set to C (cut). When the above
conditions are all met, the issue operation in cut issue mode is as follows:
1
Head lifted
2
Forward feed to the cut position
3
Head lowered
4
Cut
5
Head lifted
6
Backfeed to the home position
7
Head lowered.
Case 2
Generally the minimum label length which is available in cut mode is 38.0 mm. When using
a label with a length of less than 38 mm, the edge of the label may be caught on the print
head during back feed to the print start position after cutting the label gap, causing a
improper print start position.
In this case set the cut position fine adjustment value after calculating the value using the
following formula so that the unprinted label returns to the correct print start position.
However, use of this method will leave one or two printed label(s) between the print head
and the cutter. Feed or print the label(s) to remove them.
(a) Formula for cut position fine adjustment value
Cut position fine adjustment value
= (the number of labels left between the print head and the cutter) x (span of label)
= (32.8 mm/label length) x (span of label)
* Omit the decimals of the value obtained by dividing 32.8 mm by the label length
for one unit.
(example) Span of label : 30.0 mm, Label length : 24.0 mm
(32.8 mm/30.0 mm) x 30.0 mm = 1 x 30.0 mm = +30.0 mm
(b) Example
1
Idling
2
Printing the first label (A) is completed.
3
Label A is fed to the cut position and the front
gap is cut.
4
Label B is fed in the reverse direction to the
print start position.
5
Printing the second label (B) is completed.
6
Label B is fed to the cut position and the front
gap is cut.
7
Label C is fed in the reverse direction to the
print start position.
8
To take away label B, label (C) is fed.
9
Label B is fed to the cut position and the front
gap is cut.
0
Label D is fed in the reverse direction to the
print start position.
Summary of Contents for B-880 series
Page 3: ...TEC Thermal Printer B 870 880 QQ SERIES Owner s Manual ...
Page 35: ......
Page 36: ...PRINTED IN JAPAN EO1 33017 ...
Page 56: ......
Page 57: ......
Page 58: ...PRINTED IN JAPAN EO10 33008 ...
Page 146: ...6 59 6 DIAG TEST OPERATION EO18 33007 Fig 6 25 Bar code AUTO PRINT Fig 6 24 ...
Page 176: ......
Page 177: ......
Page 178: ...PRINTED IN JAPAN EO18 33007 ...
Page 179: ......
Page 180: ......