


© 2011 Tyco Electronics Corporation, a TE Connectivity Ltd. Company
All Rights Reserved
*Trademark
TE Connectivity, TE connectivity (logo), and TE (logo) are trademarks. Other logos, product and/or Company names may be trademarks of their respective owners.
1 of 4
Instruction Sheet
TOOLING ASSISTANCE CENTER 1-800-722-1111
PRODUCT INFORMATION 1-800-522-6752
This controlled document is subject to change.
For latest revision and Regional Customer Service,
visit our website at www.te.com
LOC B
408-9736
STRATO-THERM* Die Head Assembly
314915-1 for Use in Pneumatic
Crimping Tool 69015
19 DEC 11 Rev B
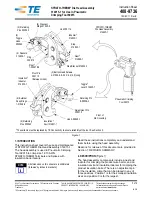
Figure 1
(6) Crescent
Rings 21045-8
(2) Retaining
Pins 302563
(2)
Toggle
Links
302562
(2) Spacers
314936-1 Ring
302016
Rivet
†
1-305678-5
(2) Button Head Screws
2-21002-0, 8-32 X 6.4 [.25] Long
Stop Bracket 314934-1
Nest
†
314929-1
Stop
314933-1
Indenter
†
314930-1
Link 300114
Pivot Pin
300115
(Between Links)
Insulation
†
Indenter
314932-1
(4) External
Snap Rings
1-21048-6
(2) Retaining
Pins 300042
Insulation
†
Anvil 314931-1
Link 3-59649-1
Adjustment Pin
302015
Retaining Pin
8-59558-3
Toggle
†
Lever 314935-1
†
These items must be replaced by TE Connectivity to ensure reliability of the tool. See Section 6.
STRATO-THERM
Die Head Assembly
314935-1
Pneumatic Crimping
Tool 69015
Front of
Die Assembly
1. INTRODUCTION
This instruction sheet covers the use and maintenance
of STRATO-THERM Die Head Assembly 314915-1.
The head assembly is used in Pneumatic Crimping
Tool 69015 to crimp size 12-10 AWG
STRATO-THERM Terminals and Splices with
insulation barrel feature.
NOTE
i
All dimensions on this sheet are in millimeters
[followed by inches in brackets].
Read these instructions completely and understand
them before using the head assembly.
Reasons for reissue of this document are provided in
Section 7, REVISION SUMMARY.
2. DESCRIPTION (Figure 1)
The head assembly components include a nest and
indenter for crimping the product wire barrel, and an
insulation anvil and insulation indenter for crimping the
product insulation barrel. There is an adjustment pin
for the insulation crimp that can be placed in any of
three positions. Position 1 is for the smallest insulation
sizes and position 3 is for the largest.