background image

Sound Chamber Fundamentals

Re

fl

ections and interference inside of a sound chamber can distort the stimulus frequency or

have   an   undesirable   effect   on   the   stimulus   level.   This   section   provides   supplemental
information on these issues and correctly setting-up your sound chamber.

Re

fl

ections and Interference

Sound waves are a mechanical force in which pressure is used to transmit energy through a
physical medium. Sound waves can be re

fl

ected off surfaces. The re

fl

ected signal strength is

based on the angle of incidence and damping factor of the re

fl

ecting surface.

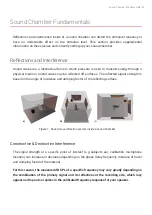
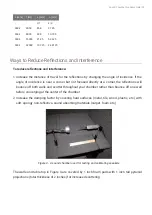
Figure 1 - Sound wave re

fl

ection vectors inside a sound chamber

Constructive & Destructive Interference

The signal strength at a speci

fi

c point of interest (e.g subject's ear, calibration microphone

location) can increase or decrease depending on the phase delay, frequency, distance of travel
and damping factor of the material.

For this reason, the measured dB SPL of a speci

fi

c frequency may vary greatly


depending on

the combination of the primary signal and its re

fl

ections at the


recording site, which may

appear as drop outs or spikes in the calibrated


frequency response for your speaker.

Sound Chamber Fundamentals | 50

Summary of Contents for Medusa4Z

Page 1: ...ABR User Guide Medusa4Z Amplifier Updated 2021 03 24...

Page 2: ...65 Notices The information contained in this document is provided as is and is subject to being changed without notice TDT shall not be liable for errors or damages in connection with the furnishing u...

Page 3: ...ting Pads The Test Equipment 14 Needle Electrodes 15 Medusa4Z BioAmp 16 Speakers 17 RZ6 Signal Processor BioSigRZ Software 21 Click ABRs 22 Tone ABRs 22 Out of the Box Experiments 23 The Stimulus Sett...

Page 4: ...Reduce Reflections and Interference Configuring MF1 for Closed Field Modifying the Stimulus 59 Modifying Variables 61 Customizing the Stimulus 64 Suggested Stimulus File Changes 65 Wrapping up Noise...

Page 5: ...or research goals We leave the science up to you but we are here to support you on your way to successful experiment completion Organization of the Guide This guide begins with a general overview of...

Page 6: ...und noise by half When viewing ABR responses you can expect to see an averaged waveform trace consisting of multiple features with at least two distinct peaks The response shape should be consistent b...

Page 7: ...r ABR recording is designed to minimize noise at every step beginning with an optically isolated battery powered Medusa4Z preamplifier This device digitizes the biologic responses right in the enclosu...

Page 8: ...gRZ software installed on computer Computer monitor Multi I O Processor with optic port RZ6 A P1 Medusa4Z 4 channel amplifier Speaker MF1 Calibration microphone PCB 378C01 not shown Needle electrode k...

Page 9: ...and screening protocols mice rats and guinea pigs Expected Hearing Range ABR tests are typically focused on the range in which the species is commonly known to hear well Subject Standard Testing Rang...

Page 10: ...e to Boost This aesthetic protocol uses an injectable combination of muscle relaxer and sedative Typically the subject is unconscious in a few minutes begins to wake 45 minutes and is completely awake...

Page 11: ...as electrical wires that serve as antennas for electrical noise We recommend using a sound attenuating chamber with a built in Faraday cage for ABR testing It is equally important to use good practice...

Page 12: ...core temperature When the subject loses body heat its hearing system is not as responsive which can artificially raise hearing thresholds A heating pad is typically used to maintain the subject s temp...

Page 13: ...It is critical that you place the heat pump and all associated electrical connections outside the Faraday cage when using this type of pad Important Your Test Area 13...

Page 14: ...jects ABRs are typically recorded using sub dermal needle electrodes There are a wide variety of suitable electrodes available When working with a TDT System you will need electrodes with 1 5 mm femal...

Page 15: ...lliVolts max input Gain The Medusa4Z amplifies the signal by 100x before digitizing and transferring it to the RZ6 The RZ6 automatically accounts for this 100x gain when receiving the data yielding a...

Page 16: ...al frequency range Impedance Frq 1KHz This is the frequency used for the built in electrode impedance tester 1KHz is the closest frequency to the ABR signal frequency range See Check Impedance for tip...

Page 17: ...at the output range can be equalized When using the tube tip use the MF1 s inline filter and the shortest tube possible You can cut the 10 cm tube to the desired length A 3 5 cm tube length is typical...

Page 18: ...mplifier drives the stimulus signals through TDT s MF1 multi function speaker via the BNC labeled Out A Use the RCA cable and BNC to RCA adapter included with the MF1 kit to connect OUT A to the RCA c...

Page 19: ...ble has identical one piece connectors at each end There is a V shaped groove on one side of the connector and a raised rectangle on the other As shown in the image above plug the connector into the R...

Page 20: ...optic interface Displaying and working with data during and after acquisition If you use TDT s WS4 computer the optical interface and BioSigRZ software are pre installed If you use your own PC you ll...

Page 21: ...range with each stimulus presentation Because a wide range of frequencies are stimulated at once the response tends to be larger and easier to identify Screening with click based ABRs also reduces the...

Page 22: ...alues suited to typical experiments Your protocol or circumstance may differ from these values but these will work as an example or a starting point in most cases To open the ABR experiment configurat...

Page 23: ...requency the tone level will vary from 90 dB SPL to 20 dB SPL in 10 dB decrements With each successive presentation the tone phase will alternate 180 degrees to eliminate potential speaker artifacts A...

Page 24: ...this schedule and choose to omit specific SGIs if desired See Modifying the Stimulus for more information on modifying the standard protocol Ch1 Speaker Calibration Leave blank for now All speakers ha...

Page 25: ...settings should be fine to begin but you may eventually want to make adjustments The acquisition settings dialog boxes can be opened by clicking Setup Acquisition The setting notes below provide info...

Page 26: ...sampling rate to 12kHz which is how we configured the sampling rate of the Medusa4Z in The Test Equipment This is set using the drop down menu in the Acquisition Setup screen immediately below the Med...

Page 27: ...ctrode is required for each channel plus one for Ground and one for Reference The electrodes should be inserted just under the skin and connected to the appropriate input on the Medusa4Z Correct place...

Page 28: ...recordings To avoid this always check the subject before beginning your experiment and monitor the subject for signs of wakefulness during testing Toe Pinch For small lab subjects a toe pinch is the...

Page 29: ...stimulus presentation Click the Start button You may be prompted to specify a response record file where data will be stored If prompted type a name in the File Name field and click Open You are now...

Page 30: ...chedule and control data averaging in real time Advance Current SGI is halted and running average is saved Stimulus presentation advances to the next SGI in the stimulus schedule Repeat Current SGI is...

Page 31: ...change the scale of the time axis Click and drag from right to left to zoom out Termination In BioSgRZ control of termination of the signal presentation and acquisition is called boundary control When...

Page 32: ...To halt stimulus presentation Click Stop To run the experiment again Click Begin Enter the new subject information 1 2 Running the Experiment 32...

Page 33: ...l be appended to the end of the History Plot the SGI will be incremented a new stimulus signal will be generated according to the current stimulus parameters and a new average will be computed This pr...

Page 34: ...onses Records may be exported to an ASCII text file txt file or CSV spreadsheet file or you can choose to do further analysis in an environment such as Matlab We can provide support for exporting data...

Page 35: ...ettings Type a report title in the Title field Click the Generate Report button When prompted specify a file name and location to store the export file and click the Save button When you are returned...

Page 36: ...512 averages During a saline test the saline replaces the subject so if the noise floor is significantly higher than expected it is likely the noise is environmental You can further test your system b...

Page 37: ...lacement Channel 1 and Reference impedances should match at 1K 3K each The nearby area should be as free of high voltage noise sources as possible Common sources are motors fans refrigerators freezers...

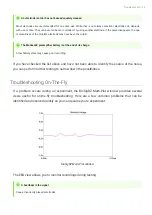
Page 38: ...you can perform further testing to narrow down the possibilities Troubleshooting On The Fly If a problem occurs during an experiment the BioSigRZ Multi Plot window provides several views useful for on...

Page 39: ...A noisy environment Run a saline test as described above Getting Help If you are unable to diagnose the noise problem contact TDT for assistance at support tdt com or 1 386 462 9622 When you contact u...

Page 40: ...me you run an ABR we recommend skipping calibration until after you have been able to successfully record an ABR response If the system has not yet been fully tested using a custom calibration file ca...

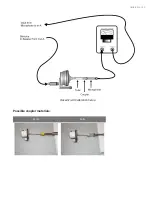
Page 41: ...d For a closed field calibration you need to interface your Calibration Microphone to your speaker tube using some sort of coupler Couplers can be made from parts common in most labs pictured below su...

Page 42: ...Closed Field Calibration Setup Possible coupler materials Eartip Putty Calibration 42...

Page 43: ...ypes and calibration see the BioSigRZ Manual Click Calibration The RZ6_Click_Calibration rcx circuit is designed to allow you to calibrate the RZ6 for click stimuli This file is part of the BioSigRZEx...

Page 44: ...art with a low voltage in the Desired Voltage Amplitude ConstF and slowly increase this value Re compile load and run step 8 after you make any modification to the circuit When the dBSPL level shown i...

Page 45: ...tage and the corresponding dB level in the Calibration area and then click OK To save the change click File then Save This will save the change to the stimulus used by BioSigRZ s standard click config...

Page 46: ...to ensure your speakers and microphones are working The test circuit SpeakerMicTest rcx is part of the BioSigRZExamples zip zipped example folder which can be downloaded from the TDT website Speaker T...

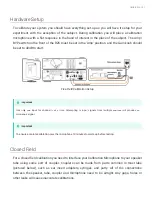
Page 47: ...one speaker is working connect the calibration microphone and run the circuit again To use this circuit there are a few steps required for setup Connect your Calibration Microphone to the In A port o...

Page 48: ...RZ6 Open Field Calibration Setup Calibration 48...

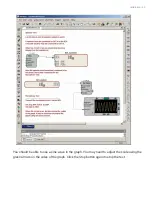
Page 49: ...You should be able to see a sine wave in the graph You may need to adjust the scale using the green arrows on the sides of the graph Click the Stop button again to stop the test Calibration 49...

Page 50: ...sed on the angle of incidence and damping factor of the reflecting surface Figure 1 Sound wave reflection vectors inside a sound chamber Constructive Destructive Interference The signal strength at a...

Page 51: ...f 30 cm and a reflective distance of 70 cm any stimulus longer than 0 175 ms will generate a temporary standing wave The table below shows speaker position offset tolerances with respect to frequency...

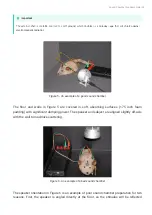
Page 52: ...verging at the center of the chamber Increase the damping factor by covering hard surfaces metal tile wood plastic etc with soft spongy non reflective sound absorbing materials carpet foam etc Figure...

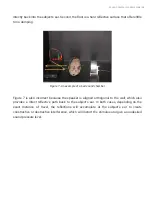
Page 53: ...all to maximize scattering Figure 6 An example of a bad sound chamber The speaker orientation in Figure 6 is an example of poor sound chamber preparation for two reasons First the speaker is angled di...

Page 54: ...cause the speaker is aligned orthogonal to the wall which also provides a direct reflective path back to the subject s ear In both cases depending on the exact distance of travel the reflections will...

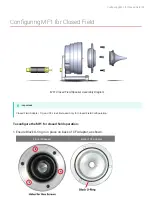
Page 55: ...configure the MF1 for closed field operation Ensure Black O ring is in place on back of CF Adapter as shown Closed Field Adapter Tip and CF Line Filter used only for Closed Field Configuration Import...

Page 56: ...ove on the CF adapter Ensure the tip is bottomed in its socket Gently insert the tube into the narrow end of the tip Attach the CF filter to the provided RCA cable CF Line Filter Attach a BNC to RCA a...

Page 57: ...eaker shown with included stand Connect the MF1 to the amplifier using the RCA cable with CF filter attached For more information on the MF1 Speaker see the System 3 Manual 6 Configuring MF1 for Close...

Page 58: ...and the variable definitions can be modified in BioSigRZ To do so display the stimulus schedule as below then select the SGIs to be included in the subset for presentation To view the current stimulu...

Page 59: ...ied to meet your needs To modify a variable Click the variable button for the desired variable such as Freq In the Signal Variable dialog box make any changes then click OK to confirm and return to th...

Page 60: ...saved in the configuration file if the Lock SigGen Files check box is selected in the Stimulus Setup dialog bog If this check box is not selected any changes to variables or SGI selections for presen...

Page 61: ...directly in the SigGenRZ software you will need to follow these basic steps Open the stimulus file sig in SigGenRZ Make changes in the file Save the file or save the file with a new name Open the des...

Page 62: ...ost common changes to the signal settings include Timing Duration and for click calibration Calibration Level and Attenuation Level These can be found in the Signal Parameters dialog box To open the S...

Page 63: ...meters Gate Type From the Gate Type box you can select a variety of gating or windowing functions including Cos2 10 90 Ramp Blackman Hanning For tone pips Cos2 is the default setting For click stimuli...

Page 64: ...A 0 2 ms gate is most commonly used Make this change as shown below in orange Click on the Gate Time variable and change the Default Start from 2 to 2 then click OK We recommend saving this resulting...

Page 65: ...Wrapping up Before running any subjects with any ABR system we recommend running a saline test Only when the saline test looks good should you proceed to test with a subject Modifying the Stimulus 65...

Page 66: ...goal of noise exposure delivery in the lab is to reproduce or simulate the effects including hearing damage or deafening of real world noise exposure Key elements of noise exposure High dB noise deliv...

Page 67: ...A commonly available three way 6 inch by 9 inch car speaker is a good choice for delivering sound Setting Up Signal Generation in RPvdsEx All of the tasks performed by your RZ6 are configured via Rea...

Page 68: ...cessing functions that make up this task appear as components ordered and connected in the processing chain and arranged on a large sheet You can use the Pan button or the horizontal and vertical scro...

Page 69: ...Random Noise Generation Circuit Working with Circuit Components This circuit is configured for you but you will need to change the properties of some of the components Noise Exposure 69...

Page 70: ...d select a component To delete a component or link click it and press the DELETE key on your keyboard For more information on working with circuits see the RPvdsEx Manual Modify a File Open the approp...

Page 71: ...he circuit segment pictured below By default it is set to 1 3 V which should be a good starting point For now leave the default voltage as is The expected dB SPL is displayed for reference The actual...

Page 72: ...To begin calibration make sure the microphone is in place and the chamber is closed then click the Compile load run button on the main toolbar To stop presenting the sound click the Stop button To re...

Page 73: ...for presentation To begin click the Compile load run button on the main toolbar To stop presenting the sound click the Stop button Using Tones If you are using the timed tone signal file you will nee...

Page 74: ...hamber Line the inside of the chamber with acoustic foam to eliminate constructive or destructive interference with the signal See Sound Chamber Fundamentals for more information Build the Enclosure U...

Page 75: ...prevent damage to the foam Position the Speaker Position the speaker directly above the tube facing down toward the subject Completed Enclosure with Subject Ensure Consistent Signal Delivery After yo...

Page 76: ...ube and speaker in the enclosure and add a second channel to the RPvdsEx circuit file To add a second channel Open the RPvdsEx file Find the RZ6_AudioOut macro component pictured below Double click th...

Page 77: ...Be sure to save your changes Connect the second output of your RZ6 to a second external amplifier and speaker 5 Noise Exposure 77...

Page 78: ...ered on and at the main screen press the Setup button twice This will bring you to the Sample Freq screen For a normal ABR this should be set to the 12kHz mode Pressing the Option button allows you to...

Page 79: ...ht corner I recommend not starting an ABR with less than 20 battery life remaining The Medusa4Z will charge from dead to 90 in only 4 hours with the included charger Other chargers may be used up to 1...

Page 80: ...RPvdsEx https www tdt com files fastfacts Microcode pdf Software Configuration Changes For mouse models with the Medusa4Z you will need to make a few changes to the stock Root_ToneABR acf file From th...

Page 81: ...is rig Wrapping up Before running any subjects with any ABR system we recommend running a saline test Only when the saline test looks good should you proceed to test with a subject 2 Acquisition Filte...

Reviews: