Stud Center Finder, Metal and
AC Live Wire Detector (TH511)
This stud finder is designed to find the wooden or metal stud and avoid
the metal and AC wires. This item features five scanning modes:
Stud 1⁄2 in. Scan Mode: Locates the center and edges of wood and
metal studs up to 1⁄2 in. (12 mm) deep
Stud 1 in. Scan Mode: Locates the center and edges of wood and metal
studs up to 1 in. (25 mm) deep
Stud 1½ in. Scan Mode: Locates the center and edges of wood and
metal studs up to 1½ in. (38 mm) deep
Metal Scan Mode: Detects metal up to 2.36 in. (60 mm) deep
AC Scan Mode: Detects live unshielded AC wires up to 2 in. (51mm)
deep
INSTALLING THE BATTERY
There is no battery in the tool. Please install the battery firstly
Push the battery cover at the bottom of the tool and
open it. Insert a new 9-volt battery, matching the
positive (+) and negative (-) terminals to the battery
wire. Snap the battery into place and close battery
cover.
Low Battery Indicator:
The Low Battery Indicator icon displays
when
the battery level is getting low.When the low battery indicator icon
appears on the screen, the battery level is too low and not sufficient to
power the tool for proper operation.
Please replace the 9-volt battery with
a brand new battery immediately.
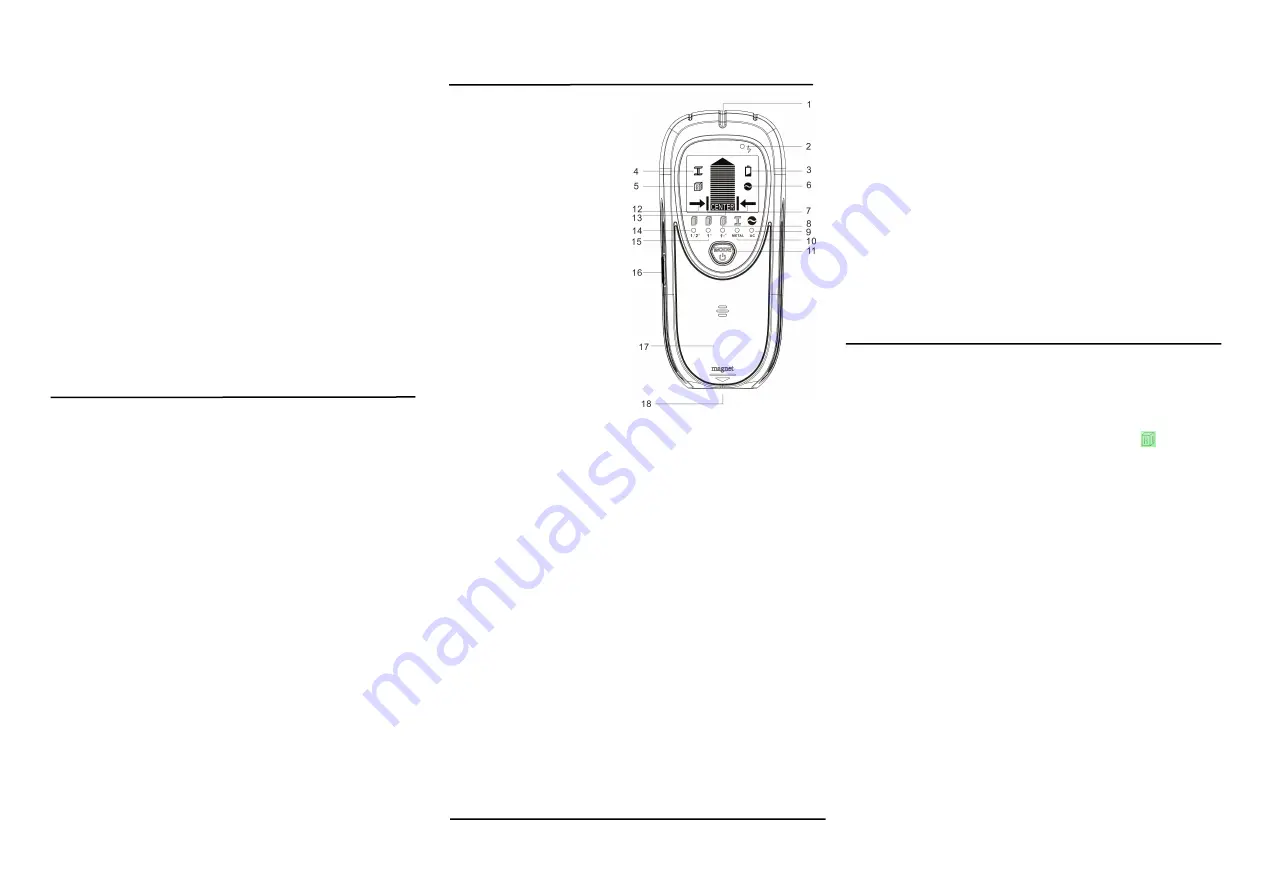
PRODUCT DISPLAY
1.
The Center Pointing
System
2. AC Wire Warning
3. Low Battery Indication
4. Metal Mode Indication
5. Stud Mode Indication
6. AC Mode Indication
7. Stud edge indicator
8. Stud 1 1⁄2 in. Scan
mode
9. AC Scan mode
10. Metal Scan mode
11. Power Button & Mode
Switch Button
12. Direction indicator
13. Stud center indicator
14. Stud 1⁄2 in. Scan mode
15. Stud 1 in. Scan mode
16.
Calibrate
Button
17. Battery case (Back of unit)
18.Magnet
(
additional function
)
Please note:
1. Press the mode button (NUMBER 11) to choose the mode.
2. Press the scan button on the side of the tool (NUMBER 16) to
calibrate the tool.
After calibrate it, you don’t have to pressing the
scan button all the time when scanning the wall
3
.
The Magnet (NUMBER 18) is an additional function. it can be
used to to confirm the metal position twice.But please note, this
function is only a reference for the second confirmation of the
location of the metal or metal stud, not as a basis for judgment.
Note: The target size and distance determine the size of the magnetic
force. If the distance is too far or the metal is too small, the magnetic
force may not change.
Work Principle
Because the stud finders are looking for a change in density behind wall
in Stud Scan Modes and Deep Scan Modes, not a particular material. The
detector will react to metal studs the same as it would for wooden
studs. We can only hang things to wooden stud and can’t drill to the metal
stud.
It is important to Confirm it is a metal stud or wooden stud before you act
ually drill to the wall.After you detect the center of a stud, Please Put the
bottom magnet on the center mark to recheck whether it is metal or wood
stud, or Use Metal Scan Mode (refer to the description of Metal Scan Mode
below) to determine whether the previous reading in Stud scan was a
wooden stud or metal stud.
Stud Scan Mode 1
Use this stud scan mode to find the center and edges of wood or metal
studs up to 1
⁄
2 in. (12 mm) deep. For best results, always start in this
mode when looking for studs.
Step 1:
Press the mode button to choose the
“stud mode”
Step 2
:
Put the scanner on the wall and Press the Scan Button on the
side of the tool to calibrate. After a short beep sounds, confirming
calibration is complete.
Note: Be sure not to move the scanner while calibrating.
Calibrate the tool on the wall before every scan.
Step3:
Move it flat against the wall to scan.
Note: If it finds metal or wooden stud, the screen will show as the picture
and it beeps.
If it finds nothing, please repeat the above steps ( calibrate it and move it
to scan)


