TAUBENREUTHER 5-285 Manual Download Page 1

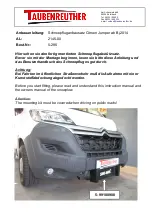
Hier sehen sie den fertig montierten Schneepflugabstützsatz.
Bevor sie mit der Montage beginnen, lesen sie bitte diese Anleitung und 
das Benutzerhandbuch des Schneepfluges gut durch.

Achtung:
Bei Fahrten im öffentlichen Straßenverkehr muß die Aufnahme mit einer 
Kunststoffabdeckung abgedeckt werden.

Before you start fitting, please read and understand this instruction manual and 
the owners manual of the snowplow.

Attention:
The mounting kit must be covered when driving on public roads!

Am Schwimmbad 8 
95326 Kulmbach
Tel. 09221 / 95620
Fax 09221 / 956222
e-mail: 

[email protected]

Anbauanleitung: 

Schneepfluganbausatz Citroen Jumper ab Bj.2014

AL:

2145-00

Best.Nr.:

5-285

5- 99100908

Summary of Contents for 5-285

Page 1: ...ie Aufnahme mit einer Kunststoffabdeckung abgedeckt werden Before you start fitting please read and understand this instruction manual and the owners manual of the snowplow Attention The mounting kit must be covered when driving on public roads Am Schwimmbad 8 95326 Kulmbach Tel 09221 95620 Fax 09221 956222 e mail verkauf taubenreuther de Anbauanleitung Schneepfluganbausatz Citroen Jumper ab Bj 20...

Page 2: ...ußen D 1 x Schneepflugaufnahme E 1 x Abstützblech F 2 x Gewindeeinlage G 1x Anbauanleitung 1x Gutachten Aufkleber 18 x Schraube M 10 x40 18 x U Scheibe M 10 18 x Federring 2 x Linsenflanschkopfschrauben M8 x40 4 x U Scheibe M8 x30 x1 5 2 x Federring M8 2 x Mutter M8 Schrauben Anzugsmomente siehe letzte Seite Torque information see last page ...

Page 3: ...1 2 ...

Page 4: ...inside of the bracket Do the same on the left side Demontieren Sie das Stützblech Demount the support plate 4 Schneiden Sie das Stützblech an den Markierungen durch und sorgen Sie für fachgerechten Rostschutz an den Schnittkanten der beiden Außenteile Cut the support plate at the markings and do rust protection at the two outer parts ...

Page 5: ...5 ...

Page 6: ...7 Wiederholen Sie den Vorgang auf der rechten Seite mit C u D Same procedure on the right side with C and D B A M10 x 40 8 E ...

Page 7: ...9 M10 x 40 E M10 x 40 10 F M10 x 40 ...

Page 8: ...11 G 12 Ziehen Sie jetzt alle Schrauben fest an Tighten all screws now M10 x 40 ...

Page 9: ...13 Linsenkopfschraube M8 x40 Raised head screw M8 x40 14 Montieren Sie links u rechts die zugeschnittenen Stützbleche Fit the cutted support plates left and right ...

Page 10: ...15 Fertig finish ...

Reviews: