4 – Mixer configuration and settings
Setting the sampling frequency
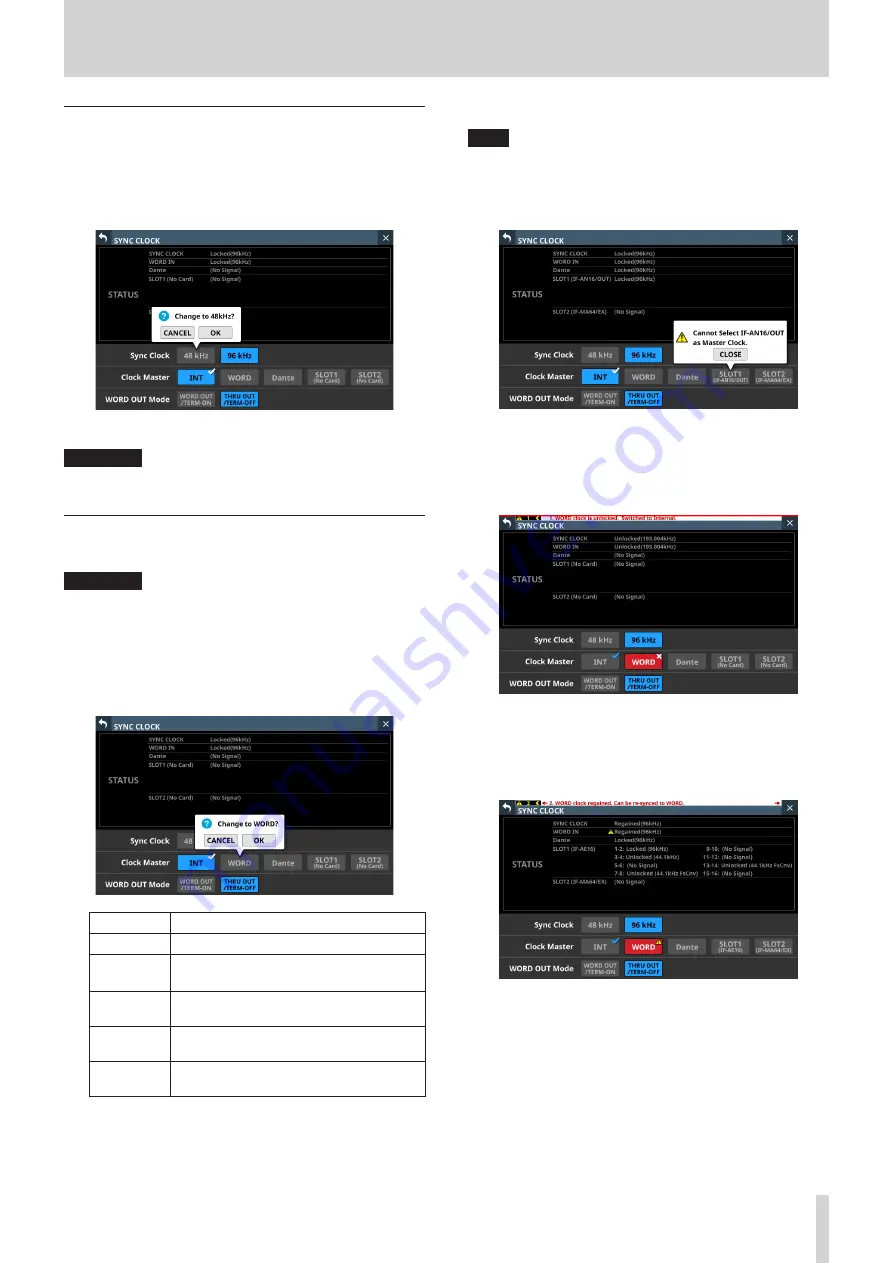
1. Tap Menu Screen > System Setup > Sync Clock to open the
SYNC CLOCK Screen.
2. Tap the button for the desired sampling frequency to set it.
A confirmation message will appear.
3. Tap the OK button to switch the sampling frequency.
ATTENTION
Switching the sampling frequency will mute the sound for a
few seconds. Be aware of this timing when switching.
Setting the master clock
The unit's master clock can be set.
ATTENTION
When connecting multiple digital audio devices, set up the
system so that it uses only one master clock.
1. Tap Menu Screen > System Setup > Sync Clock to open the
SYNC CLOCK Screen.
2. Tap the button for the desired master clock to set it.
A confirmation message will appear.
Button
Use
INT
The unit's internal clock is used.
WORD IN
Synchronize with the word clock signal
input through the WORD IN connector.
Dante
Synchronize with the clock of a connected
Dante system.
SLOT1
Synchronize with the digital signal clock
received through SLOT 1.
SLOT2
Synchronize with the digital signal clock
received through SLOT 2.
3. Tap the OK button to switch the master clock.
NOTE
i
If the SLOT 1 or SLOT 2 button is tapped when an IF-AE16 or IF-
AN16/OUT is installed in SLOT 1 or SLOT 2, or if no expansion
card has been installed in that slot, the following message will
appear.
i
If the selected external clock is unlocked, the unit will operate
using the internal clock. In this case the
4
will be shown on
the INT button as the clock in use, while
✖
is shown on the
selected button for the unlocked source. The selected button
for the unlocked source will be highlighted red.
i
When synchronization with the external master clock
becomes possible again, “WORD clock regained. Can be
re-synced to WORD.” will appear as a message at the top of
all touchscreens. Tap this message to open the SYNC CLOCK
Screen on the right touchscreen.
TASCAM Sonicview 16/Sonicview 24
29


