background image

设置主画面上的各种参数
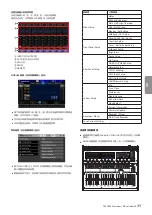
点击主画面上的

A

C

D

区,以显示选择框。

选定已点击区,从而使用 LCD 旋钮 (

2

) 启用设置。

A

 INPUT/FX/OUTPUT 区

B

 GATE/EQ/GEQ/COMP 区

C

 SEND 区

D

 PAN 区

E

 NAME 区

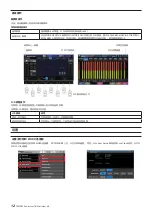
MODULE 画面(在所有触摸屏上显示)


o

按下本设备顶部的 SEL 键 (

5

y

) 或点击主画面顶部的示图或选

择框,以打开其中一个画面。


o

可以显示和操作所选模块的调音台参数并显示各种仪表。


o

点击参数进行选择,并使用 LCD 旋钮调整参数。

菜单画面(在右侧触摸屏上显示)


o

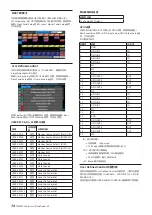
按下 MENU 键 (

q

),以打开右侧触摸屏上的菜单画面。可在此画

面上调整各种系统设置。


o

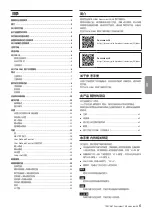
菜单结构如下所示。有关每个菜单项的详细信息,请参见参考手册。

菜单项

子菜单项

Mixer Setup

Meter
MIX Send Overview
Main L/R Assign Overview
DCA / Mute Group
Monitor / Solo Setup
Talkback / OSC Setup
Mixer Config / Bus Config

Front Panel Setup

User Key Setup
Layer / Master Fader Setup
Talkback Setup
Brightness

Rear Panel Setup

Dante Setup
Slot Setup
WORD OUT Mode Setup
Network Setup
FOOT SW Setup
GPIO Input Setup
GPIO Output Setup
LAMP Dimmer Setup

System Setup

Info
Sync Clock
Preferences
Media Manage
All System Data
Clock Adjust
Version Information
Firmware Update

Recorder / Player

Recorder / Player
Multi Track Recorder

Save Current Settings

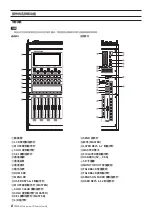
通道模块和触摸屏


o

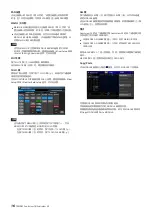
通道模块的主画面 (Fader/SEL/SOLO/MUTE) 显示在其上方的触

摸屏上。


o

MODULE 画面显示在被操作的 SEL 键 (

5

) 上方的触摸屏上。

TASCAM  Sonicview 16/Sonicview 24  

11

中文

Summary of Contents for Sonicview 16

Page 1: ...Please see the Reference Manual for information about all the unit s functions You can download the Reference Manual from the TASCAM website Sonicview 16 https tascam jp int product sonicview_16 docs...

Page 2: ...r the purpose of example and does not indicate any guarantees against infringements of third party intellectual property rights and other rights related to them TEAC Corporation will bear no responsib...

Page 3: ...1 2 3 4 5 6 7 8 9 10 11 12 13 14 i POWER STANDBY ON ON i i i TEAC i 1 i i i i i i i i i i TASCAM Sonicview 16 Sonicview 24 3...

Page 4: ...2000m Sonicview 16 Sonicview 24 Pb Hg Cd Cr6 PBB PBDE 1 CHASSIS 2 FRONT PANEL 3 4 5 PCB Assy 6 7 8 LABEL 9 GB T26572 GB T26572 4 TASCAM Sonicview 16 Sonicview 24...

Page 5: ...efined Control 14 15 17 FX 18 Snapshot 19 19 20 20 20 21 21 21 21 22 22 TASCAM Sonicview 16 24 TASCAM Sonicview 16 https tascam jp int product sonicview_16 docs Sonicview 24 https tascam jp int produc...

Page 6: ...40 C o o o o o AC o AC100V 240V 50 60Hz o SD SD 10 SDHC SDXC SD TASCAM SD TASCAM SD SD o o o o o o o SD SD SD SD SD TASCAM TASCAM TEAC https teac global com TASCAM URL 6 TASCAM Sonicview 16 Sonicview...

Page 7: ...SOLO SEL i MUTE 18 USER KEYS 7 LAYER KEYS 2 6 3mm 3 5mm 100mm i i i MASTER o 40 2 o 22 AUX GROUP 1 o 4 4 4 o 16 24 o 2 RCA o 16 o o Dante I O o 2 o 32 in 32 out USB o 96 kHz 54 bit TASCAM Sonicview 16...

Page 8: ...ENU wUSER KEYS A F eMUTE MASTER rSOLO CLEAR tSOLO MASTER ySEL MASTER uL R iSEND o MASTER pLAYER KEYS 1 7 aMASTER sFIX LAYER dUSB 5V 0 5A fSD gMONITOR OUT hTALKBACK jTALKBACK kSENDS ON FADER lUSER KEYS...

Page 9: ...MP vMIC LINE bLINE IN BAL TRS nINSERT TRS mTALKBACK Dante PRIMARY Dante SECONDARY SLOT 1 SLOT 2 WORD THRU OUT WORD IN FOOTSWITCH USB to PC ETHERNET GPIO MONITOR OUT L R ST IN 1 ST IN 2 POWER QAC IN TA...

Page 10: ...LINE v LINE IN BAL b ST IN 1 L R ST IN 2 L R 3 MONITOR OUT L R 4 USB 5 FOOTSWITCH GPIO 1 POWER 2 1 2 MENU q Save Current Settings 3 SAVE 4 POWER V SD USB LCD LCD LCD LCD o o HOME 0 o o LCD 2 10 TASCAM...

Page 11: ...ey Setup Layer Master Fader Setup Talkback Setup Brightness Rear Panel Setup Dante Setup Slot Setup WORD OUT Mode Setup Network Setup FOOT SW Setup GPIO Input Setup GPIO Output Setup LAMP Dimmer Setup...

Page 12: ...48V 48V MONITOR SETUP MONITOR SOLO DIM TALKBACK OSCILLATOR TALKBACK LCD LCD LCD LCD LCD WORD WORD MENU q System Setup Sync Clock SYNC CLOCK 12 TASCAM Sonicview 16 Sonicview 24...

Page 13: ...Front Panel Setup Layer Master Fader Setup LAYER KEYS 1 7 Sonicview 16 LAYER KEYS 1 CH 1 16 LAYER KEYS 2 CH 17 32 LAYER KEYS 3 CH 33 40 ST IN FX RTN LAYER KEYS 4 MIX 1 16 LAYER KEYS 5 MIX 17 22 MAIN...

Page 14: ...6 Sends On Fader Mix2 USER KEYS 7 Sends On Fader Mix3 USER KEYS 8 Sends On Fader Mix4 USER KEYS 9 Sends On Fader Mix5 USER KEYS 10 Sends On Fader Mix6 USER KEYS 11 Sends On Fader Mix7 USER KEYS 12 Sen...

Page 15: ...NALOG ANALOG D TRIM o INPUT 11 A MODULE INPUT PAD GATE EQ COMP GATE EQ COMP 11 B MODULE GATE MODULE EQ MODULE COMP 1 LCD 2 GATE EQ COMP MODULE LIBRARY LIBRARY SEND o SEND 11 C LCD 2 MIX1 22 FX1 4 SEND...

Page 16: ...NITOR SETUP SOLO Mixer Setup Monitor Solo Setup MENU q MONITOR SETUP MONITOR SOLO MENU q SOLO 4 MENU q SOLO CLEAR r SEL SEL 5 SEL y MODULE MODULE 1 LCD 2 Sonicview 16 16 Sonicview 24 24 SEND o SENDS O...

Page 17: ...LE SEND PAN SEND LEVEL ON OFF PRE POST PAN BAL MODE IMAGE PRE POST SETTINGS o SEND 11 C i SEND i i i o ALL SEND SEND 11 C MIX 1 22 FX 1 4 SEND 4 PAN PAN 11 D LCD 2 PAN MUTE MUTE 3 MUTE SOLO SOLO 4 MON...

Page 18: ...ODULE MODULE MODULE MODULE MODULE Copy MODULE Paste MODULE MIX 1 22 11 A MODULE OUTPUT MAIN L R MASTER SEL y MAIN L R MODULE OUTPUT MODULE OUTPUT FX o FX RTN 1 4 FX 11 A LCD 2 o FX A FX RTN MODULE FX...

Page 19: ...RE 2 snapshot Snapshot RECALL STORE 3 snapshots Snapshot RECALL SAFE SNAPSHOT RECALL SAFE 4 Snapshot snapshot Snapshot IMPORT EXPORT SNAPSHOT IMPORT EXPORT TASCAM o o o o o o MASTER o PHONES MONITOR O...

Page 20: ...Bu 0 775 Vrms 0 dBV 1 Vrms MIC LINE Sonicview 16 1 16 Sonicview 24 1 24 XLR 3 31 1 GND 2 HOT 3 COLD PAD 12 dBu TRIM 62 dBu TRIM PAD 32 dBu TRIM 42 dBu TRIM 5 0 k MIC LINE 48V LINE IN BAL Sonicview 16...

Page 21: ...CONDARY etherCON Cat5e Dante 1000BASE T IEEE 802 3ab 5e STP etherCON Neutrik AG USB 48 kHz 96 kHz 32 32 32 FOOTSWITCH 6 3mm 1 4 TS TIP HOT SLEEVE GND ETHERNET RJ 45 100BASE TX 1000BASE T GPIO 25 D sub...

Page 22: ...ew 24 85W Sonicview 16 472 0 x 228 1 x 554 4 mm Sonicview 24 690 8 x 228 1 x 554 4 mm Sonicview 16 13 kg Sonicview 24 18 kg 0 40 C Sonicview 16 228 1mm 554 4mm 472 0mm Sonicview 24 228 1mm 554 4mm 690...

Page 23: ...p over 13 Unplug this apparatus during lightning storms or when unused for long periods of time 14 Refer all servicing to qualified service personnel Servicing is required when the apparatus has been...

Page 24: ...RCHASED THE UNIT FOR A SERVICE REFERRAL DO NOT USE THE PRODUCT UNTIL IT HAS BEEN REPAIRED i USE OF CONTROLS OR ADJUSTMENTS OR PERFORMANCE OF PROCEDURES OTHER THAN THOSE SPECIFIED HEREIN MAY RESULT IN...

Page 25: ...that you will be able to use it correctly and enjoy working with it for many years After you have finished reading this manual please keep it in a safe place for future reference You can also download...

Page 26: ...damage the surface or cause discoloration About SD cards This unit uses SD cards for recording and playback This unit can use SD cards that are Class 10 or higher and compatible with SDHC or SDXC stan...

Page 27: ...s 6 3mm 3 5mm 100mm motorized faders Channel screens i Module name icon i Module meters i Gain reduction meters The MASTER section can have modules assigned to it freely by the user Main specification...

Page 28: ...annel color bars 8Channel faders 9Output meters 0HOME key qMENU key wUSER KEYS A F and indicators eMUTE key and indicator MASTER rSOLO CLEAR key and indicator tSOLO key and indicator MASTER ySEL key a...

Page 29: ...S phone nINSERT jacks TRS phone mTALKBACK input jack Analog output jacks Dante PRIMARY connector Dante SECONDARY connector Expansion card slots SLOT 1 SLOT 2 WORD THRU OUT connector WORD IN connector...

Page 30: ...p the Save Current Settings item 3 Tap the SAVE button to save the current settings to the internal memory 4 Use the POWER switch to turn the unit off VCAUTION Do not turn the power off or disconnect...

Page 31: ...adjusted on this screen o The menu structure is as follows See the Reference Manual for detailed information about each menu item Menu item Sub menu item Mixer Setup Meter MIX Send Overview Main L R...

Page 32: ...h to Home Screen Open pull down menu LCD knobs and indicators Screen name LCD knob operations The LCD knobs can be used to control the parameters shown and selected above them on the touchscreen When...

Page 33: ...reen to open the MODULE OUTPUT screen Direct Out Routing To check and change Direct Out routing settings tap a channel 1 40 NAME area on the Home Screen E area in Setting various parameters on the Hom...

Page 34: ...Sends On Fader Mix4 USER KEYS 9 Orange Sends On Fader Mix5 USER KEYS 10 Orange Sends On Fader Mix6 USER KEYS 11 Orange Sends On Fader Mix7 Key Lit color Assigned function USER KEYS 12 Orange Sends On...

Page 35: ...ODULE INPUT screen The input source input level PAD function phantom power polarity and other items can be set on this screen GATE EQ COMP Tap the GATE EQ COMP area B area in Setting various parameter...

Page 36: ...oring of signals mixed from multiple channel modules SOLO settings can be changed on the MONITOR SETUP Screen Open this using Menu Screen Mixer Setup menu Monitor Solo Setup item NOTE The MONITOR SETU...

Page 37: ...pen the selected bus group in the SEND area i Tap the button at the top left of the selection window to close it i When the button is off tapping the bus selection button will automatically close this...

Page 38: ...R output connector routing settings press the MASTER section SEL key y to open the MAIN L R master MODULE Screen Then tap the OUTPUT screen selection button at the top of the screen to open the MODUL...

Page 39: ...e SNAPSHOT IMPORT EXPORT screen Troubleshooting If you are having trouble with the operation of this unit please try the following before seeking repair If these measures do not solve the problem plea...

Page 40: ...rs 6 3mm 1 4 TRS phone jacks Tip HOT Ring COLD Sleeve GND Input levels PAD Off Maximum input level 12 dBu TRIM at minimum Minimum input level 62 dBu TRIM at maximum PAD On Maximum input level 32 dBu T...

Page 41: ...ar panel Connector USB Type B Protocol USB 2 0 HIGH SPEED 480 Mbps LAMP jack Connector XLR 4 pin female pin 4 12V pin 3 GND Power supply voltage 0 V 12 V Maximum output 5 W WORD IN connector Connector...

Page 42: ...Sonicview 24 18 kg Operating temperature range 0 40 C Dimensional drawings Sonicview 16 228 1mm 554 4mm 472 0mm Sonicview 24 228 1mm 554 4mm 690 8mm o Illustrations in this manual might differ in part...

Page 43: ...oduct to service However if the necessary repairs are covered by the warranty we will pay return surface shipping charges to any destination within the United States LIMITATION OF IMPLIED WARRANTIES A...

Page 44: ...Ochiai Tama shi Tokyo 206 8530 Japan https tascam cn cn 86 755 88311561 2 A 817 518040 0823 MA 3720A Model Sonicview 16 Sonicview 24 Serial No Date of purchase Owner s name Address Dealer s name Deale...

Reviews: