


TASCAM SD-20M
11
2 – Names and functions of parts
CAUTION
•
Before making connections, turn this unit and all equipment
to be connected off (or put them into standby).
•
Confirm that phantom power is OFF before connecting
a line level device to a
MIC/LINE INPUT (BALANCED)
1/2
jack. If you connect a line level device while phantom
power is being supplied, that device and this unit could be
damaged.
•
Do not connect or disconnect mics with the
MIC/LINE
INPUT (BALANCED) 1/2
jacks when the phantom power
is set to ON. Doing so could cause a loud noise and might
damage the equipment.
•
Turn phantom power ON only when using a condenser
microphone that requires phantom power. Turning
phantom power on when a dynamic mic or other mic that
does not require it is connected could damage this unit and
connected equipment.
•
When using condenser mics that require phantom power
and dynamic mics together, be sure to use balanced
dynamic mics. Unbalanced dynamic mics cannot be used
when phantom power is enabled.
•
Supplying phantom power to some ribbon mics will break
them. If you are unsure, do not supply phantom power to a
ribbon mic.
•
Some condenser microphones will not operate when
phantom power is set to 48V.
r
INPUT 1 and 2 knobs
Use these to adjust input levels
t
REMOTE connector (2.5mm TRS jack)
Connect a TASCAM RC-3F footswitch or TASCAM RC-10
wired remote control (both sold separately) here. This
enables remote starting and stopping of playback and other
functions.
y
DUAL indicator
This lights when dual recording is on. (See “Enabling dual
u
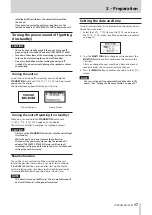
BROWSE button
Press this to open the
BROWSE
screen. (See “Opening the
BROWSE screen” on page 27.)
When the
BROWSE
screen is open, press this button to
return to the Home Screen.
Press the MENU button and this button at the same time
to open the
KEY LOCK
screen. (See “Setting the key lock
i
m
button
Press this button during playback or when stopped to move
to the previous mark.
Press and hold this button during playback to search
backward.
On the setting screens, use this button to move the cursor
left.
On the
BROWSE
screen, press this button to move up a level.
o
,
button
Press this button during playback or when stopped to move
to the next mark.
Press and hold this button during playback to search
forward.
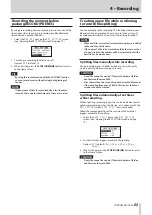
Press this button during recording to create a new
numbered file and continue recording. (See “Splitting files
manually while recording” on page 23.)
On the setting screens, use this button to move the cursor
right.
On the
BROWSE
screen, press this button to move down
a level. If a file is selected, the file is loaded and the unit
returns to the Home Screen.
p
STOP/HOME [
8
] button
Press this button during playback to cause the playback to
pause at the current position.
Press this button when paused to return to the beginning of
the file being played.
Press this button when recording or in recording standby to
stop recording.
When any other screen is open, press this button to return to
the Home Screen.
a
PLAY [
7
] button/indicator
When the Home Screen is open and the unit is stopped,
press this button to start playback.
The PLAY indicator will light during playback.
During playback, press this button to jump back and
continue playback.
Press when in recording standby to start recording.
The RECORD indicator will light during recording.
When the
BROWSE
screen is open and a file or folder is
selected, press this button to return to the Home Screen and
play that folder or file from the beginning.
s
RECORD [
0
] button/indicator
When stopped, press this button to put the unit into
recording standby. The RECORD indicator will start to blink.
When in standby, press this button to start recording. The
RECORD indicator lights when recording.
Press when recording to pause recording.
d
PHONES jack and knob
Use this standard stereo jack to connect stereo headphones.
Use an adapter to connect headphones with a mini plug.
Use the PHONES knob to adjust the headphone output
level.
CAUTION
Before connecting headphones, use the
PHONES
knob
to minimize the volume. Failure to do so could result in a
sudden loud noise that could harm hearing, for example.
Behind front cover
f
Battery compartment
Install batteries (4 AA) in this compartment to power the
unit. (See “Using AA batteries” on page 16.)
g
SD card slot
Insert an SD card here.