background image

3 – Before recording–Assignment on the 788

 TASCAM 788 Digital PortaStudio 

37

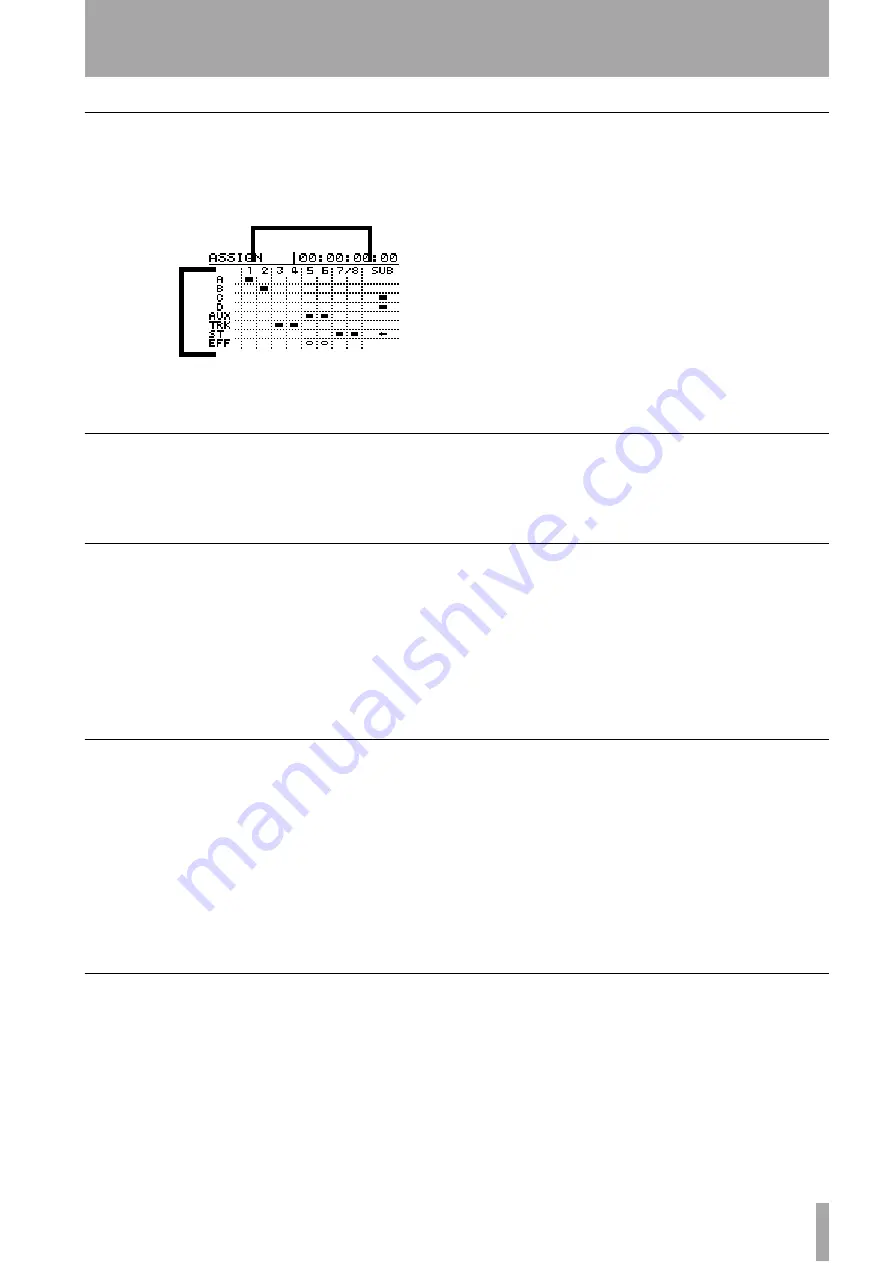
Viewing assignments

1

Press the 

SHIFT

 + 

QUICK SETUP

 (

ASSIGN 

MAP

) key to make the assign map appear on 

the display.

The eight tracks and the sub-mixer are shown 
along the top of the screen.

The inputs (sources) are shown down the left 
side of the screen.

When a source is assigned to a channel, a rect-
angle appears where the row and channel meet 
(an arrow shows when the sub-mixer is 
assigned to the stereo bus).

2

While you make and remove assignments, the 
screen changes to show this.

3

After making and viewing the assignments, 
you can press the 

HOME/ESC

 key to return to 

the “home” display.

Channel-to-track assignments

With a system consisting of a separate mixer and 
recorder, you sometimes need to set up the way in 
which the mixer channels will feed the recorder.

With the 788, this is not necessary. Mixer channel 1 
is automatically routed to track 1, channel 2 to track 
2 and so on.

Track-to-channel assignments

The 

TRACK

 key is used to assign recorded tracks to 

the mixer channels so that they can be replayed 
through the mixer, with all the facilities provided in 
each mixer channel (EQ, effect and aux sends, fader 
and panning, etc.).

There is only one 

TRACK

 key, which is used to 

assign the recorded tracks to the channels. 

When you press and hold the 

TRACK

 key, and press 

the 

SELECT

 key of a mixer channel, the track whose 

number corresponds to the selected channel is 
assigned to that channel. Track 1 is always assigned 
to channel 1, track 2 to channel 2, etc.

If you press the 

7/8 SELECT

 key, the appropriate two 

tracks will be assigned to the pair.

Assigning inputs to the sub-mixer

The sub-mixer (

SUB MIX 

key) is both an assignment 

source and a destination. 

As a source, it can only be assigned to the 

STEREO


mix.

As a destination, it can be used by the four inputs and 
the 

AUX INPUT

 pair.

This sub-mixer contains (software) faders for each of 
its inputs as well as (software) pan controls.

To assign the inputs to the sub-mixer:

1

Press and hold one of the four 

INPUT SOURCE


keys or the 

AUX INPUTS

 key.

The indicator will flash.

2

Press the 

SUB MIX

 key. The indicator will 

flash, along with the indicators of all other 
inputs that have been assigned to the sub-
mixer.

Assigning the sub-mixer to stereo

To assign the sub-mixer outputs to the 

STEREO 

bus:

1

Press and hold the 

SUB MIX

 key. The indicator 

flashes, along with the indicators of any inputs 
currently assigned to it,

2

Press the 

STEREO

 key to assign the sub-mixer 

outputs to the stereo output bus.

For details of how to use the sub-mixer, see “Sub-
mixer” on page 48.

Remove assignments to and from the sub-mixer in 
the same way as you do for other assignments 
(“Removing assignments” on page 36)

Channels (destinations)

Inputs 
(sources)

Summary of Contents for PORTASTUDIO 788

Page 1: ...ing the appliance The lightning flash with arrowhead symbol within an equilateral triangle is intended to alert the user to the presence of uninsulated dangerous voltage within the product s enclosure that may be of sufficient magnitude to constitute a risk of electric shock to persons This appliance has a serial number located on the rear panel Please record the model number and serial number and...

Page 2: ...h the letter L or coloured RED When replacing the fuse only a correctly rated approved type should be used and be sure to re fit the fuse cover IF IN DOUBT CONSULT A COMPETENT ELECTRICIAN TO THE USER This equipment has been tested and found to comply with the limits for a Class B digital device pursuant to Part 15 of the FCC Rules These limits are designed to provide reasonable protection against ...

Page 3: ... supporting structure grounding of the lead in wire to an antenna discharge unit size of grounding conductors location of antenna discharge unit con nection to grounding electrodes and requirements for the grounding elec trode Note to CATV system installer This reminder is provided to call the CATV system installer s attention to Section 820 40 of the NEC which provides guidelines for proper groun...

Page 4: ...ring and backup CD R page 72 21 9 Effects page 81 21 10 Routing and scene libraries page 91 21 11 Synchronization page 94 21 12 MMC and MIDI functions page 101 21 13 Specifications etc page 119 21 Connecting other equipment to your 788 22 Additional connection notes 22 About the menus 24 Selecting multiple entries 24 The MENU key 24 Other control screens 25 Selecting parameters 25 Setting values 2...

Page 5: ...ST REC 56 IN OUT 56 LAST TAKE LOAD 56 Checking the punch points 56 Rehearsing the punch 57 Recording the punch 57 Checking the take 57 After finishing the punch 58 If you change your mind 58 Varispeed operations pitch and SSA 58 Pitch 59 To use the set pitch 59 SSA Slow Speed Audition 59 To use the SSA 59 6 Location operations Direct location 60 Direct location i 60 Direct location ii 61 Location ...

Page 6: ...rocessor 90 10 Routing and scene libraries Routing libraries 91 Saving the current routing settings to the library91 Loading routing settings from the library 92 Scene libraries 92 Saving a scene to the library 92 Loading scenes from the library 93 Other matters concerning scenes 93 11 Synchronization Master or slave 94 How to measure time 94 Synchronization methods 95 MIDI Time Code MTC 95 MIDI c...

Page 7: ...i effect processor settings 1 109 NRPN values for clean multi effect processors 2 113 NRPN values for multi effect processor 3 118 13 Specifications etc Dimensional drawing 119 Specifications 119 Physical and electrical specifications 119 Digital recorder specifications 119 Mass storage 120 Analog audio I O 120 Audio specifications 120 Error messages etc 120 MIDI Implementation Chart 124 ...

Page 8: ...struments have been recorded allowing the singer to concentrate on getting the best vocal performance While tracking or overdubbing effects can be added to enhance the recorded sound Punching Most recorders have silent punch in and punch out facilities i e if you make a mistake in only a short passage you don t have to re record the whole piece you can re record only the part where the mistake occ...

Page 9: ...acrificing a track of audio special synchroniz ing timecode can be recorded on the sacrificed track allowing sequenced MIDI instruments to play along with the audio tracks If there are more instruments than tracks it is pos sible to do a mini mixdown from some existing tracks to a spare track or tracks This is known as track bouncing or ping pong In the example above the four recorded tracks incor...

Page 10: ...o songs On a disk based system however before you start recording a piece you must tell the recorder that you are recording a new song To the 788 a song is all the audio data you record together with the playlist which allows you to select parts of the song for playback until you start work ing on another song You can copy songs to other songs or to another disk erase them protect them against fur...

Page 11: ... though that when you record using 24 bits rather than 16 more space is used on the hard disk 50 more as you might well expect In practice given the size of the hard disk in the 788 this should make little or no difference to the way you work with your recordings Real and virtual tracks on the 788 When you use the 788 you can record spare tracks for instance different versions of the lead vocals a...

Page 12: ...is is a slightly tricky passage to play you might only get it right once or twice You d have to go through the process of punching in and out at the places where you made the mistake until you got it right three times With the 788 this becomes easier You can copy and paste the part which was recorded properly and replace the bad versions This makes life a lot sim pler and quicker as you only have ...

Page 13: ... else we encourage you to learn to listen critically to your recordings this will enable you to make the most from your equipment and add to your ultimate enjoyment Assignment When recording signals on a multitrack system the outputs of the signal sources microphones instru ments effect returns or previously recorded multi track tape tracks must be plugged into the appropriate channels of the mixi...

Page 14: ...gned to channels becoming the signal source Again track 1 is always assigned to channel 1 track 2 is always assigned to channel 2 etc In this case however there are 250 virtual tracks per song see Real and virtual tracks on the 788 on page 11 to choose from and the virtual track that is currently assigned to a real track will be sent through the mixer channel to the STEREO outputs Track bouncing A...

Page 15: ...IDI equipment as the MIDI instruments do not actually need to be recorded until the final mixdown stage Instead one way of working is to record the basic MIDI tracks say a bass and drums sequence on a sequencer and play it back as a guide click or backing track while recording guitars vocals etc Alternatively the acoustic tracks may be recorded first and MIDI tracks added later as atmosphere In ei...

Page 16: ...chronization and song positioning MIDI external control MMC etc As well as synchronization the transport controls of a sequencer can be used to control transport etc functions on the 788 Or if you want to work the other way MIDI com mands sent from the 788 can be used to control the sequencer These commands are known as MIDI Machine Con trol commands MMC Any machine capable of transmitting or resp...

Page 17: ... use with the 788 must be a SCSI drive Contact your TASCAM dealer or consult the TASCAM Web site for details of which drives are known to work well with the 788 NOTE You should never plug or unplug SCSI devices from the chain with the power to any of them switched on If you do there is a real risk that you will damage the devices beyond repair SCSI IDs SCSI devices are connected together in a dais...

Page 18: ...ed TASCAM service agents Further reading This section does not pretend to be a comprehensive listing or explanation of all these issues If you have the time and interest reading about these subjects is a very good way to add to your practical experience with the 788 If you have Internet access the Web is an excellent source of information The following books are also useful reference sources if yo...

Page 19: ...equipment with the monitoring levels turned up This can cause damage to speakers and ears Always turn down levels before making or breaking such connections always shut down the 788 before turning it off see the following section never move the 788 while it is powered on Take special care never to move it while recording or playback is taking place in order to avoid any pos sible damage to the dis...

Page 20: ... the method described in Shutting down the 788 on page 19 Do not simply press the power switch to turn off the 788 there is a risk of possible loss of your recording if you do this About the demonstration song We suggest that you use this song Liquor Store to experiment with some of the features of the 788 However before you start editing and experimenting with the song you may want to make a copy...

Page 21: ...you with a wide range of editing tools to help you in your work Read this section to find out how to select copy move and paste sections of recorded material as well as other editing features 8 Mastering and backup CD R page 72 You can use a CD R or CD RW drive connected to the 788 to create master stereo recordings on disc as well as backing up and restoring song data for future use Read this sec...

Page 22: ...he recording device appropriately As yet another alternative you can make a SCSI connection see SCSI issues on page 17 to a suitable CD R or CD RW drive Even though no audio connection is made the drive will be able to accept audio data through the SCSI cable and to transfer it back to the 788 for replay 5 If you are using an external effects unit con nect the AUX OUTPUTs of the 788 to the inputs ...

Page 23: ...ver you should make sure that MTC MIDI Timecode can be sent from the 788 to the sequencer and MIDI Machine Control commands can be received by the 788 from the sequencer even if this means routing the MIDI sig nals through some MIDI THRU ports If you are connecting an electric guitar or bass guitar directly into the 788 use INPUT D and set the switch to GUITAR this allows the matching of the input...

Page 24: ...e when copying songs In this case the selected entries in the list are shown by a check mark beside the list entry To set a check mark by a list entry press the INSERT MOVE key To clear a check mark from a list entry press the DELETE SILENCE key The MENU key The MENU key allows you to make settings with the system menus These menus provide access to system level settings that you will probably not...

Page 25: ...lected in this screen The virtual tracks are then selected with the dial Setting values When a value is to be changed use the JOG DATA dial to change the value The ENTER key is often used as a yes key to answer questions like Are you sure which may sometimes be shown on screen for example the screen below If you change your mind about carrying out an opera tion use the EXIT key The EXIT key can al...

Page 26: ...ions Absolute time MIDI Timecode Bars and beats and the current tempo when work ing with a tempo map Entering and editing titles The 788 allows you to use titles up to 12 characters in length that you choose to identify songs virtual tracks location marks library settings etc the titles of location marks can be up to 10 characters long It is probably much easier for you to remember a vir tual trac...

Page 27: ...as COUNT IN VERSE INTRO CHORUS are available Con sult the section below for a full list of these words and details of how to edit them to suit the way in which you work Setting and editing preset words The 788 provides a number of useful preset words but you may want to add your own up to a total of 100 preset words and phrases of up to 12 characters in length to include your own names and titles ...

Page 28: ...FT MENU TITLE key to enter a title for the song when the 788 is displaying the title Saving a song Typically there is no need to perform a special oper ation to save songs on the 788 as the 788 automati cally saves the song The function described here is provided as a manual method of saving the song to which you can return Reverting to the previous saved version of a song on page 28 1 Press the M...

Page 29: ...partition If you want to erase a song or songs from another disk or partition you must select it first Selecting a disk on page 32 If you have selected all the songs on a disk or partition for erasure a new song will automatically be created at 16 bit resolution after all the existing songs have been erased Copying songs As well as copying songs so that you can work on another version of them you ...

Page 30: ...d parts of the song permanently you can back up the song to removable SCSI media or to CD R before performing this cleanup operation If you change your mind later on you can restore this backed up version NOTE Remember that you cannot undo this operation Protecting a song When a song is protected recording is not possible the REC READY keys are disabled it cannot be edited using the track editing ...

Page 31: ...til the FORMAT option is highlighted and press ENTER The 788 scans through all the SCSI disks con nected to the 788 and displays a list 4 If you have more than one disk connected to the 788 use the DATA dial to scroll through the list and press ENTER when the disk you want to format is highlighted 5 Set up the parameters for formatting the disk A disk can be split into a number of different partit...

Page 32: ... only applies to removable media MO zip and jaz drives etc Of course you cannot eject a hard disk Since the SCSI standard allows the disk to iden tify itself as ejectable or not to the controlling device in this case the 788 you ll never see a disk in this list that cannot be ejected 1 Press the MENU key 2 Turn the dial until DISK is highlighted and press ENTER 3 Turn the dial until EJECT is highl...

Page 33: ...peak value is always shown on screen until this value is changed Use the cursor keys to highlight the parameter and the dial to change it TIP The KEEP setting is useful if you want a permanent record of the highest value but you cannot keep your eyes on the meters during the whole take or rehearsal Meter release time The meter drop back time can be configured to be from 0ms to 100ms in 10ms steps ...

Page 34: ...her with default EQ and send settings for use when recording or mix ing down etc 1 Press the QUICK SETUP key beside the display screen 2 Use the dial to select RECORDING MIX DOWN or BOUNCE 7 8 the library functions are explained in Routing and scene libraries on page 91 3 Press ENTER The current selection is shown on screen using the assign map see below Viewing assignments on page 37 4 Return to ...

Page 35: ...rom tracks 1 through 6 and passed to the STEREO bus The STEREO signals in their turn are passed to channels 7 and 8 which will record on tracks 7 and 8 The individual levels etc of the recorded tracks are adjusted using the channel controls and the overall level of the mixed signal is adjusted using the faders of the destination tracks in this example the 7 8 fader It is also possible to add a pre...

Page 36: ...T key of channels 7 8 the stereo source is linked to both channels of the pair If you are assigning INPUTs to channels 7 and 8 note that INPUTs A and C can only be assigned to channel 7 and INPUTs B and D can only be assigned to channel 8 If you assign a stereo source either AUX INPUT or STEREO to an unlinked mono channel the stereo link will automatically be created If you assign a mono source to...

Page 37: ...racks to the channels When you press and hold the TRACK key and press the SELECT key of a mixer channel the track whose number corresponds to the selected channel is assigned to that channel Track 1 is always assigned to channel 1 track 2 to channel 2 etc If you press the 7 8 SELECT key the appropriate two tracks will be assigned to the pair Assigning inputs to the sub mixer The sub mixer SUB MIX ...

Page 38: ...nections between the 788 and the monitor amplifier Make sure that the volume control of the monitor ing amplifier is turned up and if the amplifier has source selector switches make sure that these are correctly set If the sound source is an electric instrument make sure the volume control of the instrument is turned up If the sound source is a switchable microphone make sure the switch is turned ...

Page 39: ... screen to adjust the track cue levels from 0 minimum to 127 full NOTE The faders shown on screen here have no connection with the hardware physical faders of the 788 5 Adjust the overall level of the track cue mix with the MONITOR LEVEL control to the right of the display Arming tracks and monitoring When a track has been armed for recording i e the REC READY key of the track has been pressed and...

Page 40: ...sub mixer Monitoring in mono It may seem strange to want to do such a thing but there are sometimes occasions when it is a good idea to listen to your work in mono For instance if you expect your work to be heard over small portable radios or tape players etc or you are mixing a piece for TV or video where you are not expecting every listener to have stereo equipment this is a necessary part of th...

Page 41: ...o mix and record a ste reo source e g a stereo synthesizer or the outputs of a stereo effects unit it is often useful to link two channels together so that changes made to one chan nel automatically affect the other You can link the following pairs of channels 1 and 2 3 and 4 and 5 and 6 Note that channels 7 and 8 are always linked as a ste reo pair and you can never unlink them The parameters tha...

Page 42: ...ND and FADER PAN keys 1 Press the EQ SEND or FADER PAN key The screen changes to show the current set tings for that parameter and the selected chan nel or channels 2 Press the SELECT key of the channel whose parameters are to be edited 3 Use the dial and cursor keys to change the values as explained in this section About the screens The example below shows the pan setting for chan nels 1 and 2 In...

Page 43: ...ON you will not hear the effects of the EQ settings TIP It is also possible to use some effect settings which give further control over a channel s equalization Multi effect processor settings on page 87 EQ and linked channels If two channels have been linked and always in the case of channels 7 and 8 there is one set of on screen EQ controls which affects both channels It is not possible to make ...

Page 44: ...duce the level of the signal before it is equalized so that distortion does not occur NOTE Note that the EQ switch does not turn the pad gain on or off Send levels The 788 incorporates an effects EFF loop and an auxiliary loop AUX Both of these are stereo sends See the section on Effects on page 81 for details of where these sends are actually routed and their return paths The levels from each cha...

Page 45: ...own by C In the case of stereo linked channels or channels 7 and 8 one fader is shown on screen here since the channels are linked The word LINK is shown at the bottom right of the screen to show this is a linked pair of channels Internal and physical faders The FADER PAN screen Fader and pan on page 45 also contains a representation of the chan nels faders as shown below in the enlarged view For ...

Page 46: ...ights orange and the SELECT indicators of any soloed channels flash to show that they have been soloed 3 Release the SOLO key The indicators stay lit SOLO or flashing channel SELECT as long as any channels are being soloed When channels are soloed this is a after fader solo That is you can hear the effect of all fader EQ and in line effect settings In addition if you have assigned an effect to the...

Page 47: ...etween STEREO and the four track pairs Trk1 2 Trk3 4 Trk5 6 Trk7 8 When a track pair is selected the signal output from the STEREO OUTPUT connectors analog and coaxial digital will be the signals from the appropriate tracks NOTE When track pairs are selected as the source for the stereo outputs the channel faders and controls have no effect on the volume and neither do the stereo faders Any channe...

Page 48: ...ts you must use the INPUT and SUB MIX keys to make the assignments and press the SUB MIX key again to show this screen if the display changes NOTE Remember that an input cannot be assigned to both a mixer channel and the sub mixer at the same time 4 Use the cursor keys to move the cursor around the fields five pan settings and five level set tings and the dial to change the values The maximum leve...

Page 49: ...accessed through the STOP and PLAY keys the wind keys have a special function see Jog positioning on page 50 Playback To play back recorded material from the current play back position 1 Press the PLAY key The green PLAY indicator lights while play back is taking place 2 Stop playback with the STOP key NOTE It is not possible to start playback in some of the menu screens Exit the menu system befor...

Page 50: ...g stops and the playback position returns to the point where recording last started Jog positioning To position the playback point precisely you can jog the playback position using the dial As you move backwards and forwards through the recording you can hear the recorded sound at slow speed either backward or forward depending on the direction you are turning the dial 1 Position the playback poin...

Page 51: ...r fast forward While this winding is taking place playback is muted Holding down the keys for more than one second or pressing the keys repeatedly changes the wind speed from ten times x10 shown on the home screen to fifty times x50 to one hundred times x100 to one thousand times x1000 While the 788 is winding in one direction pressing the opposite key for example F FWD while rewind ing will immed...

Page 52: ... positioning on page 50 for zooming and moving the current jog position 5 When you have set the point where you want the IN or OUT point to be press and hold down the SHIFT key and press the IN or OUT key to set the respective point The display returns to the home screen Press EXIT to return to the home screen with out setting the points remember that ENTER does not set these points Setting the ti...

Page 53: ...h 3 Press the RECORD key The RECORD indica tor will light and the REC READY indicators of the armed tracks will also light NOTE At least one track must be armed before you start to record It is not possible to enter a record ready mode and press the REC READY keys of tracks to start recording Hands free recording You can also use a suitable footswitch for example the TASCAM RC 30P connected to the...

Page 54: ...e the channel SELECT keys or the Ó and Á keys to select the disk track to which the virtual track will be assigned as shown by the tabs at the top of the screen Pressing the 7 8 key repeatedly cycles between selecting tracks 7 and 8 3 Use the dial to choose which virtual track will be assigned to the disk track and become active 4 Press ENTER or PLAY to make the assign ment or EXIT to exit the tra...

Page 55: ...l be using for recording 2 You will almost certainly need to hear the first tracks you recorded so that you can synchro nize the new tracks with them Adjust the TRACK CUE settings Monitoring the recorded sounds TRACK CUE on page 39 and make sure the MONITOR CUE indicator is lit Auto punch operations Punch operations allow you to start and stop record ing at predefined points and these can be autom...

Page 56: ... Recording Position LRP on page 50 The punch out point is set to be the point at which recording stopped either when recording dropped into play mode or when the transport was stopped Note that this last recording does not have to be a punch recording IN OUT This uses the IN and OUT points see Setting the IN and OUT points on page 52 as the punch in and the punch out points The first of these poin...

Page 57: ... rehearsed punch mate rial you record the punch in the following way 1 Press the RHSL key so that the indicator goes out 2 Press and hold the RECORD key and press the PLAY key The display shows TAKE Playback starts at the pre roll point Both the input source and previously recorded material can be heard in the cue mix When playback reaches the punch in point the monitored signal on the armed track...

Page 58: ...ever if you have recorded anything performed an undo or redo operation or any track editing opera tions whether punch recording or not since the last punch session the list of multi takes is no longer available The list is available of a song has been saved closed and reopened however if none of the above operations have been carried out NOTE Even if you undo the recording that has overwritten the...

Page 59: ... indicator on and to change the pitch SSA Slow Speed Audition 1 Press and hold the PITCH SSA key for about a second see Key sense time on page 33 and release it The indicator lights and the display changes 2 If the SLOW SPEED section at the right of the screen is not active there is no box around it press the Á key to move the cursor there 3 Use the channel SELECT keys to select the tracks which w...

Page 60: ...wo modes ABS and MTC the way to locate directly is as follows 1 Make sure the transport is stopped You can not perform this direct location when playing back or recording 2 If the home display is not shown press the HOME ESC key 3 There is an underline cursor at the top of the screen If the top left of the screen does not show ABS or MTC that is it shows BAR press the Ó key until the cursor is und...

Page 61: ...nd Á keys to move the cursor to either of the following bars 3 digits or beats 2 digits The tempo value cannot be altered here it is set by the tempo map see Entering and edit ing the tempo map on page 98 5 Use the dial to increase or decrease the number over the cursor in the illustration the cursor is under the bars value If you increase the beats value past the maxi mum number of beats on a bar...

Page 62: ...tles are displayed on the screen The location mark which is shown on screen is referred to as the active mark This active mark can be accessed easily for titling deletion and editing as explained below Giving a title to the active location mark You can give a title to the active location mark while playing back or recording or while the playback is stopped 1 When the active mark s current title is...

Page 63: ...ngle frame accuracy and x 32 at about 10 sub frame accuracy shown below the time display 5 Use the and keys to adjust the vertical scale the way that the volume of the sound is shown The zoom levels here are x 1 x 2 x 4 x 8 x 16 and x 32 Pressing the key increases the vertical scaling of the dis play and pressing the key decreases the scale TIP If you can t see any waveforms when you first enter t...

Page 64: ...s ENTER The playback point jumps to the selected location mark Using the IN OUT and TO marks These are special cases When these marks have been set you jump to them simply be pressing the IN OUT or TO key as appropriate You can use the list as described above but there is no need for this Titling using the list 1 Press the LOCATE key 2 Use the Ó and Á keys to change to either the TITLE or the TIME...

Page 65: ... start of the part of the track which is selected when editing a part of a track rather than a whole track The OUT point marks the end of the part of the track which is selected when editing part of a track The TO point marks the final destination of a copy or a move operation Entering the edit mode 1 Make sure that the 788 is stopped not playing back or recording 2 Press the TRACK EDIT key just b...

Page 66: ...he SHIFT TRIM key combination to enter this function easily COPY INSERT This function takes the section of a track or tracks marked by the IN and OUT points copies it and places it on the chosen track or tracks inserting it as new material starting at the TO point The original source is left unchanged The insert operation adds the selected section as new material to the destination Nothing is over...

Page 67: ... also use the SHIFT INSERT key combination to enter this function easily MOVE INSERT This function takes the section of a track or tracks marked by the IN and OUT points and moves it to the chosen track or tracks inserting it as new mate rial starting at the TO point After the operation the selected section of the source between the IN and OUT points is replaced by silence The insert operation add...

Page 68: ...eration the material which followed the OUT point now moved to follow the IN point Material which was between the IN and OUT points is deleted The result is therefore shorter than the original There is only one value that you can change Src Trk Select an individual track 1 through 8 a pair of tracks 1 2 3 4 5 6 7 8 all of the eight active tracks 1 8 or all tracks including the virtual tracks all P...

Page 69: ...d OUT points do not have any meaning here There is only one value that you can change Src Trk Select an individual track 1 through 8 a pair of tracks 1 2 3 4 5 6 7 8 or all of the eight active tracks 1 8 Press YES to perform the operation or NO to leave this screen If you need to delete the contents of a virtual track that is not currently assigned to a track you must assign it to a track and then...

Page 70: ...with its correction 10 have been overwritten by 11 and 12 but you feel that the original take 9 with its cor rection 10 has more energy so you want to retrieve it 1 Press the UNDO key 2 Use the dial to scroll down to the step to where you want to undo here it s 10 3 Press ENTER Now you have the track back again If you press the UNDO key you ll see that there s a check mark beside 10 this shows tha...

Page 71: ...d vocal RECORDING 11 Another attempt at the whole of the lead vocal AUTO PUNCH 10 A try to correct a bad note in the lead vocal RECORDING 9 First try at the lead vocal AUTO PUNCH 8 Repairing the bad guitar bridge RECORDING 7 Recording the guitar solo RECORDING 6 Piano alternative part RECORDING 5 Piano RECORDING 4 Guide vocals RECORDING 3 Bass line COPY PASTE 2 Looping the drum part RECORDING 1 Ba...

Page 72: ...he only device connected to the 788 it will be the last unit should be terminated Some drives have internal termination some require an external terminator Consult the documentation of the device to discover what termination is required for your CD R drive Finally remember that you should NEVER connect or disconnect SCSI devices with the power applied to them If you make or break connections with ...

Page 73: ...ped press the MENU key 3 Move the cursor to CD R and press ENTER 4 Move the cursor to PRE MASTERING and press ENTER The screen changes to the home screen but with the word MASTERING at the top left of the screen If any REC READY indicators are on they are turned off and they cannot be turned on again while pre mastering is being carried out While pre mastering transport controls work in the usual ...

Page 74: ... from the mastering mode 1 With the transport stopped press the MENU key 2 Move the cursor to CD R and press ENTER 3 Move the cursor to CHECK MASTER and press ENTER The screen changes to the home screen but with the word MASTER TRACK at the top of the screen the title of the current song it can be edited and changed from this screen and the total time in minutes and seconds of the master track All...

Page 75: ...t is now located at the real end of the track where you set the IN point previously In both cases trimming the start and trimming the end 7 Play back the master track as described in Checking the master on page 74 The start and end should now be as you want them Recording to CD R There are two ways of using the 788 to record a CD R either a track at a time TAO Track At Once with the disc being fin...

Page 76: ... time remaining for the operation While the image and writing to disc is going on all the 788 controls are disabled and no action is possible NOTE DO NOT TURN OFF the 788 or the CD R drive while this writing operation is taking place You will almost certainly spoil the disc and may corrupt the song data Two seconds of silence are added to the end of each track recorded to disc in this way 10 To ch...

Page 77: ...hen you highlight a song that you wish to add to the final CD press the INSERT key A check mark appears by the title of every selected song There is no need to worry about the final running order of the CD at this stage If you have made a mistake in adding a song to the list you can remove it by highlighting the title and pressing the DELETE key 6 When you have added all the songs to the list that...

Page 78: ...s sent to the 788 through the SCSI con nection and is output through the MONITOR and PHONES jacks The only control over the sound from the 788 is through the MONITOR control knob All other mixer controls are disabled 1 Make sure the 788 is in normal mode that is not in the master check mode or mastering mode 2 With the transport stopped press the MENU key 3 Move the cursor to CD R and press ENTER ...

Page 79: ... you start backing up make sure you have a supply of blank CD R discs You cannot use discs that have already been used for mastering and you cannot use backup discs for mastering either You can only back up one song at a time 1 Put the first disc into the CD R drive 2 Make sure the 788 is in normal mode that is not in the master check mode or mastering mode 3 With the transport stopped press the M...

Page 80: ... song from the disc and asks you if you want to continue 5 Press YES to continue NO to eject the disc and cancel the operation 6 If you go ahead with the restore the 788 copies the data from the CD R disc to the active disk partition A bargraph on screen shows the progress 7 If the backup is spread over more than one disc when the first disc has been read it is ejected and a message asks you to pu...

Page 81: ...t you ll want to add a selective amount of the same effect to a num ber of tracks at the same time Again at mixdown you may want to engage a com pressor on the final output Digital distortion is a particularly unpleasant sound and putting a com pressor in front of the outputs is one way to avoid it another way is simply to keep the levels at a rea sonable volume of course Setting up EFFECT 1 Using...

Page 82: ...the SELECT key of any channels where you want to use the channel dynamics As you press these keys the channel SELECT indicators flash to show which channels are using the dynamics processor Pressing a channel s SELECT key which is already flashing when the EFFECT 2 key is held down will stop that channel using the dynamics processor For details of using the multi channel dynamics pro cessor see Dy...

Page 83: ...e stereo sends can be set as well as the master send level In addition these two sends can be individually selected as off or as pre or post fader on a per chan nel basis see Pre and post fader sends explained on page 84 below Stereo linked channels and channels 7 and 8 cannot have levels set independently for each channel One control affects the send levels for both channels In addition the send ...

Page 84: ...rocessor EFFECT 1 only or the single stereo effect processor EFFECT 1 or EFFECT 2 you can select the effect type that you want from a list of preset settings or from your own library of settings that you have stored previously To select from the preset list 1 Assign the effects unit to be a multi effect pro cessor Using EFFECT 1 as a multi effect processor on page 81 or as a single stereo effect p...

Page 85: ...lay DIST_PIT_REV Compressor Distortion Noise gate Pitch Shifter Reverb DIST_PIT_DLY Compressor Distortion Noise gate Pitch Shifter Delay DIST_CHO_REV Compressor Distortion Noise gate Chorus Reverb DIST_CHO_DLY Compressor Distortion Noise gate Chorus Delay P EQ_FLG_REV Compressor Noise gate Parametric EQ Flanger Reverb P EQ_FLG_DLY Compressor Noise gate Parametric EQ Flanger Delay P EQ_EXC_REV Comp...

Page 86: ... processors 128 for the multi effect processors and 128 shared between the channel and stereo dynamics processors NOTE It is not possible to use the library space for one type of effect to store another type of effect The single stereo effect library spaces may be used by both EFFECT 1 and EFFECT 2 when they are used as single stereo effect processors Storing an effect in the library 1 From the ef...

Page 87: ...signal rises above the level You can use this with noisy effects pedals etc to avoid recording the unwanted noise of the units when the instrument is silent There are three parameters on the 788 s multi effect noise gate Flanger Flanging is a distinctive swirling sound The flanger on the multi effect processor in the 788 has three parameters Parameter Min Max Explanation COMPRESS 0 100 Amount by w...

Page 88: ...imum frequency which is affected by the exciter DEPTH 0 100 The amount by which the exciter affect the signal Parameter Min Max Explanation PITCH 12 12 The amount by which the pitch is shifted expressed in semitones coarse tuning FINE 50 50 The fine tuning amount added to the coarse tuning by which the pitch is shifted expressed in cents 100 cents 1 semitone BALANCE 0 100 The balance between the o...

Page 89: ...FREQUENCY 1 0kHz 10 0kHz Choose the minimum frequency at which the ess sounds are heard to cut them out of the recording DEPTH 0 60 The depth of the de esser s effect Parameter Min Max Explanation ROOM TYPE Hall Studio Choose between Hall Room Live and Studio to set up a reverberation pattern that mimics these different scenarios PRE DELAY 0ms 250ms The time between the original signal and the sta...

Page 90: ...of the repeated sounds in practical terms this controls the number of audible repeats note that a high value here may result in runaway feedback which is unpleasant Parameter Min Max Explanation RATE 0 1Hz 10 0Hz The speed of the flanging effect DEPTH 0 100 The strength of the effect FB DELAY 0ms 1000ms The time between repeats FEEDBACK 0 100 The level of the repeated sounds in practical terms thi...

Page 91: ...the effect assignments see Setting up EFFECT 1 on page 81 and Setting up EFFECT 2 on page 82 NOTE The assignments of virtual tracks to tracks are not stored as part of a routing patterns These assignments are stored as part of a song Saving the current routing settings to the library You can save to the routing library while playback is stopped or while playing back or recording To store the curre...

Page 92: ...ttings as part of a scene Input assignment including virtual track assignment EQ settings Effector settings and assignment Effect and aux send levels Pan Digital pad gain Track cue mixer settings level and pan Fader settings including the STEREO fader Sub mixer settings Since routing is included as part of a mixer scene you do not need to store routing assignments sepa rately from scenes unless yo...

Page 93: ...s example a channel s physical fader is set at a high level and a scene is loaded from the library where the internal fader setting is at a lower level NOTE This also applies to the STEREO fader as well as the individual channel faders As explained in Internal and physical faders on page 45 this means that when the FADER PAN screen for the channel is shown the values of both the internal fader and...

Page 94: ...e of the 788 in the syn chronization chain The 788 cannot use audible SMPTE EBU timecode from the timestripe track of a tape If the source to be synchro nized with the 788 only has audible timecode available it must be converted to and from MIDI timecode MTC as appropriate Master or slave The terms master and slave are used to name the con troller and the controlled units in a chain of devices suc...

Page 95: ...cer etc which is capable of recognizing and acting on MIDI clock and SPP information The tem pos to be used throughout the piece are first worked out on the slave device and they have been finalized the sequencer plays MIDI into the 788 which records the clock The 788 can then play back these tempos along with SPP information and thereby act as a MIDI clock master for the system Tempo Map In this ...

Page 96: ...ected as explained here 6 Press ENTER to return to the home screen or use the and keys to select another option Selecting the master synchronization type If the 788 is set to be the synchronization master you must then set the type of synchronization signal out put to the slave units 1 Make sure playback and recording are stopped and press the MENU key 2 Use the dial to scroll down to SYNC MIDI an...

Page 97: ...ing are stopped and press the MENU key 2 Use the dial to scroll down to SYNC MIDI and press ENTER 3 Use the dial to highlight SYNC and press ENTER 4 Use the and keys to move the cursor to MTC OFFSET 5 Use the Ó and Á keys to move the cursor to the hours minutes seconds and frames field and use the dial to adjust these values NOTE The maximum value you can set here is 23 59 59 xx where xx is one le...

Page 98: ... clock source and make it ready to accept an external MIDI Start command 4 Return to the home screen on the 788 and press PLAY The sequencer starts playing back at the time position corresponding to the ABS time on the 788 NOTE You do not have to start playback at the beginning of the song If you locate to a time position on the 788 the sequencer will pick up the correct time from the MIDI SPP dat...

Page 99: ... and slowing down using a tempo map If you need this kind of capability we suggest that you do these tempo changes on the sequencer and then use the sync track facility to record the tempo changes from the sequencer The tempo map is stored as part of the song on disk and is reloaded automatically together with the song It is therefore possible for you to make a song com plete with a tempo map stor...

Page 100: ... and takes its timing from the map If you use the metronome you should take care that the tempo used in the tempo map matches the tempo map of all other instruments in the setup NOTE The metronome can only be output when the SYNC GEN option is set to CLOCK or SycTRK Selecting the master synchronization type on page 96 It cannot be output when it is set to the OFF or MTC values It can be output thr...

Page 101: ...equencer is waiting for MIDI timecode to be received before it can start playback however MIDI Timecode is transmitted from the 788 and read by the sequencer The sequencer now starts to play back locked to the incoming timecode When the sequencer issues a stop command the 788 responds to this stop and timecode also stops Because the sequencer needs timecode to continue playback and the timecode ha...

Page 102: ...e control chain and to receive messages which are intended only for it Alternatively you can select a universal mode which means that the 788 will respond to all MMC commands received over the system 1 With the transport stopped press the MENU key 2 Use the dial to scroll down to the SYNC MIDI menu and press ENTER 3 Use the dial to scroll down to the CONTROL menu item and press ENTER 4 There are t...

Page 103: ...1F 1E 1D 1C c5 0 26 25 24 23 22 21 20 c6 0 2D 2C 2B 2A 29 28 27 c7 0 34 33 32 31 30 2F 2E c8 0 3B 3A 39 38 37 36 35 c9 0 0 0 0 3F 3E 3D 3C c10 0 46 SEARCH 45 VARIABLE PLAY 44 LOCATE 43 UPDATE 42 READ 41 MASKED WRITE 40 WRITE c11 0 4D ADD 4C MOVE 4B MTC COMMAND 4A GENERATOR COMMAND 49 ASSIGN SYS MAS 48 STEP 47 SHUTTLE c12 0 54 DEFERRED VARI PLAY 53 COMMAND SEGMENT 52 GROUP 51 EVENT 50 PROCEDURE 4F ...

Page 104: ...UT r7 0 34 33 32 31 30 2F Short GP7 2E Short GP6 r8 0 3B 3A 39 38 37 36 35 r9 0 0 0 0 3F 3E 3D 3C r10 0 46 SELECTED TIMECODE SOURCE 45 TIME STANDARD 44 COMMAND ERROR LEVEL 43 COMMAND ERROR 42 RESPONSE ERROR 41 UPDATE RATE 40 SIGNATURE r11 0 4D RECORD STATUS 4C RECORD MODE 4B FAST MODE 4A STOP MODE 49 VELOCITY TALLY 48 MOTION CONTROL TALLY 47 SELECTED TIMECODE USER BITS r12 0 54 STEP LENGTH 53 TRAC...

Page 105: ...either channel of the pair will affect the effect assigned to the pair Enabling disabling Program Change You can enable or disable the way that the 788 responds to Program Change as explained here The 788 can be set to respond to Program Change messages for the mixer channels 15 and 16 for the effects 1 through 12 both or neither 1 With the transport stopped press the MENU key 2 Use the dial to sc...

Page 106: ...ixer are as follows MIDI channel Target Remark 1 8 Mixer channel mixer channels1 through 8 16 Master block Fader Effect Level Aux Level Control No Parameter Range 7 Fadera 0 through 100 through 127 through 0 through 6 dB 10 Pan 1 through 64 through 127 L63 through C through R63 11 Pad gain 0 through 8 42 36 30 24 18 12 6 0 6 dB 16 Low Frequency 0 through 31 32 40 50 60 70 80 90 100 125 150 175 200...

Page 107: ...hrough R63 80 EQ SW 0 1 OFF ON 81 Effect Post 0 1 2 OFF PRE POST 82 Aux Post 0 1 2 OFF PRE POST a These parameters and only these parameters apply to the master section on MIDI channel 16 Control No Parameter Range MIDI channel Target Remark 1 8 Channel dynamics ch1 through ch8 9 Stereo dynamics 10 Stereo effect1 for EFFECT1 11 Stereo effect2 for EFFECT2 12 Multi effect Control Change Effect Range...

Page 108: ...rough 99 0 1 through 10 0Hz 00 01 Depth 0 through 100 00 02 FB Delay 0 through 100 0 through 100 msec 00 03 Feedback 0 through 100 00 04 Out Level 0 through 100 through 127 through 0 through 6 dB NRPN Parameter Range 00 00 Pitch 0 through 12 through 24 12 through 0 through 12 00 01 Fine 0 through 50 through 100 50 through 0 through 50 cents 00 02 FB Delay 0 through 500 0 through 500 msec 00 03 Fee...

Page 109: ...through 100 00 02 Comp Post Gain 0 through 30 0 through 30 dB 00 03 Comp Switch 0 1 Off On 00 04 Dist Pre Gain 0 through 20 40 through 60 dB 00 05 Dist Drive 0 through 100 00 06 Dist Out Level 0 through 12 0 through 12 dB 00 07 Dist Switch 0 1 Off On 00 08 Gate Threshold 0 through 60 76 through 16 dB 00 09 Gate Release 0 through 100 00 10 Gate Suppress 0 1 through 31 30 through 0 dB 00 11 Gate Swi...

Page 110: ...hrough 100 00 15 Flanger Switch 0 1 Off On 00 16 Delay FB delay 0 through 1000 0 through 1000msec 00 17 Delay Feedback 0 through 100 00 18 Delay Mix Level 0 through 100 00 19 Delay Switch 0 1 Off On NRPN Parameter Range 00 00 Comp Compress 0 through 100 00 01 Comp Attack 0 through 100 00 02 Comp Post Gain 0 through 30 0 through 30 dB 00 03 Comp Switch 0 1 Off On 00 04 Dist Pre Gain 0 through 20 40...

Page 111: ...ff On 00 16 Delay FB delay 0 through 1000 0 through 1000msec 00 17 Delay Feedback 0 through 100 00 18 Delay Mix Level 0 through 100 00 19 Delay Switch 0 1 Off On NRPN Parameter Range 00 00 Comp Compress 0 through 100 00 01 Comp Attack 0 through 100 00 02 Comp Post Gain 0 through 30 0 through 30 dB 00 03 Comp Switch 0 1 Off On 00 04 Dist Pre Gain 0 through 20 40 through 60 dB 00 05 Dist Drive 0 thr...

Page 112: ...0 14 Pitch Balance 0 through 100 00 15 Pitch Switch 0 1 Off On 00 16 Delay FB delay 0 through 1000 0 through 1000msec 00 17 Delay Feedback 0 through 100 00 18 Delay Mix Level 0 through 100 00 19 Delay Switch 0 1 Off On NRPN Parameter Range 00 00 Comp Compress 0 through 100 00 01 Comp Attack 0 through 100 00 02 Comp Post Gain 0 through 30 0 through 30 dB 00 03 Comp Switch 0 1 Off On 00 04 Dist Pre ...

Page 113: ...lay 0 through 1000 0 through 1000msec 00 17 Delay Feedback 0 through 100 00 18 Delay Mix Level 0 through 100 00 19 Delay Switch 0 1 Off On NRPN Parameter Range 00 00 Comp Compress 0 through 100 00 01 Comp Attack 0 through 100 00 02 Comp Post Gain 0 through 30 0 through 30 dB 00 03 Comp Switch 0 1 Off On 00 04 Gate Threshold 0 through 60 76 through 16 dB 00 05 Gate Release 0 through 100 00 06 Gate ...

Page 114: ... 100 00 15 Flanger Switch 0 1 Off On 00 16 Delay FB delay 0 through 1000 0 through 1000msec 00 17 Delay Feedback 0 through 100 00 18 Delay Mix Level 0 through 100 00 19 Delay Switch 0 1 Off On NRPN Parameter Range 00 00 Comp Compress 0 through 100 00 01 Comp Attack 0 through 100 00 02 Comp Post Gain 0 through 30 0 through 30 dB 00 03 Comp Switch 0 1 Off On 00 04 Gate Threshold 0 through 60 76 thro...

Page 115: ...00 16 Delay FB delay 0 through 1000 0 through 1000msec 00 17 Delay Feedback 0 through 100 00 18 Delay Mix Level 0 through 100 00 19 Delay Switch 0 1 Off On NRPN Parameter Range 00 00 Comp Compress 0 through 100 00 01 Comp Attack 0 through 100 00 02 Comp Post Gain 0 through 30 0 through 30 dB 00 03 Comp Switch 0 1 Off On 00 04 Gate Threshold 0 through 60 76 through 16 dB 00 05 Gate Release 0 throug...

Page 116: ...itch Balance 0 through 100 00 15 Pitch Switch 0 1 Off On 00 16 Delay FB delay 0 through 1000 0 through 1000msec 00 17 Delay Feedback 0 through 100 00 18 Delay Mix Level 0 through 100 00 19 Delay Switch 0 1 Off On NRPN Parameter Range 00 00 Comp Compress 0 through 100 00 01 Comp Attack 0 through 100 00 02 Comp Post Gain 0 through 30 0 through 30 dB 00 03 Comp Switch 0 1 Off On 00 04 Gate Threshold ...

Page 117: ...h 10 0Hz 00 13 Chorus Depth 0 through 100 00 14 Chorus Mix Level 0 through 100 00 15 Chorus Switch 0 1 Off On 00 16 Delay FB delay 0 through 1000 0 through 1000msec 00 17 Delay Feedback 0 through 100 00 18 Delay Mix Level 0 through 100 00 19 Delay Switch 0 1 Off On NRPN Parameter Range 00 00 Comp Compress 0 through 100 00 01 Comp Attack 0 through 100 00 02 Comp Post Gain 0 through 30 0 through 30 ...

Page 118: ... 00 10 reserved 00 11 De esser Switch 0 1 Off On 00 12 Chorus Rate 0 through 99 0 1 through 10 0Hz 00 13 Chorus Depth 0 through 100 00 14 Chorus Mix Level 0 through 100 00 15 Chorus Switch 0 1 Off On 00 16 Delay FB delay 0 through 1000 0 through 1000msec 00 17 Delay Feedback 0 through 100 00 18 Delay Mix Level 0 through 100 00 19 Delay Switch 0 1 Off On NRPN Parameter Range 00 00 Comp Compress 0 t...

Page 119: ...USA Canada 120 VAC 60 Hz U K Europe 230 VAC 50 Hz Australia 240 VAC 50 Hz Power consumption 26 W Supplied accessories PS P788 AC adaptor 2 x XLR balanced to 1 4 unbalanced adaptors Recording resolution 16 bit or 24 bit linear selectable by song Sampling frequency 44 1 kHz Frequency response 20 Hz 20 kHz Wow and flutter Unmeasurable Number of active tracks 8 Number of virtual tracks 250 song Varisp...

Page 120: ...el One INPUT to analog STEREO OUTPUT 82 dBV input terminated at 150 Ω Total harmonic distortion INPUT to analog STEREO OUTPUT 0 01 at 1kHz maximum input level with 400 Hz HPF and 22 kHz LPF Message Meaning Action NO AUDIO ON CD This message appears if you try to finalize a CD that is blank There is no point in finalizing a blank disc Insert the correct disc and try again CD CANNOT BE ßßFINALIZED P...

Page 121: ...r restore operation INVALID CD REPLACE CD PRESS YES NO You are attempting to record a song or songs to CD but the CD is finalized and cannot be used for recording single tracks or has already been used for recording and cannot be used for recording a song list This message also appears if you are attempt ing a restore operation from the wrong disc Press YES or NO to make this message go away and s...

Page 122: ...this message go away The operation you were attempting is then stopped Erase any unwanted songs or copy them to another partition or disk and then erase them Alternatively try working on another disk or par tition with more space available READ BUSY This message may appear if The 788 playback suddenly stops without warning A track is being played back erratically or out of time with the other trac...

Page 123: ...he punch operation and pick the take you want TRACK TOO SHORT A CD track must be at least four seconds in length You are trying to write a track which is less than this length to CD Add dead time to the end of the track and try again MOVING TRANSPORT You are trying to perform an operation while the transport is moving recording playing back or winding Stop the transport and perform the operation M...

Page 124: ...el Pan Att 16 22 x o MIX EQ Control 23 28 x o MIX Send 80 81 82 x o EQ SW EFF Post Aux Post send Change 6 38 x o Data Entry 96 99 x o Data Inc Dec 98 99 x o NRPN Prog x x Scene Change True Routing Effect System Exclusive o o 3 System Qu Frame o 4 o 5 Song Pos o 6 x Song Sel x x Common Tune x x System Clock o 6 o 7 Real Time Commands o 6 o 7 Aux Local ON OFF x x All Notes OFF x x Mes Active Sense x...

Page 125: ...ting 69 CLONE TRACK editing 69 Compressor effect 87 Connecting a CD R drive 72 Connecting a guitar 23 Connecting equipment to the 788 22 Control Change messages 106 107 COPY INSERT editing 66 COPY PASTE editing 66 Copying songs 29 Copying the contents of a track 69 Creating a new song 28 CUT editing 68 D De esser effect 89 Delay effect 89 Deleting active location mark 62 contents of a track 69 son...

Page 126: ...ey sense time 33 L LAST REC 56 Last Recording Position LRP 50 LAST TAKE LOAD 56 Library loading routing settings 92 loading scenes 93 routing and scene 91 Linked channels 41 42 EQ 43 unlinking 41 Loading a song 29 Location Playback position 50 Location marks 62 editing the active mark 63 IN OUT and TO marks 64 list of marks 64 location mark list 63 titling 62 Location operations 60 LRP 50 M Master...

Page 127: ...Recording 13 53 pre master 73 punch 57 rehearsal 54 sync track 97 to CD R 75 77 Rehearsing punch recording 57 Rehearsing recording 54 Removable media 32 Repeat playback 51 Restoring data from CD R 80 Return to zero RTZ 50 REVERB effect 89 REVERB GATE effect 90 Reverberation effect 88 Reverting to previous version of a song 28 Routing and scene libraries 91 Routing libraries 91 Routing settings 34 ...

Page 128: ...52 5082 3 7 3 Nakacho Musashino shi Tokyo 180 8550 Japan TEAC AMERICA INC Phone 323 726 0303 7733 Telegraph Road Montebello California 90640 TEAC CANADA LTD Phone 905 890 8008 Facsimile 905 890 9888 5939 Wallace Street Mississauga Ontario L4Z 1Z8 Canada TEAC MEXICO S A de C V Phone 525 581 5500 Facsimile 525 581 5111 Campesinos 184 Col Granjas Esmeralda 09810 Mexico D F TEAC UK LIMITED Phone 01923...

Reviews: