3 - Preparation
Connecting microphones
Connect mics to the MIC INPUT 1–4 jacks on the back.
Point the mics at the sound sources and place the unit in a stable loca-
tion where there is little vibration.
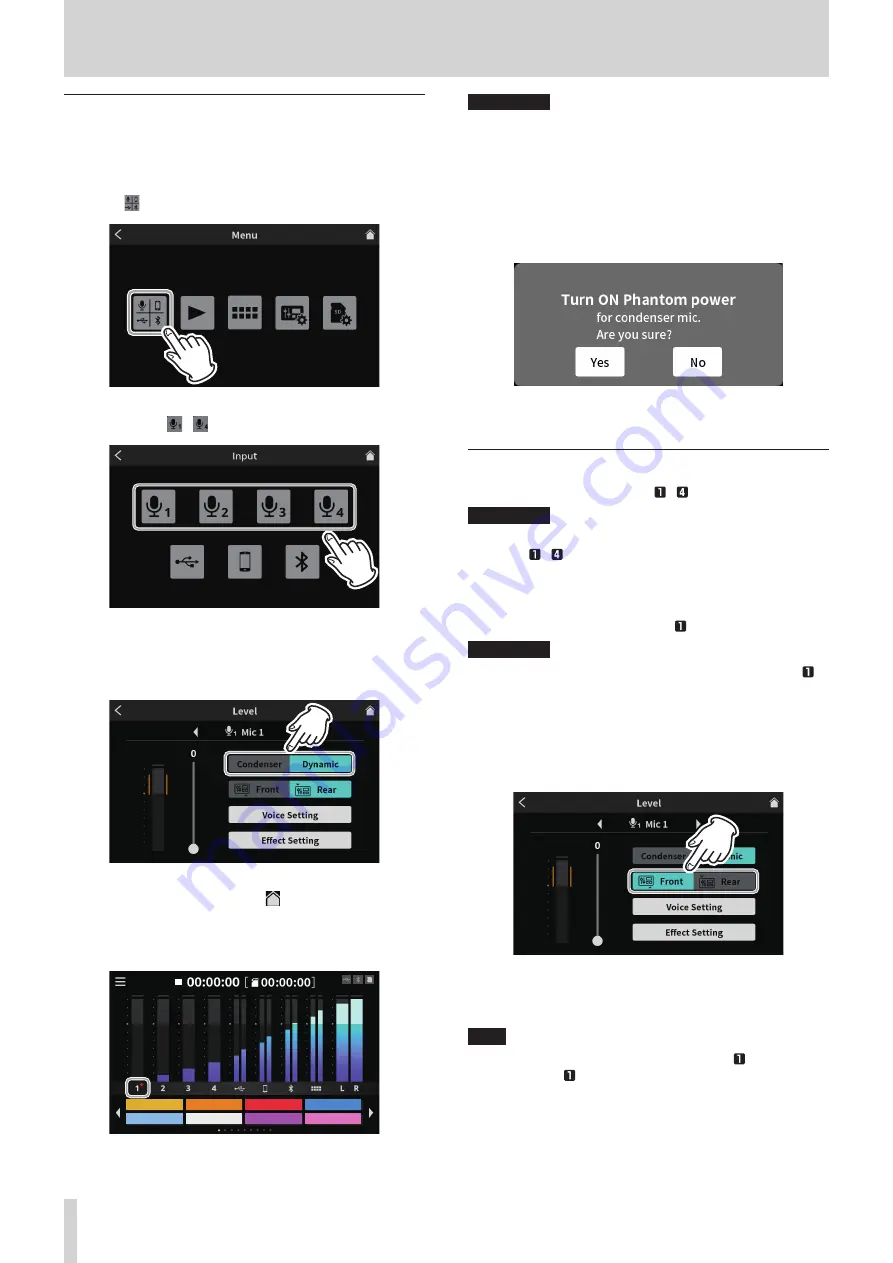
1. Select the mic type.
Tap the
input icon on the Menu Screen to open the Input Screen
Menu Screen
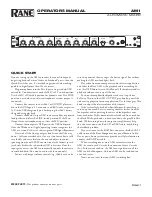
2. Select and tap a
–
mic icon.
Input Screen
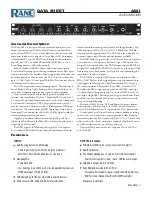
3. This will open the Level Screen. Tap the Condenser or Dynamic
(default) button to set the mic type.
(The following illustration example shows “Mic1”.)
Level Screen (MIC INPUT 1 example)
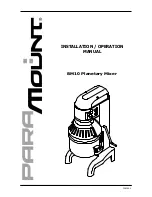
After selecting the mic type, tap the home icon at the top right
to return to the Home Screen.
Red dots will be shown on the Home Screen next to mic channel
numbers set to “Condenser” in the mic settings.
Applause
Drumbeat
Alarm
AirHorn
Brass
Heartbeat
Bleep
Effect
Home Screen
V
CAUTION
i
Do not connect mics that are compatible with plug-in power.
Doing so could cause damage.
i
When “Condenser” is selected as the mic setting for a MIC INPUT jack,
phantom power (+48V) will be turned on. Doing so could damage
dynamic mics if they are connected.
Be careful when connecting mics and selecting mic types.
i
If “Condenser” has been selected, the following message will appear
the next time the unit is turned on.
Tap “Yes” to supply phantom power (+48V) to mic inputs that have
been set to “Condenser”.
Tap “No” to change the settings of all mic inputs to “Dynamic”.
Connecting headphones
Connect headphones to the PHONES – jacks (
a
) on the back.
V
CAUTION
Before connecting headphones, minimize the volumes with the
PHONES – knobs (
6
). Failure to do so might cause sudden loud
noises from the headphones, which could harm hearing or result in
other trouble.
Switching the Mic 1 input (connecting a headset)
Connect a headset to the PHONES (TRRS) jack (
q
) on the front.
V
CAUTION
Before connecting a headset, minimize the level of the PHONES
knob (
6
) on the top.
Failure to do so might cause sudden loud noises from the headset,
which could harm hearing or result in other trouble.
1. Using a headset mic
To use the headset mic input as channel 1, set the input to “Front”
on the Mic 1 Level Screen.
Level Screen (MIC INPUT 1)
o
To use the MIC INPUT 1 jack (
g
) on the back of the unit set the
input to “Rear” (default) on the Mic 1 Level Screen.
NOTE
Output volume could be reduced if both PHONES jacks (
a
) and
PHONES (TRRS) jack (
q
) are used at the same time.
10
TASCAM Mixcast 4


