background image

20 

TASCAM  DR-44WL

NOTE


Quand des piles sont installées et que 

l’adaptateur secteur est branché, 

l’alimentation est fournie par l’adaptateur 

secteur.


L’adaptateur secteur de cette unité comprend 

deux types de broches pour prise secteur. 

Montez le type de broche qui correspond à la 

prise de courant que vous utilisez.

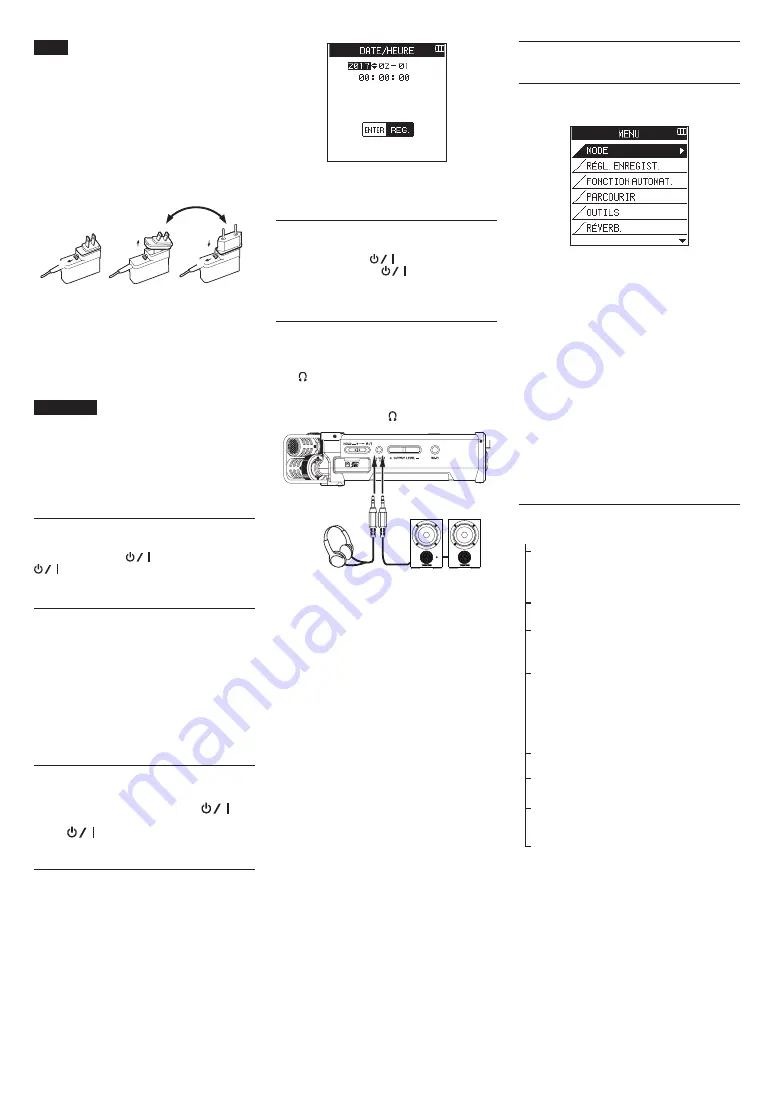
Changement des broches de prise 
électrique

$

%

2

1

5

3

4

1

   Tirez le loquet de l'adaptateur secteur dans le 

sens de la flèche.

2

   Retirez les broches pour prise électrique.

3

   Remplacez-les par les autres broches (A ou B).

4

   Tirez à nouveau le loquet de l'adaptateur 

secteur dans le sens de la flèche.

5

   Fixez les broches sur l'adaptateur secteur.

ATTENTION

N'utilisez pas l'adaptateur s'il y a quoi que 

ce soit d'anormal dans les broches après les 

avoir changées. L'utilisation avec des broches 

anormales peut entraîner un incendie ou une 

électrocution. Contactez le magasin dans 

lequel vous avez acheté cette unité ou un 

service après-vente TASCAM pour demander 

une réparation.

Allumage de l’unité

Quand l’unité est à l’arrêt (veille), glissez le 

commutateur 

HOLD

 dans la direction de 

, puis, quand 

TASCAM


DR-44WL

 (écran de 

démarrage) s’affiche, relâchez le commutateur.
L’écran d’accueil apparaît quand l’unité démarre.

Sélection de la langue

Vous pouvez changer la langue utilisée pour l’affi-

chage à l’écran. La première fois que vous allumez 

l’unité après l’avoir achetée, l’écran 

LANGUAGE

 s’ouvre. 

Vous pouvez choisir la langue utilisée pour l’affichage 

à l’écran. Vous pouvez changer ce réglage avec le 

paramètre 

LANGUE

 de l’écran 

SYSTÈME

.

1.  Tournez la molette pour déplacer le curseur et 

sélectionner la langue.

2.  Une fois la sélection faite, pressez la touche 

ENTER/MARK

 pour la valider.

Si vous avez accidentellement 

sélectionné la mauvaise langue

Faites coulisser le commutateur 

HOLD/ 

 pour 

éteindre l’unité. Puis faites coulisser le commutateur 

HOLD/ 

 en maintenant pressée la touche 

MENU

 pour rallumer l’unité. Le menu dans lequel 

vous pouvez choisir la langue apparaît.

Réglage de l’horloge intégrée

Quand on allume pour la première fois l’unité (ou 

quand elle est restée inutilisée sans piles), l’écran 

DATE/HEURE

 apparaît avant l’écran de démarrage 

pour que la date et l’heure puissent être réglées.

Utilisez les touches 

.

/

/

 et la molette pour 

saisir la date et l’heure, puis pressez la touche 

ENTER/MARK

 pour les régler.

Extinction

Pendant que l’unité est activée, glissez le 

commutateur 

HOLD/


 de la face latérale 

gauche dans la direction 

, puis, lorsque 

TASCAM DR-44WL extinction…

 s’affiche, relâchez le 

commutateur.
L’alimentation s’éteint en quelques secondes.

Branchement d’appareils 

d’écoute et d’un casque

Pour écouter au casque, branchez ce dernier à la 

prise   

/LINE OUT

.

Pour écouter avec un système d’écoute externe 

(enceintes amplifiées ou amplificateur et enceintes), 

branchez celui-ci à la prise   

/LINE OUT

.

Casque

Enceintes amplifiées ou 

amplificateur et enceintes

Procédures d’opération de 

menu de base

1.  Pressez la touche 

MENU

 pour ouvrir l’écran 

MENU

.

2.  Utilisez la molette pour sélectionner (mettre en 

surbrillance) l’un des paramètres de menu, puis 

pressez la touche 

ENTER/MARK

 pour passer à 

l’écran de réglage souhaité.

3.  Utilisez la molette pour sélectionner (mettre en 

surbrillance) un paramètre à régler.

4.  Pressez la touche 

ENTER/MARK

 ou 

/

 pour 

déplacer le curseur sur la droite et mettre en 

surbrillance la valeur de réglage.

5.  Utilisez la molette pour changer le réglage.
6.  Lorsque vous réglez un autre paramètre dans 

le même menu, pressez la touche 

ENTER/

MARK

 ou 

.

 pour déplacer le curseur vers la 

gauche.

7.  Répétez les étapes 3. à 6. si nécessaire pour 

régler d’autres paramètres.

8.  Une fois terminé, pressez la touche 

8

/HOME


pour revenir à l’écran d’accueil.

Structure du menu

MENU

MODE

Sélectionner 

le mode 

d’enregistrement ou 

de lecture

RÉGL. ENREGIST.

Définir le réglage 

d’enregistrement

FONCTION AUTOMAT.

Fonctions pratiques 

pour les fichiers 

enregistrés

PARCOURIR  

(uniquement lorsque le 

mode 4CH est sélectionné)
MORCEAU 

(uniquement lorsque le 

mode MTR est sélectionné)

Opérations sur les 

fichiers et dossiers 

de la carte SD

OUTILS

Régler d’autres 

fonctions pratiques

RÉVERB.

Réglage des effets 

de réverbérateur

ALIM./AFFICHAGE

Définissez 

l’alimentation et 

l’affichage

SYSTÈME

Réglages système 

de l’unité

Summary of Contents for dr-44wl

Page 1: ...01234300G DR 44WL Linear PCM Recorder ENGLISH FRANÇAIS ESPAÑOL DEUTSCH ITALIANO RUSSIAN OWNER S MANUAL MODE D EMPLOI MANUAL DEL USUARIO BEDIENUNGSANLEITUNG MANUALE DI ISTRUZIONI РУКОВОДСТВО ПОЛЬЗОВАТЕЛЯ ...

Page 2: ...ndent license for such use is required For details please visit http mp3licensing com MPEG Layer 3 audio coding technology licensed from Fraunhofer IIS and Thomson Wi Fi is a trademark of Wi Fi Alliance The Wi Fi CERTIFIED Logo is a certification mark of Wi Fi Alliance Microsoft Windows and Windows Vista are either registered trademarks or trademarks of Microsoft Corporation in the United States a...

Page 3: ...s The batteries could short causing leak rupture or other trouble Do not heat or disassemble batteries Do not put them in fire or water Batteries could rupture or leak causing fire injury or stains around them If the battery fluid leaks wipe away any fluid on the battery case before inserting new batteries If the battery fluid gets in an eye it could cause loss of eyesight If fluid does enter an e...

Page 4: ...ired operation Introduction Thank you very much for purchasing the TASCAM DR 44WL Linear PCM Recorder Before connecting and using this unit please take time to read this manual thoroughly to ensure you understand how to properly set it up and connect it as well as the operation of its many useful and convenient functions After you have finished reading this manual please keep it in a safe place fo...

Page 5: ...vice is used nearby to make calls or send or receive signals If this occurs increase the distance between this unit and those devices or turn them off To enable good heat dissipation do not place anything on top of this unit Do not place this unit on top of a power amplifier or other device that generates heat Beware of condensation If the unit is moved from a cold to a warm place or used after a ...

Page 6: ...ing points setting state of loop playback When the IN starting point is set the icon is displayed at the corresponding position on the playback position displaying bar When the OUT ending point is set the icon is displayed at the corresponding position on the playback position displaying bar q Playback position display The current playback position is shown by a bar w Level meter guide display Thi...

Page 7: ...language appears Setting the built in clock When the unit is started up for the first time or after being left without batteries the DATE TIME screen appears before the start up screen to allow the date and time to be set Use the button and the wheel to enter the date and time and press the ENTER MARK button to set them Shutting down While the unit is turned on slide the HOLD switch of the left si...

Page 8: ...EVEL button on the right side panel to show the INPUT LEVEL setting screen on the display as a pop up 2 Press the TRACK INPUT button to select a channel to adjust the input level for 3 Use the INPUT LEVEL volume of the right side panel to adjust the input level When the input sound is too loud the PEAK indicator of the top panel is lit in red A tg mark is visible at the 12 dB position on the level...

Page 9: ... search During playback when the Home Screen is open press and hold the button to search backward forward Moving the playback position You can move the playback position by turning the wheel while the Home Screen is open and a track is stopped or playing back After moving the playback position the unit pauses Selecting the playback file skipping While the Home Screen is open press the or button to...

Page 10: ... to peer connection with a smart phone via Wi Fi without the use of a router or other external devices No Wi Fi network environment is required It can make direct connection with your smart phone or tablet NOTE During Wi Fi peer to peer connection the smart phone or tablet cannot connect to an external Wi Fi network 8 8 Setting the Wi Fi mode to TO DEVICE 1 Press the MENU button to open the MENU s...

Page 11: ...to VIA ROUTER and press the ENTER MARK button to confirm it Options TO DEVICE default value VIA ROUTER 8 8 Connecting the unit to an external router 1 When the Wi Fi screen is open use the wheel to select the LIST item and press the ENTER MARK or button Exec appears selected for the LIST item 2 Press the ENTER MARK button to open the SSID LIST screen 3 From the list shown on the SSID LIST screen u...

Page 12: ...r completing the Wi Fi connection launch the DR CONTROL app installed beforehand on the smartphone or other device NOTE Always use the latest version of DR CONTROL 2 A screen like the following will appear when the app launches and remote operation of the device will be enabled iOS device example Android device example For a detailed explanation of the DR CONTROL application see the DR CONTROL Ref...

Page 13: ...ings for automatic file change Automatic track incre mentation Home Screen w MENU w AUTO FUNCTION w TRACK INCREMENT This function automatically changes a file to a different one at the set size Start recording from slightly before pressing RECORD PRE REC function Home Screen w MENU w REC SETTING w PRE REC When the unit is slow to change from recording standby to recording state this function allow...

Page 14: ...ut Back up files on the SD card to a computer and format the card If any other errors occur turn the unit off and restart it If the error message continues to appear frequently please contact the store where you purchased this unit or a TASCAM customer support service Troubleshooting If you are having trouble with the operation of this unit please try the following before seeking repair If these m...

Page 15: ... 05 or less EXT IN to LINE OUT 44 1 48 96 kHz sampling frequency JEITA S N ratio 92 dB or higher EXT IN to LINE OUT 44 1 48 96 kHz sampling frequency JEITA Note JEITA indicates compliance with JEITA CP 2150 Recording times File format setting when recording SDHC card capacity 4 GB WAV BWF 16 bit STEREO 44 1 kHz 6 hours 17 minutes WAV BWF 24 bit STEREO 96 kHz 1 hours 55 minutes The recording times ...

Page 16: ...s ou des objets métalliques Lorsque vous jetez les piles usagées suivez les instructions de mise au rebut indiquées sur les piles et les lois locales sur l enlèvement des ordures N utilisez pas d autres piles que celles spécifiées N utilisez pas en même temps des piles neuves et usagées ni des types de piles différents Les piles peuvent se rompre ou fuir risquant de causer un incendie des blessure...

Page 17: ...ionné la mauvaise langue 20 Réglage de l horloge intégrée 20 Extinction 20 Branchement d appareils d écoute et d un casque 20 Procédures d opération de menu de base 20 Structure du menu 20 Enregistrement 21 Écran d enregistrement 21 Réglage du niveau d entrée 21 Réglage du filtre coupe bas 21 Utilisation de la fonction de contrôle de niveau 21 Enregistrer 22 À propos de l armement d enregistrement...

Page 18: ...cette unité sur un amplificateur de puissance ou un autre appareil générant de la chaleur Attention à la condensation Si l unité est déplacée d un endroit froid à un endroit chaud ou utilisée après un changement soudain de température il existe un risque de condensation la vapeur de l air peut se condenser sur le mécanisme interne empêchant le bon fonctionnement Pour empêcher cela ou si cela se pr...

Page 19: ...hé 0 Statut de réglage des points IN début et OUT fin de la lecture en boucle Affiche le statut de réglage des points IN début et OUT fin de la lecture en boucle Quand le point IN début est réglé l icône s affiche à l endroit correspondant sur la barre d affichage de position de lecture Quand le point OUT fin est réglé l icône s affiche à l endroit correspondant sur la barre d affichage de positio...

Page 20: ...ée Quand on allume pour la première fois l unité ou quand elle est restée inutilisée sans piles l écran DATE HEURE apparaît avant l écran de démarrage pour que la date et l heure puissent être réglées Utilisez les touches et la molette pour saisir la date et l heure puis pressez la touche ENTER MARK pour les régler Extinction Pendant que l unité est activée glissez le commutateur HOLD de la face l...

Page 21: ...ale droite pour afficher l écran de réglage NIVEAU D ENTRÉE sur l écran en tant que fenêtre contextuelle 2 Pressez la touche TRACK INPUT pour sélectionner un canal pour lequel ajuster le niveau d entrée 3 Utilisez le volume INPUT LEVEL de la face latérale droite pour ajuster le niveau d entrée Quand le son en entrée est trop fort le voyant PEAK de la face supérieure s allume en rouge Un repère tg ...

Page 22: ...avance rapides recherche Durant la lecture quand l écran d accueil est ouvert pressez et maintenez la touche pour une recherche en arrière avant Déplacement de la position de lecture Vous pouvez déplacer la position de lecture en faisant tourner la molette tandis que l écran d accueil est ouvert et qu une piste est arrêtée ou en cours de lecture L unité passe en pause après le déplacement de la po...

Page 23: ...ar Wi Fi mode APPAREIL Le DR 44WL peut établir une connexion Wi Fi pair à pair avec un smartphone par Wi Fi sans recourir à un routeur ni à d autres appareils externes Aucun environnement de réseau Wi Fi n est requis Il peut établir directement la connexion avec votre smart phone ou tablette NOTE Durant la connexion Wi Fi pair à pair le smartphone ou tablette ne peut pas se connecter à un réseau W...

Page 24: ...AREIL par défaut À ROUTEUR 8 8 Connexion de l unité à un routeur externe 1 Quand l écran Wi Fi est ouvert utilisez la molette pour sélectionner LISTE et pressez la touche ENTER MARK ou Exéc apparaît sélectionné pour le paramètre LISTE 2 Pressez la touche ENTER MARK pour ouvrir l écran LISTE SSID 3 Dans la liste affichée en écran LISTE SSID sélectionnez le routeur auquel vous connecter avec la mole...

Page 25: ...Wi Fi lancez l appli DR CONTROL qui aura été installée précédemment sur le smartphone ou autre appareil NOTE Utilisez toujours la version la plus récente de DR CONTROL 2 Un écran du type ci dessous s affiche au lancement de l app et le contrôle à distance de l appareil est activé Ex d appareil iOS Ex d appareil Android Pour de plus amples informations concernant l application DR CONTROL reportez v...

Page 26: ...e Passage automatique à la piste suivante Écran d accueil w MENU w FONCTION AUTOMAT w CRÉA FICH Cette fonction fait automatiquement passer un fichier à un autre de la taille établie L enregistrement commence à partir de l instant précédant le moment où vous pressez RECORD Fonction pré enregistrement Écran d accueil w MENU w RÉGL ENREGIST w PRÉ ENRG Quand l unité met longtemps à passer du mode d ar...

Page 27: ...ez la carte Si d autres erreurs surviennent éteignez l unité et rallumez la Si cela se produit souvent réunissez des informations à ce sujet notamment les actions qui provoquent cet affichage et contactez le service clientèle TASCAM Guide de dépannage Si vous avez des problèmes de fonctionnement avec cette unité veuillez essayer ce qui suit avant de solliciter une réparation Si ces mesures ne réso...

Page 28: ...50 Durées d enregistrement Format de fichier réglage en cours d enregistrement Capacité de carte SDHC 4 Go WAV BWF 16 bits STEREO 44 1 kHz 6 heures 17 minutes WAV BWF 24 bits STEREO 96 kHz 1 heures 55 minutes Les durées d enregistrement indiquées ci dessus sont des valeurs théoriques Les durées peuvent différer en fonction des cartes SD SDHC SDXC utilisées Les durées d enregistrement indiquées ci ...

Page 29: ...as junto con objetos metálicos pequeños Las pilas se pueden romper puede haber fugas u otros problemas No caliente ni trate de desmontar las pilas Nunca arroje las pilas al fuego ni dentro del agua El hacer esto podría dar lugar a roturas o fugas en las pilas produciendo incendios o daños En caso de una fuga del fluido interno de la pila limpie los restos del mismo del compartimento de las pilas a...

Page 30: ...erencia recibida incluso aquellas que puedan producirle un funcionamiento no deseado Índice PRECAUCIONES IMPORTANTES DE SEGURIDAD 29 Precauciones relativas a equipos inalámbricos 29 Cumplimiento de normativa de transmisión de radio e interferencias 29 Requisitos de exposición a las radiaciones 30 Información relativa a interferencias requisitos FCC 30 Introducción 30 Nota acerca del Manual de refe...

Page 31: ...es todo lo posible Esta unidad puede producir ruidos si utiliza un teléfono móvil u otro dispositivo inalámbrico cerca de ella durante una llamada o recepción de señal inalámbrica En ese caso trate de separar ambas unidades o apagar el móvil sistema inalámbrico Para permitir una correcta disipación del calor no coloque nada encima de este aparato No coloque esta unidad sobre dispositivos eléctrico...

Page 32: ...aquí el estado de ajuste de los puntos IN inicio y OUT final del bucle de reproducción Cuando haya ajustado el punto IN inicio el icono aparecerá en la barra de posición de reproducción correspondiente al punto fijado Aparecerá el icono cuando haya ajustado el punto OUT final q Posición de reproducción La posición de reproducción activa es mostrada con una barra w Guía de medidor de nivel Esta es ...

Page 33: ...odrá ajustar el idioma que quiera Ajuste del reloj interno Cuando ponga en marcha la unidad la primera vez o tras haber estado sin pilas aparecerá la pantalla FECHA HORA antes de la de arranque para que pueda ajustar la fecha y la hora Use el botón y la rueda para introducir la fecha y la hora y pulse el botón ENTER MARK para fijar esos valores Apagado Con la unidad encendida deslice el interrupto...

Page 34: ...botón INPUT LEVEL del panel derecho para que aparezca la pantalla desplegable de ajuste NIVEL ENTRADA 2 Pulse el botón TRACK INPUT para elegir el canal al que ajustar el nivel de entrada 3 Use el volumen INPUT LEVEL del panel derecho para ajustar el nivel de entrada Cuando la señal de entrada sea excesiva el piloto PEAK del panel superior se iluminará en rojo Dispone de una marca tg en la posición...

Page 35: ...ial activa mantenga pulsado el botón para realizar un rebobinado avance rápido Cambio de la posición de reproducción Puede mover la posición de reproducción girando la rueda con la pantalla inicial activa y una pista en reproducción o con la unidad parada Tras cambiar la posición la unidad quedará en pausa Selección del fichero a reproducir salto Con la pantalla inicial activa pulse el botón o par...

Page 36: ...ecer una conexión Wi Fi peer to peer P2P con un smartphone vía Wi Fi sin la necesidad de un router u otro dispositivo externo No es necesario tampoco ninguna red Wi Fi dado que puede establecer una conexión directa con su smartphone o tablet NOTA Durante la conexión Wi Fi P2P el smartphone o tablet no podrá conectarse a una red Wi Fi externa 8 8 Ajuste el modo Wi Fi a A DISPOSITIV 1 Pulse el botón...

Page 37: ...ITIV valor por defecto VIA ROUTER 8 8 Conexión de la unidad a un router externo 1 Con la pantalla Wi Fi activa use la rueda para elegir el elemento LISTA y pulse el botón ENTER MARK o Aparecerá Ejec seleccionado para el elemento LISTA 2 Pulse el botón ENTER MARK para abrir la pantalla LISTADO SSID 3 En el listado que aparece en la pantalla LISTADO SSID use la rueda para elegir el router que quiera...

Page 38: ...a previamente en el smartphone u otro dispositivo NOTA Utilice siempre la última versión de la aplicación DR CONTROL 2 Una vez que se inicie la aplicación aparecerá una pantalla como la siguiente y a partir de ese momento podrá controlar de forma remota la unidad Ejemplo dispositivo iOS Ejemplo dispositivo Android Si necesita una explicación detallada de esta app DR CONTROL vea el Manual de refere...

Page 39: ...l cambio de fichero automático Aumento automático de pista Pantalla inicial w MENU w FUNCION AUTO w AUMENTO PISTA Esta función produce un cambio automático de fichero al llegar a un tamaño determinado Iniciar la grabación desde un poco antes de pulsar RECORD Función PRE GRAB Pantalla inicial w MENU w AJUSTES GRABAC w PRE GRAB Cuando esta unidad resulte lenta a la hora de cambiar del estado de espe...

Page 40: ...en la grabación en tarjeta Haga una copia de seguridad de los ficheros en un ordenador y formatee la tarjeta Si se produce cualquier otro tipo de error apague la unidad y vuelva a encenderla Si estos errores siguen apareciendo de forma frecuente póngase en contacto con el comercio en el que adquirió la unidad o con el servicio técnico de TASCAM Resolución de problemas Si esta unidad no funciona or...

Page 41: ... 44 1 48 96 kHz frec muestreo JEITA Relación señal ruido 92 dB o superior EXT IN a LINE OUT 44 1 48 96 kHz frec muestreo JEITA Nota JEITA indica que cumple con lo indicado en JEITA CP 2150 Tiempos de grabación Formato de fichero ajustado al grabar Capacidad de tarjeta SDHC 4 GB WAV BWF 16 bits STEREO 44 1 kHz 6 horas 17 minutos WAV BWF 24 bits STEREO 96 kHz 1 horas 55 minutos Los tiempos de grabac...

Page 42: ... alten Schalten Sie das Gerät immer aus bevor Sie Batterien Akkus einlegen Achten Sie beim Einlegen der Batterien Akkus auf die richtige Polarität Der Pluspol muss auf die jeweilige Plus markierung im Batteriefach weisen Nehmen Sie die Batterien Akkus heraus wenn Sie das Gerät längere Zeit nicht benutzen Wenn Sie Batterien Akkus lagern oder entsorgen wollen decken Sie die Kontakte mit Klebeband ab...

Page 43: ...entlich die falsche Sprache gewählt haben 46 Datum und Uhrzeit der eingebauten Uhr einstellen 46 Den Recorder ausschalten 46 Lautsprecher oder Kopfhörer anschließen 46 Grundsätze für die Verwendung des Menüs 46 Aufbau des Menüs für die Wiedergabe Einstellungen 46 Aufnahme 47 Die Aufnahmeseite 47 Den Eingangspegel anpassen 47 Das Tiefenfilter nutzen 47 Die automatische Pegelanpassung nutzen 47 Aufn...

Page 44: ...meabfuhr zu gewähr leisten Stellen Sie das Gerät nicht auf einen Leistungs verstärker oder andere Hitze erzeugende Geräte Kondensation vermeiden Wenn Sie das Gerät aus einer kalten Umgebung in eine warme Umgebung bringen besteht die Gefahr dass sich Kondenswasser bildet Kondenswasser im Geräteinneren kann Fehlfunktionen hervorrufen Um dies zu vermeiden lassen Sie das Gerät ein bis zwei Stunden ste...

Page 45: ...eint das Symbol an der entsprechenden Stelle der Wiedergabepositionsanzeige q Wiedergabepositionsanzeige Die aktuelle Wiedergabeposition können Sie anhand dieses Balkens abschätzen w Hilfsmarken der Pegelanzeigen Die Hilfsmarken dienen der Anpassung von Ein und Ausgangspegel Sie markieren einen Pegel von 12 dB e Pegelanzeigen Zeigen den Pegel der eingegebenen bzw wiedergegebenen Signale an r Statu...

Page 46: ...instellen Wenn Sie den Recorder zum ersten Mal einschalten oder wenn längere Zeit keine Batterien eingelegt waren erscheint zuerst die Seite DATUM ZEIT auf der Sie Datum und Uhrzeit einstellen können Stellen Sie Datum und Uhrzeit mit den Tasten und dem Steuerrad ein und drücken Sie ENTER MARK um sie festzulegen Den Recorder ausschalten Schieben Sie den HOLD Schalter in die Position und halten Sie ...

Page 47: ... Kanal aus für den Sie den Eingangspegel einstellen wollen 3 Um den Eingangspegel anzupassen verwenden Sie den INPUT LEVEL Regler an der rechten Geräteseite Wenn das Eingangssignal zu laut ist leuchtet auf der Geräteoberseite das PEAK Lämpchen rot auf Die Symbole tg auf der Pegelanzeige markieren einen Pegelwert von 12 dB Stellen Sie den Eingangspegel so ein dass sich der Pegel im Bereich der Mark...

Page 48: ...et er auf Pause Zu einer anderen Wiedergabedatei springen Wählen Sie auf der Hauptseite mit den Tasten oder die Datei aus die Sie wiedergeben wollen Wenn Sie die Taste am Anfang einer Datei drücken springen Sie an den Anfang der vorherigen Datei Um von einer beliebigen Position einer Datei zur nachfolgenden Datei zu springen drücken Sie die Sprungtaste rechts DieWiedergabelautstärke anpassen Den A...

Page 49: ... herzustellen 8 8 Den WLAN Modus auf DIREKTVERB einstellen 1 Drücken Sie die Taste MENU Das Menü erscheint 2 Wählen Sie mit dem Rad den Eintrag WERKZEUGE und drücken Sie die ENTER MARK Taste oder die Sprungtaste rechts Die Seite WERKZEUGE erscheint 3 Wählen Sie Wi Fi und drücken Sie ENTER MARK Neben Wi Fi ist nun Ausf hervorgehoben 4 Drücken Sie ENTER MARK Die Seite Wi Fi erscheint 5 Wählen Sie MO...

Page 50: ...ENTER MARK 6 Wählen Sie mit dem Rad die Option ÜBER ROUTER und drücken Sie ENTER MARK um zu bestätigen Auswahlmöglichkeiten DIREKTVERB Direktverbindung die Vorein stellung ÜBER ROUTER über einen Router 8 8 Die Verbindung mit dem vorhandenen Router herstellen 1 Wählen Sie auf der Wi Fi Seite den Eintrag LISTE und drücken Sie ENTER MARK oder die Sprungtaste rechts Neben LISTE ist nun Ausf hervorgeho...

Page 51: ...shalb zunächst mit dem Recorder vertraut bevor Sie die App DR CONTROL nutzen Auf diese Weise werden Sie sich auf der App schnell zurechtfinden Anmerkung Nutzen Sie immer die neueste Version von DR CONTROL Wenn die WLAN Verbindung mit dem Recorder besteht starten Sie die auf Ihrem Smartphone oder anderen Gerät installierte App DR CONTROL Nach dem Starten der App nimmt das Display etwa folgendes Aus...

Page 52: ...omatisches Erzeugen einer neuen Aufnahmedatei Hauptseite w MENU w AUTO FUNKTIONEN w DAT TEILEN Diese Funktion setzt die Aufnahme automatisch mit einer neuen Datei fort sobald die einge stellte Größe erreicht ist Die Aufnahme kurz vor dem Drücken der RECORD Taste starten lassen Vorgezogene Aufnahme Hauptseite w MENU w AUFN EINSTELL w VGZ AUFN Diese Funktion ermöglicht es einige Sekunden vor dem Drü...

Page 53: ...D Karte ist nicht ordnungsgemäß formatiert oder beschädigt Diese Meldung erscheint ebenfalls wenn Sie die Karte über eine USB Verbindung mit einem Computer formatiert haben oder wenn Sie eine nicht formatierte Karte einlegen Karten die Sie in diesem Recorder verwenden wollen müssen immer mit einem DR 44WL formatiert werden Tauschen Sie die SD Karte aus oder drücken Sie die Taste ENTER MARK wenn di...

Page 54: ...üfen Sie die Kabelverbindung zu Ihrer Abhöranlage Stellen Sie sicher dass die Lautstärke an Ihrer Abhöranlage aufgedreht ist Stellen Sie sicher dass der Ausgangspegel am Recorder aufgedreht ist Das Gerät führt keine Aufnahme aus Wenn Sie von einem externen Gerät aufnehmen überprüfen Sie die Kabel verbindung Überprüfen Sie ob der Eingang richtig konfiguriert ist Vergewissern Sie sich dass der Einga...

Page 55: ...er Speicherkarte abweichen Die angegebenen Zeiten stehen nicht durchgängig für eine Aufnahme zur Verfügung sondern geben die gesamte Aufnahmezeit auf der jeweiligen Karte an Bei Mono Aufnahmen im WAV Format entspricht die maximale Aufnahmezeit dem Doppelten der oben genannten Werte Bei der Dual Aufnahme im WAV BWF Format oder bei Vierspuraufnahmen entspricht die maximale Aufnahmezeit der Hälfte de...

Page 56: ...e i loro terminali con nastro isolante o simile per impedire il contatto con altre batterie o oggetti metallici Quando si gettano batterie usate seguire le istruzioni indicate per lo smaltimento delle batterie e le leggi locali sullo smaltimento Non usare batterie diverse da quelle specificate Non mescolare e usare batterie vecchie e nuove o tipi diversi di batterie Le batterie potrebbero rompersi...

Page 57: ...62 Selezione del file di riproduzione salto 62 Regolare il volume di riproduzione 62 Collegamento a un computer 62 Scambio di file con un computer 62 Scollegamento dell unità dal computer 62 Visualizzazione impostazioni e informazioni 62 Spegnere l altoparlante incorporato 62 Impostazioni di sistema 62 Connettere l unità a uno smartphone tramite Wi Fi 63 Come ottenere e installare l applicazione d...

Page 58: ...tà viene spostata da un ambiente freddo a uno caldo o usata dopo un improvviso sbalzo di temperatura vi è il rischio di condensa il vapore nell aria potrebbe condensarsi sul meccanismo interno rendendo impossibile un corretto funzio namento Per prevenire questo o se questo accade lasciare riposare l unità per una o due ore alla nuova temperatura ambiente prima di usarla Pulizia dell unità Usare un...

Page 59: ...parte formattata dei nomi del file e il numero di base dei file registrati Quando si registra un solo file viene visualizzato il suo titolo Quando si seleziona la modalità MTR viene visualizzato il titolo di un brano aperto 0 Stato delle impostazioni dei punti di inizio IN e fine OUT della riprodu zione ciclica Visualizza lo stato delle impostazioni del punto iniziale IN e di quello finale OUT del...

Page 60: ...ENU per attivare l unità di nuovo Apparirà il menu di selezione della lingua in cui è possibile impostare la lingua Impostazione dell orologio incorporato Quando l unità viene avviata per la prima volta o dopo che è rimasta senza batterie viene visualizzata la schermata DATA ORA prima della schermata di avvio per consentire l impostazione della data e dell ora Utilizzare il pulsante e la ruota per...

Page 61: ...lo destro per mostrare la schermata di imposta zione LIVELLO INGRESSO a comparsa sul display 2 Premere il pulsante TRACK INPUT per selezionare un canale per il quale regolare il livello in ingresso 3 Usare il controllo del volume INPUT LEVEL sul pannello laterale destro per regolare il livello in ingresso Se il segnale in ingresso è troppo forte l indi catore PEAK nel pannello superiore si illumin...

Page 62: ...l pulsante 8 HOME la ripro duzione si arresta all inizio del file Riavvolgimento e avanzamento veloce ricerca Durante la riproduzione quando la schermata principale è aperta tenere premuto il pulsante per la ricerca avanti indietro Spostamento della posizione di riprodu zione È possibile spostare la posizione di riproduzione agendo sulla ruota mentre la schermata principale è aperta e una traccia ...

Page 63: ...r to peer con uno smartphone tramite Wi Fi senza l uso di un router o altri dispositivi esterni Non è necessario alcun ambiente di rete Wi Fi Può fare il collegamento diretto con uno smartphone o un tablet NOTA Durante la connessione Wi Fi peer to peer la smartphone o il tablet non possono connettersi a una rete Wi Fi esterna 8 8 Impostare la modalità Wi Fi su AL DISPOS 1 Premere il pulsante MENU ...

Page 64: ...nfermare Opzioni AL DISPOS valore di default VIA ROUTER 8 8 Collegamento dell unità a un router esterno 1 Quando la schermata Wi Fi è aperta usare la ruota per selezionare List e premere il pulsante ENTER MARK o Eseg appare selezionato per la voce LIST 2 Premere il pulsante ENTER MARK per aprire la schermata ELENCO SSID 3 Dall elenco visualizzato nella schermata ELENCO SSID usare la ruota per sele...

Page 65: ...icazione DR CONTROL installata sullo smartphone NOTE Utilizzare sempre l ultima versione di DR CONTROL 2 Dopo aver avviato l applicazione DR CONTROL sullo smartphone verrà visualizzata la seguente schermata e sarà possibile di utilizzare l unità con il telecomando Dispositivo iOS Dispositivo Android Per una spiegazione dettagliata delle caratteri stiche dell applicazione DR CONTROL consultare il m...

Page 66: ...o Incremento automatico della traccia Schermata principale w MENU w FUNZIONE AUTO w INCREMENTO TRACCIA Questa funzione consente di passare automaticamente da un file a un altro avente le dimensioni impostate Iniziare a registrare poco prima di premere RECORD Funzione REG PRE Schermata principale w MENU w IMPOSTAZ REG w REG PRE Se il passaggio dalla registrazione in standby alla registrazione attiv...

Page 67: ...a sulla scheda SD è scaduto Eseguire il backup dei file presenti nella scheda SD su un computer quindi formattare la scheda SD Se si verifica qualsiasi altro errore spegnere l unità e riavviarla Se questi messaggi di errore continuano ad apparire frequentemente si prega di contattare il negozio dove è stata acquistata l unità o il servizio di assistenza clienti TASCAM Risoluzione dei problemi Se s...

Page 68: ...E OUT frequenza di campionamento 96 kHz JEITA Distorsione 0 05 o inferiore da EXT IN a LINE OUT frequenza di campionamento 44 1 48 96 kHz JEITA Rapporto S N 92 dB o superiore da EXT IN a LINE OUT frequenza di campionamento 44 1 48 96 kHz JEITA Nota JEITA indica la conformità allo standard JEITA CP 2150 Tempi di registrazione Formato file impostazione durante la registrazione Capacità della scheda ...

Page 69: ...вредить батареи или вызвать утечку что может вызвать пожар травму или повреждение поверхностей вокруг батарей При хранении и утилизации батарей изолируйте их терминалы изолентой или аналогичным средством чтобы предотвратить контакт с другими батареями или металлическими объектами При выбрасывании батарей соблюдайте инструкции по утилизации указанные на батареях и местное законодательство Не исполь...

Page 70: ...е доступна для пользователей Модель для ЕЭЗ Европейская экономическая зона Данное оборудование соответствует стандарту EN 62311 Оценка соответствия параметров элек тронного и электро оборудования предельным значениям воздействия на человека электромаг нитного поля согласованный стандарт Директива 2014 53 EU Информация о соответствии требованиям по излучению помех Требования Феде ральной комиссии п...

Page 71: ...компьютеру 76 Обмен файлами с компьютером 76 Отключение устройства от компьютера 76 Дисплей настроек и информации 76 Выключение встроенного динамика 76 Системные настройки 76 Подключение устройства к смартффону через Wi Fi 76 Загрузка и установка эксклюзивного приложения DR CONTROL 76 Выбор режима Wi Fi 76 Прямое подключение рекордера к внешним устройствам смартфонам планшетам и компьютерам через ...

Page 72: ...ик выключен 5 Дисплей подачи фантомного питания Пусто фантомное питание не подается подается фантомное питание 48 В подается фантомное питание 24 В o Слот для карты SD p Переключатель HOLD БЛОКИ РОВКА a Разъём LINE OUT s Кнопка OUTPUT LEVEL ВЫХОДНОЙ УРОВЕНЬ d Кнопка Wi Fi Правая боковая панель f Переключатель EXT IN ВНЕШНИЙ ВХОД g Кнопка INPUT LEVEL ВХОДНОЙ УРОВЕНЬ h Регулятор громкости INPUT LEVE...

Page 73: ...спользование батарей AA 1 Снимите крышку отсека для батарей на задней панели 2 Установите 4 батареи типа АА так чтобы их полярность и совпадала с указателями в отсеке для батарей 3 Закройте крышку отсека для батарей ПРИМЕЧАНИЕ В разделе ТИП БАТАРЕЙ меню ПИТАНИЕ ДИСПЛЕЙ установите нужный тип батарей чтобы устройство точно отображало остаток заряда и правильно рассчитывало доста точно ли заряда для ...

Page 74: ...мости для настройки других категорий 8 По окончании нажмите кнопку 8 HOME для возврата в главный экран Структура меню МЕНЮ РЕЖИМ Переключение между режимами записи и воспро изведения НАСТРОЙКА ЗАП Настройки записи АВТО ФУНКЦИИ Удобные функции для записи файлов ОБЗОР только в режиме 4CH КОМПОЗИЦИЯ только в режиме MTR Работа с файлами и папками на карте SD ИНСТРУМЕНТЫ Настройка других удобных функци...

Page 75: ...При записи с микрофонного входа можно исполь зовать функцию регулировки уровня 1 Нажмите кнопку INPUT чтобы открыть экран НАСТРОЙКА ВХОДА 2 Назначение канала для активации функции регулировки уровня производится нажатием кнопок TRACK INPUT 3 С помощью регулятора выберите РЕГУЛИР УРОВ и нажмите кнопку ENTER MARK или кнопку для отображения на дисплее разделов настроек 4 После того как с помощью регу...

Page 76: ...файлы из компьютера в папку MUSIC Отключение устройства от компьютера Прежде чем отключить USB кабель следуйте инструкциям компьютера по правильному извле чению внешних дисков После завершения процессов устройство отключится Информацию об извлечении внешних дисков из компьютера смотрите в соответствующей инструкции по эксплуатации компьютера Дисплей настроек и информации Выключение встроенного дин...

Page 77: ...droid На устройстве откроется экран для ввода пароля 6 Введите пароль который показан на дисплее устройства Теперь соединение по Wi Fi между устрой ством DR 44WL и вашим смартфоном установлено и индикатор Wi Fi на устройстве будет гореть постоянно ПРИМЕЧАНИЕ Приведённое выше описание работы с устройством дано для справок Для более подробной информации обратитесь к руко водству по эксплуатации ваше...

Page 78: ... подключение будет возможно простым нажатием на кнопку Wi Fi на устройстве Пароли для двух последних подключений сохраняются в данном устройстве 8 8 Подключение смартфона или другого устройства к внешнему роутеру 1 Выберите Настройки w Wi Fi на устройстве Пример для устройства iOS Android 2 После включения Wi Fi устройства появится список SSID Wi Fi устройств Выберите иденти фикатор SSID внешнего ...

Page 79: ... не меняя при этом уровня записи Одновременная запись двух файлов с разным входным уровнем ДВОЙН ЗАПИСЬ Функция ДВОЙН ЗАП Главный экран w МЕNU w НАСТРОЙКА ЗАП w ДВОЙН ЗАП Изменение настроек функции ДВОЙН ЗАП Использование MS микрофона Главный экран w МЕNU w НАСТРОЙКА ЗАП w MS МИКРОФОН Настройте конфигурацию MS микрофона перед использованием Другие функции записи Установить метку во время записи Фу...

Page 80: ... восполь зоваться функцией РАЗДЕЛИТЬ необходимо под ключить рекордер к компьютеру и отредактировать имя файла Переполн файлов Общее число папок и файлов превышает 5000 Удалите ненужные файлы или переместите их на компьютер Ошиб имени файла В результате применения функции РАЗДЕЛИТЬ количество символов в имени создаваемого файла превысило максимально допустимое значение 200 Функция РАЗДЕЛИТЬ добавля...

Page 81: ...ведён до минимума Не выводится сигнал Проверьте подключение мониторов Убедитесь что громкость мониторов не сведена до минимума Убедитесь что уровень выхода не сведён до минимума Не включается запись Если используется внешнее устройство перепроверьте подключение Перепроверьте настройки входа Убедитесь что уровень записи не слишком низкий Убедитесь что карта SD не переполнена Убедитесь что количеств...

Page 82: ...в файлы формата WAV максимальное время записи будет вдвое дольше указанного Для записи в режиме ДВОЙН ЗАП в формате WAV BWF и для записи в 4 канальном режиме максимальная длительность записи в два раза меньше чем указано выше Wi Fi Стандарт беспроводной связи Соответствует стандарту IEEE 802 11b g n только 2 4 ГГц Режим беспроводной связи Режим К УСТРОЙТВ Простая точка доступа точка с ограниченным...

Page 83: ...repairs are covered by the warranty we will pay return surfaceshippingchargestoanydestinationwithintheUnitedStates LIMITATIONOFIMPLIEDWARRANTIES Any implied warranties INCLUDING WARRANTIES OF MERCHANTABILITY AND FITNESS FOR A PARTICULAR PURPOSE are limited in duration to the length of this warranty EXCLUSION OF DAMAGES TEAC s liability for any defective product is limited to repair or replacement ...

Page 84: ...s Indirizzo del commerciante Dirección del establecimiento 销售店地址 DR 44WL Memo WARRANTY TEAC CORPORATION https tascam jp jp Phone 81 42 356 9143 1 47 Ochiai Tama shi Tokyo 206 8530 Japan TEAC AMERICA INC https tascam com us Phone 1 323 726 0303 10410 Pioneer Blvd Suite 1 and 4 Santa Fe Springs California 90670 U S A TEAC UK Ltd https tascam eu Phone 44 1923 797205 Meridien House 69 71 Clarendon Roa...

Reviews: