background image

IMPORTANT SAFETY INSTRUCTIONS

TASCAM  DP-02/DP-02CF


This section gives you a brief guide to some operations on 
the DP-02/DP-02CF which may not be immediately obvi-
ous from looking at the panel controls.

Key names are written like this: 

LOCATE

SHIFT

 + 

CLEAR

 means “press and hold the 

SHIFT

 key and press 

CLEAR

.

Menu items are written like this: 

MENU


®


WAVE


®


IMPORT TRACK

, meaning “press the 

MENU

 key, select 

the 

WAVE

 menu, and then the 

IMPORT TRACK

 action.

You may find the same action listed more than once in 
this alphabetical list. That’s because different people use 
different words for the same things, so you may find both 
“Delete” and “Erase”, for example.

The list of popup messages and their meaning (“Messages” 
on page 54) may also be useful to you.

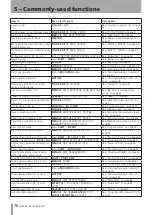
How do I..?

How to

Keys, etc. TO press

Description

Assign inputs to tracks

ASSIGN

 + 

REC

See “Assigning inputs” on page 23.

Back up a song to a PC

MENU


®


DATA BACKUP


®


SONG BACKUP

See “Backing up and restoring 
songs” on page 44.

Bounce tracks

BOUNCE

See “Bouncing” on page 34.

Change the display between minutes/ 
seconds and bar/beat

Dial from “home screen”

See “Working in bars & beats” on 
page 35.

Change the EQ frequencies

Press 

FREQ

See “EQ settings” on page 31.

Choose another disk partition as the 
active partition

MENU


®


DISK 

® 

PARTITION

 (DP-02) 

CARD


® 

PARTITION

 (DP-02CF)

See “Selecting the active partition” on 
page 38.

Connect the unit to a PC

MENU


®


USB


®


YES/ENTER

 (DP-02) 

USB


®


YES/ENTER

 (DP-02CF)

See “Using the USB connection” on 
page 42.

Copy a song

SONG


®


COPY

See “Copying songs” on page 41.

Copy and insert parts of a track

TRACK EDIT


®


COPY INSERT

See “COPY -> INSERT” on page 49.

Copy and paste parts of a track

TRACK EDIT


®


COPY PASTE

See “COPY -> PASTE” on page 48.

Create a new song

SONG


®


CREATE

See “Creating a new song” on page 
21.

Cut and close up part of a track

TRACK EDIT


CUT

See “CUT” on page 51.

Delete a song

SONG


®


ERASE

See “Erasing a song” on page 22.

Delete unused song data

SHIFT

 + 

CLEAR

See “Deleting unused data” on page 
26.

Display the current partition

SHIFT

 + 

SONG INFO

See “Song information” on page 23

Edit the IN and OUT and TO points

SHIFT

 + 

POINT EDIT

See “IN and OUT marks” on page 30.

Edit the location marks

Press 

µ

 + 

 at a time

See “Location marks” on page 29.

Erase a song

SONG


®


ERASE

See “Erasing a song(s)” on page 22.

Erase the whole of a track

TRACK EDIT


®


CLEAN OUT

See “CLEAN OUT” on page 52.

Export a stereo mix to PC

MENU


®


WAVE


®


EXPORT MASTER

.

See “Exporting the mastered stereo 
tracks” on page 47. 

Export a track's contents to PC

MENU


®


WAVE


®


EXPORT TRACK

See “Exporting tracks” on page 46.

Find out how much time is left for 
recording

SHIFT

 + 

SONG INFO

“Song information” on page 23.

Format one partition

MENU


®


DISK


®


REFORMAT

 (DP-02)


CARD


®


REFORMAT

 (DP-02CF)

See “Formatting a partition” on page 
40.

Format the disk

MENU


®


DISK


®


FORMAT

 (DP-02)


CARD


®


FORMAT

 (DP-02CF)

See “Formatting a disk/card” on 
page 39.

Format the FAT partition

MENU


®


DISK


®


FAT REFORMAT

 (DP-02) 

CARD


®


FAT REFORMAT

 (DP-02CF)

See “Formatting the FAT partition” on 
page 40.

Hands-free recording

AUTO PUNCH

, RHSL, etc

See “Punching” on page 32.

Import a WAV file to a track

MENU


®


WAVE


®


IMPORT TRACK

See “Importing a track” on page 45.

Insert silence at a point in a track

TRACK EDIT


®


OPEN

See “OPEN” on page 50.

Jump to a location mark

Press 

µ

 or 

≤ 

LOCATION LIST

 keys for the location mark list

See “Location marks” on page 29.

Jump to the IN and OUT and TO 
points

Press 

IN

OUT 

or 

TO

See “IN and OUT marks” on page 30.

5 – Commonly-used functions

Summary of Contents for DP-02

Page 1: ...D01001200A DP 02 DP 02CF DIGITAL PORTASTUDIO OWNER S MANUAL...

Page 2: ...ses and can radiate radio frequency energy and if not installed and used in accordance with the instruction manual may cause harmful interference to radio communications However there is no guarantee...

Page 3: ...manufacturer or sold with the apparatus When a cart is used use caution when moving the cart apparatus combination to avoid injury from tip over 13 Unplug this apparatus during lightning storms or whe...

Page 4: ...ulation is shown at 1 Optical pickup Type HOP 6201T Manufacturer Hitachi Media Electronics Co Ltd Laser output Less than 75 mW on the objective lens record Wavelength 777 to 787 nm CAUTION DO NOT REMO...

Page 5: ...Undoing the last action and redoing the undo action 25 Undoing Redoing actions at once 26 Deleting unused data 26 Mixdown and matering 27 Mixdown 27 Mastering 27 2 Advanced techniques 29 Location 29...

Page 6: ...ing the effect type 59 Selecting the effect 59 Setting the parameter 59 Setting the effect volume 59 Available multi effect settings 60 Electric guitar settings Elec Guitar 58 Acoustic guitar settings...

Page 7: ...We give hints and tips on using the DP 02 DP 02CF when you see this icon NOTE A note at the side of the main text provides addi tional explanations for special situations CAUTION A caution shows that...

Page 8: ...sed Older and some cheaper Compact Flash CF cards use slower memory components and little internal buffering which results in poor recording performance Newer CF cards not only perform reading and wri...

Page 9: ...N Do not remove the card when the unit is turned on Always turn the power off before you take the card out from the unit Starting up the unit Connect the power adaptor to the unit the power cable to t...

Page 10: ...onnect the power or open the CF card door DP 02CF only when the ACCESS indicator is lit to avoid damage to the recording media and possible loss of data How to play back demo songs DP 02 only Before t...

Page 11: ...t or confirm the action In these cases you should use the cursor keys or the DATA dial to highlight and select the item or use the YES ENTER key to enter the action If you want to adjust the contrast...

Page 12: ...to make a few connections to other equipment The following picture shows how you can connect the unit to your exist ing audio setup Instruments to INPUT A and B Microphones to INPUT Aand B Drum machi...

Page 13: ...02 only to tune the guitar or bass see Tuning a guitar on page 58 The INPUT MODE key You will use this key when you are recording from input A and input B at the same time This top panel key affects...

Page 14: ...re more powerful than others and you may need to turn down the control to prevent overloading Balanced XLR inputs SEND of the unit to the mono input of the processor 1 4 unbalanced jack NOTE The DP 02...

Page 15: ...hone jacks 5 INPUT MODE key and the indicators Use this key to select the MONO X 2 or STEREO modes see The INPUT MODE key on page 13 for details 6 EFFECT key A B key DP 02 only Pressing the EFFECT key...

Page 16: ...gh frequencies for each track r EQ LOW controls Adjusts the level of the low frequencies for each track t FREQ key This key brings up the E Q F R E Q U E N C Yscreen to adjust the high and low frequen...

Page 17: ...track The LRP key locates the playback position to where the last recording was ended and puts the unit in stop mode Last Rec Point LRP Press and hold down the STOP key and press the LRP key d STOP k...

Page 18: ...INFO key Press the HOME key to display the home screen on some screens this key does nothing With the SHIFT key pressed the SYSTEM INFO key is used to display the S Y S T E MI N F O R M A T I O Nscre...

Page 19: ...cording on the fly Q Disc slot on the DP 02 Discs should be inserted label side upwards into this slot ACCESS indicator On the DP 02 this indicator lights up or flashes while the unit is writing or im...

Page 20: ...in S PDIF format T MIDI OUT jack MIDI signals such as MIDI Clock MIDI Time Code and Song Position Pointer are output here Y LINE OUT L R RCA jacks The analog signals mixed in stereo are output U STER...

Page 21: ...38 and Advanced song management on page 41 NOTE Any recording made on the unit is referred to as a song even though it may only consist of instrumen tal tracks or spoken word Managing your songs Stor...

Page 22: ...se it 1 From the S O N Gmenu select the E R A S Eaction 2 Select a song that you want to erase using the cursor keys or DATA dial 3 When decided rotate the DATA dial clockwise to confirm the song to e...

Page 23: ...same time but you can t then use the other input or the two inputs can be assigned to different tracks You can t assign both inputs to the same track at the same time ASSIGN keys Eight REC keys 1 Pre...

Page 24: ...GH and EQ LOW equalization controls work in a similar way to the bass and treble tone controls on a stereo system The center click posi tion of the knob means there s no cut or boost for that control...

Page 25: ...ng and a song is being played back press the RECORD transport key to punch in When recording press the PLAY key to stop recording punch out If you have a footswitch connected to the PUNCH jack you can...

Page 26: ...ring starts at S T A R T U P 0at the bottom of the history list you can t change this list The top line on the list is the most recent event 2 Use the DATA dial to scroll up and down through the list...

Page 27: ...just the left right position of each track in the stereo mix To cut out the sound of a track use the SHIFT key and the track s REC key to mute the orange MUTE indicator lights for muted tracks and un...

Page 28: ...save a mix from the unit as a file you can transfer it via USB to a computer see Exporting the mastered stereo tracks on page 47 If a song has had a master stereo mix recorded and saved with it you ca...

Page 29: ...from the position whose value has just been entered Location marks The unit can store up to 999 location marks per song Use these to mark the start of verses vocal entry points etc To set a location...

Page 30: ...fader controls the level of these meters Using the meters These marks are used for setting the points at which auto mated punch recording starts and ends and for repeat playback as well as for track e...

Page 31: ...dually for each channel T I P This can help you emphasize the particular frequency ranges on a track 1 Press the FREQ key The display shows 2 Use the cursor keys to highlight frequency you want to cha...

Page 32: ...l key so that it lights 5 Press the PLAY key Playback starts from before the IN point the PLAY indicator is lit At the IN point the playback of the armed track s stops The RECORD indicator starts to f...

Page 33: ...tus stays the same If you want to re record the punch turn AUTO PUNCH back on before recording again Punch recording The pre roll and post roll times can be set to suit your style of playing 1 Press M...

Page 34: ...3 Lead vox 1 4 Lead vox 2 5 Backing vox 1 6 Backing vox 2 7 Bounce mix L 8 Bounce mix R BOUNCE MASTER stereo You ve recorded the drums in stereo the bass and two rhythm guitars one acoustic and one e...

Page 35: ...a few famous exceptions Some country and folk songs as well as waltzes are in 3 4 Working in bars beats Besides working in minutes and seconds as explained in detail in Direct location on page 29 the...

Page 36: ...ecording and R E C P L A Y at recording and playback T I P The internal metronome is not output in the following instances While the BOUNCE key is lit While the MASTER key is flashing or is lit LEVEL...

Page 37: ...he O F Fsetting to C L K clock The unit now sends the messages described here from MIDI OUT when playing back or recording Connect the MIDI OUT of the unit to the MIDI IN of your MIDI instrument Consu...

Page 38: ...hich you can create new songs etc On the DP 02 1 From the M E N Uscreen select and enter the D I S K 2 Highlight the P A R T I T I O Naction and press the cursor or YES ENTER key The display shows An...

Page 39: ...size of the remaining space 4 Press YES ENTER A message reminds you that all songs will be lost WARNING It is most important that the power to the unit is not turned off when the disk is being formatt...

Page 40: ...s the way to do it You use the R E F O R M A Tscreen to format a partition CAUTION You cannot undo this operation all data on the selected partition will be lost ONLY CARRY OUT THIS OPERATION IF YOU A...

Page 41: ...ong to another partition 1 From the S O N Gmenu select the C O P Yaction 2 Use the cursor keys to highlight a song and rotate the DATA dial clockwise to confirm the song to copy A appears in the check...

Page 42: ...songs for copying deletion etc a key icon appears beside any protected song If you try to do an action which cannot be performed on a protected song a message appears Song Protected Unprotect a song...

Page 43: ...u can disconnect the unit Before using the unit s FAT partition you must open the system so that it can be read by the PC While the system is open you cannot perform any recording playback etc or any...

Page 44: ...an now use the left and right cursor keys and the dial to name the song archive up to 8 charac ters see Titling on page 11 5 Press YES ENTER to back up the song to the FAT partition An error message a...

Page 45: ...WAV extension Audio in other formats intended for import must be converted before they can be imported to the unit This is basically the reverse of the backup process allow ing you to transfer a song...

Page 46: ...es not contain audio it does not appear in this list 3 Use the DATA dial or cursor keys to highlight a track and rotate the DATA dial clockwise to mark it for export A appears on the check box Repeat...

Page 47: ...ith the name you just entered and a WAV extension 5 Connect the unit to the computer and open the recording media Open and Close on page 43 6 Use the PC operating system to copy or move the exported m...

Page 48: ...acks 1 through 8 here If you have selected a pair of tracks for instance 1 2 you can only select track pairs here If you have selected all tracks 1 8 then 1 8 is the only option available to you here...

Page 49: ...of a track or tracks marked by the IN and OUT points copies it and inserts it on the chosen track or tracks as new material starting at the TO point The original source is left unchanged The insert o...

Page 50: ...cks DESTINATION TRK This sets the destination track or tracks into which the selected section is inserted What you can select here depends on what you have selected for the source track If you have se...

Page 51: ...mix in the following way Mix down to the mix master track using the EFFECT SEND and EFFECT RETURN Mixdown and master ing on page 27 to add reverb to your mix Clone the stereo mix to a pair of tracks C...

Page 52: ...5 6 7 8 or all the tracks 1 8 Press YES ENTER to perform the operation or NO EXIT to leave this screen CLEAN OUT Disconnect the drum machine from the STEREO MIX and connect it to the RETURN jacks Make...

Page 53: ...unit set appropriately for the input source If you re recording an acoustic instrument are you sure you re not sending it through an electric guitar effect DP 02 only Are you listening at too high a v...

Page 54: ...onnect the unit to a computer and free up some space on the FAT partition No Armed Track You re trying to set up auto punching with no tracks armed Punching recording on page 25 Arm a track or tracks...

Page 55: ...utput level 6 dBV EFFECT SEND 1 x 1 4 phone unbalanced Output impedance 1 k Nominal output level 10 dBV Maximum output level 6 dBV PHONES 1 4 stereo jack Maximum output 25 mW 25 mW into 30 Digital spe...

Page 56: ...IMPORTANT SAFETY PRECAUTIONS 56 TASCAM DP 02 DP 02CF 3 Specifications Dimensional drawings DP 02 DP 02CF...

Page 57: ...UTE MUTE INPUT A L INPUT A R INPUT B R INPUT B L STEREO L STEREO R NONE NONE MTR Input Assign Record Source Select REC REC REC On On On Off Off Off Reverb Guitar Tuner Multi Effect Tuner Reverb Algori...

Page 58: ...f you need to do this Noise reduction When you are recording the background noise of micro phones or the noise from guitar amplifiers etc may be too loud The unit allows you to gate this noise and onl...

Page 59: ...bring up the multi effect selec tion and editing screen Use the cursor keys to highlight the T Y P Evalue Rotate the DATA dial to scroll through the different effect types available Elec Guitar Elect...

Page 60: ...re delay expands the treble emphasized sound CompChr2 A good backing sound Rhythm1 A backing sound with an edge to it Rhythm2 Smooth backing sound suitable for jazz Rhythm3 A harder backing sound Funk...

Page 61: ...p Run Away Play a cutting sound using a pick Remains Double neck 12 string sound Nostalgi Tube based overdrive RealDst1 Distortion only influenced by a large stack RealDst2 Distortion only influenced...

Page 62: ...native to the exter nal SEND RETURN loop with an external effect processor see Effect processor on page 13 You cannot use both at the same time T I P Reverb is short for reverberation the sound produc...

Page 63: ...CD R and CD RW discs in their cases to avoid dirt and dust accumulating on their surfaces When labeling CD R and CD RW discs always use a soft oil based felt tipped pen to write the information Never...

Page 64: ...cause the laser pickup to skip Keep discs away from direct sunlight and places of high heat and humidity If left in such places warping could result Do not affix any labels or stickers to the label si...

Page 65: ...n finalized N 8cm CDDA standard format Commercially available CD N Format other than CDDA standard Commercially available CD protected CD DATA CD CD extra etc B Format other than CDDA standard CD R CD...

Page 66: ...til the unit pulls the disc in When the disc has been loaded the following C D P L A Y E R display is shown Press the EJECT key to eject the disc Inserting Ejecting CDs NOTE When the EJECT key does no...

Page 67: ...DAO With DAO the track order can be set when writing two or more tracks A silent gap of any desired length can also be added between tracks 1 Insert a blank CD R or an erased CD RW into the slot 2 Pre...

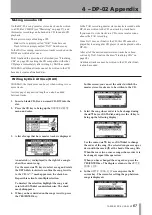
Page 68: ...With Track at Once a silent gap of two seconds is auto matically added at the end of each track 1 Press the CD key to bring up the M A S T E R W R I T E menu and press YES ENTER 2 A list of songs inc...

Page 69: ...onverted before the import operation Importing and exporting tracks You can read WAV format files recorded on data CDs and import these files to tracks of the currently loaded song 1 Insert a CD conta...

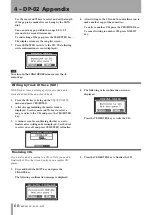
Page 70: ...highlight the track and rotate the DATA dial counterclockwise The check mark disappears To edit a track name Press and hold down the SHIFT key and press the TITLE key The following screen is displayed...

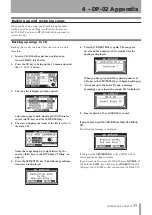
Page 71: ...y again The songs are saved and the number of CDs required for the backup is displayed When you have prepared the required number of CDs press the YES ENTER key to begin backing up 7 After backup to t...

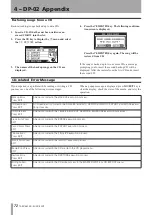
Page 72: ...CD read error occurred in the FINALIZE BACKUP RESTORE IMPORT EXPORT and ERASE execu tion processes CD Write Error Press EXIT An error occurred in the FINALIZE BACKUP RESTORE and ERASE execution proces...

Page 73: ...CD RESTORE menu Insert a CD written with backup data Invalid CD Insert Blank CD An invalid CD has been inserted Insert a blank CD A CD other than a blank CD has been inserted when writing to CD by th...

Page 74: ...to write to again No Room On HD Press EXIT Not enough room on hard disk Exit the menu There is no free space to make the CD image file on hard disk when writing to CD is started in the MASTER WRITE C...

Page 75: ...ts of a track TRACK EDIT C O P Y P A S T E See COPY PASTE on page 48 Create a new song SONG C R E A T E See Creating a new song on page 21 Cut and close up part of a track TRACK EDIT C U T See CUT on...

Page 76: ...ongs on page 21 Save a stereo mix to PC MENU W A V E E X P O R T M A S T E R See Exporting the mastered stereo tracks on page 47 Save a track s contents to PC MENU W A V E E X P O R T T R A C K See Ex...

Page 77: ...IMPORTANT SAFETY INSTRUCTIONS TASCAM DP 02 DP 02CF 77 Notes For China...

Page 78: ...IMPORTANT SAFETY PRECAUTIONS 78 TASCAM DP 02 DP 02CF 4 DP 02 Appendix Notes...

Page 79: ...TASCAM DP 02 DP 02CF 79 Notes...

Page 80: ...39 Wallace Street Mississauga Ontario L4Z 1Z8 Canada TEAC MEXICO S A De C V Phone 52 555 581 5500 www tascam com Campesinos No 184 Colonia Granjes Esmeralda Delegacion Iztapalapa CP 09810 Mexico DF TE...

Reviews: