background image

76


TASCAM  DP-008EX

12 – Exchanging Data with a Computer

CAUTION

• 

This unit receives power from batteries or a 

TASCAM PS-P520 AC adaptor. It cannot be 

powered over USB.

• 

Do not make a USB connection when the 

remaining battery level is low. If the power turns 

OFF during data transfer, all the data will be lost. 

This lost data cannot be restored.

• 

Do not change the names of the three folders in 

“DP-008EX”.

• 

The total number of files and folders that this 

unit can recognize on a FAT partition is 100. If the 

number exceeds 100, transfer them to a computer 

hard drive, for example.

NOTE

• 

This unit can only be connected to a computer 

by USB when the recorder mode is set to 

MULTI 

TRACK

.

• 

Before connecting the unit and the computer by 

USB, confirm that you have exported or backed up 

to the FAT partition all the files that you want to 

transfer to the computer.

• 

The “UTILITY” folder is used to update the unit’s 

system software, for example.

Disconnecting

Follow these steps to properly end the USB 

connection.

CAUTION

When transferring data, do not disconnect the unit 

or remove the USB cable. Doing so could cause 

data on the computer or this unit to be damaged.

NOTE

The procedure on the computer for disconnecting 

might be called “eject” or “unmount”.

Disconnecting from Windows XP/Windows Vista/

Windows 7
Follow the procedures below to disconnect 

computers that use Windows XP, Windows Vista, or 

Windows 7 operating systems.
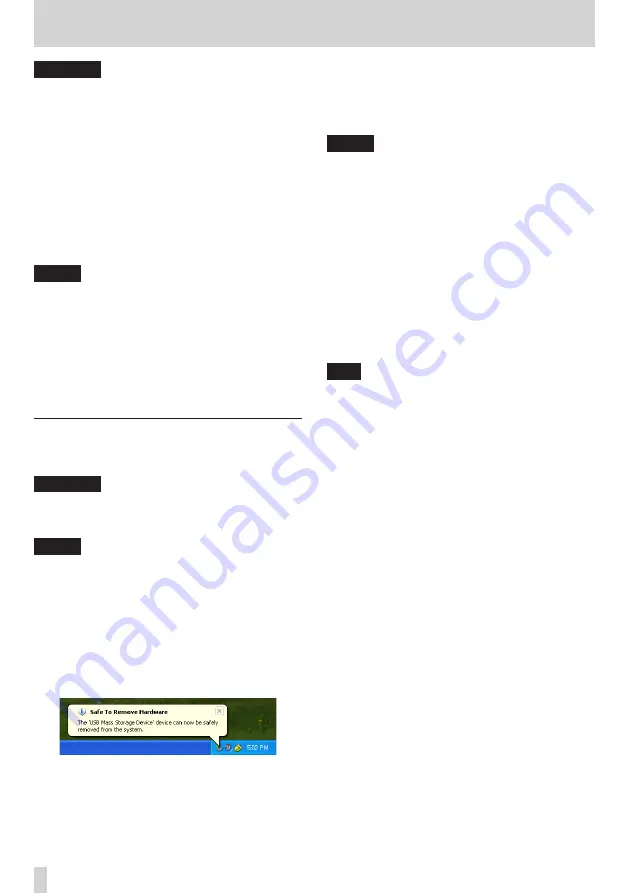
A PC card icon and arrow appear in the taskbar 

(usually at the bottom right of the screen).

1.  Left-click on this icon to open a pop-up bar. Click 

this pop-up bar to disconnect this unit from the 

computer.

2.  After a pop-up message appears on the computer 

display saying that the unit can be disconnected, 

remove the USB cable. 


The unit restarts automatically and the Home 

Screen opens on its display. 

NOTE

Do not remove the USB cable if a pop-up message 

warning that the unit cannot be disconnected 

safely appears on the computer display. Close all 

the computer programs and windows that are 

accessing (reading or writing) files on the unit, and 

then try the operation again.

Disconnecting from Mac OS X
1.  Drag the “DP-008EX” icon that represents this unit 

to the Trash, or type Command-E to disconnect 

the DP-008EX.

2.  After the DP-008EX icon disappears from the 

desktop, remove the USB cable.


This unit restarts and the Home Screen appears 

on the display.

TIP

Depending on the OS version or OS settings you 

might also be able to eject the “DP-008EX” icon 

by clicking an eject button next to it in the Finder 

window or by using a control key.

Summary of Contents for DP-008EX

Page 1: ...OWNER S MANUAL D01175820A DP 008EX Digital Multitrack Recorder...

Page 2: ...does cause harmful interference to radio or television reception which can be deter mined by turning the equipment off and on the user is encouraged to try to correct the interference by one or more...

Page 3: ...14 Refer all servicing to qualified service personnel Servicing is required when the apparatus has been damaged in any way such as power supply cord or plug is damaged liquid has been spilled or objec...

Page 4: ...l of batteries and or accumulators a Waste batteries and or accumulators should be disposed of separately from the municipal waste stream via designated collection facilities appointed by the governme...

Page 5: ...ns around them Do not carry or store batteries together with small metal objects The batteries could short causing leak rupture or other trouble Do not heat or disassemble batteries Do not put them in...

Page 6: ...contrast 36 Setting the backlight 36 5 Song Management 37 Partitions and songs 37 Selecting the active partition 37 Editing names 38 Loading a saved song 38 Creating a new song 39 Saving a song 39 Vie...

Page 7: ...Functions 69 Metronome 69 Tuner 69 Chromatic tuner mode 69 Oscillator mode 70 Automatic power saving function 70 Restoring preferences to default values 71 Viewing information 71 11 SD Card Managemen...

Page 8: ...ain settings Guitars and basses can be directly connected to 2 mic line inputs INPUT A B Independent LEVEL PAN and REVERB knobs for each track allow intuitive operation Wheel allows rapid location to...

Page 9: ...gistered trademarks or trademarks of Microsoft Corporation in the United States and or other countries Apple Macintosh iMac Mac OS and Mac OS X are trademarks of Apple Inc Other company names product...

Page 10: ...places Doing so could degrade the sound quality or cause malfunctions Places with significant vibrations Near windows or other places exposed to direct sunlight Near heaters or other extremely hot pla...

Page 11: ...n Home Screen CAUTION Do not remove or insert the SD card when the unit s power is ON Make sure the unit s power is OFF in standby mode before you remove or insert an SD card If you remove or insert a...

Page 12: ...4 t button to open the SONG LOADscreen that shows a list of songs 5 Use the DATA wheel to select highlight DEMO_8EX and press the F2 EXEC button The demo song loads and the SONGscreen reopens 6 Press...

Page 13: ...that you have already followed the instructions in the previous Playback and mixing section and that you have already connected headphones and installed an SD card TIP This example uses the built in...

Page 14: ...st the current input source for INPUT A is already selected highlighted 4 In order to use the external line input to record guitar to tracks 1 and 2 use the DATA wheel to set the INPUT A input source...

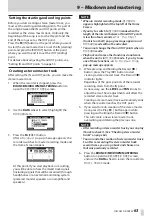
Page 15: ...7 After changing the setting press the HOME button to return to the Home Screen Setting the guitar as the TRACK 1 recording source When the recorder is stopped press the ASSIGN button to open the INP...

Page 16: ...o light even when the TRIM knob is turned down the guitar signal itself is too loud In this case if the input source is set to Ext Input Hi gh change it to Ext Input Midor Ext Input LINE Low If the in...

Page 17: ...to stop playback Record guitar to TRACK 2 Now you will record the lead guitar on TRACK 2 while listening to the rhythm guitar on TRACK 1 Use the following procedures to change the recording source for...

Page 18: ...Record 0 button to begin recording Play the lead guitar part The Record 0 indicator lights and the TRACK 2 REC indicator stops blinking and stays lit 9 When you are finished playing press the Stop 8 b...

Page 19: ...o Internal MIC Hi gh change it to Internal MIC Low If the OL indicator lights even when set to Internal MIC Low move the sound source away from the mic or lower the volume at the sound source When the...

Page 20: ...we will mix down the tracks and create a stereo master track 1 Use the TRACK 1 3 LEVEL knobs to adjust the level Use the MASTER LEVEL knob to adjust the overall level 2 Use the TRACK 1 3 PAN knobs to...

Page 21: ...t highlight MIXDOWN 9 Press the F4 EXEC button to put the unit into MIXDOWNmode After a Mixdown pop up message appears the Home Screen reopens NOTE When the recorder is in MIXDOWN mode MIXDOWN appears...

Page 22: ...en NOTE If there is no stereo master track a No Master T rkpop up message appears and you will not be able to switch to MASTERINGmode 4 Press the F3 AUTO button to switch the recorder to MASTERINGmode...

Page 23: ...ferring the stereo master track to a computer You can connect this unit to a computer using the included USB cable and transfer the stereo master track that you created in Creating stereo master track...

Page 24: ...phantom power is ON Turn phantom power ON only when using a condenser microphone that requires phantom power Do not supply phantom power to an unbalanced dynamic microphone Supplying phantom power to...

Page 25: ...plifier and speakers press that track s REC button When a REC button is ON its REC indicator blinks when the recorder is stopped and lights when it is recording On the INPUT ASSIGNscreen press this bu...

Page 26: ...st started LRP function on page 52 h Play 7 button Press this button to start playback While pressing the Record 0 button press this button to start recording Press this button again when recording to...

Page 27: ...MIC LINE For electric guitars and basses that are connected directly set it to GUITAR TIP When connecting an electric acoustic guitar with a built in preamp or an active electric guitar as well as wh...

Page 28: ...This allows to sharing importing and exporting files between the unit and the computer including backup of the song files See Connecting with a computer on page 75 DC IN 5V connector Connect a dedicat...

Page 29: ...indicator When repeat playback is active appears The icon appears when auto punch in out mode is active 7 Recorder time counter Shows the elapsed time from the start of the song 8 Cursor that shows t...

Page 30: ...directly access some setting screens as follows Button Function Reference BOUNCE MIXDOWN MASTERING Bounce tracks and create and refine stereo master tracks page 51 page 62 PHANTOM Turn phantom power...

Page 31: ...appears at the top bottom of the scrollbar in the right half of the screen In the MENUscreen shown above the b shows that there is at least one more item below DATA BUCKUP 0 If an item has a submenu...

Page 32: ...n switches SD cards have write protection switches Writing possible Write protected When a write protection switch is set to the LOCK position you will not be able to write files to the card or edit f...

Page 33: ...rs or an amplifier and speakers Do not wear headphones when turning the power ON or OFF putting it into standby because noise at such times could harm your hearing Shutting down Make the following pre...

Page 34: ...number of partitions for the card capacity The Home Screen appears after the format completes correctly NOTE To cancel formatting press the F4 NO button Depending on the SD card capacity the partition...

Page 35: ...ar panel connections Headphone Powered speakers or amplifier and speakers Mic to INPUT A B Guitar bass to INPUT A Keyboard to INPUT A B Drum machine Footswitch standard jack NOTE Before outputting sou...

Page 36: ...adjust it while the unit is in the actual position that you plan to use it in Adjusting the contrast might make it easier to read 4 After completing the setting press the HOME button to return to the...

Page 37: ...a song on it or create a new song Selecting the active partition If you want to use a file that is on a partition other than the currently active partition in order to load an existing song or create...

Page 38: ...position On the SONG BACKUP EXPORT TRACKand EXPORT MASTERscreens press the F3 INS button to insert the letter Aat the cursor position Press the F4 DEL button to delete the character at the cursor pos...

Page 39: ...song and during shutdown when it stores various information about operations conducted to that point You can also save a song at any time using the following procedures 1 When the recorder is stopped...

Page 40: ...otal are shown If the open space Free is less than the song data copying is not possible If you try to execute it a No Disk Spacepop up message appears to warn you that there is not enough free space...

Page 41: ...is stopped press the MENU button to open the MENUscreen 2 Use the DATA wheel to select highlight the SONGitem and press the F4 t button to open the SONGmenu screen 3 Use the DATA wheel to select high...

Page 42: ...ITAR switch on the left side panel appropriately Set it to GUITAR when connecting an electric guitar or electric bass directly Set it to MIC LINE when inputting a mic or line signal TIP When connectin...

Page 43: ...indicator lights the input source signal could be too loud or the LEVEL knob set too high If the OL indicator lights even if the LEVEL knob is set to MIN the input source signal is too high so lower t...

Page 44: ...8 3 When finished making settings press the HOME button to return to the Home Screen Using the input equalizers INPUT A and INPUT B each have a two band equalizer EQ Use the INPUT SETTINGscreen to se...

Page 45: ...en 3 Use the F3 5 and F4 b buttons to select highlight the following parameters and use the DATA wheel to adjust their values INPUT A or INPUT B Select the input that the dynamics effect is used on DY...

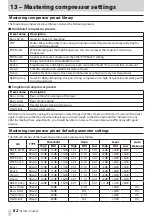
Page 46: ...alue that causes the compressor to activate when exceeded Range 32dB default 0dB RATIO Set the compression ratio Options 1 0 1 1 1 1 1 3 1 1 5 1 1 7 1 2 0 1 2 5 1 3 0 1 3 5 1 4 0 1 5 0 1 6 0 1 8 0 1 1...

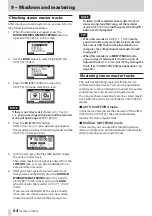
Page 47: ...ecorded simul taneously If you press a different REC button when the REC indicators of two tracks are already blinking the track that was put into record standby first will become inactive and the REC...

Page 48: ...d with the recorded sound follow the procedures above again from the beginning Multitrack recording You can record new audio to different tracks while playing back already recorded tracks Setting the...

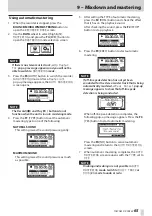
Page 49: ...restored to the most recently conducted operation so the UN REDO HISTORY indicator remains lit because further redo operations are possible Undoing a previous operation multi undo 1 Press and hold th...

Page 50: ...operation history is not restored so past operations cannot be undone or redone when the power is turned ON again You can also erase the operation history of the currently loaded song without turning...

Page 51: ...ack 8 Chorus R Source tracks are erased when they are bounce destinations In the illustration above the drum parts are overwritten by the stereo mix However you can use the unit s undo function to ret...

Page 52: ...eel to change the value above the cursor underlined When adjusting the value will carry over automatically when it reaches the highest or lowest value in a field For example when using the DATA wheel...

Page 53: ...T NOTE When the Home Screen is open you can also use the F3 and F4 buttons to set IN and OUT points even though these F3 F4 button assignments do not appear The set times will be shown with a SET IN o...

Page 54: ...o locate to the IN point Press the F2 button while pressing and holding the Stop 8 button to locate to the OUT point Punching in and out Punching in out is a technique to replace a part of an already...

Page 55: ...rehearse When rehearsing you can monitor as though recording without recording 1 Press TRACK REC buttons to use auto punch in out with those tracks 2 After setting the IN and OUT points press the Reco...

Page 56: ...points See Setting IN and OUT points on page 53 IN point The IN point is the beginning of the part of the track that will be edited Press the IN OUT button to open the I O SETTING screen and press the...

Page 57: ...iting However you cannot change the IN OUT and TO points when using a track editing function Set these points on the I O SETTINGscreen which you can open by pressing the IN OUT button Setting IN and O...

Page 58: ...SOURCE TRK 1 8 1 2 3 4 5 6 7 8 1 8 IN OUT TO DESTINATION TRK COPY TIMES COPY INSERT IN OUT TO IN OUT TO This function copies the audio data from between the IN and OUT points on the copy source track...

Page 59: ...move source track This operation inserts recorded data into the move destination track starting from the TO point Therefore the move destination track becomes longer This operation uses the following...

Page 60: ...n create a copy of a single track a track pair or a master track on a different track or tracks This copies the entire track so the IN and OUT points have no effect The parameters that can be set are...

Page 61: ...screen to set the track equal izers 1 Press the EQ button to open the EQ SETTING screen 2 Set the following parameters for the track equal izers Parameter Settings EQ SWITCH track equalizer switch On...

Page 62: ...e 2 1 8 60 INI appears below a setting value when it is the same as the default value for the TYPE Muting tracks 1 Press the EQ and REVERB buttons at the same time to open the TRACK MUTEscreen 2 Press...

Page 63: ...hlighted at the top left of the Home Screen If you try to switch to MIXDOWNmode when the length of the interval between IN and OUT points is less than four seconds a T rk T oo Short track is too short...

Page 64: ...tereo master track you can create a new one A new stereo master track will overwrite the previous one NOTE To listen to the recorded stereo master track of a saved song load that song set the recorder...

Page 65: ...d pressure gently MAXIMUM SOUND This setting raises the sound pressure as much as possible 5 After setting the TYPE of automatic mastering press the F2 RHSL button and check the effect that it has on...

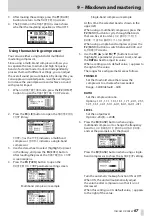
Page 66: ...ck with the master effects During recording the Record 0 indicator lights Recording always starts from the beginning of the song 00h00m00s00f regardless of the current playback position When in MASTER...

Page 67: ...ompressor example Single band compressor example At this time the selected band is shown in the upper left When using a multiband compressor press the F2 BAND button to cycle through the bands that ca...

Page 68: ...of the track and then increases the volume of the entire track so that the highest level is the maximum possible CAUTION If you use the mastering equalizer or compressor after normalization distortion...

Page 69: ...ing the its sound will not be recorded directly NOTE If you record using a mic while monitoring the metronome sound through connected speakers the metronome sound could be recorded When the metronome...

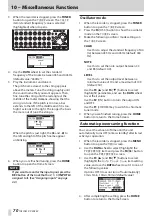
Page 70: ...ERscreen 2 Press the F4 OSC button to show the oscillator mode on the TUNERscreen 3 Make the following oscillator mode settings on the TUNERscreen CALIB Use this to adjust the standard frequency of A4...

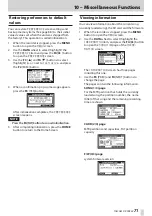
Page 71: ...pens NOTE Press the F4 NO button to cancel initialization 5 After completing initialization press the HOME button to return to the Home Screen Viewing information You can view information about the cu...

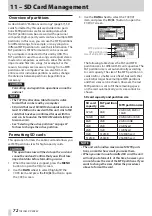
Page 72: ...SD cards This operation formats the entire card and allows you set MTR partition sizes for high capacity cards CAUTION This operation erases all the data on the card and cannot be undone Confirm that...

Page 73: ...e this function when you just want to format a specific partition without changing its size CAUTION You cannot undo this operation All the data on the selected partition will be erased so be certain t...

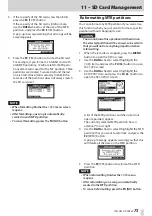
Page 74: ...tition NOTE When reformatting finishes the CARDmenu screen reopens To cancel reformatting press the F4 NO button Initializing SD cards If you want to use an SD card that was used with this unit to oth...

Page 75: ...port WAV files from a computer These WAV files are stored on the WAVE directory of this unit s FAT partition 8 8 Stereo master files Stereo master files can be transferred as stereo WAV files from the...

Page 76: ...the computer for disconnecting might be called eject or unmount Disconnecting from Windows XP Windows Vista Windows 7 Follow the procedures below to disconnect computers that use Windows XP Windows V...

Page 77: ...file name title of the song selected on the SONG BACKUPscreen 5 Edit the name title of the song being backed up as necessary See Editing names on page 38 6 After setting the name title press the F2 E...

Page 78: ...t button to open the DATA BACKUPscreen 6 Use the DATA wheel to select highlight the SONG RESTOREitem and press the F4 t button to open the SONG RESTOREscreen This screen shows the backup files on the...

Page 79: ...ect highlight the IMPORT EXPORTitem and press the F4 t button to open the IMPORT EXPORTscreen IMPORT EXPORTscreen appears 6 Use the DATA wheel to select highlight the IMPORT TRACKitem and press the F4...

Page 80: ...a checkbox select highlight that track and press the F4 4 button 5 When you finish selecting putting a 4 next to the tracks that you want to export press the F2 NEXT button The amount of open space o...

Page 81: ...press the F4 t button to open the IMPORT EXPORTscreen 3 Use the DATA wheel to select highlight the EXPORT MASTERitem and press the F4 t button to open the EXPORT MASTERscreen NOTE A Master T rack Not...

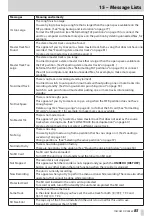
Page 82: ...g Hard Comp Results in fairly deep compression Hard Limit Deep limiter setting If distortion occurs when using the compressor lower the gain of the compressor bands or mix down the tracks again making...

Page 83: ...T A or INPUT B on the top panel of the unit set too high Is the input source too loud Is the monitoring level too high causing distortion from the external monitoring system powered monitor speakers o...

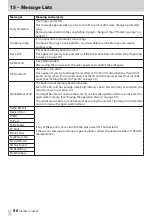
Page 84: ...he IN and OUT points are too close together Make sure the IN and OUT points are at least 2 frames apart See Using repeat playback on page 53 Import File Not Found The file you are trying to import can...

Page 85: ...hen the MTR partition does not have enough space Delete songs See Erasing songs on page 40 or format the SD card See Formatting SD cards on page 72 for example to make more space available No Master T...

Page 86: ...ge the recorder to MIXDOWNmode when the IN and OUT points are less than four seconds apart Set the IN and OUT points at least four seconds apart See Setting IN and OUT points on page 53 Work Memory Fu...

Page 87: ...3mm 1 4 TS standard jack Input impedance 10 k or more Standard Input level 10 dBV Maximum Input level 6 dBV Headroom 16dB Built in microphones Omnidirectional x2 LINE OUT jacks Connector RCA pin jacks...

Page 88: ...A standards used for recording and playback Dimensions W x H x D including protrusions 221 x 44 3 x 126 5 mm 8 7 x 1 74 x 4 98 in Weight w o batteries 610g 1 34lbs Operating temperature range 5 35 C B...

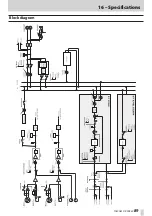
Page 89: ...TASCAM DP 008EX 89 16 Specifications Block diagram...

Page 90: ...d out the current partition MENUeINFORMATION Viewing song information on page 39 Make all of an SD card usable by a PC MENUeCARDeSD INITIALIZE Initializing SD cards on page 74 Format an SD card MENUeC...

Page 91: ...Playback a created stereo master track BOUNCE MIXDOWN MASTERING eMASTERING Checking stereo master tracks on page 64 Use mastering effects on a stereo master track BOUNCE MIXDOWN MASTERING eMASTERING...

Page 92: ...MEXICO S A de C V Phone 52 55 5010 6000 http teacmexico net R o Churubusco 364 Colonia Del Carmen Delegaci n Coyoac n CP 04100 M xico DF M xico TEAC UK LIMITED Phone 44 8451 302511 http tascam eu Sui...

Reviews: