TASCAM Model 16
1
Model 16
Checking the firmware version
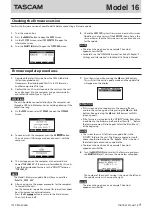
Confirm the firmware version of your Model 16 before conducting a firmware update.
1. Turn the main unit on.
2. Press the MENU button to open the
MENU
Screen.
3. On the
SYSTEM
Screen, select
INFORMATION
to open the
Information Screen.
4. Turn the MULTI JOG dial to open the
FIRMWARE
screen.
5. Check the
VERSION
(system firmware version) on this screen.
Updating is not necessary if the
VERSION
shown here is the
same or newer than the firmware version you intend to use
for the update.
NOTE
i
The screen shown above is an example. The actual
appearance will differ.
i
For details, see the “FIRMWARE screen” section of Chapter “9 –
Settings and Information” in the Model 16 Owners Manual.
Firmware update procedures
1. Download the latest firmware from the TEAC Global Site
(http://teac-global.com/).
Decompress the downloaded file if it is in ZIP format or
another compressed file type.
2. Confirm that an SD card is loaded in the unit, turn the unit
on and connect it to the computer using a commercially-
available USB cable (Type-A - Type-B).
ATTENTION
The unit should be connected directly to the computer, not
through a USB hub. Moreover, noise could be picked up if the
cable is too long.
3. On the
MENU
Screen, select
STORAGE
to open the
STORAGE
Screen.
4. To connect with the computer, press the F4
button.
The unit enters USB storage mode and connects with the
computer.
5. This unit appears on the computer as an external drive
named “
TASCAM_M
” (if the card was formatted by this unit).
Copy the downloaded firmware to the “
UTILITY
” folder on
“
TASCAM_M
”.
NOTE
The Model 16 firmware update file will have a name like
“
Model16_XXXX.XXX
”.
6. After copying, use the proper procedures for the computer
to unmount the unit.
See the computer’s operation manual for instructions about
how to unmount an external volume.
Press the F1
button to return to the Meter Screen.
Then, turn the unit off.
7. Turn the unit on while pressing the
8
and
m
buttons.
This will start the unit in update mode, and the update file
will appear on the display.
ATTENTION
i
If this screen does not appear, turn the power off once,
and turn the unit on again while pressing the
8
and
m
buttons. Keep pressing the
8
and
m
buttons until this
screen appears.
i
If the firmware was copied to the “
UTILITY
” folder from a Mac,
in addition to the firmware itself, another file with “
._
” before
the firmware name will also appear. Select the file without “
._
”
at the beginning.
NOTE
i
This screen shows a list of firmware update files in the
“
UTILITY
” folder in the unit. The firmware copied in step 5
above should also be shown. “
No Update File
” is shown if
the folder does not contain an update file.
i
The screen shown above is an example. The actual
appearance will differ.
8. Turn the MULTI JOG dial to select the firmware, and press
the MULTI JOG dial. The screen shown below will appear.
The number of the current version is shown on the left and
the update version is shown on the right.
NOTE
The screen shown above is an example. The actual
appearance will differ.
1019.MA-3036A


