III.Additional Adjustments and Features
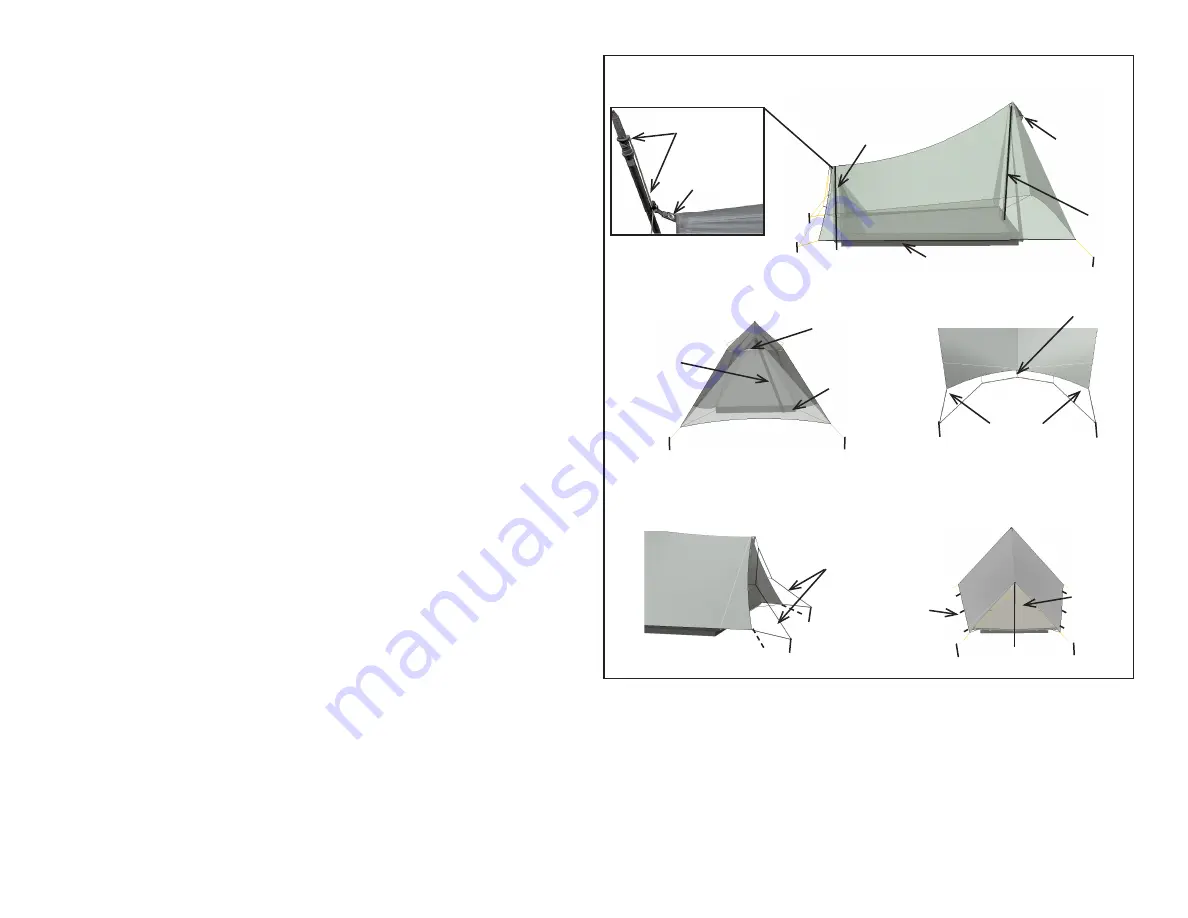
1. Beak rolls away and storm flap can be opened or closed from inside the tent
(Image 3B).
2. Use sidewall pullouts to further tension fly edge in bad weather (Image 3B).
3. Bathtub/floor height can be adjusted by line tighteners located at the front
corners of the interior (Image 2A).
4. Front apex guyline can be used for extra support in high winds or tied to a
fixed support as an alternative to the front pole (Image 2A).
1
Tarptent ProTrail Setup
With practice, setup is less than 2 minutes. For additional photos and videos
visit: http://www.tarptent.com/protrail.html
Your ProTrail order includes: stuff sack, tent body and 4 blue stakes. You will
need trekking poles OR substitute poles which can be ordered from Tarptent.
I. Layout and Positioning
1. Once you have found an ideal place to pitch your ProTrail, spread out
the tent body so the black bathtub floor is facing the ground. If you are
using a ground sheet, lay it down first.
2. Remove 4 blue stakes from the bag and have them ready to place in guyline
loops (2 stakes in front and 2 in back).
3. Set one trekking pole to the lowest setting (approx 24in/60cm)--this will
serve as the back pole. Set the other (front) pole to 45in/115cm (Image 1).
• If you are not using trekking poles, assemble substitute poles:
back pole=24in/60cm & front pole=45in/115cm. ground.
II. Pitching the ProTrail
1. Stretch out rear tent edge to prepare for back pole and stake placement.
• Place substitute or trekking pole tip into grommet hole and pole head on
the ground (Image 1).
• Trekking pole tip can be placed in the extendable O-ring if the length is
greater than 60cm/24in (Image 1 close up).
• If using O-ring, adjust guyline so the distance from the grommet to the
ground is 60cm/24in (Image 1 close up).
• Loop guyline over stake body and pull out both corners of the tent to give
guyline tension. Approx. 12in tail of guyline should remain unless using
higher trekking poles. Push stakes into the ground (Images 3A & 2B).
2. Locate the grommet under the apex vent at the front of the tent (Image 2A).
• Pull grommet firmly forward and wiggle it from side until it is centered
between the rear corners of the tent, creating a symmetrical ridge line.
• Insert optional pole or trekking pole tip into grommet hole and place
bottom of the pole on the ground slightly off vertical (Image 2A).
3. With one hand support the apex/top of the tent and with the other hand pull
out corner guyline with stake until tent body and guyline is taught. Push
stake into the ground and repeat with the other corner (see image 2A).
4. Adjust guyline tighteners and stake placement as needed—first at the back,
then at the front to ensure the body of the tent is taught without creasing.
• For further tension and shape, increase pole height OR decrease the angle
of the front pole by bringing it closer to vertical.
Front
apex
front pole
Adjust distance
to O ring to fit
trekking pole
grommet
bathtub/floor
Image 1
back pole
Image 2
(B.) Back
(A.) Front
stake
stake
24in/ 60cm
45in/115cm
pull to tighten
guylines
Image 3
beak
adjust bathtub
floor
adjustable
storm flap
(A.) Back
(B.) Back
sidewall
pullout
Back
front pole
(set off
vertical)
vent +
guyline
apex
rear
guylines
tensioned
back pole
guyline tail
(close up)


