background image

D14129.02—NOVEMBER 2008

18

Codec C90

Administrator Guide

Contents

Introduction

Getting started

About the menus

About the settings

Settings Library

Cameras

Appendices

Contact us

Admin. Settings menu

Administrator settings, 

cont...

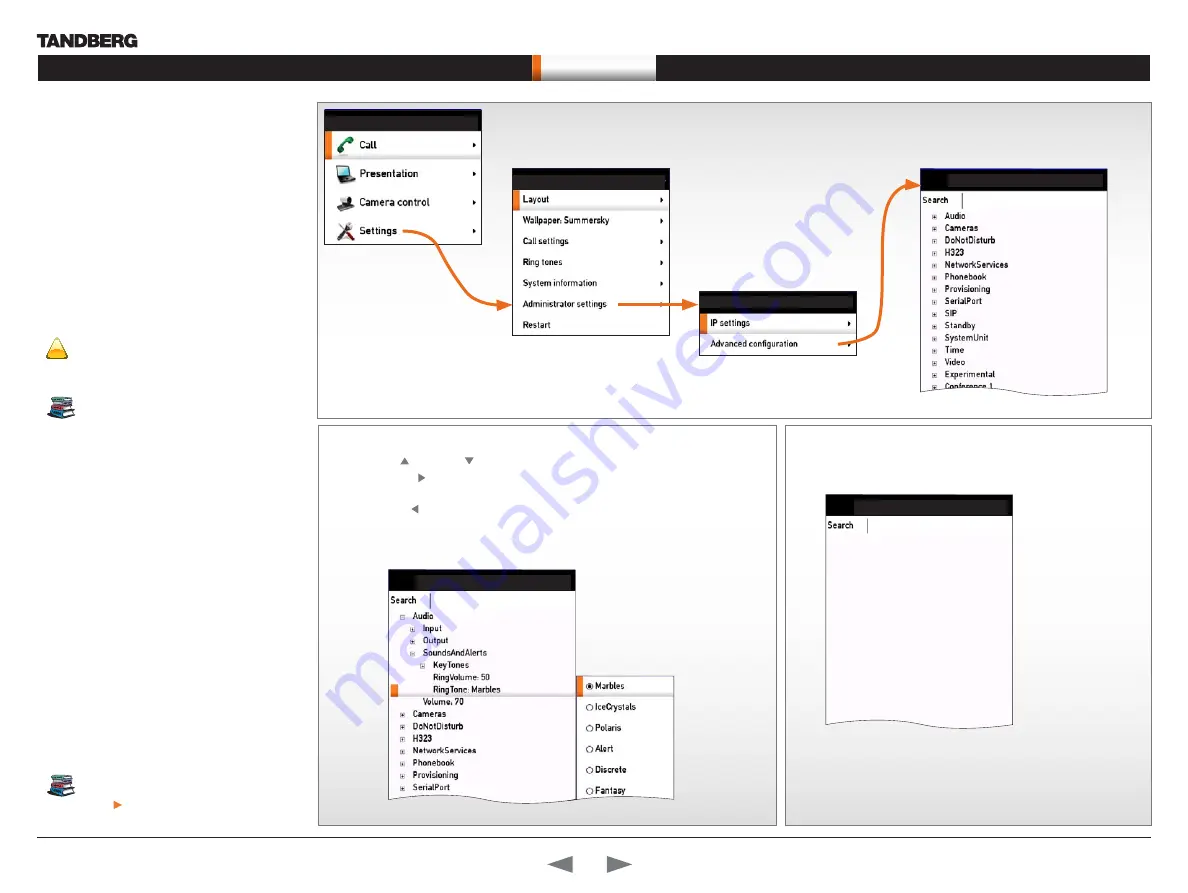
The Administrator settings menu lets the user:

Open the IP address menu to configure the IP 

• 

settings
Open the 

• 

Advanced configuration

 menu to 

access the system configuration settings

The Advanced configuration menu

The Advanced configuration defines the system 
settings. The system settings are structured in 
a hierarchy, making up a database of system 
settings.

!

Changes in the administrator settings may 
affect the behavior of the system and should 
be configured by the system administrator.

Each setting is explained in the  
administrator 

The settings library

 section. 

In this guide we will concentrate on what’s behind 
the 

Administrator Settings

 menu and leave the 

other menus to be explained in the Codec C90 
User Guide. 

You can download the Codec C90 User 
Guide from our web site.  
Go to:   

http://www.tandberg.com/docs

ADMINISTRATOR SETTINGS

SETTINGS

HOME

Search

Enter the as many characters as needed, until the setting you are 
searching for displays in the list.

ADVANCED CONFIGURATIONS

htt

NetworkServices HTTP Mode: On
NetworkServices HTTPS Mode: On

Navigate in the menu

Use the up 

1. 

 and down   arrow keys on the remote control to navigate in the menu

Press the right 

2. 

 arrow key to expand the selected menu item or to move to the 

right in a text field
Press the left 

3. 

 arrow key to go one step back in the menu or to move to the left in 

a text field
Press the OK/Select key to confirm your choice or selection

4. 

ADVANCED CONFIGURATIONS

ADVANCED CONFIGURATIONS

Summary of Contents for Codec C90 D14129.02

Page 1: ...D14129 02 NOVEMBER 2008 1 Software version TC1 0 NOVEMBER 2008 TANDBERG Codec C90 Administrator Guide ...

Page 2: ...The Camera settings 22 The Conference settings 23 The Do not disturb setting 24 The H323 Profile settings 24 The Network settings 25 The Network services settings 26 The Phone book server settings 28 The Provisioning settings 28 The Serial port settings 28 The SIP Profile settings 29 The Standby settings 29 The System unit settings 30 The Time zone setting 30 The Video settings 30 The Experimental...

Page 3: ...0 has been designed to give you many years of safe reliable operation How to read this document You will find that some places information has been copied from other chapters but adapted when needed to let you have all the relevant information there and then This helps eliminating the need to read through long sections before you can even think of getting started Our main objective with this user ...

Page 4: ...y effort has been made to supply complete and accurate information in this Administrator Guide however TANDBERG assumes no responsibility or liability for any errors or inaccuracies that may appear in this document INTELLECTUAL PROPERTY RIGHTS The Products that are covered by this Administrator Guide are protected under copyright patent and other intellectual property rights of various jurisdictio...

Page 5: ...oduct or any peripherals connected to the product where this action requires a tool This product should always be powered from an earthed power outlet Never connect attached power supply cord to other products In case any parts of the product has visual damage never attempt to connect main power or any other power source before consulting service personnel The plug connecting the power cord to the...

Page 6: ...s 2002 96 EC WEEE Waste Electrical and Electronic Equipment and 2002 95 EC RoHS The primary aim of the WEEE Directive and RoHS Directive is to reduce the impact of disposal of electrical and electronic equipment at end of life The WEEE Directive aims to reduce the amount of waste electrical and electronic equipment sent for disposal to landfill or incineration by requiring producers to arrange for...

Page 7: ...your system Using the remote control Turn on the system Verify IP address settings Setting a static IP address Add the system to the network Verify your settings Time zone settings About monitors This chapter introduces you to the codec and gets you up and going This guide has been divided into several chapters all of which provide different information You can access the chapters directly by clic...

Page 8: ...able LAN and line voltage to your codec Make sure the codec has been switched off and disconnected from the line voltage whenever connecting or disconnecting other equipment OPTIONAL Dual monitor setup Connect the second monitor to HDMI 3 Main camera Video from PrecisionHD 1080p OPTIONAL You may connect additional microphones Video from PC OPTIONAL You may connect a second camera extra camera not ...

Page 9: ...23 9 1 5 0 8 jkl tuv 2 abc 3 def mno wxyz 4 7 ghi pqrs 6 abc 123 9 1 5 0 8 jkl tuv 2 abc 3 def mno wxyz ARROW UP DOWN Use the up and down arrow keys to navigate in the menu OK SELECT Press the OK Select key to confirm your choice or selection 4 7 ghi pqrs 6 abc 123 9 1 5 0 8 jkl tuv 2 abc 3 def mno wxyz HOME Press the Home key to go back to the main menu 4 7 ghi pqrs 6 abc 123 9 1 5 0 8 jkl tuv 2 ...

Page 10: ...1 5 0 8 jkl tuv 2 abc 3 def mno wxyz 4 7 ghi pqrs 6 abc 123 9 1 5 0 8 jkl tuv 2 abc 3 def mno wxyz ALPHANUMERIC KEYPAD Use the keypad in the same way as you would use a cellular phone Using the Remote Control cont 4 7 ghi pqrs 6 abc 123 9 1 5 0 8 jkl tuv 2 abc 3 def mno wxyz The functions keys in the upper part of the remote control reflects the soft keys on screen and the middle part of the remot...

Page 11: ...vigate up and down in the menus Confirm your choice To confirm your choice press OK on the remote control 1 3 If you need to set a static IP address Go to IP Settings to set static IP addresses Navigate to Settings Administrator Settings IP Settings 1 Set IP Assignment to Static Press the left arrow key to go back one step 2 Enter the IP Address Subnet Mask and Gateway address in the address field...

Page 12: ...e System Information list You do this by accessing the System Information in the same way as you did when you verified you IP address setting Go to System Information to verify the settings Navigate to 1 Settings System Information Verify the previous configurations For example if you successfully registered 2 to a SIP server the Status will show Registered If the registration failed the Status wi...

Page 13: ...l be set to the default value which is 1280x720 60Hz for HDMI and 1024x768 60Hz for DVI The menu on screen icons and other information OSD on screen display will be moved to the selected output Key sequence If connected to DVI I 2 DVI I 4 or HDMI 3 you must run the following shortcut or key sequence on the remote control Disconnect 0 x where x is output 2 3 or 4 Example Set DVI I 2 as the OSD outp...

Page 14: ...dec C90 Administrator Guide Contents Introduction Getting started About the menus About the settings Settings Library Cameras Appendices Contact us About the menus About the menus In this chapter Explains the menu system Chapter 3 ...

Page 15: ...oom the camera Open the Settings menu to configure the system The Settings menu The Settings menu lets the user Open the Layout control menu to control the screen layout including selfview Select Wallpaper to chose a background picture on screen Open the Call settings menu to configure the default bit rate and auto answer settings Select Ring tones to chose a ring tone Open the System Information ...

Page 16: ...dministrator Guide Contents Introduction Getting started About the menus About the settings Settings Library Cameras Appendices Contact us Admin Settings menu The Settings menu In this chapter Explaining the administrator settings Chapter 4 ...

Page 17: ...a value from a drop down list and press the OK button to save or press the left arrow to leave without saving Enter a value text in a value text field Press Save to save the change or Cancel to leave without saving If IP Assignment is set to DHCP the IP address Subnet Mask and Gateway will automatically be assigned to the codec from the DHCP server If IP Assignment is set to Static the IP address ...

Page 18: ...d in the administrator The settings library section In this guide we will concentrate on what s behind the Administrator Settings menu and leave the other menus to be explained in the Codec C90 User Guide You can download the Codec C90 User Guide from our web site Go to http www tandberg com docs ADMINISTRATOR SETTINGS SETTINGS HOME Search Enter the as many characters as needed until the setting y...

Page 19: ...ot Disturb H323 Network Network Services Phone Book Server Provisioning Serial Port SIP Standby System Unit Video Chapter 5 This chapter gives a detailed description of the administrator settings The administrator settings defines the system settings and are structured in a hierarchy making up a database of system settings Note The description of the Administrator settings are preliminary and subj...

Page 20: ... the Audio Level tabels in the Codec C90 System Integrators Guide for a complete overview of the menu values represented in dB Range 0 to 18 dB Example Audio Input Microphone 1 Level 14 Audio Input Microphone 1 8 EchoControl Mode On Off The echo canceller continuously adjusts itself to the audio characteristics of the room and compensate for any changes it detects in the audio environment If the c...

Page 21: ...o On to enable the Audio Line output Off Set to Off to disable the Audio Line output Example Audio Output Line 1 Mode On Audio Output Line 1 3 Type Auto SPDIF Determines if the Audio Line output is an analog or digital type output Addresses the specified Audio Line output 1 or 3 Auto The system will select analog or digital SPDIF mode depending on the detected Audio Module If a TANDBERG Digital NA...

Page 22: ...er to control the camera brightness manually or to have it automatically adjusted by the system Addresses the specific camera Auto When set to Auto the camera brightness is automatically set by the system Manual Set to Manual to enable manual control of the camera brightness e g the level of the brightness level setting will be used for the camera Example Cameras Camera 1 Brightness Mode auto Came...

Page 23: ... 1 1 AutoAnswer Mode On Off The Autoanswer setting determines whether an incoming call is put through automatically or manually On The system will automatically answer all incoming calls Off All incoming call must be answered manually by pressing the OK key or the green Call key on the remote control Example Conference 1 AutoAnswer Mode Off Conference 1 1 AutoAnswer Delay 0 50 Defines how long in ...

Page 24: ... 6555 Example H323 Profile 1 PortAllocation Dynamic H323 Profile 1 1 H323Alias ID S 0 49 Lets you specify the H 323 Alias ID which is used to address the system on a H 323 Gatekeeper and will be displayed in the call lists Example name surname company com My H 323 Alias ID Format String with a maximum of 49 characters Example H323 Profile 1 H323Alias ID H323 Profile 1 1 H323Alias E164 S 0 30 The H...

Page 25: ...ff On If the H 323 Gatekeeper Authentication Mode is set to On and a H 323 Gatekeeper indicates that it requires authentication the system will try to authenticate itself to the gatekeeper Requires the Authentication ID and Authentication Password to be defined on both the codec and the Gatekeeper Off If the H 323 Gatekeeper Authentication Mode is set to Off the system will not try to authenticate...

Page 26: ... Diffserv Signalling 0 Network 1 1 IPv4 QoS Diffserv Video 0 63 The DiffServ Video setting is used to define which priority Video packets should have in an IP network Enter a priority which ranges from 0 to 63 for the packets The higher the number the higher the priority These priorities might be overridden when packets are leaving the network controlled by the local network administrator Video A ...

Page 27: ... important events Can be used to send event created messages to the SNMP agent about different events like system reboot system dialing system disconnecting MCU call packet loss etc Traps can be sent to multiple SNMP Trap Hosts Format String with a maximum of 64 characters Example NetworkServices SNMP HostIpAddress 1 NetworkServices H323 Mode On Off Determines whether the system should be able to ...

Page 28: ...a maximum of 255 characters Example Provisioning ExternalManager Path The Phone book server settings The Provisioning settings Provisioning Mode Off TMS Provides the possibility of managing the codec endpoint by using an external manager management system Off The system will not try to register to any management system TMS If set to TMS the system will try to register with a TMS server as describe...

Page 29: ... Must be used when registering to a Nortel MCS 5100 or MCS 5200 PBX Microsoft Must be used when registering to a Microsoft LCS or OCS server Cisco Must be used when registering to a Cisco CallManager version 5 or later Alcatel Must be used when registering to a Alcatel Lucent OmniPCX Enterprise R7 or later Siemens Must be used when registering to a Siemens HiPath 8000 Telio Must be used in combina...

Page 30: ...ideo Input Matrix in the Interfaces section Range 1 5 presentation sources Example Video DefaultPresentationSource 3 Video Monitors Single Dual The codec can be used with more than one monitor and this setting lets you set the codec s monitor layout mode to Single or Dual The dual output is provided on HDMI output 3 Single The same layout is shown on all monitors Dual The layout is distributed on ...

Page 31: ...r HDMI Video Input Source 2 Connector HDMI HDSDI YPbPr Select which video input connector to be active on connector group 2 HDMI Select HDMI when you want to use the HDMI 2 connector as input HDSDI Select HD SDI when you want to use the HD SDI 2 connector as input YPbPr Select YPbPr when you want to use the Y Pb Pr Component 2 connectors as input Example Video Input Source 2 Connector HDMI Video I...

Page 32: ...I 1 or 3 This will force the selected resolution on the monitor Range 640x480 60p 800x600 60p 1024x768 60p 1280x1024 60p 1280x720 60p 1920x1080 60p 1280x768 60p 1360x768 60p 1366x768 60p Example Video Output HDMI 1 Resolution 1920_1080_60 Video Output DVI 2 4 Resolution 640_480_60 800_600_60 1024_768_60 1280_1024_6 0 1280_720_60 1920_1080_60 1280_768_60 1360_768_60 1366_768_60 Select the preferred...

Page 33: ...act us Cameras Cameras Chapter 6 In this chapter The PrecisionHD 1080p camera Connecting the camera Best view Face recognition Video output formats Cameras in daisy chain Your TANDBERG PrecisionHD 1080p Camera has been designed to give you many years of safe reliable operation Additional information about the camera is found in the TANDBERG PrecisionHD 1080p User Guide ...

Page 34: ...m resolution is 1080p30 The HDMI and HD SDI can be used simultaneously The maximum resolution is then 1080p30 if you want both to run with the same resolution Kensington lock The Kensington lock may be used to prevent the camera to be moved from its place or to prevent theft Cascaded cameras The sockets named Extra Camera Out and Power In are used when connecting cameras in daisy chain The first c...

Page 35: ...d HDMI to DVI D adapter HD SDI socket HDMI and HD SDI can be used simultaneously VISCA is a trademark of Sony Corporation Connecting the camera The HDMI and HD SDI can be used simultaneously HDMI cable The HDMI cable delivered with the camera is 5 meters Maximum length is 15 meter with a category 2 certified good quality HDMI cable HD SDI cable The HD SDI cable must be purchased separately The max...

Page 36: ...ollowing The Best view optimization process may take up to 5 seconds The detection of faces works better when people look towards the camera The area from the eyebrows down to just below the lips should be uncovered Beard is normally not a problem Using Best view Note that Best view works with TANDBERG C90 Codecs only Press the 1 Layout key on the remote control to display the Layout menu Select S...

Page 37: ...n it is 50 or 60Hz You may set the video output format to a specific value use the DIP switches to override the auto frequency detection if a different line voltage frequency is an issue DIP Switch table for video formats 1 2 3 4 5 HDMI HD SDI 0 0 0 0 0 Auto 0 0 0 0 1 1920x1080p25 1920x1080p25 0 0 0 1 0 1920x1080p30 1920x1080p30 0 0 0 1 1 1920x1080p50 1280x720p50 0 0 1 0 0 1920x1080p60 1280x720p60...

Page 38: ...hain is powered up from the codec by the VISCA camera control cable Additional cameras must use the 12V DC Power in Extra camera cable The daisy chained cameras are connected by using the VISCA Extra Camera cable between the Extra Camera In and Codec Control In sockets Main camera Second camera Third camera Fourth camera Connect to the Camera Control socket on the Codec When used with TANDBERG Cod...

Page 39: ...er 7 In this chapter General room guidelines Executive meeting room setup High end meeting room setup Video input matrix Software upgrade Upload certificates XML files Log files NTP Time Zone expression Supported RFCs in SIP Remote Control TRC5 Remote Control key map PrecisionHD camera CE Declaration China RoHS Codec C90 dimensions PrescisionHD 1080p dim PrescisionHD dimensions Technical specifica...

Page 40: ...ilt and zoom features to adjust the picture The PC PC s placed on the table should not cover the microphones as this will reduce the audio quality at the far end Position of the system Position the video system in such a way that all participants attending the meeting are visible to the far end If appropriate the far end should be able to see people entering or leaving the room The document camera...

Page 41: ...tween the people Adjust the camera view using zoom in out to allow the participants to be shown in full size on screen and to keep eye contact with each other at the same eye level If the participants are sitting too close to the monitor the camera will look down at the participants This may not give a good presentation of the participants at the far end The far end participants The best audio qua...

Page 42: ...act with each other at the same eye level The camera should capture all participants in the room If the participants are sitting too close to the monitor the camera will look down at the participants This may not give a good presentation of the participants at the far end The speaker module There should be free sight between the system speaker module and the ear of the participants The microphones...

Page 43: ... control the default presentation source is activated The DVI VGA input is compliant with VESA Extended Display Identification Data EDID and will be able to notify the PC of the supported output formats Troubleshooting if the presentation does not show On most PC s you must press a special key combination to switch the PC image from the PC screen to the video screen Make sure the connector used fo...

Page 44: ...eye contact with each other at the same eye level The camera should capture all participants in the room If the participants are sitting too close to the monitor the camera will look down at the participants This may not give a good presentation of the participants at the far end The speaker module There should be free sight between the system speaker module and the ear of the participants The mic...

Page 45: ...n 3 on the remote control the default presentation source is activated The DVI VGA input is compliant with VESA Extended Display Identification Data EDID and will be able to notify the PC of the supported output formats Troubleshooting if the presentation does not show On most PC s you must press a special key combination to switch the PC image from the PC screen to the video screen Make sure the ...

Page 46: ...source and the default presentation source for the system the following setting must be configured Video MainVideoSource 1 Video DefaultPresentationSource 3 Comp 5 and YC 5 are not supported in version 1 Administrator settings Open the menu on screen to configure the video input sources and which of the sources should be the main video source and the default presentation source If the system is in...

Page 47: ...ade The Upgrade tab lets you select the software upgrade file for TANDBERG Codec C90 and install the new software Please follow the procedure described on this page Open a web browser and enter the 1 IP address to connect to the Codec C90 by HTTP Select the 2 Upgrade tab Click 3 Browse and locate the upgrade file PKG Click the 4 Install software button to start the installation Leave the system fo...

Page 48: ...h system For TLS connections a ROOT Certificate CA list can be uploaded from the web interface When the SIP setting TlsVerify is enabled only TLS connections to servers whom x 509 certificate is validated against the CA list will be allowed Go to Settings Administrator settings Advanced configuration SIP Profile TlsVerify To install a certificate you need HTTPS certificate PEM format ROOT certific...

Page 49: ... disabling of various features etc The configuration commands are structured in a hierarchy making up a database of system settings Status Status type commands returns information about the system and system processes and are issued from the API Status type commands are read by the user Example Information generated by the system about ongoing calls network status conference status etc All status ...

Page 50: ...us Appendices Debug log files Select a debug log file by clicking on the name of the file Some of the log files can be opened or saved Log files In the Logs tab you will find debug log files These are TANDBERG specific debug files which may be required by TANDBERG in the need of technical support Some of the log files can be saved You will then see the following dialog box ...

Page 51: ...merica Campo_Grande America Cancun America Caracas America Catamarca America Cayenne America Cayman America Chicago America Chihuahua America Coral_Harbour America Cordoba America Costa_Rica America Cuiaba America Curacao America Danmarkshavn America Dawson America Dawson_Creek America Denver America Detroit America Dominica America Edmonton America Eirunepe America El_Salvador America Ensenada Am...

Page 52: ...za Asia Harbin Asia Ho_Chi_Minh Asia Hong_Kong Asia Hovd Asia Irkutsk Asia Istanbul Asia Jakarta Asia Jayapura Asia Jerusalem Asia Kabul Asia Kamchatka Asia Karachi Asia Kashgar Asia Katmandu Asia Kolkata Asia Krasnoyarsk Asia Kuala_Lumpur Asia Kuching Asia Kuwait Asia Macao Asia Macau Asia Magadan Asia Makassar Asia Manila Asia Muscat Asia Nicosia Asia Novosibirsk Asia Omsk Asia Oral Asia Phnom_P...

Page 53: ...kholm Europe Tallinn Europe Tirane Europe Tiraspol Europe Uzhgorod Europe Vaduz Europe Vatican Europe Vienna Europe Vilnius Europe Volgograd Europe Warsaw Europe Zagreb Europe Zaporozhye Europe Zurich Factory GB GB Eire GMT GMT 0 GMT0 GMT 0 Greenwich Hongkong HST Iceland Indian Indian Antananarivo Indian Chagos Indian Christmas Indian Cocos Indian Comoro Indian Kerguelen Indian Mahe Indian Maldive...

Page 54: ...ses in SIP RFC 3263 Locating SIP Servers RFC 3264 An Offer Answer Model with SDP RFC 3311 UPDATE method RFC 3361 DHCP Option for SIP Servers RFC 3420 Internet Media Type message sipfrag RFC 3515 Refer method RFC 3550 RTP A Transport Protocol for Real Time Applications RFC 3581 Symmetric Response Routing RFC 3605 RTCP attribute in SDP RFC 3711 The Secure Real time Transport Protocol SRTP RFC 3840 I...

Page 55: ...tation Zoom Press the or on the key to zoom the camera in and out Arrows Up Down Use the and arrow keys to navigate in the menu Arrow Right Press the arrow key to expand the selected menu item or to move to the right in a text field Arrow Left Press the arrow key to go one step back in the menu or to move to the left in a text field Layout Press the key to display the Layout menu then select a vie...

Page 56: ...8 0 Number 8 9 9 0 Number 9 10 0A 0 Number 0 11 0B 0 12 0C 0 13 0D 14 0E 15 0F 16 10 17 11 0 Presenter 18 12 19 13 20 14 21 15 22 16 0 Zoom out 23 17 0 Zoom in 24 18 25 19 0 Volume down 26 1A 0 Volume up 27 1B 0 Microphone off 28 1C 29 1D 0 Arrow up 30 1E 0 Arrow down 31 1F 0 Arrow left 32 20 0 Arrow right IR Signal parameters Name Description Protocol Reference frequency Address IR wavelength IR ...

Page 57: ...MI HDMI is the main source for video out when connected to a Codec C90 Maximum resolution is 1280x720p30 This output does not support HDCP High Bandwidth Digital Content Protection Cascaded cameras The sockets named Extra Camera and Power In are used when connecting cameras in daisy chain The first camera in the chain is powered up by the camera control cable The next cameras must use the 12V DC P...

Page 58: ...ormity MANUFACTURER TANDBERG Telecom AS PRODUCT NAME TANDBERG Codec C90 TYPE NUMBER TTC6 09 DESCRIPTION Video Conferencing Equipment DIRECTIVES This equipment complies with LVD 2006 95 EC EMC 2004 108 EC HARMONIZED STANDARDS Applied in order to verify compliance with directives EN 60950 1 2001 A11 2004 EN 55022 2006 EN 55024 1998 A1 2001 A2 2003 EN 61000 3 2 2006 EN 61000 3 3 1995 A1 2001 A2 2005 ...

Page 59: ...59 Codec C90 Administrator Guide Contents Introduction Getting started About the menus About the settings Settings Library Cameras Appendices Contact us Appendices China RoHS table This product complies with the Chineese RoHS ...

Page 60: ...on Getting started About the menus About the settings Settings Library Cameras Appendices Contact us Appendices 0 2 3 0 0 1 0 8 6 0 5 8 2 0 2 4 4 0 5 6 4 0 8 8 0 6 6 0 6 8 4 TANDBERG Codec C90 dimensions The TANDBERG Codec C90 dimensions in mm Front view Left side view Top view ...

Page 61: ...ction Getting started About the menus About the settings Settings Library Cameras Appendices Contact us Appendices 220 0 105 0 20 5 105 9 eye centre 32 2 148 1 114 6 ø82 0 ø79 6 2 5 2 5 62 4 125 4 142 0 4 4 63 0 190 0 14 0 34 5 191 0 106 3 PrecisionHD 1080p camera dimensions ...

Page 62: ...2 NOVEMBER 2008 62 Codec C90 Administrator Guide Contents Introduction Getting started About the menus About the settings Settings Library Cameras Appendices Contact us Appendices PrecisionHD camera dimensions ...

Page 63: ...080p60 1280x720 60fps HD720p60 1366x768 60fps WXGA 1280x768 60fps WXGA 1024x768 60fps XGA 1280x1024 60fps SXGA 640x480 60fps VGA 800x600 60fps SVGA 1 x COMPOSITE OUTPUT BNC CONNECTOR supported formats PAL NTSC VESA Monitor Power Management LIVE VIDEO RESOLUTIONS ENCODE DECODE 176x144 30fps QCIF 352x288 30fps CIF 512x288 30fps w288p 576x448 30fps 448p 768x448 30fps w448p 704x576 30fps 4CIF 1024x576...

Page 64: ...camera Dual HDMI and HD SDI output Upside down mounting with automatic flipping of picture SYSTEM MANAGEMENT Support for the TANDBERG Management Suite Total management via embedded SNMP Telnet SSH XML SOAP Remote software upload via web server SCP HTTP HTTPS 1 x RS 232 local control and diagnostics Remote control and on screen menu system DIRECTORY SERVICES Support for Local directories My Contact...

Page 65: ...s Contact us Contact us U S HEADQUARTERS TANDBERG 1212 Avenue of the Americas 24th Floor New York NY 10036 Telephone 1 212 692 6500 Fax 1 212 692 6501 Video 1 212 692 6535 E mail tandberg tandberg com EUROPEAN HEADQUARTERS TANDBERG Philip Pedersens vei 20 1366 Lysaker Norway Telephone 47 67 125 125 Fax 47 67 125 234 Video 47 67 126 126 E mail tandberg tandberg com ...

Reviews: