background image

TALARIA POWER TECH (CHONGQING) CO., LTD.

IX. Troubleshooting

— 33 —

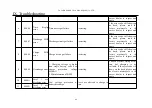
12

0000C

Level

1

over

discharge current
error

The battery discharge current is
greater

than

the

level

1

overcurrent

protection

threshold.

Stop the over current discharge or
reduce the discharge current for 1
minute, the error will disappear
automatically.

If the error code still shows on
the dash, please send the
electric

motorcycle

to

the

nearest dealer to inspect and
repair.

13

0000D

Level

2

over

discharge current
error

The battery discharge current is
greater

than

the

level

2

overcurrent

protection

threshold.

Stop the over current discharge or
control the discharge current less
than 110A, or check whether
there's the short circuit? If yes,
eliminate the short circuit.

If the error code still shows on
the dash, please send the
electric

motorcycle

to

the

nearest dealer to inspect and
repair.

14

0000E

Over
charging-current
error

The charging current is greater
than the protection threshold.

Check to see the charger is the
right one to match the battery.

If the error code still shows on
the dash, please send the
electric

motorcycle

to

the

nearest dealer to inspect and
repair.

15

0000F

Soft start failure
error

When the battery is connected
with load, the external load
capacitance

is

too

large,

resulting in failure to start
directly.

Please power on and start the
electric motorcycle according to
the instructions.

16

00010

Overtime
pre-charge error

1. BMS fault.
2. Charger is damaged or does
not match.

If the error code still shows on
the dash, please send the
electric

motorcycle

to

the

nearest dealer to inspect and
repair.

17

00020

MOS
temperature
sensor fault error

MOS temperature sensor fault

Restarting

If the error code still shows on
the dash, please send the
electric

motorcycle

to

the

nearest dealer to inspect and

33

Summary of Contents for STING TL3000 L1E

Page 1: ...Talaria Owner s Manual Sting TALARIA POWER TECH CHONGQING CO LTD...

Page 2: ...TALARIA POWER TECH CHONGQING CO LTD STING TL3000 L1E Owner s Manual...

Page 3: ...s 12 II Diagram of Dash 13 III Top View 16 IV Left Side View 17 V Right Side View 18 VII Starting and Operating Diagram 19 I Pre ride Inspection 19 II Riding Operation 20 VIII Charging and Battery Inf...

Page 4: ...g with maximum performance less failure and longer service life Do not lend the electric motorcycle to persons that are unable to ride Always wear a helmet when using this electric motorcycle Follow t...

Page 5: ...and operating features and have been trained in safe and proper riding techniques Regular inspections and proper maintenance along with good riding skills help you safely enjoy the capabilities and th...

Page 6: ...unique Electric motorcycle Identification Number and motor number so the dealer can provide you with better services The Electric motorcycle Identification Number VIN is a 17 digit number located on t...

Page 7: ...ation Number is stamped on the motor shell 2 182ZW6043407NA internal management code in another line electric motorcycle model 6 digits manufacturing year month and day 2 digits respectively manufactu...

Page 8: ...ce 300mm Seat Height 870mm Rake 26 Max Climb Ability 70 EEC Homologation Limited Top Speed 45km h or 25km h Rated Motor Output Power 3000W EEC Homologation Limited Motor Output Power 3500W or 1500W Pe...

Page 9: ...justable hi performance dual crown fork with 200mm travel Rear Suspension Adjustable 85mm travel shock absorber with linkage Brake Fr Rr Hydraulic disc brakes 1st Transmission Hi efficiency quiet runn...

Page 10: ...TALARIA POWER TECH CHONGQING CO LTD IV General Information 7 II Electric motorcycle Outline Parameter 7...

Page 11: ...TALARIA POWER TECH CHONGQING CO LTD IV General Information 8 III Electrical Diagram 8...

Page 12: ...wise and the whole electric motorcycle is powered off and then remove the key 2 Steering Lock Turn the handlebar to the leftmost position insert the key and turn it anticlockwise to lock the steering...

Page 13: ...torcycle It is extremely dangerous to ride with a single hand or no hand on the handlebar or after drinking alcohol Wet roads in rainy or snowy days are also very dangerous Do not ride at high speed B...

Page 14: ...TALARIA POWER TECH CHONGQING CO LTD V Safety Information 11 11 III Position of Warning Signs 11...

Page 15: ...un when the instrument shows READY 1 4 Oil level sightglass Special note a At the ECO mode the electric motorcycle is set at the running mode of limited power and maximum speed which is suitable for b...

Page 16: ...n 2 to enter the selected setting dialog box press the buttons 3 and 4 again to select the parameters and set the parameters using the button 2 Press the button 1 to exit the current parameter setting...

Page 17: ...ilure icon 3 8 Number 9 energy consumption 3 9 Number 10 electric motorcycle status WAIT READY 3 10 Number 11 grades of energy recovery 0 1 2 3 and 4 The arrows for grade 0 circulation are in white th...

Page 18: ...tem option press the buttons 3 and 4 to skip among the setting items press the button 2 to select them then press the buttons 3 and 4 again to set the parameters and press the button 2 to confirm the...

Page 19: ...rake Lever 3 3 Right Rearview Mirror 3 4 Right Handlebar Grip Plus throttle 3 5 Ignition Switch 3 6 Battery Case Cover 3 7 Footpeg 3 8 Seat 3 9 Rear Right Turn Signal 3 10 Front Left Turn Signal 3 11...

Page 20: ...Reflector 4 4 Front Fender 4 5 Front Wheel 4 6 Front Disc Brake Disc 4 7 Front Disc Brake Pump 4 8 Battery Charging Port 4 9 Controller 4 10 Motor Protective Cover 4 11 Gearbox Decorating Cover 4 12...

Page 21: ...nents 18 V Right Side View 5 1 Rear Reflector 5 2 Tail Light 5 3 Sprocket 5 4 Chain Guide 5 5 Chain 5 6 Rear Shock Absorber 5 7 Motor Assembly including gear box 5 8 Battery Case Lock 5 9 Lithium ion...

Page 22: ...he throttle is smooth and returns correctly Tire 1 Tire pressure inspection Abnormal tire pressure damages and wears will cause safety risks Insufficient tire pressure may cause abnormal wears malfunc...

Page 23: ...he right to the ON position and then check the switches dash and horns for normal function squeeze the front and rear brake lever and check whether the braking function is normal 2 Motor start After f...

Page 24: ...p or tumbling It is extremely dangerous especially in rainy days Precautions in riding 1 In the premise of ensuring safety ride smoothly as far as possible and avoid sudden acceleration or deceleratio...

Page 25: ...to approach the parking site 2 Use the brake to park the electric motorcycle reset the throttle turn OFF the Ignition Switch and remove the key after the electric motorcycle stopped 3 After parking st...

Page 26: ...ill adversely affect the performance and lifetime of the battery so please do not use it at a temperature beyond this range CAUTION 1 Do not charge the battery under 0 or it may be damaged Please wait...

Page 27: ...3 months to prevent it from losing activity and avoid compromised performance CAUTION Sideslip may happen in the case that only front brake or rear brake is used It is safer to use combined braking W...

Page 28: ...en the charger and battery charging port please be sure to complete the operation within 3S Otherwise the charger will run the protection and automatically shut down because the battery cannot be dete...

Page 29: ...ilation and heat dissipation for 30 minutes is recommended 3 Avoid using the battery immediately after it is fully charged Let it stand for 10 minutes before using 4 It is strictly forbidden to cover...

Page 30: ...then open the battery case cover forward and you can see the battery 2 Switch off the circuit breaker in front of the battery remove the discharge plug on the battery then pull up to take out the bat...

Page 31: ...ention to the front and rear direction of the battery the charging port should toward the left and plug in the discharge plug Then switch on the circuit breaker close and lock the battery case cover a...

Page 32: ...rt the bike and send it to the authorized dealer to repair CAUTION The operating voltage of the electric motorcycle is high During and after start up and when the electric motorcycle is turned off the...

Page 33: ...rectly connected or loose 1 Charge the battery 2 Switch on the circuit breaker 3 Check the U V and W phase wires connections The charger does not work No AC power supply Check the AC power supply sock...

Page 34: ...connecting piece and poor contact of sampling line Restarting If the error code still shows on the dash please send the electric motorcycle to the nearest dealer to inspect and repair 3 00003 Voltage...

Page 35: ...harge MOS error Charge circuit got failure Restarting If the error code still shows on the dash please send the electric motorcycle to the nearest dealer to inspect and repair 9 00009 Overcharge error...

Page 36: ...tric motorcycle to the nearest dealer to inspect and repair 14 0000E Over charging current error The charging current is greater than the protection threshold Check to see the charger is the right one...

Page 37: ...ery follow the owner s manual 21 00060 Battery discharge low temperature error When the battery pack discharges in very low temperature the battery will carry out the protection function for low tempe...

Page 38: ...during the production Send the electric motorcycle to the nearest dealer to repair 27 000C0 Discharge fuse failure error Don t have this error for STING s battery Just a default setting error 28 000D0...

Page 39: ...low green and blue wires on the harness assy 2 Check whether anything stuck the rear wheel If the solution cannot solve the error please send the electric motorcycle to the nearest dealer to inspect a...

Page 40: ...ottle connection loose 2 The throttle didn t return back to the proper position before start 3 The throttle is broken 1 Check the throttle connection is loose or broken 2 Make sure the throttle return...

Page 41: ...he circuit breaker Then check the whether the motor phase wire terminal got loose or broken And then check whether the motor outlet phase sequence corresponds to the U V W on the controller Finally ch...

Page 42: ...controller return to the normal temperature If the solution cannot solve the error please send the electric motorcycle to the nearest dealer to inspect and repair 45 01000 Current sensor error Failure...

Page 43: ...gearbox chain and brake If yes please eliminate it 2 Choose the right road condition to ride the bike If the solution cannot solve the error please send the electric motorcycle to the nearest dealer t...

Page 44: ...riod and cannot be used normally after maintenance they will be replaced free of charge II User s Note 1 For services beyond the warranty scope or after expiration of the warranty period the dealer wi...

Page 45: ...h as tires brake pads etc are not in the scope of warranty 7 Failures caused by collision impact overload and chemical corrosion will be out of the warranty scope and after sale service will be charge...

Page 46: ...operating an electric motorcycle II Scheduled Inspection To prolong the lifetime of your electric motorcycle and ensure safe and comfortable riding periodical inspection and maintenance is recommended...

Page 47: ...ing function Inspection for tire and other parts 1 When the tire is cool check the air pressure with a tire barometer 2 Check for any cracks damages foreign matters and abnormal wear 3 Check whether t...

Page 48: ...to measure the cathode and anode voltage The full voltage should be between 65 5 67 2 Otherwise please send it to the dealer s maintenance facility for inspection Caution Please turn off the electric...

Page 49: ...ke oil view lens If the brake oil level is low then need to open the brake oil container cap to add the specified mineral oil for the disc brake Note Before checking the brake oil level the electric m...

Page 50: ...the brakes by observing the remaining brake pad materials on both sides of the brake caliper Brake pads Replace the brake pads when the free clearance of the brake lever exceeds the specified range 1...

Page 51: ...s when cleaning the chain to prevent eye injuries WARNING Never place your hand or any other body part between the chain and sprockets Work with the chain only in the middle between the two sprockets...

Page 52: ...e wheel only by hand Failure to do so could result in serious injury WARNING Never place your hand between the chain and sprockets Work with the chain only in the middle between the two sprockets Fail...

Page 53: ...t both sides equally 1 Remove key from the ignition switch and switch off the circuit breaker 2 Loosen the rear axle nut on right side of the electric motorcycle 3 Loosen the left and right M6 jam nut...

Page 54: ...uring the run in period for 300km change the gear oil every 1000km gear oil model CL 5 85W 90 Loosen the screw of dipstick cap on the gearbox then loosen oil drain bolt and the gear oil flows out thro...

Page 55: ...e tension of the chain to make sure it s in the proper tension range After the first maintenance Each1000KM or 3 months Check the fastening status of the safety components of the entire electric motor...

Page 56: ...rvice and Maintenance Record Card 53 Maintenance Record Card Maintenance record card Date Odometer reading Maintenance Note Customer Information Card Basic information Version TL3000 L1E 25KM H TL3000...

Reviews: