Synology RS3413xs+ Quick Installation Manual Download Page 23


  23   


A p p e n d i x  

B


Appendix B: 

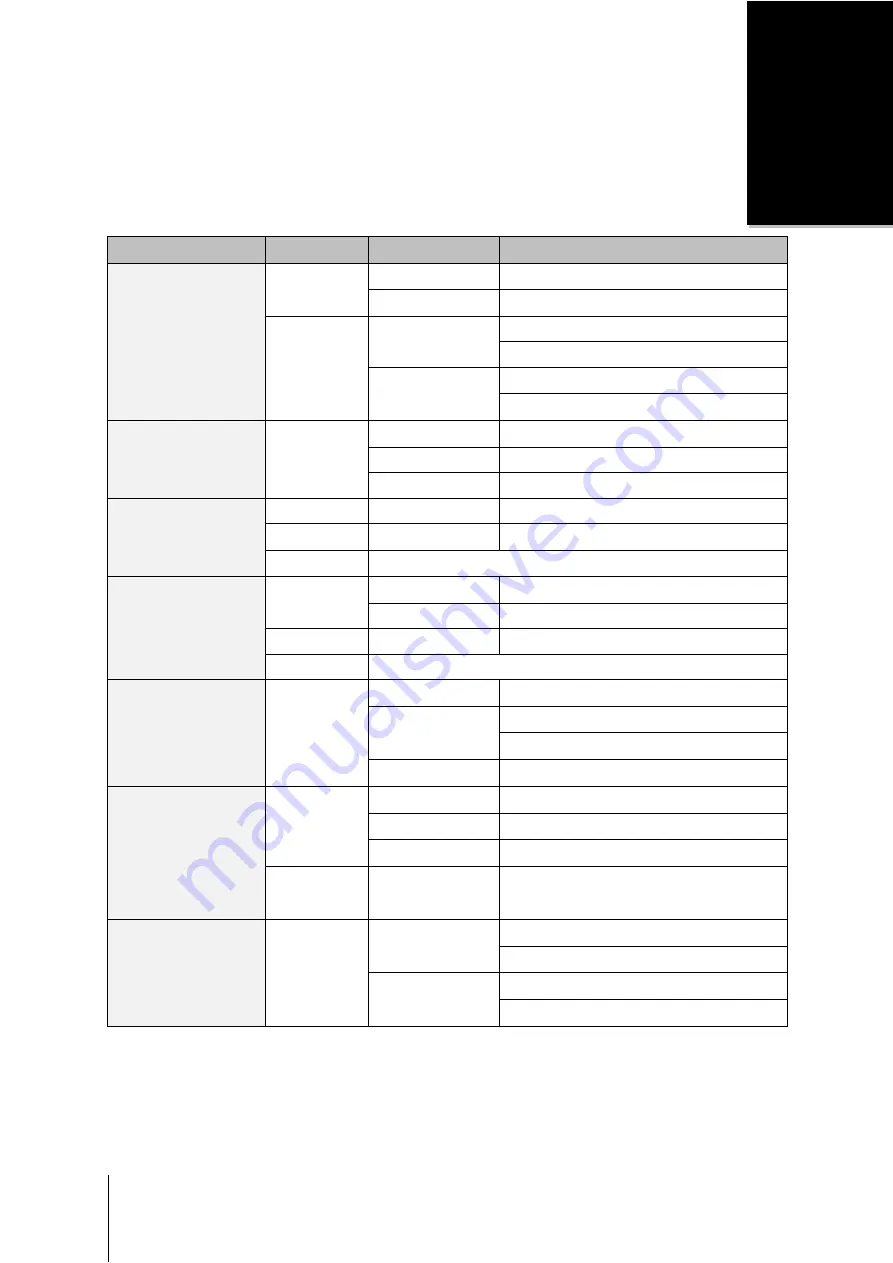
LED Indication Table 

LED Indication 

Color 

Status 

Description 

STATUS 

Green 

Static 

Volume Normal 

Off 

HDD Hibernation 

Orange 

Static 

Available volume space < 1GB 

Available volume space < 1 % 

Blinking 

Volume degraded or crashed 

No volume 

Back LAN LED (Left) 

Orange 

Static 

Network is normal 

Blinking 

Network is active 

Off 

Network is down 

Back LAN LED (Right)


Green


Static 

Gigabit is normal 

Orange 

Static 

10/100 Link 

Off 

Network is down 

Disk Status/Activity 

Indicator (on tray) 

Green 

Static 

Disk ready 

Blinking 

Disk is being accessed 

Orange 

Static 

Cannot Read/ Write 

Off 

No internal disk 

Power LED 

Blue 

Static 

Power ready 

Blinking 

Booting up 

Shutting down 

Off 

Power off 

Redundant Power LED


Green


Static 

Both power supplies are working 

Blinking 

1 power supply is not working or fan is not working 

Off 

Power off 

Orange 

Static 

Power Supply On/Off Switch is on ("|") but 

RackStation System Power on the front panel is off 

(“0”) 

Alert 

Orange 

Blinking 

System fan is not working 

Over temperature 

Off 

System fan normal 

Temperature normal 

Note: 

Model specifications are subject to change without notice. Please refer t

Summary of Contents for RS3413xs+

Page 1: ...Synology_QIG_RS3413xs _20121224 Synology RackStation RS3413xs Quick Installation Guide...

Page 2: ...nstallation 7 Install Hard Disks and SSD 7 Add a RAM Module to RackStation 9 Add a Network Interface Card to RackStation 11 Replace a Malfunctioning Fan 13 Start Up Your RackStation 15 LCM Display 16...

Page 3: ...s to verify that you have received the items below Please also read the safety instructions carefully before use to prevent your RackStation from any damage Package Contents Main Unit x 1 AC Power Cor...

Page 4: ...nt Panel Use these buttons to navigate info menus on the LCM display For more information see LCM Display on Page 16 7 Fan Back Panel Fans dispose of excessive heat from the power supply In the event...

Page 5: ...each LAN port Each LAN port has two individual LEDs 19 Expansion Ports Back Panel Connect Synology Expansion Units1 20 to your Synology RackStation RESET Button Back Panel 1 Press and hold to restore...

Page 6: ...any liquid Before cleaning unplug the power cord first Wipe Synology product with damp paper towels Do not use chemical or aerosol cleaners to clean it To avoid the damaging your RackStation do not p...

Page 7: ...ease install at least one hard disk In addition RackStation offers the option to install SSD Solid State Drives in order to boost cache read performance This section will guide you through the process...

Page 8: ...the hard drive tray Make sure the hard drive tray is completely inserted Otherwise the hard disk might not function properly 5 Repeat the steps above to install all prepared hard disks 6 Hard disk po...

Page 9: ...ze Please visit www synology com for a complete compatibility list Add a RAM Module to RackStation Synology offers RAM modules 4GB 8GB which allow you to expand the memory capacity of your RackStation...

Page 10: ...s inserted correctly the ejectors will snap into place Important 5 Replace the top cover slide it into place and tighten the two screws on the back of your RackStation To avoid damaging the memory mod...

Page 11: ...oward the sides b Hold the memory module by the edges and remove it from the slot 3 Replace the top cover slide it into place and tighten the two back screws Add a Network Interface Card to RackStatio...

Page 12: ...all the network interface card 1 Follow steps 1 to 2 of Install a RAM Module on Page 9 to remove the cover from your RackStation 2 To install the network interface card follow the steps below a Remove...

Page 13: ...ll guide you through the steps necessary to replace a malfunctioning fan To replace a malfunctioning fan please follow the instructions below 1 Follow steps 1 to 2 of Install a RAM Module on Page 9 to...

Page 14: ...malfunctioning fan from the fan casing 5 Slide a new fan into the casing 6 Apply firm pressure and slide the power cord onto the power port 7 Slide the new cooling fan unit into your RackStation Make...

Page 15: ...s located on the back of your RackStation and the other end to your switch router hub Your RackStation comes equipped with a redundant power supply system allowing two power cords to be connected The...

Page 16: ...These event messages will alert you to various issues such as overheating hardware failed connections or missing hard disks When a problem occurs please return to the deactivate beep page and press t...

Page 17: ...web browser Install from Windows 1 Insert the DSM installation disc included with your RackStation into your computer and click Start Follow the onscreen instructions to complete the setup process 2 S...

Page 18: ...f DSM from Synology Download Center 4 Follow the onscreen instructions to complete the setup process After the installation process is finished you will be able to manage your RackStation with Synolog...

Page 19: ...nt distribution version 8 and 9 However you may still try installation on other Linux distributions for evaluation purpose only You can install and run Synology Assistant using the command lines or th...

Page 20: ...local bin SynologyAssistant If usr local bin exists in your environment variable PATH SynologyAssistant just type If you want to install using the GUI 1 Go to usr local and usr local bin and delete t...

Page 21: ...ant or the path you just specified SynologyAssistant double click SynologyAssistant and then select Run in Terminal in the dialog box that appears Install DSM on RackStation When you have activated Sy...

Page 22: ...nal Disk Read Write Basic JBOD RAID 0 RAID 1 RAID 5 RAID 5 Hot Spare RAID 6 RAID 10 Agency Certifications Synology Hybrid RAID 1 Disk Fault Tolerance 2 Disk Fault Tolerance FCC Class A CE Class A HDD...

Page 23: ...r on tray Green Static Disk ready Blinking Disk is being accessed Orange Static Cannot Read Write Off No internal disk Power LED Blue Static Power ready Blinking Booting up Shutting down Off Power off...

Page 24: ...o control access to the components features or functions of the Product or Software Section 6 Open Source The Software may contain components licensed to Synology under the GNU General Public License...

Page 25: ...the United States except as otherwise provided below In such cases the arbitration will be conducted before a single arbitrator and will be limited solely to the dispute between you and Synology The a...

Page 26: ...will at Synology s option a use commercially reasonable efforts to repair the Product or b replace the noncomplying Product or part thereof upon return of the complete Product in accordance with Sect...

Page 27: ...S LIMITED TO THE AMOUNT ACTUALLY PAID BY CUSTOMER FOR THE PRODUCT REGARDLESS OF THE AMOUNT OF DAMAGES CUSTOMER MAY INCUR AND WHETHER BASED ON CONTRACT TORT INCLUDING NEGLIGENCE STRICT LIABILITY OR OTH...

Page 28: ...tion award shall be final and binding on the parties and may be enforced in any court having jurisdiction Nothing in this Section shall be deemed to prohibit or restrict Synology from seeking injuncti...

Reviews: