


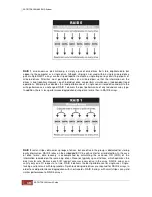

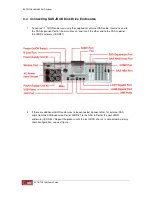

RAID 1
, also known as disk mirroring, is simply a pair of disk drives that store duplicate data but
appear to the computer as a single drive. Although striping is not used within a single mirrored drive
pair, multiple RAID 1 arrays can be striped together to create a single large array consisting of pairs of
mirrored drives. All writes must go to both drives of a mirrored pair so that the information on the
drives is kept identical. However, each individual drive can perform simultaneous, independent read
operations. Mirroring thus doubles the read performance of a single non-mirrored drive and while the
write performance is unchanged. RAID 1 delivers the best performance of any redundant array type.
In addition, there is less performance degradation during drive failure than in RAID 5 arrays.
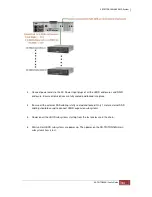
RAID 3
sector-stripes data across groups of drives, but one drive in the group is dedicated for storing
parity information. RAID 3 relies on the embedded ECC in each sector for error detection. In the case
of drive failure, data recovery is accomplished by calculating the exclusive OR (XOR) of the
information recorded on the remaining drives. Records typically span all drives, which optimizes the
disk transfer rate. Because each I/O request accesses every drive in the array, RAID 3 arrays can
satisfy only one I/O request at a time. RAID 3 delivers the best performance for single-user, single-
tasking environments with long records. Synchronized-spindle drives are required for RAID 3 arrays in
order to avoid performance degradation with short records. RAID 5 arrays with small stripes can yield
similar performance to RAID 3 arrays.
Summary of Contents for TRITON 16Ni
Page 1: ...SurfRAID TRITON 16Ni User s Guide Revision 1 1...
Page 40: ......
Page 41: ......
Page 42: ......
Page 43: ......
Page 67: ...5 3 7 Stop Volume Check Use this option to stop current running Check Volume Set process...
Page 111: ...4 Verify the new LV size...
Page 135: ...4 The iSCSI logical volume capacity is extended...
Page 236: ...2 Select Set LAN Configuration and press Enter key 3 Setup LAN Configuration...
Page 247: ......