background image

SuperServer 1019S-MC0T User's Manual

Chapter 2: Server Installation

22

21

Installing the Rack Rails

Determine where you want to place the server in the rack (see the Rack and Server 
Precautions in Section 2.2). Note that servers should always be installed to the bottom of a 

rack first for stability reasons.

1. Position the chassis rail guides at the desired location in the rack, keeping the sliding 

rail guide facing the inside of the rack. 

2. Screw the assembly securely to the rack using the brackets provided.

3. Attach the other assembly to the other side of the rack, making sure that both are at the 

exact same height and with the rail guides facing inward.

Note:

 Both front chassis rails and the rack rails have a locking tab, which serves two functions. 

First, it locks the server into place when installed and pushed fully into the rack (its normal 
operating position. In addition, these tabs lock the server in place when fully extended from 
the rack. This prevents the server from coming completely out of the rack when pulled out 
for servicing.

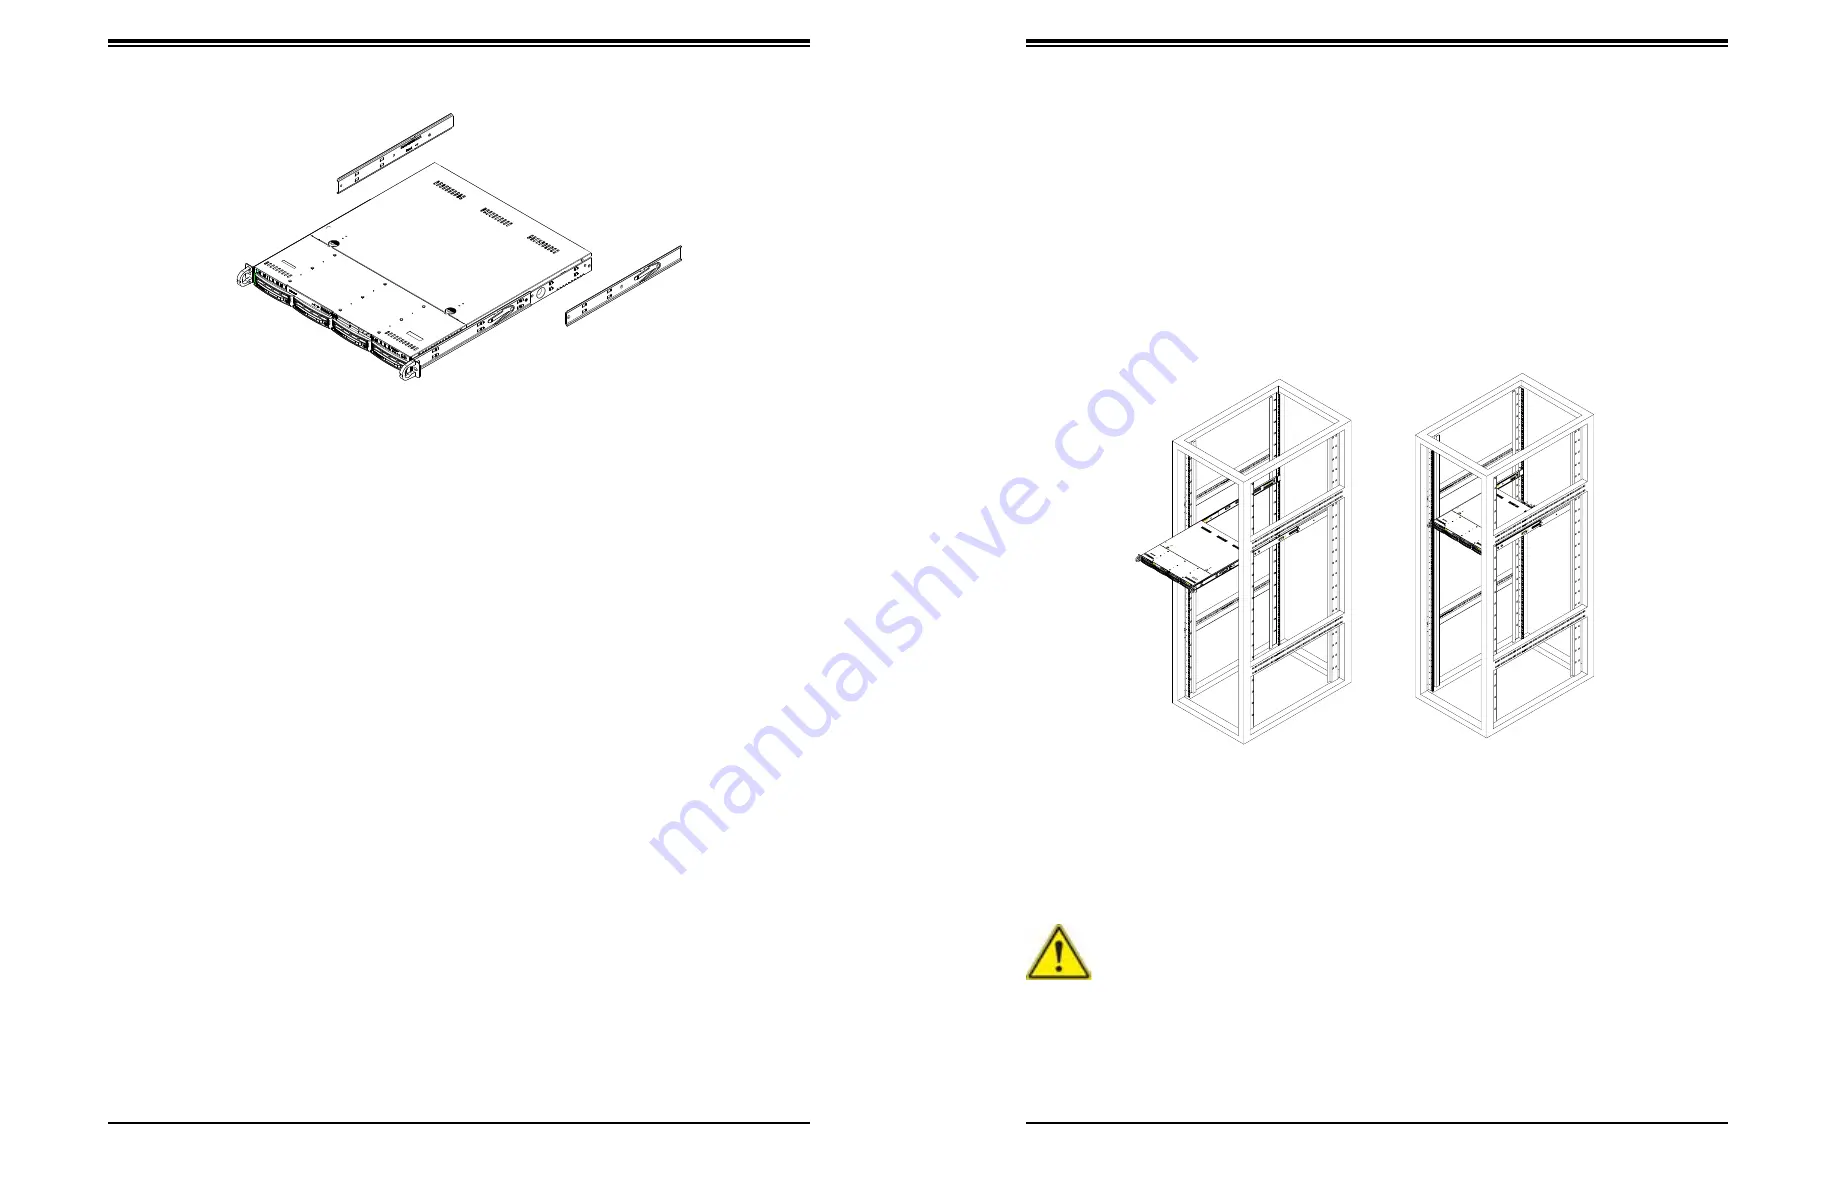
Figure 2-1. Installing the Rear Inner Rails

Figure 2-2. Installing the Server into a Rack

Note: 

Figures are for illustrative purposes only. Always install servers to the bottom of a rack 

first.

2.4 Installing the Server into a Rack

You should now have rails attached to both the chassis and the rack. The next step is to 
install the server into the rack.

1. Line up the rear of the chassis rails with the front of the rack rails.

2. Slide the chassis rails into the rack rails, keeping the pressure even on both sides (you 

may have to press the locking tabs when inserting). See Figure 2-2.

3. When the server has been pushed completely into the rack, you should hear the locking 

tabs "click".

Warning:

 Stability hazard. The rack stabilizing mechanism must be in place, or the 

rack must be bolted to the floor before you slide the unit out for servicing. Failure to 

stabilize the rack can cause the rack to tip over.

Summary of Contents for SuperServer 1019S-MC0T

Page 1: ...ence when the equipment is operated in a commercial environment This equipment generates uses and can radiate radio frequency energy and if not installed and used in accordance with the manufacturer s...

Page 2: ...upermicro website for possible updates to the manual revision level Warnings Special attention should be given to the following symbols used in this manual Warning Indicates high voltage may be encoun...

Page 3: ...Connectors 40 Control Panel 44 Data Cables 47 Power Cables 47 4 3 Ports 48 Rear I O Ports 48 4 4 Jumpers 50 Explanation of Jumpers 50 4 5 LED Indicators 54 Chapter 5 Software 5 1 OS Installation 56 In...

Page 4: ...V Het Sterrenbeeld 28 5215 ML s Hertogenbosch The Netherlands Tel 31 0 73 6400390 Fax 31 0 73 6416525 Email sales supermicro nl General Information support supermicro nl Technical Support rma supermic...

Page 5: ...Heatsink passive SNK P0046P 1 SATA SAS Backplane BPN SAS3 113A N2 1 Hard Drive Carriers MCP 220 00047 0B 8 Cooling Fans 4 cm FAN 0154L4 4 Riser Card RSC RR1U E8 1 Outer Rack Rails MCP 290 00102 0N 1 s...

Page 6: ...tes network activity on LAN port 2 when flashing 6 NIC1 LED Indicates network activity on LAN port 1 when flashing 7 HDD LED Indicates activity on the hard drive when flashing 8 Power LED Indicates po...

Page 7: ...MEGERAC LICENSE IPMI CODE MAC CODE PRESS FIT Intel PCH LSI3008 CTF only X550 BT1 JSAS1 JSTBY1 LEDS1 J2 SP1 LE1 LEDBMC LEDPWR JPSAS1 JOH1 JL1 JPG1 JBR1 JVRM2 JVRM1 JPME2 JVR1 JPS1 JPB1 JI2C1 JI2C2 JWD...

Page 8: ...reen Active Connector Description BT1 Onboard Battery COM1 COM2 COM Port COM Header FAN1 FAN5 FANA System CPU Fan Headers FAN1 CPU Fan IPMI_LAN Dedicated IPMI LAN Port I SATA0 I SATA7 Intel PCH SATA 3...

Page 9: ...0 PCH C236 6 0 Gb S USB 2 0 LPC USB 1 0 SATA 5 4 RTL8211E VB CG 3 2 RJ45 SPI Temp Sensor EMC1402 1 2 at diff SMBUS TPM HEADER USB 3 0 USB BIOS SPI AST2400 BMC RMII NCSI COM1 Connector COM2 Header VGA...

Page 10: ...s on the bottom of the rack are extended to the floor so that the full weight of the rack rests on them In single rack installations stabilizers should be attached to the rack In multiple rack in stal...

Page 11: ...3 Installing the Rails There are a variety of rack units on the market which may require a slightly different assembly procedure The following is a basic guideline for installing the system into a ra...

Page 12: ...addition these tabs lock the server in place when fully extended from the rack This prevents the server from coming completely out of the rack when pulled out for servicing Figure 2 1 Installing the R...

Page 13: ...of the chassis four total 1 First determine how far the server will extend out from the front of the rack The chassis should be positioned so that the weight is balanced between front and back 2 Atta...

Page 14: ...the inside of the chassis Removing the Top Cover 1 Disconnect the chassis from any power source if necessary see above 2 Remove any screws securing the cover to the chassis 3 Slide the cover toward th...

Page 15: ...mponents 5 With the processor inserted into the socket inspect the four corners of the CPU to make sure that it is properly installed and flush with the socket Figure 3 5 Installing Removing the Heats...

Page 16: ...socket 1 Unscrew and remove the heatsink screws from the motherboard in the sequence as show in the figure above 2 Hold and gently pivot the heatsink back and forth to loosen it from the CPU Do not us...

Page 17: ...ble damage to the DIMMs or slots Release Tabs Notches Press both notches straight down into the memory slot Note Visit the product page on the Supermicro website for possible updates to memory support...

Page 18: ...ger of explosion if the onboard battery is installed upside down which reverses its polarities This battery must be replaced only with the same or an equivalent type recommended by the manufacturer CR...

Page 19: ...m It is very important that the chassis top cover is installed for the cooling air to circulate properly through the chassis and cool the components Installing Fans Fan speed is controlled by system t...

Page 20: ...the system will shut down and you will need to replace the unit Replacement units can be ordered directly from Supermicro see contact information in the Preface Removing the Power Supply Begin by remo...

Page 21: ...SuperServer 1019S MC0T User s Manual 38 Figure 3 14 Removing Replacing a Power Supply...

Page 22: ...s included with the power supply 24 pin Primary ATX Power JPWR1 8 pin Processor Power JPWR2 Main ATX Power Connector The primary power connector JPWR1 meets the ATX SSI EPS 24 pin specification You mu...

Page 23: ...efinition Pins 1 3 Power LED Pins 4 7 Speaker SGPIO Headers I SGPIO1 and I SGPIO2 Serial General Purpose Input Output headers are used to communicate with the enclosure management chip on the backplan...

Page 24: ...l Chassis Intrusion A Chassis Intrusion header is located at JL1 on the motherboard Attach the appropriate cable from the chassis to the header to inform you when the chassis is opened Chassis Intrusi...

Page 25: ...the motherboard The other end connects to the control panel PCB board Power Button OH Fan Fail NIC1 Active LED Reset Button HDD LED PWR LED Reset PWR 3 3V ID_UID_SW 3 3V Stby 3 3V Stby Ground 19 X Gro...

Page 26: ...JF1 to provide warnings for chassis overheat fan failure Refer to the table below for pin definitions NMI Button The non maskable interrupt button header is located on pins 19 and 20 of JF1 Refer to t...

Page 27: ...here is also a dedicated IPMI LAN port on the I O back panel These ports accept RJ45 type cables Please refer to the LED Indicator section for LAN LED information Rear I O Ports Description Descriptio...

Page 28: ...CMOS will also clear all passwords Do not use the PW_ON connector to clear CMOS JBT1 contact pads VGA Enable Disable JPG1 allows you to enable or disable the VGA port using the onboard graphics contro...

Page 29: ...anufacturing Mode Select Close JPME2 to bypass SPI flash security and force the system to use the Manufacturing Mode which will allow you to flash the system firmware from a host server to modify syst...

Page 30: ...icator at LE1 is located near the UID switch on the I O back panel This UID indicator provides easy identification of a system unit that may need service M 2 LED State LED Color Definition Green Blink...

Page 31: ...e Windows OS Setup screen will display 3 From the Windows OS Setup screen press the Enter key The OS Setup will automatically load all device files and then continue with the Windows installation 4 Af...

Page 32: ...ith SuperDoctor 5 Management Server SSM Server you can remotely control power on off and reset chassis intrusion for multiple systems with SuperDoctor 5 or IPMI SuperDoctor 5 Management Server monitor...

Page 33: ...include omit or change any of these text messages Settings printed in Bold are the default values A indicates a submenu Highlighting such an item and pressing the Enter key will open the list of setti...

Page 34: ...revert to the default to the manufacture default settings Boot Feature Quiet Boot Use this feature to select the screen display between the POST messages and the OEM logo upon bootup Select Disabled t...

Page 35: ...Enabled Power Configuration Watch Dog Function If enabled the Watch Dog Timer will allow the system to reset or generate NMI based on jumper settings when it is expired for more than 5 minutes The opt...

Page 36: ...to reduce power consumption and heat dissipation The options are Disabled and Enabled Turbo Mode Select Enabled for processor cores to run faster than the frequency specified by the manufacturer The...

Page 37: ...wrong values in the following features may cause the system to malfunc tion System Agent SA Configuration The following System Agent information will display System Agent Bridge Name SA PCIe Code Ver...

Page 38: ...28 TLP and 256 TLP SAS3008 ASPM Support Use this item to set the Active State Power Management ASPM level for a PCI E device Select Auto for the system BIOS to automatically set the ASPM level based o...

Page 39: ...5 GB 3 GB 3 25 GB and 3 5 GB Energy Performance Gain Use this feature to enable or disable the energy performance gain The options are Disabled and Enabled Memory Scrambler Select Enabled to enable me...

Page 40: ...it 4 Emulation Select Enabled to enable the emulation of Port 61h bit 4 toggling in SMM System Management Mode The options are Disabled and Enabled PCIe PLL SSC Enable this feature to reduce EMI inter...

Page 41: ...led PCH SLOT4 PCI E 3 0 X2 IN X4 OPROM Use this feature to select which firmware type to be loaded for the add on card in this slot The options are Disabled Legacy and EFI CPU SLOT6 PCI E 3 0 X8 OPROM...

Page 42: ...al Port 2 only Select SOL to use COM Port 2 as a Serial Over LAN SOL port for console redirection The options are SOL and COM Intel Server Platform Services The following Intel Server Platform Service...

Page 43: ...e Windows OS The options are VT100 LINUX XTERMR6 SC0 ESCN and VT400 COM1 Redirection After BIOS POST Use this feature to enable or disable legacy console redirection after BIOS POST When set to Bootlo...

Page 44: ...nd Disabled If the item above set to Enabled the following items will become available for user s configuration EMS Console Redirection Settings This feature allows the user to specify how the host co...

Page 45: ...be performed by a security device for system data integrity Your system will reboot to carry out a pending TPM operation The options are None and TPM Clear Platform Hierarchy Use this item to disable...

Page 46: ...displays the connection status MAC Address This item displays the MAC address for this computer Mac addresses are six two digit hexadecimal numbers Virtual MAC Address This item displays the Virtual M...

Page 47: ...ing Options SMBIOS Event Log Change this item to enable or disable all features of the SMBIOS Event Logging during system boot The options are Enabled and Disabled Erasing Settings Erase Event Log If...

Page 48: ...stem for the changes to take effect View SMBIOS Event Log This section displays the contents of the SMBIOS Event Log 6 5 IPMI Use this feature to configure Intelligent Platform Management Interface IP...

Page 49: ...ess Source This feature allows the user to select the source of the IP address for this computer If Static is selected you will need to know the IP address of this computer and enter it to the system...

Page 50: ...enu allows the user to configure the following Key Management settings Provision Factory Default Keys Select Enabled to install the default Secure Boot keys set by the manufacturer The options are Dis...

Page 51: ...options are Yes and No Append Key Select Yes to add the DBT from the manufacturer s defaults list to the existing DBT Select No to load the DBT from a file The options are Yes and No 6 7 Boot Use thi...

Page 52: ...which UEFI devices are boot devices UEFI Boot Order 1 6 8 Save Exit Select the Exit tab from the BIOS setup utility screen to enter the Exit BIOS Setup screen Discard Changes and Exit Select this opt...

Page 53: ...eature select Save as User Defaults from the Exit menu and press Enter This enables the user to save any changes to the BIOS setup for future use Restore User Defaults To set this feature select Resto...

Page 54: ...to continue the boot up process The error messages normally appear on the screen Fatal errors are those which will not allow the system to continue the boot up procedure If a fatal error occurs you s...

Page 55: ...mit den Gefahren elektrischer Schaltungen und den blichen Verfahren zur Vorbeugung vor Unf llen vertraut Suchen Sie mit der am Ende jeder Warnung angegebenen Anweisungsnummer nach der jeweiligen bers...

Page 56: ...R DEZE INSTRUCTIES Installation Instructions Warning Read the installation instructions before connecting the system to the power source Warnung Vor dem Anschlie en des Systems an die Stromquelle die...

Page 57: ...sche installatie Controleer of het beveiligde aparaat niet groter gedimensioneerd is dan 250V 20A Power Disconnection Warning Warnung Das System muss von allen Quellen der Energie und vom Netzanschlus...

Page 58: ...dieser Ausr stung sollte nur geschultem qualifiziertem Personal gestattet werden Advertencia Solamente el personal calificado debe instalar reemplazar o utilizar este equipo Restricted Area Waarschuw...

Page 59: ...alleen verkregen worden door gebruik te maken van speciaal gereedschap slot en sleutel of andere veiligheidsmaatregelen Battery Handling Warnung Bei Einsetzen einer falschen Batterie besteht Explosio...

Page 60: ...he unit Warnung Dieses Ger t kann mehr als eine Stromzufuhr haben Um sicherzustellen dass der Einheit kein trom zugef hrt wird m ssen alle Verbindungen entfernt werden Waarschuwing Deze eenheid kan me...

Page 61: ...tenance Warning Hazardous voltage or energy is present on the backplane when the system is operating Use caution when servicing Comply with Local and National Electrical Codes Warnung Die Installation...

Page 62: ...ertencia Al deshacerse por completo de este producto debe seguir todas las leyes y reglamentos nacionales Waarschuwing De uiteindelijke verwijdering van dit product dient te geschieden in overeenstemm...

Page 63: ...Anschlusskabel Stromkabel und Netzteile Verwendung anderer Kabel und Adapter kann zu einer Fehlfunktion oder ein Brand entstehen Elektrische Ger te und Material Safety Law verbietet die Verwendung von...

Page 64: ...s appareils lectriques que les produits d sign s par Supermicro seulement AC AC UL CSA UL CSA UL CSA Supermicro UL CSA AC Electrical Appliance and Material Safety Law UL CSA UL CSA Waarschuwing Bij he...

Page 65: ...kmount 17 2 x 1 7 x 20 in 437 x 43 x 508 mm W x H x D System Cooling Four 4 cm PWM fans Power Supply Model PWS 341P 1H AC Input Voltages 100 240 VAC Rated Input Current 4 2A 100V to 1 8A 240V Rated In...

Reviews: