


Chapter 5: Advanced Serverboard Setup
5-7
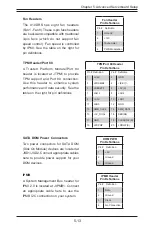
Figure 5-3. DIMM Installation
Socket Key
Release Tab
Release Tab
5-4 Installing
Memory
•
Caution:
Exercise extreme care when installing or removing DIMM modules to
prevent any possible damage.
Memory Support
Each X10DRS-4U has eight (8) DIMM slots that can support up to
1 TB of LRDIMM (Load Reduced) or 512 GB of Registered (RDIMM)
DDR4 (288-pin) ECC 2400/2133/1866/1600 MHz memory. See the following
tables for memory installation. For the latest memory updates, please refer to the
Supermicro website.
DIMM Installation
Installing Memory Modules
1. Insert the desired number of DIMMs into the memory slots starting with DIMM
slot #P1-DIMMA1. For optimal memory performance, please install a pair
(or pairs) of memory modules of the same type and speed (see the Memory
Installation Table below).
2. Push the release tabs outwards on both ends of the DIMM slot to unlock it.
Insert each DIMM module vertically into its slot. Pay attention to the key along
the bottom of the module to avoid installing incorrectly (see Figure 5-3).
3. Gently press down on the DIMM module until it snaps into place in the slot.
Press the release tabs to the locking positions to secure the DIMM module
into the slot. Repeat for all modules.
Summary of Contents for 6048R-DE2CR24L
Page 1: ...User s Manual Revision 1 0 SuperStoreSystem 6048R DE2CR24L ...
Page 5: ...Notes Preface v ...
Page 10: ...SUPERSTORESYSTEM 6048R DE2CR24L User s Manual x Notes ...
Page 26: ...3 4 SUPERSTORESYSTEM 6048R DE2CR24L User s Manual Notes ...
Page 46: ...4 20 SUPERSTORESYSTEM 6048R DE2CR24L User s Manual Notes ...
Page 72: ...6 6 SUPERSTORESYSTEM 6048R DE2CR24L User s Manual Figure 6 5 Replacing Node Fans ...
Page 78: ...6 12 SUPERSTORESYSTEM 6048R DE2CR24L User s Manual Notes ...
Page 122: ...A 2 SUPERSTORESYSTEM 6048R DE2CR24L User s Manual Notes ...