background image

Chapter 1

System Overview

7

Back-End Storage

The Sun StorEdge 5300 RAID EU Controller Enclosure provides direct-attached
back-end storage for the Sun StorageTek 5320 NAS Appliance or Sun StorageTek
5320 NAS Cluster Appliance. Systems can be set up with one or two controller
enclosures using all Fibre Channel disk drives or all SATA disk drives in one
enclosure.

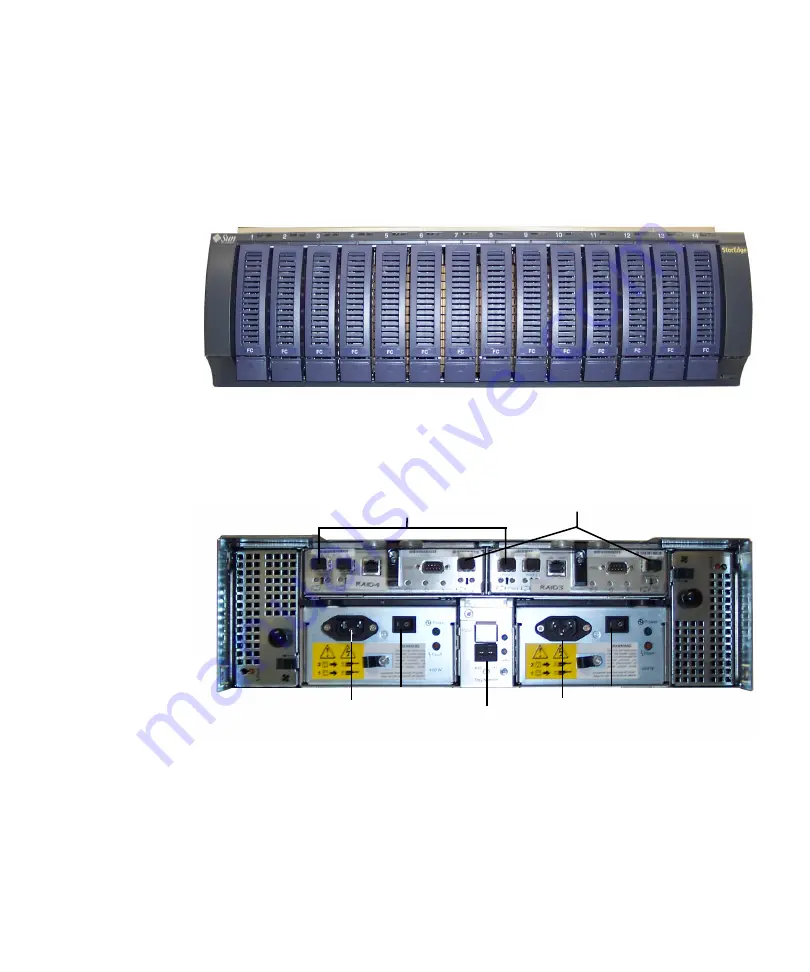
FIGURE 1-4

Sun StorEdge 5300 RAID EU Controller Enclosure Front, With Fibre Channel
Disk Drives

FIGURE 1-5

Sun StorEdge 5300 RAID EU Controller Enclosure Back Panel

There are two kinds of Sun StorEdge 5300 EU Expansion Enclosures that can be used
with the controller enclosures: Sun StorEdge 5300 EU F (Fibre Channel disk drives
only) and Sun StorEdge 5300 EU S (SATA disk drives only).

Power switch

Power switch

AC power plug

AC power plug

Tray number

To Sun StorEdge 5320 NAS Appliance

thumb wheel

expansion enclosures

Expansion ports to optional

Summary of Contents for StorageTek 5320

Page 1: ... com Submit comments about this document at http www sun com hwdocs feedback Sun StorageTek 5320 NAS Appliance and Gateway System Getting Started Guide Installing and Configuring the System Part No 819 6387 10 May 2006 Revision A ...

Page 2: ...INVALID Copyright 2006 Sun Microsystems Inc 4150 Network Circle Santa Clara Californie 95054 États Unis Tous droits réservés Sun Microsystems Inc possède les droits de propriété intellectuels relatifs à la technologie décrite dans ce document En particulier et sans limitation ces droits de propriété intellectuels peuvent inclure un ou plusieurs des brevets américains listés sur le site http www su...

Page 3: ...IP Address Assignment 3 RAID Controllers Non Gateway Systems 3 SAN Storage Gateway Systems 3 Data Management 3 Setup and Configuration 3 Client Data Backup 4 Hardware Overview 4 Sun StorageTek 5320 NAS Appliance Server 4 Sun StorageTek 5320 NAS Cluster Appliance 5 Sun StorageTek 5320 NAS Gateway System 6 Sun StorageTek 5320 NAS Gateway Cluster System 6 Server Options for All Configurations 6 ...

Page 4: ... Procedure 14 To Avoid Damage to Internal Components 14 To Ground the Rack Installation 15 Main AC Power Disconnect 15 To Prepare the Server Rackmount Kit 15 To Prepare the Server 16 To Prepare the CAM100 3RU Rackmount Kit 16 To Prepare the Controller and Expansion Enclosures 17 To Prepare the Cabinet 18 Installing in the Cabinet 18 To Install the System With a Single Controller Enclosure 20 To In...

Page 5: ...roller Enclosures to Expansion Enclosures 59 To Cable a Controller Enclosure to One Expansion Enclosure 60 To Cable a Controller Enclosure to Two Expansion Enclosures 61 To Cable a Controller Enclosure to Three Expansion Enclosures 62 To Cable a Controller Enclosure to Seven Expansion Enclosures 64 Connecting to the Network 65 To Connect to Copper Fast Ethernet or Gigabit Ethernet Networks 65 To C...

Page 6: ...n Enclosure 82 To Cable a Controller Enclosure to Two Expansion Enclosures 83 To Cable a Controller Enclosure to Three Expansion Enclosures 84 To Cable a Controller Enclosure to Seven Expansion Enclosures 86 Connecting the Server Health Monitoring and Network Cables 88 To Connect the Health Monitoring Cable 88 To Connect to Optical Gigabit Ethernet Networks 88 To Connect to Copper Fast Ethernet or...

Page 7: ...ray LUNs Between All Port Pairs 108 To Connect a Dual Server High Availability Fabric Attach to Sun StorEdge 6130 Array 109 Connecting the Sun StorageTek 5320 NAS Gateway System to the Sun StorageTek FlexLine 200 and 300 Series 114 Connecting Directly to the FlexLine 200 and 300 Series 114 To Connect a Single Server Direct Attach to Sun StorageTek FlexLine 200 and 300 Series 114 To Connect a Dual ...

Page 8: ... 6920 System 136 Connecting the Sun StorageTek 5320 NAS Gateway System or NAS Gateway Cluster System to the Sun StorEdge 99xx System 143 Connecting Directly to the Sun StorEdge 99xx System 143 To Connect a Single Server Direct Attach to Sun StorEdge 99xx System 143 To Connect a Dual Server Direct Attach to Sun StorEdge 99xx System 145 Using Fabric Switches to Connect to the Sun StorEdge 99xx Syste...

Page 9: ...ek NAS Gateway License 165 To Configure Storage on the Sun StorageTek 5320 NAS Gateway System Single Server 167 Initial Sun StorageTek 5320 NAS Gateway Cluster System Configuration 167 To Set IP Addresses 168 Basic Dual Server System Configuration 169 To Set Up Basic Configuration 169 To Activate the Sun StorageTek NAS Gateway License 170 To Set Up Server H2 171 To Configure SAN Storage on the Sun...

Page 10: ... Array 177 To Automatically Verify the Array 177 To Manually Register the Array 177 To Configure Storage on the Sun StorEdge 6130 Array 178 To Configure Storage on the Sun StorEdge 6920 System 178 To Configure Storage on the Sun StorEdge 99xx System 179 A Hardware Technical Specifications 181 B Third Party Licence Agreements 183 Glossary 199 Index 203 ...

Page 11: ...Order 19 FIGURE 2 2 Loosening the Rail Screws to Adjust the Rail Length 22 FIGURE 2 3 Positioning the Rack Alignment Template 23 FIGURE 2 4 Securing the Left Rail to the Front of the Cabinet 24 FIGURE 2 5 Adjusting the Length of the Left Rail at the Back of the Cabinet 25 FIGURE 2 6 Securing the Right Rail to the Back of the Cabinet 26 FIGURE 2 7 Tightening the Adjusting Screws 27 FIGURE 2 8 Remov...

Page 12: ...tch 50 FIGURE 3 1 Sun StorageTek 5320 NAS Appliance HBA Cards and Controller Enclosure Ports 55 FIGURE 3 2 Connecting the Sun StorageTek 5320 NAS Appliance to the Controller Enclosure 56 FIGURE 3 3 Connecting Two HBA Cards to the Controller Enclosure 57 FIGURE 3 4 Connecting the Sun StorageTek 5320 NAS Appliance to Two Controller Enclosures 58 FIGURE 3 5 Controller Enclosure and Expansion Enclosur...

Page 13: ...hrough Fabric Switches to the Sun StorEdge 6130 Array 108 FIGURE 5 6 Connecting All HBA Ports Through Two Fabric Switches to the Sun StorEdge 6130 Array 109 FIGURE 5 7 Connecting Two HBA Ports per HA Server Through Fabric Switches to the Sun StorEdge 6130 Array 111 FIGURE 5 8 Connecting Two HBA Ports per HA Server Through Fabric Switches to the Sun StorEdge 6130 Array With Additional Switch Connec...

Page 14: ...Server Through Fabric Switches to the Sun StorEdge 6920 System With Additional Switch Connections 140 FIGURE 5 28 Connecting All HBA Ports per HA Server Through Two Fabric Switch Zones to the Sun StorEdge 6920 System 142 FIGURE 5 29 Connecting Two HBA Ports to the Sun StorEdge 99xx System 144 FIGURE 5 30 Connecting All HBA Ports to the Sun StorEdge 99xx System 145 FIGURE 5 31 Connecting Two HBA Po...

Page 15: ... Connecting to a Fast Ethernet or a Gigabit Ethernet Network 159 FIGURE 5 41 Connecting to an Optical Gigabit Ethernet Network 160 FIGURE 5 42 Dual Server HA NIC Ports 161 FIGURE 5 43 Power Button and Front Panel Detail 162 ...

Page 16: ...xvi Sun StorageTek 5320 NAS Appliance and Gateway System Getting Started Guide May 2006 ...

Page 17: ...s Document Before you begin to install the system you must have already prepared the site as described in these books Sun StorageTek 5320 NAS Appliance Regulatory and Safety Compliance Manual Sun StorEdge 5300 RAID Expansion Unit and Sun StorEdge 5300 Expansion Unit Safety and Compliance Guide if using back end storage arrays Sun Rack Installation Guide How This Document Is Organized This guide co...

Page 18: ...torageTek 5320 NAS Gateway System or the Sun StorageTek 5320 NAS Gateway Cluster System with SAN storage and applies only to those setups Appendix A is a brief technical specification of the Sun StorageTek 5320 NAS Appliance system hardware Glossary is a list of words and phrases and their definitions Index is an alphabetical list of topics Typographic Conventions Typeface The settings on your bro...

Page 19: ...etup 819 6229 nn Printed PDF Shipping kit Online Gateway Sun StorageTek 5320 NAS Gateway System Setup 819 4286 nn Printed PDF Shipping kit Online GUI usage Sun StorageTek 5320 NAS Appliance and Gateway System Administration Guide 819 6388 nn PDF Online Safety Sun StorageTek 5320 NAS Server Regulatory and Safety Compliance Manual 819 4281 nn PDF Online Safety Sun StorageTek 5320 NAS Array Regulator...

Page 20: ... be responsible or liable for any actual or alleged damage or loss caused by or in connection with the use of or reliance on any such content goods or services that are available on or through such sites or resources Sun Welcomes Your Comments Sun is interested in improving its documentation and welcomes your comments and suggestions You can submit your comments by going to http www sun com hwdocs...

Page 21: ...l configurations Sun StorageTek 5320 NAS Appliance single server with controller enclosure and optional expansion enclosures available for back end storage Sun StorageTek 5320 NAS Cluster Appliance with two NAS servers for high availability and failover protection with controller enclosure and optional expansion enclosures available for back end storage Sun StorageTek 5320 NAS Gateway System singl...

Page 22: ...ht Directory Access Protocol LDAP LDAP authentication for NFS Network Time Protocol NTP syslogd Remote Logging Simple Network Management Protocol SNMP Supported Clients A client is any computer on the network that requests file services from the Sun StorageTek 5320 NAS Appliance In general if a client implementation follows the NFS version 2 or 3 protocol or the CIFS specifications it is supported...

Page 23: ... array Sun StorageTek FlexLine 280 and 380 systems Sun StorEdge 6920 system or Sun StorEdge 9970 9980 9985 9990 systems Note Refer to the Sun StorageTek 5320 NAS Gateway System web page for the most current SAN storage information Data Management Sun StorageTek File Checkpoint facility enables users to recover accidentally damaged or deleted data with a simple file copy operation Directory tree qu...

Page 24: ...ions are available Sun StorageTek 5320 NAS Appliance with back end storage Sun StorageTek 5320 NAS Cluster Appliance with back end storage Sun StorageTek 5320 NAS Gateway System single server with SAN storage Sun StorageTek 5320 NAS Gateway Cluster System high availability dual server in a cluster configuration with SAN storage The sections that follow describe each of the system components Sun St...

Page 25: ...age 6 FIGURE 1 2 shows the back of the server FIGURE 1 2 Sun StorageTek 5320 NAS Appliance Back Panel With Single HBA Card Sun StorageTek 5320 NAS Cluster Appliance In the Sun StorageTek 5320 NAS Cluster Appliance configuration two high availability HA servers are sold as a matched pair and are identified as server H1 and server H2 in their software serial numbers Each server contains two dual por...

Page 26: ... the Sun StorageTek 5320 NAS Gateway Cluster System configuration the servers are sold as a matched pair and are identified as server H1 and server H2 Each server contains two dual port FC HBA cards and can contain other optional cards see Server Options for All Configurations on page 6 Server Options for All Configurations Other options for all server configurations include the following Up to tw...

Page 27: ... enclosure FIGURE 1 4 Sun StorEdge 5300 RAID EU Controller Enclosure Front With Fibre Channel Disk Drives FIGURE 1 5 Sun StorEdge 5300 RAID EU Controller Enclosure Back Panel There are two kinds of Sun StorEdge 5300 EU Expansion Enclosures that can be used with the controller enclosures Sun StorEdge 5300 EU F Fibre Channel disk drives only and Sun StorEdge 5300 EU S SATA disk drives only Power swi...

Page 28: ...closure Back Panel SAN Storage The Sun StorageTek 5320 NAS Gateway System can connect directly or through fabric switches to the following types of SAN storage Sun StorEdge 6130 array Sun StorEdge Flexline 280 and 380 storage systems Sun StorEdge 6920 system Sun StorEdge 9970 9980 9985 9990 systems Power switch Power switch AC power plug AC power plug Tray number To controller enclosure thumb whee...

Page 29: ...s you configure system parameters through a series of menus and screen panels These settings are discussed in the Sun StorageTek 5320 NAS Appliance and Gateway System Administration Guide To access the Web Administrator management interface you must be running Windows 98 NT 2000 XP 2003 Sun Solaris Operating System Solaris OS 5 7 minimum version or Red Hat Linux software Windows users require one ...

Page 30: ...e following options are available Sun StorageTek File Replicator which enables you to duplicate data from one volume onto a mirrored volume on a different Sun StorageTek 5320 NAS Appliance Sun StorageTek 5320 NAS Cluster Appliance Sun StorageTek 5320 NAS Gateway System or Sun StorageTek 5320 NAS Gateway Cluster System Sun StorageTek Compliance Archiving Software which allows you to enable volumes ...

Page 31: ... EU as used with the Sun StorageTek 5320 NAS Appliance and Sun StorageTek 5320 NAS Cluster Appliance This chapter describes the process of installing Sun StorageTek 5320 NAS Appliance servers controller enclosures and expansion enclosures It contains the following sections Standard Cabinets Racks and Rail Kits on page 12 Preparing for the Installation on page 13 Installing in the Cabinet on page 1...

Page 32: ...ront and back mounting planes between 610 mm and 915 mm 24 to 36 inches Clearance depth to front cabinet door in front of front rackmounting plane at least 25 4 mm 1 inch Clearance depth to back cabinet door behind front rackmounting plane at least 800 mm 31 5 inches or 700 mm 27 5 inches without cable management arm Clearance width between structural supports cable troughs and the like between fr...

Page 33: ...ailable to allow 2 point front mount or mid mount configuration The slide kit includes hardware that enables mounting to any of the following types of rack rails 6 mm threaded holes No 10 32 threaded holes No 10 clearance holes Square unthreaded holes per EIA and IEC standards listed above Preparing for the Installation Use the following procedures to prepare for installation Before You Begin on p...

Page 34: ...AC branch circuit size for the quantity of units in your configuration and your operating voltage Always follow your local electrical codes for loading circuits Caution The Sun StorageTek 5320 NAS Appliance controller enclosure and expansion enclosures contain several components sensitive to static electrical discharge Surges of static electricity caused by shuffling your feet across a floor and t...

Page 35: ... the earth ground stud on the back of the server 3 Connect the safety ground conductor to the chassis stud with a two hole crimp terminal with a maximum width of 0 25 inch 4 Install the nuts on the chassis with a 10 in lb torque The safe ground conductor provides proper grounding only for the Sun StorageTek 5320 NAS Appliance You must provide additional proper grounding for the rack and other devi...

Page 36: ...e mounting bracket attaches to the server chassis To Prepare the Server 1 Unpack the unit 2 Check the contents of the box for the following items Sun StorageTek 5320 NAS Appliance or Sun StorageTek 5320 NAS Cluster Appliance or Sun StorageTek 5320 NAS Gateway System single server or dual server Ship kit for the server 3 Be sure you have the power cords two per server which were shipped separately ...

Page 37: ...closure 2 Check the contents of the box for the following items Sun StorEdge 5300 enclosure controller or expansion Ship kit for the controller enclosure Two 5 meter optical Fibre Channel FC cables for connecting the RAID controller enclosure to your Sun StorageTek 5320 NAS Appliance Two 6 meter RJ45 RJ45 Ethernet cables Sun StorEdge 6130 Array Rack Alignment Template Documentation URL brochure Sh...

Page 38: ... NAS Appliance system installed in third party racks or cabinets It is the customer s responsibility to ensure that the rack or cabinet can house the Sun StorageTek 5320 NAS Appliance system in all conditions that might exist All racks and cabinets must comply with local building and construction codes Installing in the Cabinet You must plan your installation carefully The controller and expansion...

Page 39: ...ounting Order Sun StorageTek 5320 NAS Appliance server Space for second server if installing a cluster Space for additional expansion enclosures 5 more Sun StorEdge 5300 RAID Controller Enclosures Sun StorEdge 5300 Expansion Enclosure Second controller enclosure if used for a single controller enclosure or three more if Expansion enclosures for second Empty using two controller enclosures controll...

Page 40: ...umber ending H2 below server H1 To Install the System With Two Controller Enclosures 1 Mount the controller enclosure in the bottom of the cabinet 2 Mount any expansion enclosures maximum four from the bottom up and be sure to leave space for the maximum four EUs if you do not install them at this time The first expansion enclosure above the controller enclosure is EU 1 then EU 2 and so on 3 Mount...

Page 41: ...nstallation refer to the Sun LX50 SunFire V60x SunFire V65x rail mounting kit instructions Use the following procedure to attach the rails to a Sun Rack 900 or Sun Rack 1000 cabinet Because this rail kit can be adapted for several cabinets closely follow the procedures they may require actions that you have not previously taken Note In this section you will loosely hang the rails from screws you a...

Page 42: ...ing Started Guide May 2006 To Attach the Rails to the Sun Rack 900 1000 Cabinet 1 Using the No 2 Phillips screwdriver loosen the side rail screws and adjust each rail to its maximum length FIGURE 2 2 FIGURE 2 2 Loosening the Rail Screws to Adjust the Rail Length ...

Page 43: ...ver the front left cabinet rail FIGURE 2 3 FIGURE 2 3 Positioning the Rack Alignment Template 3 Slide the template up and down until all four holes line up with the cabinet rail holes 4 Note the screw hole numbers of the two mounting holes You will use the same screw hole numbers for the rest of this installation FRONT LEFT RACK R AIL H FRO NT LE FT RACK R AIL H ...

Page 44: ...Getting Started Guide May 2006 5 Using the No 2 Phillips screwdriver insert and tighten two 8 32 screws to secure the the left rail to the front of the cabinet FIGURE 2 4 Repeat for the right rail FIGURE 2 4 Securing the Left Rail to the Front of the Cabinet ...

Page 45: ...nd Storage 25 6 At the back of the cabinet adjust the length of each rail as needed to fit the cabinet and position the rail flange over the vertical rail FIGURE 2 5 FIGURE 2 5 Adjusting the Length of the Left Rail at the Back of the Cabinet ...

Page 46: ...nce and Gateway System Getting Started Guide May 2006 7 Using the No 3 Phillips screwdriver insert and tighten the M6 screws on each side at the back of the rail FIGURE 2 6 FIGURE 2 6 Securing the Right Rail to the Back of the Cabinet ...

Page 47: ...nstalling Servers and Back End Storage 27 8 Using the No 2 Phillips screwdriver tighten the four adjusting screws two on each side toward the back of each rail FIGURE 2 7 FIGURE 2 7 Tightening the Adjusting Screws ...

Page 48: ...res from the bottom up followed by the controller enclosure For information about order of enclosure installation refer to Installing in the Cabinet on page 18 After installing each enclosure you must connect its power cables and set the tray ID as described in Setting the Tray ID on page 49 To Install an Enclosure in a Cabinet 1 Unsnap and remove the left and right end caps on the enclosure to pe...

Page 49: ...people one at each side of the enclosure carefully lift and rest the enclosure on the bottom ledge of the left and right rails FIGURE 2 9 Caution Use care to avoid injury An enclosure can weigh up to 95 pounds 45 kg FIGURE 2 9 Positioning the Enclosure in the Cabinet ...

Page 50: ...nd Gateway System Getting Started Guide May 2006 3 Carefully slide the enclosure into the cabinet until the front flanges of the enclosure touch the vertical face of the cabinet FIGURE 2 10 FIGURE 2 10 Sliding the Enclosure Into the Cabinet ...

Page 51: ...e do one of the following For a Sun StorEdge Expansion cabinet use the No 2 Phillips screwdriver to insert and tighten four 10 32 screws two per side to secure the enclosure to the front of the cabinet FIGURE 2 11 FIGURE 2 11 Securing the Enclosure to the Front of a Sun StorEdge Expansion Cabinet ...

Page 52: ...illips screwdriver to install and tighten four M6 screws two per side to secure the enclosure to the front of the cabinet FIGURE 2 12 FIGURE 2 12 Securing the Enclosure to the Front of a Sun Rack 900 1000 Cabinet 5 Replace the left and right end caps to hide the front mounting screws The end caps snap onto the front bezel of the tray ...

Page 53: ...osure to the Back of the Cabinet Installing a Server in a Cabinet Installing a server involves three steps 1 Installing the slide rails refer to To Install the Slide Rail Assemblies on page 34 2 Installing the cable management kit refer to To Install the Cable Management Kit on page 41 3 Verifying the operation of the slide rails and cable management refer to To Verify the Operation of the Slide R...

Page 54: ...Rail Assemblies 1 Pull both mounting brackets completely out of their respective slide rails a Simultaneously press and hold the upper and lower lock buttons of the slide rail lock FIGURE 2 14 FIGURE 2 14 Unlocking the Slide Rail Assembly b Pull the mounting bracket out until it locks in the extended position ...

Page 55: ...ers and Back End Storage 35 c Slide the mounting bracket release button in the direction shown in FIGURE 2 15 and then slide the mounting bracket out of the slide rail FIGURE 2 15 Location of the Mounting Bracket Release Button ...

Page 56: ...y 2006 d Press the metal lever labeled Push on the middle section FIGURE 2 16 of the sliding rail and then push the middle section back into the rack FIGURE 2 16 Unlocking the Slide Rail Middle Section 2 Attach a mounting bracket to the right side of the server chassis Metal lever ...

Page 57: ...ee keyed openings in the mounting bracket pull the mounting bracket toward the front of the chassis until the bracket locks into place with an audible click c Verify that all three locating pins are trapped in the keyed openings and that the back locating pin has engaged the mounting bracket lock as shown in the right side of FIGURE 2 17 3 Attach the second mounting bracket to the left side of the...

Page 58: ...he threads are metric or standard Select the appropriate screws from the package included in the mounting kit If your rack does not have threaded mounting holes the mounting screws are secured with a caged nut 6 Attach a slide rail to the right front rack post a Loosely attach the front of a slide rail to the right front rack post FIGURE 2 18 using two screws Note Do not tighten the screws yet FIG...

Page 59: ...the back rack post with two screws 7 Attach the second slide rail to the left rack posts in a similar manner Again do not tighten the screws 8 Use the slide rail spacing tool to adjust the distance between the slide rails a At the front of the rack plug the left side of the tool into slots at the end of the left rail FIGURE 2 19 FIGURE 2 19 Using the Slide Rail Spacing Tool to Adjust the Distance ...

Page 60: ...ting brackets c Tighten the screws to lock the ends of the rails in place d At the back of the rack repeat Step a through Step c for the back ends of the rails 9 Deploy the anti tilt bar if the chassis or rack is so equipped Caution The weight of the server on extended slide rails can be enough to overturn a cabinet 10 Insert the ends of the mounting brackets into the sliding rails FIGURE 2 20 Cau...

Page 61: ...ils and guide the chassis into the rack Caution Verify that the server is securely mounted in the rack and that the slide rails are locked to the mounting brackets before continuing To Install the Cable Management Kit The cable management assembly CMA clips into the ends of the left and right sliding rail assemblies No screws are necessary for mounting the CMA ESC APE ENT ER ...

Page 62: ...nd of the left sliding rail assembly FIGURE 2 21 The tab at the front of the rail extension clicks into place FIGURE 2 21 Inserting the CMA Rail Extension Into the Back of the Left Slide Rail The right sides of the two CMA arms have hinged extensions On the manufacturer s instruction sheet the smaller extension is called the CMA Connector for Inner Member It attaches to the right mounting bracket ...

Page 63: ...Chapter 2 Installing Servers and Back End Storage 43 2 Insert the smaller extension into the clip located at the end of the mounting bracket FIGURE 2 22 FIGURE 2 22 Mounting the Inner CMA Connector ...

Page 64: ... StorageTek 5320 NAS Appliance and Gateway System Getting Started Guide May 2006 3 Insert the larger extension into the end of the right sliding rail FIGURE 2 23 FIGURE 2 23 Attaching the Outer CMA Connector ...

Page 65: ...ounting the Left Side of the Slide Rail To Verify the Operation of the Slide Rails and the CMA Tip Two people are needed for this procedure one to move the server in and out of the rack and one to observe the cables and CMA 1 For a cabinet or a free standing rack deploy the anti tilt bar 2 Unlock the slide lock buttons FIGURE 2 25 at the right and left sides of the server chassis and slowly pull t...

Page 66: ...pliance and Gateway System Getting Started Guide May 2006 FIGURE 2 25 Unlocking the Slide Rail Assembly 3 Inspect the attached cables for any binding or kinks 4 Verify that the CMA extends fully and does not bind in the slide rails ...

Page 67: ...ck End Storage 47 5 When the server is fully extended out release the slide rail lever stops FIGURE 2 26 Push both levers simultaneously and slide the server back into the rack FIGURE 2 26 Unlocking the Slide Rail Lever Stops Metal lever ...

Page 68: ...Rail Release Button The server should stop after approximately 15 inches 40 cm of travel 7 Verify that the cables and the CMA retracted without binding 8 Adjust the cable hangers and CMA as required Connecting the Power Cables 1 Verify that both power switches are off for each controller enclosure and expansion enclosure in the cabinet 2 Connect each power supply in each unit to a separate power s...

Page 69: ...ndby power mode 4 Connect the primary power cables from the cabinet to the external power source Note Do not power on the units until you complete the installation procedures for your system The power on sequence is described in detail in Powering On the Sun StorageTek 5320 NAS Appliance Controller Enclosures and Expansion Enclosures on page 67 Setting the Tray ID You set the tray ID using the Tra...

Page 70: ...tch to the appropriate setting The X10 switch at the left sets the tens place of the tray ID and the X1 switch sets the ones place For example to set the tray ID to 11 set the X10 switch to 1 and the X1 switch to 1 By convention tray ID 00 refers to the controller enclosure The first expansion enclosure located above the controller enclosure is tray ID 01 The second expansion enclosure is tray ID ...

Page 71: ...roller units and the controller units to the optional expansion units as described in subsequent chapters Use the chapter appropriate to the system that you are setting up To connect Refer to Single server Sun StorageTek 5320 NAS Appliance to back end storage Chapter 3 Dual server Sun StorageTek 5320 NAS Cluster Appliance to back end storage Chapter 4 Sun StorageTek 5320 NAS Gateway System to SAN ...

Page 72: ...52 Sun StorageTek 5320 NAS Appliance and Gateway System Getting Started Guide May 2006 ...

Page 73: ...k 5320 NAS Appliance connection and configuration instructions only If you are connecting a different system refer to the appropriate chapter This chapter contains the following sections Before You Begin on page 54 Connecting the Sun StorageTek 5320 NAS Appliance to Back End Storage on page 54 Connecting to the Network on page 65 Powering On the Sun StorageTek 5320 NAS Appliance Controller Enclosu...

Page 74: ...kend storage for several different configurations This section includes the following tasks Connecting the Sun StorageTek 5320 NAS Appliance to Controller Enclosures on page 54 Connecting Controller Enclosures to Expansion Enclosures on page 59 Connecting the Sun StorageTek 5320 NAS Appliance to Controller Enclosures The Sun StorageTek 5320 NAS Appliance connects to each controller enclosure with ...

Page 75: ...o Connect One Controller Enclosure Use the instructions in this section if you are connecting one controller enclosure to the Sun StorageTek 5320 NAS Appliance For a Sun StorageTek 5320 NAS Appliance with one dual port HBA card FIGURE 3 2 1 Connect the HBA port 2 on the Sun StorageTek 5320 NAS Appliance to the Controller A host 1 port 2 Connect the HBA port 1 on the Sun StorageTek 5320 NAS Applian...

Page 76: ...main empty FIGURE 3 2 Connecting the Sun StorageTek 5320 NAS Appliance to the Controller Enclosure For a Sun StorageTek 5320 NAS Appliance with two dual port HBA cards FIGURE 3 3 1 Connect the HBA port 1 of the first HBA card to the Controller A host 1 port Sun StorageTek 5320 NAS Appliance 5300 RAID controller enclosure Controller B Controller A ...

Page 77: ...ageTek 5320 NAS Appliance Note The Sun StorageTek 5320 NAS Appliance must have two HBA cards to connect to two controller enclosures Caution One array can contain Fibre Channel disk drives in the controller enclosure and expansion enclosures and the other array can contain SATA disk drives in the expansion enclosures only However you cannot mix EU F Fibre Channel and EU S SATA expansion enclosures...

Page 78: ...f the first HBA card to the Controller A host 1 port on the first controller enclosure 4 Connect the HBA port 2 of the second HBA card to the Controller B host 1 port on the first controller enclosure FIGURE 3 4 Connecting the Sun StorageTek 5320 NAS Appliance to Two Controller Enclosures Sun StorageTek 5320 NAS Appliance First controller enclosure Second controller enclosure Controller A Controll...

Page 79: ... enclosures and expansion enclosures These instructions apply to one controller enclosure or to two controller enclosures If you are using two controller enclosures follow the same instructions to connect expansion enclosures to each controller enclosure Caution One array can contain Fibre Channel disk drives in the controller enclosure and expansion enclosures and the other array can contain SATA...

Page 80: ... Cable a Controller Enclosure to Seven Expansion Enclosures on page 64 To Cable a Controller Enclosure to One Expansion Enclosure To connect a controller enclosure and one expansion enclosure two 2 meter Active Copper cables are required Refer to FIGURE 3 6 FIGURE 3 6 Controller Enclosure and One Expansion Enclosure Cable Interconnection 1 Connect one Active Copper cable between the A side expansi...

Page 81: ... the A side expansion port of the controller enclosure and the A side port 1 of expansion enclosure 1 2 Connect one Active Copper cable between the A side port 2 of expansion enclosure 1 and the A side port 1 of expansion enclosure 2 3 Connect one Active Copper cable between the B side expansion port of the controller enclosure and the B side port 2 of expansion enclosure 2 4 Connect one Active Co...

Page 82: ...ntroller enclosure 1 Connect one Active Copper cable between the A side expansion port of the controller enclosure and the A side port 1 of expansion enclosure 1 2 Connect one Active Copper cable between the A side port 2 of expansion enclosure 1 and the A side port 1 of expansion enclosure 2 3 Connect one Active Copper cable between the A side port 2 of expansion enclosure 2 and the A side port 1...

Page 83: ...ort 1 of expansion enclosure 3 and the B side port 2 of expansion enclosure 2 6 Connect one Active Copper cable between the B side port 1 of expansion enclosure 2 and the B side port 2 of expansion enclosure 1 Note The A side port 2 of expansion enclosure 3 and the B side port 1 of expansion enclosure 1 remain empty ...

Page 84: ...troller Enclosure and Seven Expansion Enclosures Cable Interconnection Caution Do not mix EU F Fibre Channel and EU S SATA expansion enclosures attached to a controller enclosure 1 Connect one Active Copper cable between the A side expansion port of the controller enclosure and the A side port 1 of expansion enclosure 1 Expansion enclosure 5 A B Expansion enclosure 6 Controller enclosure Expansion...

Page 85: ...he B side port 1 of each expansion enclosure and the B side port 2 of the expansion enclosure directly above it until the B sides of all expansion enclosures are interconnected with Active Copper cables Note The A side port 2 of expansion enclosure 7 and the B side port 1 of expansion enclosure 1 remain empty Connecting to the Network Use the following procedures to connect the Sun StorageTek 5320...

Page 86: ...et port locations To connect the Sun StorageTek 5320 NAS Appliance to an optical Gigabit Ethernet network you must have the optional add in optical Gigabit Ethernet connections Connect an FC cable from the network to the top LINK A and connect another FC cable from the network to the bottom LINK B optical Gigabit Ethernet connector on the back of the Sun StorageTek 5320 NAS Appliance FIGURE 3 11 C...

Page 87: ...s and separate power cords provide fault tolerance if properly connected Note If you are using a UPS connect all units to the UPS Caution The expansion enclosures and controller enclosures must always be powered on and properly connected to each other and the main appliance before the Sun StorageTek 5320 NAS Appliance is powered on The expansion enclosures must be powered on first before the contr...

Page 88: ... Enclosures on page 54 and Connecting Controller Enclosures to Expansion Enclosures on page 59 2 Power on each expansion enclosure by setting the two power supply switches to the On position 3 Check that all LEDs on the expansion enclosure front panels turn solid green to indicate good operation 4 Power on each controller enclosure by setting the two power supply switches to the On position 5 Chec...

Page 89: ... apply to the Sun StorageTek 5320 NAS Appliance only For cluster configuration instructions refer to Chapter 4 For NAS Gateway System or NAS Gateway Cluster System configuration instructions refer to Chapter 5 To complete the initial Sun StorageTek 5320 NAS Appliance configuration you must do the following Provide an IP address Access the wizard through the Web Administrator Follow the instruction...

Page 90: ...e If your system uses DHCP to assign Domain Name System DNS and Windows Internet Naming Service WINS as well as IP and gateway addresses the corresponding fields in the wizard and Web Administrator screens are dynamically configured Verify the information when it is presented by the wizard during system configuration If your system supports DHCP the DHCP server automatically assigns an IP address ...

Page 91: ...irm each digit The cursor moves to the next digit Once the last digit is set press the ENTER button again to proceed to the next network setting After the broadcast address is set press the ENTER button to return to the Network Config menu Accessing the Web Administrator Note Before you can access Web Administrator you must have connected the Sun StorageTek 5320 NAS Appliance to your network provi...

Page 92: ...rm This sets the secure clock to the same time and date Make sure you set the time and date accurately as you can set the secure clock only once 4 Accept the license agreement to start the Configuration wizard If you decline Web Administrator returns you to the main login screen 5 Follow the on screen prompts entering information as requested For more detailed descriptions of the wizard screens re...

Page 93: ...m Administration Guide for information on creating file systems Note The boot sequence log is located in the bootlog under cvol log The log that the Web Admin GUI displays is a running log that can overflow If you want to save the entire log you can set up a local log See the Sun StorageTek 5320 NAS Appliance and Gateway Administration Guide for information about initial setup tasks including sett...

Page 94: ...74 Sun StorageTek 5320 NAS Appliance and Gateway System Getting Started Guide May 2006 ...

Page 95: ...ting system installed Note This chapter contains Sun StorageTek 5320 NAS Cluster Appliance connection and configuration instructions only If you are connecting a different system refer to the appropriate chapter This chapter contains the following sections Before You Begin on page 76 Connecting the Sun StorageTek 5320 NAS Cluster Appliance to Back End Storage on page 76 Connecting the Server Healt...

Page 96: ...e to the optional expansion enclosures for several different configurations This section includes the following tasks Connecting the Sun StorageTek 5320 NAS Cluster Appliance to Controller Enclosures on page 76 Connecting the Controller Enclosures to Expansion Enclosures on page 81 Connecting the Sun StorageTek 5320 NAS Cluster Appliance to Controller Enclosures The Sun StorageTek 5320 NAS Cluster...

Page 97: ... NAS Cluster Appliance This section contains details on the following To Connect One Controller Enclosure on page 77 To Connect Two Controller Enclosures on page 78 To Connect One Controller Enclosure Use the instructions in this section if you are connecting one controller enclosure to the Sun StorageTek 5320 NAS Cluster Appliance Sun StorageTek 5320 NAS Cluster server H1 Sun StorageTek 5320 NAS ...

Page 98: ...Tek 5320 NAS Cluster Appliance server H2 to the Controller A host 2 port 4 Connect the HBA port 1 of the second HBA card on the Sun StorageTek 5320 NAS Cluster Appliance server H2 to the Controller B host 2 port FIGURE 4 2 Connecting Pairs of HBA Cards to One Controller Enclosure To Connect Two Controller Enclosures Use the instructions in this section and refer to FIGURE 4 3 and FIGURE 4 4 if you...

Page 99: ...ed to a controller enclosure 1 Connect the HBA port 2 of the first HBA card on the Sun StorageTek 5320 NAS Cluster Appliance server H1 to the Controller A host 1 port on the first controller enclosure 2 Connect the HBA port 1 of the first HBA card on the Sun StorageTek 5320 NAS Cluster Appliance server H1 to the Controller B host 1 port on the second controller enclosure 3 Connect the HBA port 2 o...

Page 100: ...Appliance server H1 to the Controller A host 1 port on the second controller enclosure FIGURE 4 3 Connecting the Sun StorageTek 5320 NAS Cluster Appliance to Two Controller Enclosures Sun StorageTek 5320 Cluster server H1 NAS Sun StorageTek 5320 Cluster server H2 NAS First controlller enclosure Second controller enclosure Controller A Controller B Controller A Controller B ...

Page 101: ...ver H2 to the Controller B host 2 port on the first controller enclosure 8 Connect the HBA port 1 of the second HBA card on the Sun StorageTek 5320 NAS Cluster Appliance server H2 to the Controller A host 2 port on the second controller enclosure Connecting the Controller Enclosures to Expansion Enclosures Each controller enclosure uses Controller A and Controller B expansion ports to connect to F...

Page 102: ...n contain SATA disk drives in the expansion enclosures only However you cannot mix EU F Fibre Channel and EU S SATA expansion enclosures attached to a controller enclosure Note A maximum of seven EU F or eight EU S expansion enclosures can be attached to a controller enclosure The cabling differs depending on the number of expansion enclosures you are connecting For one expansion enclosure refer t...

Page 103: ...xpansion enclosure 2 Connect one Active Copper cable between the B side expansion port of the controller enclosure and the B side port 2 of the expansion enclosure Note The A side port 2 and B side port 1 of the expansion enclosure remain empty To Cable a Controller Enclosure to Two Expansion Enclosures To connect a controller enclosure and two expansion enclosures four 2 meter Active Copper cable...

Page 104: ...osure 1 and the A side port 1 of expansion enclosure 2 3 Connect one Active Copper cable between the B side expansion port of the controller enclosure and the B side port 2 of expansion enclosure 2 4 Connect one Active Copper cable between the B side port 1 of expansion enclosure 2 and the B side port 2 of expansion enclosure 1 Note The A side port 2 of expansion enclosure 2 and the B side port 1 ...

Page 105: ...closure 1 and the A side port 1 of expansion enclosure 2 3 Connect one Active Copper cable between the A side port 2 of expansion enclosure 2 and the A side port 1 of expansion enclosure 3 4 Connect one Active Copper cable between the B side expansion port of the controller enclosure and B side port 2 of expansion enclosure 3 5 Connect one Active Copper cable between the B side port 1 of expansion...

Page 106: ...to Seven Expansion Enclosures To connect a controller enclosure and seven expansion enclosures fourteen 2 meter Active Copper cables are required Refer to FIGURE 4 8 FIGURE 4 8 Controller Enclosure and Seven Expansion Enclosures Cable Interconnection Expansion enclosure 5 A B Expansion enclosure 6 Controller enclosure Expansion enclosure 7 Expansion enclosure 4 Expansion enclosure 3 Expansion encl...

Page 107: ...of the expansion enclosure directly below it until the A sides of all expansion enclosures are interconnected with Active Copper cables 4 Connect one Active Copper cable between the B side expansion port of the controller enclosure and the B side port 2 of expansion enclosure 7 5 Connect one Active Copper cable between the B side port 1 of expansion enclosure 7 and the B side port 2 of expansion e...

Page 108: ...ter Appliance is commonly configured with two Gigabit Ethernet cards FIGURE 4 9 FIGURE 4 9 Connecting to an Optical Gigabit Ethernet Network To Connect the Health Monitoring Cable Use a Cat5 Ethernet cable to connect the two servers NET0 heartbeat ports To Connect to Optical Gigabit Ethernet Networks You must have a second optical Gigabit Ethernet card installed Connect an FC cable from the networ...

Page 109: ...thernet networking refer to FIGURE 4 9 for NIC port locations To connect the Sun StorageTek 5320 NAS Cluster Appliance to a Fast Ethernet or Gigabit Ethernet network connect an RJ 45 unshielded twisted pair cable from your local area network LAN to the NET1 port on the back of each of the Sun StorageTek 5320 NAS Cluster Appliance servers For additional LAN connections continue to connect in order ...

Page 110: ...he redundant power supplies and separate power cords provide fault tolerance if properly connected Caution The expansion enclosures and controller enclosures must always be powered on and properly connected to each other and the Sun StorageTek 5320 NAS Cluster Appliance before the Sun StorageTek 5320 NAS Cluster Appliance The expansion enclosures must be powered on first before the controller encl...

Page 111: ... in Connecting the Server Health Monitoring and Network Cables on page 88 3 Power on each expansion enclosure by setting the two power supply switches to the On position 4 Check that all LEDs on the expansion enclosure front panels turn solid green to indicate good operation Note If the expansion enclosure contains SATA disk drives only the Power LED turns solid green The drive LEDs turn solid gre...

Page 112: ...er button FIGURE 4 10 FIGURE 4 10 Power Button and Front Panel Detail Caution Do not power up server H2 until directed in the instructions that follow 9 Verify server H1 has completed booting up the LCD should display QUIET 10 To complete the power on sequence continue with the next section Initial Sun StorageTek 5320 NAS Cluster Appliance Configuration on page 93 ESCAPE ENTER ESCAPE ENTER Power b...

Page 113: ...nce configuration you must specify the following IP addresses Basic configuration information Failover configuration information LUN ownership LUN paths To Set IP Addresses You assign a static IP address using the server H1 s LCD panel 1 Select Menu 2 Select A Network Config 3 Select A Set Gateway and enter the gateway address 4 Select C Set Port emc2 and enter the IP address subnet mask and broad...

Page 114: ...r H2 software serial number ending in H2 by pressing the recessed Power button 10 Wait until server H2 s LCD display status is QUIET 11 Use the instructions in Step 1 through Step 5 to assign server H2 s IP address and gateway address To Configure the System To configure the system using the Web Admin application follow these instructions 1 From a client on the same network open a Java platform en...

Page 115: ...H2 The Partner Name is the host name you want to assign to server H2 Any network information server H2 obtained manually through the LCD panel is displayed here and can be corrected if necessary The field for Private IP should already be populated and should not be changed e Click Next f On the Configure Network Adapters screen verify that the information is correct You can configure additional ne...

Page 116: ...ddress 2 On the Web Admin login screen click Apply A password is not required The password can be set later Refer to the Sun StorageTek 5320 NAS Appliance and Gateway System Administration Guide 3 From the navigation panel select High Availability Recover Check the status of the recover process in the logging window bottom pane 4 In the Restore RAID Configuration window assign some of the LUNs to ...

Page 117: ...Set LUN Path 2 Select a LUN and click Edit 3 Select the desired controller from the Primary Path drop down menu Evenly divide the assignment of LUNs to the two available paths For example the first and third LUN to 1 0 and the second and fourth LUN to 1 1 4 Click Apply Refer to the Sun StorageTek 5320 NAS Appliance and Gateway System Administration Guide for additional information about LUNs and o...

Page 118: ...98 Sun StorageTek 5320 NAS Appliance and Gateway System Getting Started Guide May 2006 ...

Page 119: ...Edge 9970 9980 9985 9990 system shortened to Sun StorEdge 99xx system in this chapter Note Refer to the Sun StorageTek 5320 NAS Gateway System web page for the most current SAN storage information This chapter contains the following sections Before You Begin on page 100 Installation and Configuration Task Overview on page 100 Connecting the Sun StorageTek 5320 NAS Gateway System to the Sun StorEdg...

Page 120: ...S Gateway System or Sun StorageTek 5320 NAS Gateway Cluster System and switch or switches if used in a cabinet Follow the installation instructions in Chapter 2 for Installing a Server in a Cabinet on page 33 Set up the SAN storage devices referring if necessary to your SAN storage documentation You will configure storage after the Sun StorageTek 5320 NAS Gateway System is installed and set up Ins...

Page 121: ...rver configuration refer to Initial Sun StorageTek 5320 NAS Gateway System Single Server Configuration on page 163 For the cluster configuration refer to Initial Sun StorageTek 5320 NAS Gateway Cluster System Configuration on page 167 Storage Concepts Each Sun StorageTek 5320 NAS Gateway System server contains two dual port HBA cards Using pairs of optical fiber cables you can connect to storage d...

Page 122: ...ter connecting the systems proceed to Connecting to the Network on page 159 Connecting Directly to the Sun StorEdge 6130 Array The following direct attach configurations are described in this section To Connect a Single Server Direct Attach to Sun StorEdge 6130 Array on page 102 To Connect a Dual Server Direct Attach to Sun StorEdge 6130 Array on page 104 Note Do not power on the server until inst...

Page 123: ...e Sun StorEdge 6130 array FIGURE 5 1 Connecting Two HBA Ports to the Sun StorEdge 6130 Array 3 Optional For additional redundancy attach the additional HBA ports a Connect the HBA Port 2 of the first HBA card to the Controller B host 2 port on the Sun StorEdge 6130 array Sun StorageTek 5320 NAS Gateway System Sun StorEdge 6130 Controller A Controller B array ...

Page 124: ... HA Sun StorageTek 5320 NAS Gateway Cluster System to SAN storage with two optical fiber cables from each server 1 Connect the HBA Port 1 of the first HBA card PCI1 on server H1 to the Controller A host 1 port on the Sun StorEdge 6130 array 2 Connect the HBA Port 1 of the second HBA card PCI0 on server H1 to the Controller B host 1 port on the Sun StorEdge 6130 array 3 Connect the HBA Port 1 of th...

Page 125: ...A card on server H2 to the Controller B host 2 port on the Sun StorEdge 6130 array FIGURE 5 3 Connecting Two HBA Ports per HA Server to the Sun StorEdge 6130 Array Sun StorageTek 5320 NAS Gateway System Sun StorEdge 6130 Controller A Controller B array Sun StorageTek 5320 NAS Gateway System server H2 server H1 ...

Page 126: ...power on the server until instructed in Powering On the Sun StorageTek 5320 NAS Gateway System on page 161 To Connect a Single Server Fabric Attach to Sun StorEdge 6130 Array You can connect to SAN storage with one or two pairs of optical fiber cables Using two pairs to connect all HBA ports and using two switches ensures redundancy and improves processing speed 1 Connect the HBA Port 1 of the fir...

Page 127: ...5 4 Connecting Two HBA Ports Using Fabric Switches to the Sun StorEdge 6130 Array 5 Optional For additional redundancy attach the additional HBA ports a Connect the HBA Port 2 of the first HBA card to the next available port of the second fabric switch 5 6 7 8 1 2 3 4 5 6 7 8 1 2 3 4 Sun StorageTek 5320 NAS Gateway System Sun StorEdge 6130 Controller A Controller B array Fabric switches ...

Page 128: ... all port pairs attach the four HBA ports to two switches and use four cables to attach the switches to the Sun StorEdge 6130 array 1 Connect the HBA Port 1 of the first HBA card PCI1 to the first available port of the first fabric switch 2 Connect the HBA Port 1 of the second HBA card PCI0 to the first available port of the second fabric switch 3 Connect the HBA Port 2 of the first HBA card to th...

Page 129: ...5 6 Connecting All HBA Ports Through Two Fabric Switches to the Sun StorEdge 6130 Array To Connect a Dual Server High Availability Fabric Attach to Sun StorEdge 6130 Array You can connect a dual server high availability Sun StorageTek 5320 NAS Gateway Cluster System to SAN storage with two or four pairs of optical fiber cables with or without additional switch connections Using four pairs to conne...

Page 130: ...e second HBA card PCI0 in the server H1 to the first available port of the second fabric switch 3 Connect the HBA Port 1 of the first HBA card in the server H2 to the next available port of the first fabric switch 4 Connect the HBA Port 1 of the second HBA card in the server H2 to the next available port of the second fabric switch 5 Connect an available port on the first switch to the Controller ...

Page 131: ...bric Switches to the Sun StorEdge 6130 Array 7 Optional For additional redundancy attach additional cables from the two switches a Connect the next available port on the first switch to the Controller B host 2 port on the Sun StorEdge 6130 array 5 6 7 8 1 2 3 4 5 6 7 8 1 2 3 4 Sun StorageTek 5320 NAS Gateway System Sun StorEdge 6130 Controller A Controller B array Fabric switches server H2 Sun Sto...

Page 132: ... the other HBA ports a Connect the HBA Port 2 of the first HBA card on server H1 to the next available port of the second fabric switch b Connect the HBA Port 2 of the second HBA card on server H1 to the next available port of the first fabric switch c Connect the HBA Port 2 of the first HBA card on server H2 to the next available port of the second fabric switch 5 6 7 8 1 2 3 4 5 6 7 8 1 2 3 4 Su...

Page 133: ...the first fabric switch FIGURE 5 9 Connecting All HBA Ports per HA Server Through Two Fabric Switch Zones to the Sun StorEdge 6130 Array Zone A Zone B 5 6 7 8 1 2 3 4 Zone A Zone B 5 6 7 8 1 2 3 4 Sun StorEdge 6130 Controller A Controller B array Fabric switches server H2 Sun StorageTek 5320 NAS Gateway System server H1 Sun StorageTek 5320 NAS Gateway System ...

Page 134: ...necting the systems proceed to Connecting to the Network on page 159 Note All figures in this section show the FlexLine 380 system Cabling for the FlexLine 240 and FlexLine 280 is similar to the 380 Connecting Directly to the FlexLine 200 and 300 Series You can direct connect a single server or a dual server to the Sun StorageTek FlexLine series array To Connect a Single Server Direct Attach to Su...

Page 135: ...ecting Two HBA Ports to the Sun StorageTek FlexLine Array 3 For redundancy and increased processing speed you can also attach the additional HBA ports Note Do not map a LUN to more than two ports on the Gateway system a Connect the HBA Port 2 of the first HBA card to the next available port on the Sun StorageTek FlexLine 200 and 300 series Sun StorageTek 5320 NAS Gateway System Sun StorageTek Flex...

Page 136: ...em to SAN storage with two or four pairs of optical fiber cables Using four pairs to connect all HBA ports simulates a dual array ensures redundancy and improves processing speed 1 Connect the HBA Port 1 of the first HBA card PCI1 on server H1 to the first available port on the Sun StorageTek FlexLine 200 and 300 series 2 Connect the HBA Port 1 of the second HBA card PCI0 on server H1 to the next ...

Page 137: ...e Sun StorageTek FlexLine 200 and 300 Series The following fabric attach configurations are described in this section To Connect a Single Server Fabric Attach to Sun StorageTek FlexLine 200 and 300 Series on page 118 To Share All Sun StorageTek FlexLine LUNs Between All Port Pairs on page 120 To Connect a Dual Server High Availability Fabric Attach to Sun StorageTek FlexLine 200 and 300 Series on ...

Page 138: ...AN storage with one or two pairs of optical fiber cables Using two pairs to connect all HBA ports and using two switches ensures redundancy and improves processing speed 1 Connect the HBA Port 1 of the first HBA card PCI1 to the first available port of the first fabric switch 2 Connect the HBA Port 1 of the second HBA card PCI0 to the first available port of the second fabric switch 3 Connect an a...

Page 139: ... Connecting Two HBA Ports Using Fabric Switches to the Sun StorageTek FlexLine Array 5 For additional redundancy you can also attach the additional HBA ports a Connect the HBA Port 2 of the first HBA card to the next available port of the second fabric switch 5 6 7 8 1 2 3 4 5 6 7 8 1 2 3 4 Sun StorageTek 5320 NAS Gateway System Sun StorageTek Controller A Controller B FlexLine 200 300 Fabric swit...

Page 140: ...irs To enable all LUNs to be shared between all port pairs attach the four HBA ports to two switches and use four cables to attach the switches to the Sun StorageTek FlexLine 200 and 300 series 1 Connect the HBA Port 1 of the first HBA card PCI1 to the first available port of the first fabric switch 2 Connect the HBA Port 1 of the second HBA card PCI0 to the first available port of the second fabr...

Page 141: ...ilable port of the first fabric switch 5 Connect an available port on the first switch to the Controller A host 1 port on the Sun StorageTek FlexLine 200 and 300 series 6 Connect an available port on the second switch to the Controller B host 1 port on the Sun StorageTek FlexLine 200 and 300 series 7 Connect the next available port on the first switch to the Controller A host 2 port on the Sun Sto...

Page 142: ...orageTek FlexLine 200 and 300 Series You can connect a dual server high availability Sun StorageTek 5320 NAS Gateway Cluster System to SAN storage with two or four pairs of optical fiber cables with or without additional switch connections Using four pairs to connect all HBA ports ensures redundancy and improves processing speed 1 Connect the HBA Port 1 of the first HBA card PCI1 in the server H1 ...

Page 143: ...fabric switch 3 Connect the HBA Port 1 of the first HBA card in the server H2 to the next available port of the first fabric switch 4 Connect the HBA Port 1 of the second HBA card in the server H2 to the next available port of the second fabric switch 5 Connect an available port on the first switch to the Controller A host 1 port on the Sun StorageTek FlexLine 200 and 300 series ...

Page 144: ...ugh Fabric Switches to the Sun StorageTek FlexLine Array 7 Optional For additional redundancy attach additional cables from the two switches a Connect the next available port on the first switch to the Controller B host 2 port on the Sun StorageTek FlexLine 200 and 300 series 5 6 7 8 1 2 3 4 5 6 7 8 1 2 3 4 Sun StorageTek 5320 NAS Gateway System Sun StorageTek Controller A Controller B FlexLine 38...

Page 145: ...exLine With Additional Switch Connections 8 Optional Use the other HBA ports a Connect the HBA Port 2 of the first HBA card on server H1 to the next available port of the second fabric switch b Connect the HBA Port 2 of the second HBA card on server H1 to the next available port of the first fabric switch 5 6 7 8 1 2 3 4 5 6 7 8 1 2 3 4 Sun StorageTek 5320 NAS Gateway System Sun StorageTek Control...

Page 146: ...he second HBA card on server H2 to the next available port of the first fabric switch FIGURE 5 18 Connecting All HBA Ports per HA Server Through Two Fabric Switch Zones to the Sun StorageTek FlexLine Array Zone A Zone B 5 6 7 8 1 2 3 4 Zone A Zone B 5 6 7 8 1 2 3 4 Sun StorageTek Controller A Controller B FlexLine 380 Fabric switches server H2 Sun StorageTek 5320 NAS Gateway System server H1 Sun S...

Page 147: ...ctly to the Sun StorEdge 6920 System The following direct attach configurations are described in this section To Connect a Single Server Direct Attach to Sun StorEdge 6920 System on page 127 To Connect a Dual Server Direct Attach to Sun StorEdge 6920 System on page 129 Note Do not power on the server until instructed in Powering On the Sun StorageTek 5320 NAS Gateway System on page 161 To Connect ...

Page 148: ... speed attach the additional HBA ports Note Do not map a LUN to more than two ports on the Gateway system a Connect the HBA Port 2 of the first HBA card to the next available port on the Sun StorEdge 6920 system EXP 2 B FC1 B FC2 SP LAN OUT SERVICE PROCESSOR PANEL SP LAN IN USER LAN AUX SERVICE SERIAL SERIAL CONSOLE PHONE PWR SEQUENCER OUT FRONT OUT REAR EXP 1 A FC1 Gigabit Ethernet EXP ENET 1 I O...

Page 149: ...ual array ensures redundancy and improves processing speed 1 Connect the HBA Port 1 of the first HBA card PCI1 on server H1 to the first available port on the Sun StorEdge 6920 system 2 Connect the HBA Port 1 of the second HBA card PCI0 on server H1 to the next available port on the Sun StorEdge 6920 system 3 Connect the HBA Port 1 of the first HBA card on server H2 to the next available port on t...

Page 150: ... HBA Port 2 of the first HBA card on server H1 to the first available port on the Sun StorEdge 6920 system b Connect the HBA Port 2 of the second HBA card on server H1 to the next available port on the Sun StorEdge 6920 system EXP 2 B FC1 B FC2 SP LAN OUT SERVICE PROCESSOR PANEL SP LAN IN USER LAN AUX SERVICE SERIAL SERIAL CONSOLE PHONE PWR SEQUENCER OUT FRONT OUT REAR EXP 1 A FC1 Gigabit Ethernet...

Page 151: ... on the Sun StorEdge 6920 system FIGURE 5 22 Connecting All HBA Ports per HA Server to the Sun StorEdge 6920 System EXP 2 B FC1 B FC2 SP LAN OUT SERVICE PROCESSOR PANEL SP LAN IN USER LAN AUX SERVICE SERIAL SERIAL CONSOLE PHONE PWR SEQUENCER OUT FRONT OUT REAR EXP 1 A FC1 Gigabit Ethernet EXP ENET 1 I O A FC2 EXP ENET 2 A NPORT 1 B 2 3 4 5 6 7 8 C D Sun StorageTek 5320 NAS Gateway System Sun Stora...

Page 152: ... not power on the server until instructed in Powering On the Sun StorageTek 5320 NAS Gateway System on page 161 To Connect a Single Server Fabric Attach to Sun StorEdge 6920 System You can connect to SAN storage with one or two pairs of optical fiber cables Using two pairs to connect all HBA ports and using two switches ensures redundancy and improves processing speed 1 Connect the HBA Port 1 of t...

Page 153: ...tach the additional HBA ports Note Do not map a LUN to more than two ports on the Gateway system a Connect the HBA Port 2 of the first HBA card to the next available port of the second fabric switch EXP 2 B FC1 B FC2 SP LAN OUT SERVICE PROCESSOR PANEL SP LAN IN USER LAN AUX SERVICE SERIAL SERIAL CONSOLE PHONE PWR SEQUENCER OUT FRONT OUT REAR EXP 1 A FC1 Gigabit Ethernet EXP ENET 1 I O A FC2 EXP EN...

Page 154: ...m LUNs Between All Port Pairs To enable all LUNs to be shared between all port pairs attach the four HBA ports to two switches and use four cables to attach the switches to the Sun StorEdge 6920 system EXP 2 B FC1 B FC2 SP LAN OUT SERVICE PROCESSOR PANEL SP LAN IN USER LAN AUX SERVICE SERIAL SERIAL CONSOLE PHONE PWR SEQUENCER OUT FRONT OUT REAR EXP 1 A FC1 Gigabit Ethernet EXP ENET 1 I O A FC2 EXP...

Page 155: ...ic switch 3 Connect the HBA Port 2 of the first HBA card to the next available port of the second fabric switch 4 Connect the HBA Port 2 of the second HBA card to the next available port of the first fabric switch 5 Connect an available port on the first switch to the first available port on the Sun StorEdge 6920 system 6 Connect an available port on the second switch to the next available port on...

Page 156: ...ateway Cluster System to SAN storage with two or four pairs of optical fiber cables with or without additional switch connections Using four pairs to connect all HBA ports ensures redundancy and improves processing speed 1 Connect the HBA Port 1 of the first HBA card PCI1 in the server H1 to the first available port of the first fabric switch EXP 2 B FC1 B FC2 SP LAN OUT SERVICE PROCESSOR PANEL SP...

Page 157: ...the second fabric switch 3 Connect the HBA Port 1 of the first HBA card in the server H2 to the next available port of the first fabric switch 4 Connect the HBA Port 1 of the second HBA card in the server H2 to the next available port of the second fabric switch 5 Connect an available port on the first switch to the first available port on the Sun StorEdge 6920 system ...

Page 158: ...Server Through Fabric Switches to the Sun StorEdge 6920 System EXP 2 B FC1 B FC2 SP LAN OUT SERVICE PROCESSOR PANEL SP LAN IN USER LAN AUX SERVICE SERIAL SERIAL CONSOLE PHONE PWR SEQUENCER OUT FRONT OUT REAR EXP 1 A FC1 Gigabit Ethernet EXP ENET 1 I O A FC2 EXP ENET 2 A NPORT 1 B 2 3 4 5 6 7 8 C D Heartbeat connection Sun StorEdge 6920 system FC Switch FC Switch Sun StorageTek 5320 NAS Gateway Sys...

Page 159: ...AS Gateway System 139 7 Optional To enable all LUNs to be shared between all port pairs attach additional cables from the two switches a Connect the next available port on the first switch to the next available port on the Sun StorEdge 6920 system ...

Page 160: ...Fabric Switches to the Sun StorEdge 6920 System With Additional Switch Connections EXP 2 B FC1 B FC2 SP LAN OUT SERVICE PROCESSOR PANEL SP LAN IN USER LAN AUX SERVICE SERIAL SERIAL CONSOLE PHONE PWR SEQUENCER OUT FRONT OUT REAR EXP 1 A FC1 Gigabit Ethernet EXP ENET 1 I O A FC2 EXP ENET 2 A NPORT 1 B 2 3 4 5 6 7 8 C D Heartbeat connection Sun StorageTek 5320 NAS Gateway System Sun StorageTek 5320 N...

Page 161: ...port of the second fabric switch c Connect the HBA Port 2 of the first HBA card on server H2 to the next available port of the first fabric switch d Connect the HBA Port 2 of the second HBA card on server H2 to the next available port of the second fabric switch e Connect an available port on the first switch to the next available port on the Sun StorEdge 6920 system f Connect an available port on...

Page 162: ...erver Through Two Fabric Switch Zones to the Sun StorEdge 6920 System EXP 2 B FC1 B FC2 SP LAN OUT SERVICE PROCESSOR PANEL SP LAN IN USER LAN AUX SERVICE SERIAL SERIAL CONSOLE PHONE PWR SEQUENCER OUT FRONT OUT REAR EXP 1 A FC1 Gigabit Ethernet EXP ENET 1 I O A FC2 EXP ENET 2 A NPORT 1 B 2 3 4 5 6 7 8 C D Sun StorEdge 6920 system Heartbeat connection FC Switch FC Switch Sun StorageTek 5320 NAS Gate...

Page 163: ...rk on page 159 Connecting Directly to the Sun StorEdge 99xx System The following direct attach configurations are described in this section To Connect a Single Server Direct Attach to Sun StorEdge 99xx System on page 143 To Connect a Dual Server Direct Attach to Sun StorEdge 99xx System on page 145 Note Do not power on the server until instructed in Powering On the Sun StorageTek 5320 NAS Gateway ...

Page 164: ...E 5 29 Connecting Two HBA Ports to the Sun StorEdge 99xx System 3 Optional For redundancy and increased processing speed you can also attach the additional HBA ports Note Do not map a LUN to more than two ports on the Gateway system a Connect the HBA Port 2 of the first HBA card to the next available port on the Sun StorEdge 99xx system Sun StorEdge 99xx Port pairs Sun StorageTek 5320 NAS Gateway ...

Page 165: ...o SAN storage with two or four pairs of optical fiber cables Using four pairs to connect all HBA ports simulates a dual array ensures redundancy and improves processing speed 1 Connect the HBA Port 1 of the first HBA card PCI1 on server H1 to the first available port on the Sun StorEdge 99xx system 2 Connect the HBA Port 1 of the second HBA card PCI0 on server H1 to the next available port on the ...

Page 166: ...ou can also attach the additional HBA ports a Connect the HBA Port 2 of the first HBA card on server H1 to the first available port on the Sun StorEdge 99xx system b Connect the HBA Port 2 of the second HBA card on server H1 to the next available port on the Sun StorEdge 99xx system c Connect the HBA Port 2 of the first HBA card on server H2 to the next available port on the Sun StorEdge 99xx syst...

Page 167: ...e second HBA card on server H2 to the next available port on the Sun StorEdge 99xx system FIGURE 5 32 Connecting All HBA Ports per HA Server to the Sun StorEdge 99xx System Sun StorageTek 5320 NAS Gateway System Sun StorageTek 5320 NAS Gateway System Heartbeat connection Sun StorEdge 99xx Port pairs ...

Page 168: ...Sun StorEdge 99xx System on page 153 Note Do not power on the server until instructed in Powering On the Sun StorageTek 5320 NAS Gateway System on page 161 To Connect a Single Server Fabric Attach to Sun StorEdge 99xx System You can connect to SAN storage with one or two pairs of optical fiber cables Using two pairs to connect all HBA ports and using two switches ensures redundancy and improves pr...

Page 169: ... Ports Through Fabric Switches to the Sun StorEdge 99xx System 5 Optional For redundancy and increased processing speed attach the additional HBA ports Note Do not map a LUN to more than two ports on the Gateway system a Connect the HBA Port 2 of the first HBA card to the next available port of the second fabric switch Sun StorEdge 99xx Port pairs Sun StorageTek 5320 NAS Gateway System FC Switch F...

Page 170: ...ween All Port Pairs To enable all LUNs to be shared between all port pairs attach the four HBA ports to two switches and use four cables to attach the switches Note Do not map a LUN to more than two ports on the Gateway system 1 Connect the HBA Port 1 of the first HBA card PCI1 to the first available port of the first fabric switch 2 Connect the HBA Port 1 of the second HBA card PCI0 to the first ...

Page 171: ...n the Sun StorEdge 99xx system 6 Connect an available port on the second switch to the next available port on the Sun StorEdge 99xx system 7 Connect the next available port on the first switch to the next available port on the Sun StorEdge 99xx system 8 Connect the next available port on the second switch to the next available port on the Sun StorEdge 99xx system FIGURE 5 35 Connecting All HBA Por...

Page 172: ...er to the first available port of the first fabric switch 2 Connect the HBA Port 1 of the second HBA card PCI0 in the first server to the first available port of the second fabric switch 3 Connect the HBA Port 1 of the first HBA card in the second server to the next available port of the first fabric switch 4 Connect the HBA Port 1 of the second HBA card in the second server to the next available ...

Page 173: ...nect a Dual Server High Availability Fabric Attach to Sun StorEdge 99xx System You can connect a dual server high availability Sun StorageTek 5320 NAS Gateway Cluster System to SAN storage with two or four pairs of optical fiber cables with or without additional switch connections Using four pairs to connect all HBA ports ensures redundancy and improves processing speed Sun StorEdge 99xx Port pair...

Page 174: ...he second HBA card PCI0 in the server H1 to the first available port of the second fabric switch 3 Connect the HBA Port 1 of the first HBA card in the server H2 to the next available port of the first fabric switch 4 Connect the HBA Port 1 of the second HBA card in the server H2 to the next available port of the second fabric switch 5 Connect an available port on the first switch to the first avai...

Page 175: ...Ports per HA Server Through Fabric Switches to the Sun StorEdge 99xx System 7 Optional To enable all LUNs to be shared between all port pairs attach additional cables from the two switches a Connect the next available port on the first switch to the next available port on the Sun StorEdge 99xx system Sun StorageTek 5320 NAS Gateway System Sun StorageTek 5320 NAS Gateway System Sun StorEdge 99xx Po...

Page 176: ...h Additional Switch Connections 8 Optional For maximum redundancy use all four HBA ports on each server and attach additional cables from the two switches a Connect the HBA Port 2 of the first HBA card on server H1 to the first available port of the second fabric switch b Connect the HBA Port 2 of the second HBA card on server H1 to the first available port of the first fabric switch Sun StorEdge ...

Page 177: ...he second HBA card on server H2 to the next available port of the first fabric switch e Connect an available port on the first switch to the next available port on the Sun StorEdge 99xx system f Connect an available port on the second switch to the next available port on the Sun StorEdge 99xx system g Connect the next available port on the first switch to the next available port on the Sun StorEdg...

Page 178: ...second switch to the next available port on the Sun StorEdge 99xx system FIGURE 5 39 Connecting All HBA Ports per HA Server Through Two Fabric Switches to the Sun StorEdge 99xx System Sun StorEdge 99xx Port pairs Sun StorageTek 5320 NAS Gateway System Sun StorageTek 5320 NAS Gateway System FC Switch FC Switch Heartbeat connection ...

Page 179: ...nstallation required To Connect to a 100BASE T Fast Ethernet Network or to a 1000BASE T Gigabit Network Connect an RJ 45 unshielded twisted pair cable from your local area network LAN to the port NET0 or the port NET1 on the back of the Sun StorageTek 5320 NAS Gateway System FIGURE 5 40 Connecting to a Fast Ethernet or a Gigabit Ethernet Network Note Later when you configure the system see Initial...

Page 180: ...ter when you configure the system see Initial Sun StorageTek 5320 NAS Gateway System Single Server Configuration on page 163 the LINK A port displays as Port emf3 and the LINK B port displays as Port emf4 Connecting Dual Server HA Servers Each server in a dual server Sun StorageTek 5320 NAS Gateway Cluster System uses a dedicated Ethernet connection to communicate with its partner and perform peri...

Page 181: ...ernet cable from your LAN to the NIC NET1 NET2 or NET3 port on the back of each of the servers see FIGURE 5 42 for NIC port locations To Connect to an Optical Gigabit Ethernet Network Connect an optical network cable from the network to the top LINK A and connect another optical network cable from the network to the bottom LINK B optical Gigabit Ethernet connector on the back of each of the server...

Page 182: ...way Cluster System to the Sun StorEdge 99xx System on page 143 2 Verify that the Sun StorageTek 5320 NAS Gateway System is connected to the network Refer to Connecting to the Network on page 159 3 For the Sun StorageTek 5320 NAS Gateway Cluster System dual server configuration verify that the health monitoring cable is connected Refer to To Connect the Health Monitoring Cable on page 161 4 Using a...

Page 183: ...nfiguration on page 167 Initial Sun StorageTek 5320 NAS Gateway System Single Server Configuration Note These instructions apply to the Sun StorageTek 5320 NAS Gateway System single server only For Sun StorageTek 5320 NAS Gateway Cluster System configuration instructions refer to Initial Sun StorageTek 5320 NAS Gateway Cluster System Configuration on page 167 For Sun StorageTek 5320 NAS Appliance ...

Page 184: ... server Note You must perform both tasks before proceeding to SAN Storage Configuration on page 175 To Set Up Basic Configuration 1 From a client on the same network open a Java platform enabled web browser with Java Plug in and enter the IP address for the server 2 Accept the Applet Security Certificate and wait until the Web Admin applet is loaded on this system 3 On the Web Admin login screen c...

Page 185: ... steps refer to the Sun StorageTek 5320 NAS Appliance and Gateway System Administration Guide for more information Note When adding your DNS server click Add to ensure that the DNS server has been added g In the Confirmation screen review the configuration information you have added Note Be sure the configuration information is accurate before continuing h Click Finish on the wizard Confirmation s...

Page 186: ...ft and bottom to top as shown in TABLE 5 1 For each HBA port the port WWN is listed in the upper portion of the window The port WWNs are used to map the LUNs on the SAN storage device or to zone these ports on the fabric switch 8 Write down the port WWNs of all the HBA ports WWNs consist of 16 characters that start after the x and do not include the 9 Log out of Web Admin and close the browser 10 ...

Page 187: ... or the right arrow button to reboot 2 After the server has rebooted use Web Admin to configure file volumes Refer to the Sun StorageTek 5320 NAS Appliance and Gateway System Administration Guide Initial Sun StorageTek 5320 NAS Gateway Cluster System Configuration Note These instructions apply to the Sun StorageTek 5320 NAS Gateway Cluster System configuration only For Sun StorageTek 5320 NAS Gate...

Page 188: ...atic IP address use server H1 s LCD panel 1 Select Menu 2 Select A Network Config 3 Select A Set Gateway and enter the gateway address To enter data use the up and down arrows to select digits dots or spaces Then use the ENTER or right arrow button to accept each character 4 Select C Set Port emc2 or emc3 or emc4 and enter the IP address subnet mask and broadcast address as prompted This IP addres...

Page 189: ...lect the date the time and the time zone and click Apply Then click Yes to confirm This sets the secure clock to the same time and date Make sure you set the time and date accurately as you can set the secure clock only once 5 Read the license agreement in the Configuration wizard dialog box and click Accept to proceed with the following wizard steps a Click Next in the Welcome dialog box b From t...

Page 190: ...to ensure the DNS server has been added h In the Confirmation screen review the configuration information you have added Note Be sure the configuration information is accurate before continuing i Click Finish on the wizard Confirmation screen The system configures the settings and indicates that in the Save Configuration screen j Click Close on the Save Configuration screen To Activate the Sun Sto...

Page 191: ... to zone these ports on the fabric switch 8 Write down the port WWNs of all the HBA ports WWNs consist of 16 characters that start after the x and do not include the 9 Log out of Web Admin and close the browser To Set Up Server H2 1 Assign server H2 s IP address and gateway address using the instructions in To Set IP Addresses on page 168 2 Set up server H2 s basic configuration using the instruct...

Page 192: ...or right arrow button to shut down 3 When server H1 has restarted and the LCD panel displays QUIET press the ENTER or right arrow button Then press the down arrow button until the flashing cursor is on C Take All LUNs 4 Press the ENTER or right arrow button to select C Take All LUNs 5 When prompted to Take All LUNs No press the up arrow button to select Yes and press the ENTER or right arrow butto...

Page 193: ...ugh DHCP or manually through the LCD panel is displayed here and can be corrected if necessary The field for Private IP for the heartbeat connection should already be populated IP 10 10 10 2 private network and should not be changed 9 Click Apply 10 A message appears stating that the system will be rebooted for changes to take effect Confirm that you want to reboot both servers Server H1 reboots a...

Page 194: ...r Status should display NORMAL 5 Follow these steps first on server H1 and then on server H2 a Using Web Admin on server H1 in the navigation panel select Network Configuration Configure TCP IP Configure Network Adapters b Check that the emc or emf NIC port being used displays the partner IP alias address To Configure LUN Paths You should assign LUN paths on each server to balance multipath access...

Page 195: ...age and of the HBAs on the Sun StorageTek 5320 NAS Gateway System Sun StorEdge 6130 Array To use the Sun StorEdge 6130 array for Sun StorageTek 5320 NAS Gateway System storage there are certain requirements The Sun StorEdge 6130 array requires the software and firmware shown in TABLE 5 2 to interoperate with the Gateway System If the Sun StorEdge 6130 array is currently at version 1 2 upgrade the ...

Page 196: ...ware or firmware the script completes the upgrade without pausing for questions When the installation is complete a confirmation is displayed followed by the date and time that the upgrade finished You can now install the patches as described in the next section To Upgrade the Sun StorEdge 6130 Array Firmware 1 Download the required patches see TABLE 5 2 from http sunsolve sun com 2 Stop all I O t...

Page 197: ... in to the management software 4 Click Sun StorEdge 6130 Configuration Service The Array Summary page is displayed 5 On the Array Summary page click Auto Discover to display arrays that are on the same subnet as the management host Note It takes approximately 2 minutes for the software to discover each array 6 Verify that the array is listed on the Array Summary page To Manually Register the Array...

Page 198: ...Single Server on page 167 For the dual server HA system refer to Configure SAN storage using the appropriate instructions on page 171 To Configure Storage on the Sun StorEdge 6920 System 1 Using the Sun StorEdge 6920 Configuration Service select the NAS storage profile nfs_stripe for RAID 5 or nfs_mirror for RAID 1 0 2 Create a storage pool to be used by the Sun StorageTek 5320 NAS Gateway System ...

Page 199: ...ric switch choose FC AL connection 3 If you are using a fabric switch choose point to point connection 4 Select a 00 host group node type 5 Enable LUN Manager 6 Build Array Groups 7 Complete configuration on the Sun StorageTek 5320 NAS Gateway System For the single server system refer to To Configure Storage on the Sun StorageTek 5320 NAS Gateway System Single Server on page 167 For the dual serve...

Page 200: ...180 Sun StorageTek 5320 NAS Appliance and Gateway System Getting Started Guide May 2006 ...

Page 201: ...Unit if variable Value Voltage 90 264VAC Frequency 47 63 Hz AC current input typical Appliance 5 7A 115V or 2 9A 230V CU and EU 6 3A 115V or 3 1A 230V Power consumption Appliance Power availability 658VA from AC source 395W from power supply typical 550W maximum from power supply CU and EU Power availability 723VA 434W typical unit 21W 133 GB drives 600W typical unit Power cord SJT or SVT 18 SWG m...

Page 202: ...d EU Dimension HxWxD 13 2 cm x 48 2 cm x 56 4 cm 5 2 in x 19 in x 22 2 in Weight 44 5 kg 98 lb Rack height 3U TABLE A 3 Environmental Specifications Specification Unit Appliance CU and EU Temperature Operating 10 C to 35 C 50 F to 95 F 10 C to 40 C 50 F to 104 F Non operating storage 40 C to 65 C 40 F to 149 F 10 C to 50 C 14 F to 122 F Humidity Operating 10 to 90 non condensing 20 to 80 non conde...

Page 203: ...tising materials mentioning features or use of this software must display the following acknowledgement This product includes software developed by the University of California Berkeley and its contributors 4 Neither the name of the University nor the names of its contributors may be used to endorse or promote products derived from this software without specific prior written permission THIS SOFTW...

Page 204: ...THE FOUNDATION OR CONTRIBUTORS BE LIABLE FOR ANY DIRECT INDIRECT INCIDENTAL SPECIAL EXEMPLARY OR CONSEQUENTIAL DAMAGES INCLUDING BUT NOT LIMITED TO PROCUREMENT OF SUBSTITUTE GOODS OR SERVICES LOSS OF USE DATA OR PROFITS OR BUSINESS INTERRUPTION HOWEVER CAUSED AND ON ANY THEORY OF LIABILITY WHETHER IN CONTRACT STRICT LIABILITY OR TORT INCLUDING NEGLIGENCE OR OTHERWISE ARISING IN ANY WAY OUT OF THE ...

Page 205: ...hts reserved Redistribution and use in source and binary forms are permitted provided that this notice is preserved and that due credit is given to the University of Michigan at Ann Arbor The name of the University may not be used to endorse or promote products derived from this software without specific prior written permission This software is provided as is without express or implied warranty 7...

Page 206: ...INCLUDING ALL IMPLIED WARRANTIES OF MERCHANTABILITY AND FITNESS IN NO EVENT SHALL CMU BE LIABLE FOR ANY SPECIAL INDIRECT OR CONSEQUENTIAL DAMAGES OR ANY DAMAGES WHATSOEVER RESULTING FROM LOSS OF USE DATA OR PROFITS WHETHER IN AN ACTION OF CONTRACT NEGLIGENCE OR OTHER TORTIOUS ACTION ARISING OUT OF OR IN CONNECTION WITH THE USE OR PERFORMANCE OF THIS SOFTWARE 9 Troll FTP License Copyright 1995 2000...

Page 207: ...ped by Bill Paul 4 Neither the name of the author nor the names of any co contributors may be used to endorse or promote products derived from this software without specific prior written permission THIS SOFTWARE IS PROVIDED BY Bill Paul AND CONTRIBUTORS AS IS AND ANY EXPRESS OR IMPLIED WARRANTIES INCLUDING BUT NOT LIMITED TO THE IMPLIED WARRANTIES OF MERCHANTABILITY AND FITNESS FOR A PARTICULAR P...

Page 208: ...IMPLIED WARRANTIES OF MERCHANTABILITY AND FITNESS FOR A PARTICULAR PURPOSE ARE DISCLAIMED IN NO EVENT SHALL THE OPENLDAP FOUNDATION ITS CONTRIBUTORS OR THE AUTHOR S OR OWNER S OF THE SOFTWARE BE LIABLE FOR ANY DIRECT INDIRECT INCIDENTAL SPECIAL EXEMPLARY OR CONSEQUENTIAL DAMAGES INCLUDING BUT NOT LIMITED TO PROCUREMENT OF SUBSTITUTE GOODS OR SERVICES LOSS OF USE DATA OR PROFITS OR BUSINESS INTERRU...

Page 209: ...ncludes parts that are not under my direct control As far as I know all included source code is used in accordance with the relevant license agreements and can be used freely for any purpose the GNU license being the most restrictive see below for details However none of that term is relevant at this point in time All of these restrictively licensed software components which he talks about have be...

Page 210: ...rpose without restrictions COPYRIGHT C 1986 Gary S Brown You may use this program or code or tables extracted from it as desired without restriction 3 The 32 bit CRC compensation attack detector in deattack c was contributed by CORE SDI S A under a BSD style license See http www core sdi com english ssh for details Cryptographic attack detector for ssh source code Copyright c 1998 CORE SDI S A Bue...

Page 211: ... reproduce the above copyright notice this list of conditions and the following disclaimer in the documentation and or other materials provided with the distribution 3 All advertising materials mentioning features or use of this software must display the following acknowledgment This product includes software developed by the OpenSSL Project for use in the OpenSSL Toolkit http www openssl org 4 Th...

Page 212: ...ns are met 1 Redistributions of source code must retain the copyright notice this list of conditions and the following disclaimer 2 Redistributions in binary form must reproduce the above copyright notice this list of conditions and the following disclaimer in the documentation and or other materials provided with the distribution 3 All advertising materials mentioning features or use of this soft...

Page 213: ...ip org madler alumni caltech edu 19 Sun RPC License Sun RPC is a product of Sun Microsystems Inc and is provided for unrestricted use provided that this legend is included on all tape media and as a part of the software program in whole or part Users may copy or modify Sun RPC without charge but are not authorized to license or distribute it to anyone else except as part of a product or program de...

Page 214: ...OSS OF USE DATA OR PROFITS OR BUSINESS INTERRUPTION HOWEVER CAUSED AND ON ANY THEORY OF LIABILITY WHETHER IN CONTRACT STRICT LIABILITY OR TORT INCLUDING NEGLIGENCE OR OTHERWISE ARISING IN ANY WAY OUT OF THE USE OF THIS SOFTWARE EVEN IF ADVISED OF THE POSSIBILITY OF SUCH DAMAGES 21 QLogic 2300 License Copyright c 1997 1998 1999 2000 2001 by Matthew Jacob Feral Software All rights reserved Redistrib...

Page 215: ... the author may not be used to endorse or promote products derived from this software without specific prior written permission THIS SOFTWARE IS PROVIDED BY THE AUTHOR AND CONTRIBUTORS AS IS AND ANY EXPRESS OR IMPLIED WARRANTIES INCLUDING BUT NOT LIMITED TO THE IMPLIED WARRANTIES OF MERCHANTABILITY AND FITNESS FOR A PARTICULAR PURPOSE ARE DISCLAIMED IN NO EVENT SHALL THE AUTHOR OR CONTRIBUTORS BE ...

Page 216: ...ILITY AND FITNESS FOR A PARTICULAR PURPOSE ARE DISCLAIMED IN NO EVENT SHALL THE INTEL OR ITS CONTRIBUTORS BE LIABLE FOR ANY DIRECT INDIRECT INCIDENTAL SPECIAL EXEMPLARY OR CONSEQUENTIAL DAMAGES INCLUDING BUT NOT LIMITED TO PROCUREMENT OF SUBSTITUTE GOODS OR SERVICES LOSS OF USE DATA OR PROFITS OR BUSINESS INTERRUPTION HOWEVER CAUSED AND ON ANY THEORY OF LIABILITY WHETHER IN CONTRACT STRICT LIABILI...

Page 217: ...entation and source code may be found at http sourceforge net projects bonding 26 Open source http client library COPYRIGHT AND PERMISSION NOTICE Copyright c 1996 2005 Daniel Stenberg daniel haxx se All rights reserved Permission to use copy modify and distribute this software for any purpose with or without fee is hereby granted provided that the above copyright notice and this permission notice ...

Page 218: ...oftware is furnished to do so subject to the following conditions The above copyright notice and this permission notice shall be included in all copies or substantial portions of the Software THE SOFTWARE IS PROVIDED AS IS WITHOUT WARRANTY OF ANY KIND EXPRESS OR IMPLIED INCLUDING BUT NOT LIMITED TO THE WARRANTIES OF MERCHANTABILITY FITNESS FOR A PARTICULAR PURPOSE AND NONINFRINGEMENT IN NO EVENT S...

Page 219: ...American wire gauge n A unit for measuring the thickness of wire cluster n A pair of identical servers providing redundant high availability NAS services with failover protection configuration 1 n The manner in which the software and hardware of an information processing system are organized and interconnected 2 n The physical and logical arrangement of programs and devices that make up a data pro...

Page 220: ...it Ethernet n An Ethernet technology that enables data transfer rates of up to 1 Gbps using optical fiber cable or unshielded twisted pair cable hot swap v To replace a failed component without interruption of system service interface cable n A cable designed to connect a computer to a peripheral device or a peripheral device to another peripheral device allowing each device to communicate with th...

Page 221: ...mation RAM random access memory n Semiconductor based memory that can be read and written by the microprocessor or other hardware devices Generally understood to refer to volatile memory which can be written as well as read SAN storage area network n A network that includes various storage devices shared by multiple servers SCSI Small Computer Systems Interface n A standard interface for PCs that ...

Page 222: ...e is written to the first drive the next to the second drive and so on The primary advantage of striping is the ability for all drives in the array to process reads and writes simultaneously termination n The electrical connection at each end of the SCSI bus composed of a set of resistors on internal SCSI devices or an active or passive SCSI terminator block on external SCSI devices ...

Page 223: ...ances 76 to 87 SAN storage to gateway systems 99 to 161 Sun StorEdge 6130 array 102 to 113 Sun StorEdge 6920 system 127 to 142 Sun StorEdge 99xx system 143 to 158 CLI 10 clients 2 cluster appliance See Sun StorageTek 5320 NAS Cluster Appliance cluster configuration serial number 20 cluster configuration serial numbers 5 cluster gateway system See Sun StorageTek 5320 NAS Cluster Gateway System CMA ...

Page 224: ...159 G gateway system See Sun StorageTek 5320 NAS Gateway System Gigabit Ethernet appliances 65 cluster appliances 89 cluster gateway systems 161 gateway systems 159 optical appliances 66 cluster appliances 88 cluster gateway systems 161 gateway systems 160 grounding rack installation 15 requirements 14 to 15 H hardware overview 4 to 9 health monitoring cable cluster appliances 88 cluster gateway s...

Page 225: ...kmount kit preparation 16 applicable Sun cabinets 17 rackmount kits preparation 15 racks 12 rail installation servers 33 to 48 rail kits 12 to 13 rails attaching to a cabinet 21 Sun Rack 900 1000 22 requirements grounding 14 to 15 rack 12 software 9 S SAN storage 8 99 cabling gateway systems 99 to 161 configuration 175 to 179 direct attach 101 fabric attach 101 Sun StorEdge 6130 array 102 to 113 S...

Page 226: ...160 to 161 IP address configuration 168 See also Sun StorageTek 5320 NAS Gateway System Sun StorageTek 5320 NAS Gateway System cabling to SAN storage 99 to 161 configuration 163 to 167 storage 167 Fast Ethernet 159 Gigabit Ethernet optical 160 network connections 159 to 161 overview 6 powering on 161 to 163 Sun StorageTek FlexLine 200 and 300 Series 114 to 126 Sun StorEdge 6130 array 102 to 113 Su...

Reviews: