S One
User’s Manual
OPOS
3-4
Normally, the OPOS sensor registers all the marks before it starts cutting. With long cutting
jobs, however, this can lead to extensive back-and-forth shifting of the media, which can result
in poor tracking. To prevent this, an additional parameter can be set in the cutter. This option
divides the job into
segments (“
panels
”)
to prevent the media from being moved around
unnecessarily. When OPOS panelling is activated, all cutting data is cut in segments. The size
of the segments is the distance between the OPOS marks in X direction.
The
OPOS panelling
parameter can be set to
Off
,
On (2 marks)
or
On (4 marks)
. If set to
On (2
marks)
, the cutter will only load up to 2 marks in X direction during an OPOS loading action
and read the marks (4 total for the first segment). The next segments will then be cut after
reading the marks at the end of that segment (i.e. 2 for each subsequent segment). If set to
On (4 marks)
, the last marks of the previous segment are read again, which ensures a better
connection between the segments.
NOTE:
Do not use software panelling when
OPOS panelling
is on.
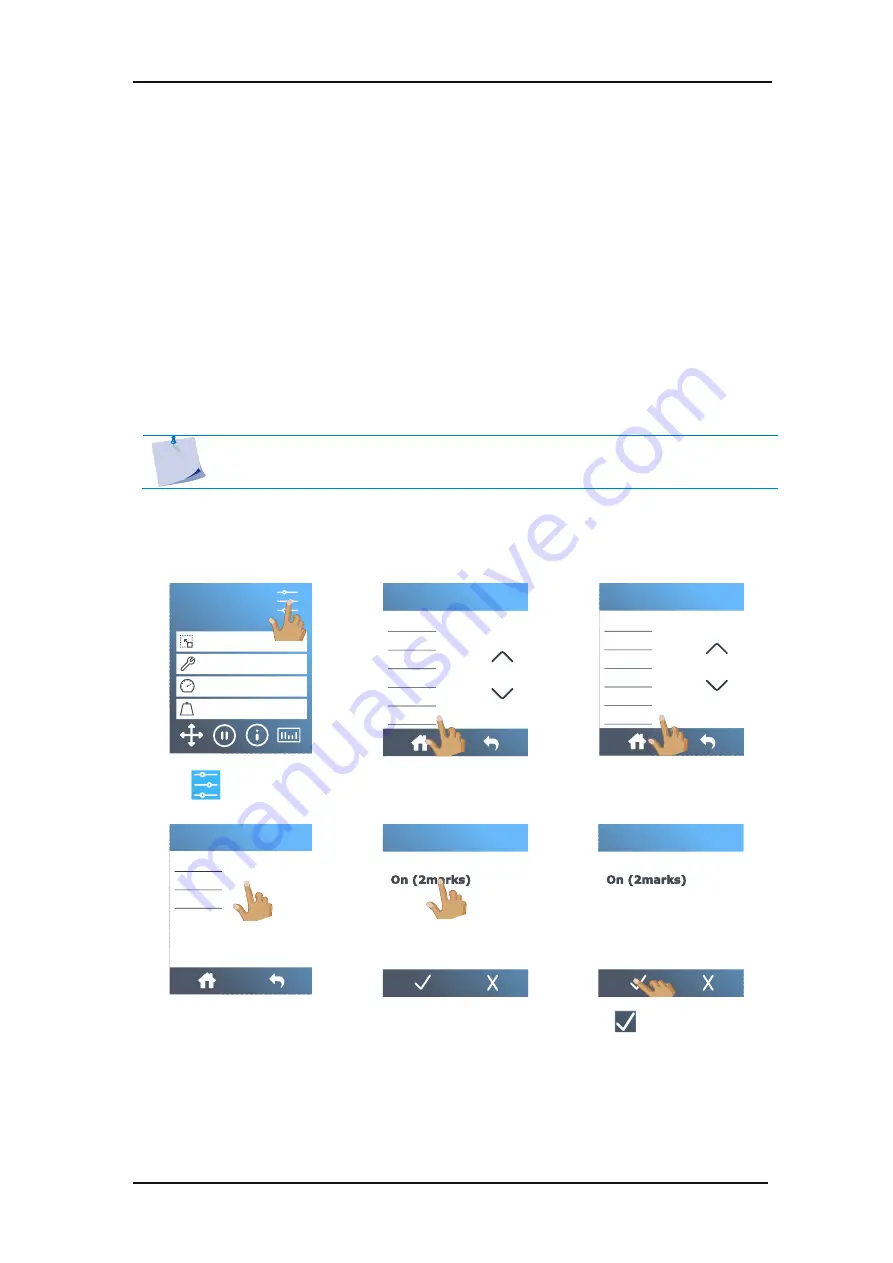
Activating OPOS panelling:
1.
Power on the cutter and load the media.
2.
Tap
.
3.
Scroll down with the arrow
and tap
Configuration
.
4.
Tap
OPOS parameters
.
5.
Tap
OPOS panelling
.
6.
Tap the desired option.
7.
Tap
to confirm.
S1D160
50000 x 145 mm
Knife
700 mm/s
90 g
Configuration 1
LAN 192.168.10.2
FlexCut
Tool
Actions
Settings
Calibrations
Configuration
Menu
Ethernet
Wi-Fi
USB port
Language
Menu units
OPOS parameters
Configuration
OPOS sheet mode
OPOS panelling
OPOS origin
OPOS parameters
Off
On (4marks)
OPOS panelling
Off
On (4marks)
OPOS panelling
3.2.3
Processing long jobs
Summary of Contents for S CLASS
Page 1: ...User Manual Rev 003 ...
Page 52: ......


