16E / 16E-H / 16E-P Spray Gun
37
MAN 96150 EN 01
4.2.3 Spraying
Once the gun is lit and the turbine is up to speed, you may begin feed-
ing wire and spraying. Make final adjustments to gas flows and pres-
sures to obtain an optimal flame.
Adjust the wire feed to the highest rate that allows the wire to melt off
and spray without spattering. Hold the gun 130 to 205 (5” - 8”) mm
from the surface being sprayed. Keep the gun aimed as perpendicular
to the surface as possible. Hold hoses back from the work area while
spraying.
Generally, you should stop wire feeding before releasing the safety
handle or closing the gas head valve. If you release the safety handle
while wire is feeding, the wire will stop but the flame will be extin-
guished at the same time and the wire will not be fully melted. It will
extend beyond the front of the air cap. Before relighting the gun, close
the wire feed valve, trim the wire and position it inside the air cap just
beyond the nozzle face.
If you are finished spraying and you intend to remove the wire from the
gun, you may release the safety while wire is feeding. This will leave
the wire tapered and make it easier to remove from the gun. Trim the
sharp tip of the wire before stowing the wire spool.
When spraying low-melting-point wires in occasional start/stop opera-
tion, the standard nozzles and air caps are satisfactory. However, fre-
quent starts and stops may cause these parts to load with sprayed
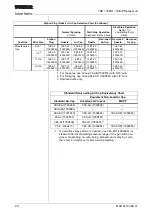
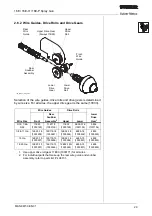
metal. If loading occurs or if the wire sticks in the nozzle, select non-
load hardware as described under “Hardware Selection” on page 26.
4.2.4 Shutdown
When spraying operations are finished for the day (or for any
extended period), shut down the system as follows:
1. Press
WIRE FEED ON-OFF
control to stop wire feeding.
2. Close gas head valve (release safety handle).
3. Close tank supply valves for oxygen and fuel.
4. Open gas head valve for 3-5 seconds to purge system.
5. Back out 3GRA and 3GRO regulator screws.
6. Close compressed air supply valve or shutoff valve on 6A Air Con-
trol Unit.
7. Unlock snubber, remove wire from rear wire guide and secure wire
to 2W Wire Control Unit.
INFO
The spray parameters
(PAR 96447) provide
starting points for the
materials listed. You
may need to make
adjustments to obtain
the best results for your
application.
i
INFO
Always leave the origi-
nal tag on the wire
spool so that the wire
can be identified.
i

