


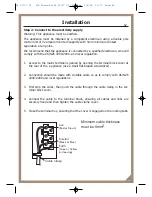
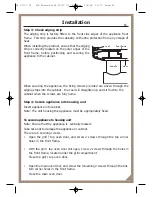


Step 3: Check edging strip
The edging strip is factory fitted to the front side edges of the appliance front
frame. This strip provides the cabinetry with extra protection from any escape of
heat.
When installing the product, ensure that the edging
strip is correctly located on the outer edges of the
front frame, before positioning and securing the
appliance to the cabinet.
When securing the appliance, the fixing screws provided are driven through the
edging strips into the cabinet - the seal will straighten up and sit flush to the
cabinet when the screws are fully home.
Step 4: Secure appliance into housing unit
Insert appliance into cabinet.
Note: The unit housing the appliance must be appropriately fixed.
To secure appliance to housing unit
Note: Ensure that the appliance is centrally located.
Take care not to damage the appliance or cabinet.
There are 6 securing screws.
•
Open the grill / top oven door, and screw 2 screws through the top corner
holes in the front frame.
•
With the grill / top oven door still open, screw 2 screws through the holes in
the front frame, located under the grill compartment.
Close the grill / top oven door.
•
Open the main oven door, and screw the remaining 2 screws through the bot-
tom corner holes in the front frame.
Close the main oven door.
Installation
seal
front frame
door
handle
63
08 27317 02 - 900 Genus-AU:08 27317 01 -900 Gen 9/4/08 10:37 Page 65