background image


R 8-Oct-05 / P 27-Jul-06 


- 5 -


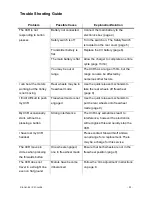
Fig 1: Removing the front cover 


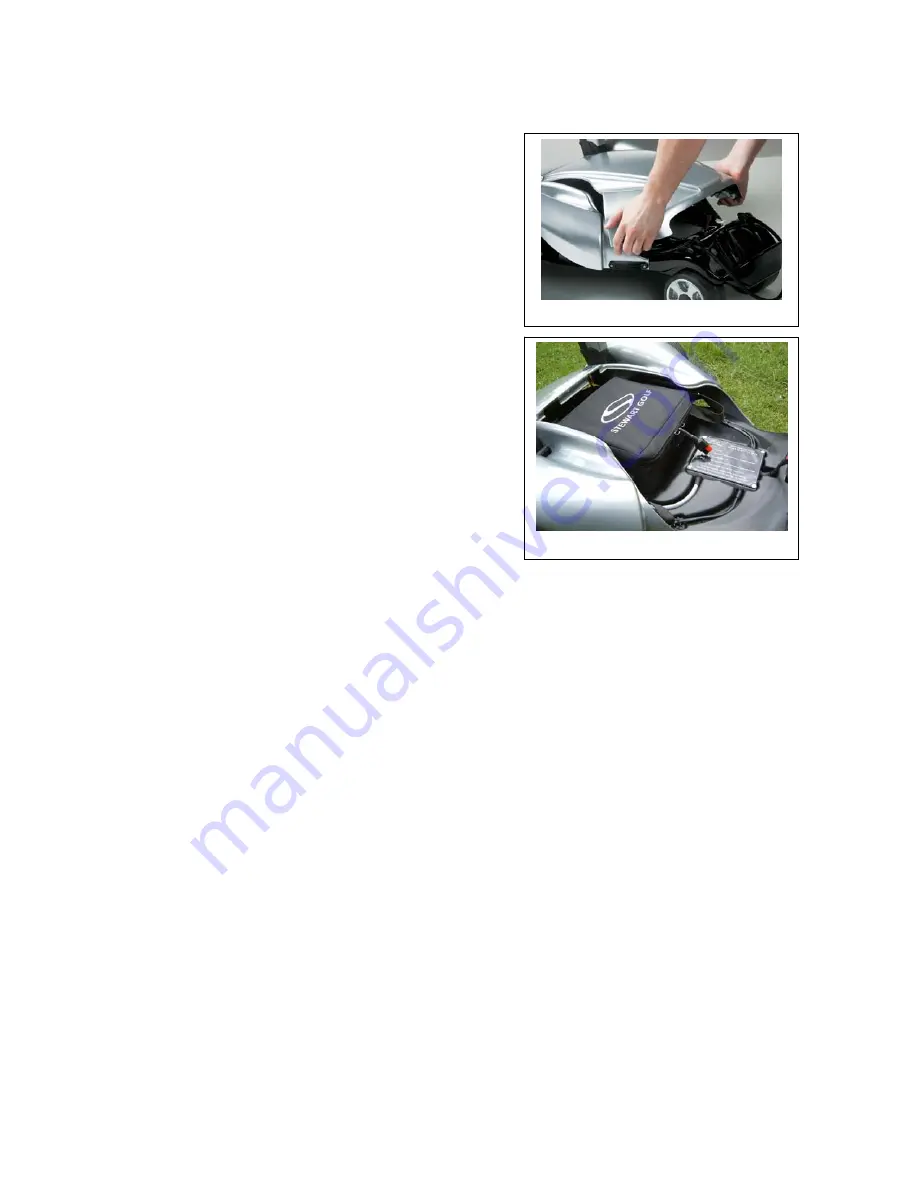
Fig 2: Inserting the battery 

To Start Using Your New X3R 


1.  The X3R has two purpose designed lifting 

places, one being the anti-tip device and the 

other under the front of the chassis. 

These are 

the only places from which you should lift 

the X3R.


2.  With the X3R placed on the floor, hold the 

handle and pull it up and towards you until both 

top and bottom clips snap into place.  

3. Remove the 

front cover

 (fig 1). To do this, hold 

the 'S' logos on either side of the front cover, 

apply slight outward pressure and lift. The front 

cover can then be lifted completely away from 

the X3R.  

4.  Remove the battery from its box. The battery is 

already in the Stewart Golf carry case for your 

convenience.  

5.  Ensuring that the straps are out of the way, insert the battery into the chassis with the 

power lead facing forwards (fig 2) and secure with the straps. 

6.  Connect the battery and ensure that the 

safety switch 

is in the 

'off'

 position (the ‘O’). 

7.  Replace the front cover. Holding the front cover by the 'S' logos, line up the two lugs on 

the rear of the front cover with the corresponding parts of the rear cover, and then pivot 

it into place. Ensure that the front of the cover is behind the ‘bump’ on the chassis.   

8.  Make sure that the 'S' clips are secured to the chassis. Gently press the front cover 

down until it is secured in place.    

9.  With the lower bag strap out of the way and the top one only connected on one side, 

place your bag onto the lower bag stay and rest it against the top bag stay.  

10. Using the large handle in the middle of the strap, pull the lower bag strap over the base 

of the golf bag. Using the handle means that you are less likely to trap your fingers.  

11. Take the loose end of the top bag strap and pull it around the golf bag, then attach it to 

the clip on the other side.  

12. Ensure that both wheels are in the ‘drive’ position (not in freewheel, page 9) 

13. Operate as outlined in this manual. 

Summary of Contents for X3R

Page 1: ...olfusa com Stewart Golf Asia Pacific Pty Ltd Level 21 201 Miller Street North Sydney NSW 2060 Australia Tel 61 1 300 738 381 Email ask stewartgolf com Web http www stewartgolf com aus This device complies with Part 15 of the FCC Rules Operation is subject to the following two conditions 1 This device may not cause harmful interference and 2 This device must accept any interference received includi...

Page 2: ...attery Power 6 X3R Handset Information 7 Other X3R Information Tips 8 Trim Adjustment Cruise Control 9 Quick Release Wheels Scorecard Holder 10 Beverage Holder Optional Towel Loop Sunglasses Holder 11 When You Have Finished Your Round 12 X3R Electronics System 13 Battery Battery Charger Charging The Battery 14 Battery Charging Safety 15 After Sales Service Warranty ...

Page 3: ... of the X3R will change on different surfaces You will find that the X3R will steer very quickly on a hard smooth car park but will behave differently on grass The weight of a golf bag will also affect speed and steering If you should ever suffer any problems or faults with your X3R we will need to know the serial number of your trolley This is located on the chassis just next to the electronics b...

Page 4: ...R 8 Oct 05 P 27 Jul 06 3 never let it run out of your sight ...

Page 5: ... below show the basic anatomy of the machine with the major parts labeled These parts will be referred to in this manual Handle Scorecard Holder Ball Tee Holder Top Bag Strap Main Support Aerial Front Cover Rear Wheels S Logos Lower Bag Stay Bottom Bag Strap Beverage Holder Optional Remote Cradle Top Clip Bottom Clips Safety Switch Rear Cover Stabiliser ...

Page 6: ... secure with the straps 6 Connect the battery and ensure that the safety switch is in the off position the O 7 Replace the front cover Holding the front cover by the S logos line up the two lugs on the rear of the front cover with the corresponding parts of the rear cover and then pivot it into place Ensure that the front of the cover is behind the bump on the chassis 8 Make sure that the S clips ...

Page 7: ...ting the front or back Under no circumstances should you try to make the X3R jump up or down kerbs To Help Conserve Battery Power Try not to overload your bag Extra weight in your golf bag will reduce the life of your battery and change the characteristics of the X3R s operation Try to keep the X3R on the fairway as long grass and rugged terrain will sap strength from the battery When negotiating ...

Page 8: ... the Off button will bring the X3R to a gradual stop Use this for normal stopping Pressing either the forward button or any of the 4 cruise control buttons will set the X3R in forward motion Once the X3R is in motion continually pressing the forward or back buttons will either speed up or slow down the trolley respectively The Cruise Control buttons are factory set button 1 is the slowest with but...

Page 9: ...he old battery and then press every button before connecting the new battery Now carefully replace the two halves ensuring that the battery lead is not obstructing location and replace the screws making sure they are not over tightened ...

Page 10: ...e change for example may engage one of the buttons and set the X3R in motion Instead use the belt clip on the handset to attach the handset to a belt or pocket When you are not using the X3R for example if you are in the pro shop or having lunch either disconnect the battery or use the safety switch located on the rear cover This removes the possibility of accidentally engaging the motors When the...

Page 11: ... trim may require adjustment This can be done from the handset by following these easy steps 1 Ensure that your X3R is on a flat level surface It is useful to align the caddy with a curb or object in the distance so that you know when the X3R is moving in a straight line 2 Hold down the Off button for 5 seconds to activate the trim mode The X3R will set off at a slow speed 3 Use the left and right...

Page 12: ... can always finish your round even in the unlikely event of a fault To engage this mode move the handle clockwise to the unlock symbol and move the wheel 15 to 20mm towards you Now rotate the wheel by 90 degrees and push it back towards the motor until it stops Turn the handle 90 degrees anti clockwise to lock and spin the wheel Scorecard Holder The scorecard holder has been designed to accept mos...

Page 13: ...back through the larger ring This is quite simple but does take a little practice to perfect Towel Loop Sunglass Holder There is provision on the X3R for you to place these items See images below To attach your sunglasses or spectacles slide one arm through the loop until they rest on the hinge Be aware that if the X3R is operating on rough terrain e g a bumpy path then it is possible for your gla...

Page 14: ...le and lower the handle until it comes to rest on the rear cover Fig 11 4 Now release both lower clips by pressing the clips with your thumbs simultaneously and slowly lower the parts until they nest together Fig 12 Do not drop either of the folding parts of the X3R 5 Place the X3R into the travel bag optional with the logo on the bag facing upwards Fig 13 The X3R has two purpose designed lifting ...

Page 15: ...rt periods of time for example if you go into the pro shop or stop for a drink Green Power On This light will remain on all of the time that the battery is connected Red Means that the battery is flat In this situation you can make use of the freewheel position on the rear wheels and use the X3R like a regular trolley Yellow Transmitter sending and receiving Every time any of the control buttons a...

Page 16: ...ety switch is activated you should contact us immediately Important The electronics box contains no user serviceable parts The lid to the case is sealed to reduce the risk of water ingress Breaking this seal increases the risk of moisture entering the case and reduces the reliability of your X3R No attempt should be made to open the case and doing so may invalidate the warranty ...

Page 17: ...eks put the battery through a full charging procedure Always recharge the battery as soon as possible after every round and never leave it for more than 24 hours before charging Even if you only complete a few holes it is important to fully charge the battery The battery is covered by a 1 year manufacturers warranty When not using your X3 always disconnect the battery from the electronics and remo...

Page 18: ...ed could emit explosive gasses Prevent flames and sparks close to the battery Always provide proper ventilation when charging Avoid covering the charger Battery acid is corrosive Rinse immediately with water if acid comes into contact with skin or eyes Seek medical advice Do not charge a frozen battery Never operate a damaged charger Never place the charger on top of the battery when charging Alwa...

Page 19: ...ear and tear misuse or modification of the standard products are not covered by this warranty You must report any fault to Stewart Golf as soon as it is noticed Further information regarding the terms and conditions of the warranty can be found on the warranty card supplied with your X3R Returning Your X3R To Stewart Golf If your address is within the United Kingdom and you agree to use a carrier ...

Page 20: ...R 8 Oct 05 P 27 Jul 06 19 high pressure jet washers as this increases the possibility of moisture entering the motors gearboxes and electronics ...

Page 21: ...ode Use the quick release mechanism to take the rear wheels off freewheel page 9 I find it difficult to push my X3R Freewheel mode is not engaged Use the quick release mechanism to put the rear wheels onto freewheel mode page 9 My X3R occasionally starts without me pressing a button Strong interference The X3R may sometimes react to interference however the electronics will recognise this and quic...

Reviews: