background image

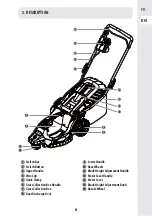
2. DESCRIPTION

1

  Switch Bar

2

  Switch Button

3

  Upper Handle

4

  Wire Clip

5

  Quick Clamp

6

  Grass Collection Box Handle

7

  Grass Collection Box 

8

  Rear Discharge Door

9

  Lower Handle

10

  Rear Wheels

11

  Blade Height Adjustment Handle

12

  Motor Cover Handle

13

  Motor Cover 

14

  Blade Height Adjustment Knob 

15

  Rotate Wheel

12

13

14
15

6

7

8

9

11

10

1

2

3

4

5

33

33

FR

EN

Summary of Contents for ELM2-36

Page 1: ...nstructionmanual FR NoticedeMontage Utilisation etEntretien EN Assemby Use Maintenance Manual 2021 09 V01 ELM2 36P 3W 4 STERWINS ELECTRICAL LAWN MOWER 36CM 360 3 WHEELS EANcode 3276000429975 FR Tondeuse à gazon électrique 1400W EN Electric lawn mower 1400W ...

Page 2: ......

Page 3: ...x4 x2 x3 4x16 4x30 5130 included ...

Page 4: ...n d entretien sur l appareil ou si son cordon d alimentation a été endommagé Maintenez toute tierce personne à distance Veillez à ce que le cordon d alimentation reste éloigné des accessoires de coupe Étiquette de puissance acoustique garantie 96 Portez des lunettes de sécurité Portez des gants protecteurs Portez des chaussures de sécurité Portez une protection auditive Portez des vêtements de pro...

Page 5: ...vous aider à mieux comprendre les processus impliqués Les symboles suivants sont utilisés dans cette notice d utilisation Classe II double isolation Cet outil est conforme aux directives européennes applicables et une évaluation de la conformité à ces directives a été effectuée Protégé contre les projections d eau de tous côtés Symbole de la circulation du produit sur le marché de l union douanièr...

Page 6: ...ation et la rallonge électrique ne présentent aucun signe de détérioration Utilisez uniquement une rallonge en parfait état Lescâblesélectriquesendommagéssontextrêmementdangereux Les données électriques de l alimentation électrique doivent être identiques à celles indiquées sur la plaque signalétique de cet outil N utilisezpasl outilsilesdonnéesélectriquessontdifférentes Insérez la fiche principal...

Page 7: ...immédiatement de l alimentation électrique NE TOUCHEZ PAS LE CORDON AVANT DE DEBRANCHER L ALIMENTATION N utilisez pas la machinesilecordonestendommagéouusé Utilisez l outil uniquement à la lumière du jour ou sous un éclairage suffisant N utilisezpasl outilsurdel herbemouillée Veillezàtoujoursavoirdesappuisdespiedssolidessurlespentes Marchez necourezjamais Tondezperpendiculairementàlapente jamaisve...

Page 8: ...ansportez pas l outil quand il est branché sur une alimentation électrique sous tension Arrêtez l outil puis retirez le coupe circuit Veillez à ce que toutes les pièces mobiles soient entièrement immobiles lorsque vous laissez la machine sans surveillance avant de dégager un bourrage ou de déboucher la goulotte avant de nettoyer ou d entretenir la machine après avoir heurté un objet étranger Vérif...

Page 9: ...esfixesdelatondeuse Pour les tondeuses rotatives veillez à ce que seuls des systèmes de coupederechangedetypeadaptésoientutilisés Parsécurité lespiècesuséesouendommagéesdoiventêtrechangées N utilisezquedespiècesderechangeetaccessoiresauthentiques Lors de la maintenance des lames gardez à l esprit que même si le moteurestarrêté leslamespeuventtoujourstourner Larallonge laficheetlaprisedoiventêtreét...

Page 10: ... résultant de la projection accidentelled accessoiresendommagéset oud objetscachés Brûluresencasdecontactavecdessurfaceschaudes AVERTISSEMENT Ceproduitcréeunchampélectromagnétique pendant l utilisation Dans certaines circonstances ce champ peut interférer avec des implants médicaux actifs ou passifs Pour réduire le risque de blessures graves ou mortelles nous recommandons que les personnes portant...

Page 11: ...latondeuseàgazonSterwins 2 Description 3 Spécificationstechniques 4 Avantlamiseenservicedel appareil 5 Utilisation 6 Entretien 7 Dépannage 8 Miseaurebutetrecyclage 9 Garantie 10 Vueéclatéeetlistedespièces 11 DéclarationdeconformitéCE 11 FR EN ...

Page 12: ...éballage terminé vérifiez que le produit est complet et qu il dispose de tous ses accessoires le cas échéant Si le produit est endommagéouqu ilprésenteundéfaut nel utilisezpasetretournez le auprès de votre revendeur Si vous donnez l outil à une tierce personne veuillez également lui transférer le présent mode d emploi Gardezàl espritquenotreéquipementn apasétéconçupour des applications commerciale...

Page 13: ...rouillage rapide Poignée du bac de ramassage Bac de ramassage Bouche d éjection arrière 9 10 11 12 13 14 15 12 13 14 15 6 7 8 9 11 10 1 2 3 4 5 Partie inférieure du guidon Roues arrière Poignée de réglage de la hauteur de lame Poignée de carter du moteur Carter du moteur Bouton de réglage de la hauteur de lame Roue rotative 13 FR EN ...

Page 14: ...n acoustique 77 9 dB A K 3 dB A Niveau de puissance acoustique mesuré 93 82 dB A K 0 686dB A Niveau de puissance acoustique garanti 96 dB A Hauteur de coupe 30 mm 60 mm Indice de protection contre les liquides IPX4 Poids de l outil 11 7 kg Lame n 5130 Niveau de vibration K 1 5 m s2 0 928 m s2 Réglage des roues Manuel Capacité du bac de ramassage 35 L 14 FR EN ...

Page 15: ...extérieur en PVC ou en caoutchouc et dont la section transversale est au minimum de 1 5 mm2 Avant et pendant l utilisation vérifiez que le cordon d alimentation et la rallonge ne soient pas endommagés N utilisez pas l appareil si le cordon la rallonge est détériorée ou usée Veillez à ce que les rallonges électriques restent éloignées des accessoires de coupe Si le cordon d alimentation la rallonge...

Page 16: ...decâble 4 Mise en place de votre tondeuse à gazon Il existe trois niveaux différents sur le côté de la partie inférieure du guidon 9 pour régler la hauteur Si la hauteur semble trop élevée ou trop basse ouvrez la bride de verrouillage rapide 5 sur le côté de la partie inférieure du guidon 9 réglez la partie supérieure du guidon 3 correctement puis serrez la bride de verrouillage rapide 5 pour fixe...

Page 17: ...er la tondeuse Pourarrêterlatondeuse relâchezlelevierd interrupteur 1 Patientezjusqu àl arrêtcomplet de la lame avant d effectuer un réglage sur la tondeuse Tenez toujours le guidon fermement avec vos deux mains lors de la tonte Commencez à tondre à proximité de la prise secteur pour vous assurer que la rallonge ne devienne pas un obstacle Veillez à ce que la rallonge ne puisse pas passer en desso...

Page 18: ...rner dans le vide Al aided uneclé desserrezl écroudelameen dessousdelatondeuse Retirezl écroudelame la rondelle et la lame de la machine Placez la lame neuve sur l arbre et replacez la rondelle et l écrou de lame Serrez l écrou de lame Serrez l écrou avec un couple de 25 30 N m Une fois la lame fixée vérifiez à la main que tout tourne comme il faut Examinez la tondeuse pour voir si elle présente d...

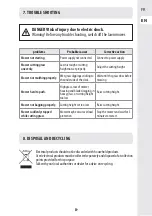
Page 19: ...e La tondeuse tond inégalement Le gazon est épais ou la hauteur de coupe n a pas été correctement réglée Réglez la hauteur de coupe Le paillage ne s effectue pas correctement Le gazon coupé est mouillé et colle sous le châssis Attendez que le gazon ait séché avant de le tondre La tondeuse est difficile à pousser Le gazon est haut l arrière du carénage de la tondeuse et la lame traînent dans le gazon ...

Page 20: ... l usage Nous serions ravis de récupérer vos commentaires sur le site internet du magasin Garantie Les produits STERWINS sont conçus selon les standards de qualité des produits grand public les plus exigeants Ces produits sont assortis d une garantie de 3 ans à compter de la date d achat Cette garantie couvre tous les défauts de fabrication ou matériels gSivousachetezunetondeuseàgazonSTERWINSavecu...

Page 21: ... gL outil la batterie le chargeur n a jamais été démonté e ou ouvert e gL outil la batterie le chargeur n a jamais été placé e dans un environnement humide exposition à la rosée ou à la pluie immersion gAucune pièce incorrecte pièce non fabriquée par STERWINS s avérant être la cause de la détérioration n a été utilisée gL outil n a pas été utilisé de manière inappropriée surcharge ou utilisation d...

Page 22: ...10 VUE ÉCLATÉE ET LISTE DES PIÈCES 22 FR EN ...

Page 23: ...3 1 A021039 015 00 Cache de roue 2 13 2 8121 511002 Roue arrière 2 13 3 8202 989101 00 Joint ondulé 2 13 4 8440 513001 00 Ensemble axe de roue 1 13 5 8SQDD05 12D Vis 2 13 6 8440 513002 Poignée de réglage de la hauteur 1 13 7 8NE 05D01 Écrou 2 13 8 8CC 10B Bague 2 14 8SNAB50 16Q Vis 15 POS Numéro de pièce Description Nombre 15 8304 511002 Plaque de fixation 2 16 8440 513007 00 Ensemble capot supéri...

Page 24: ... off Remove plug from mains before maintenance or if cord is damaged Keep by standers away Keep the flexible supply cord away from the cutting blades Guarantee sound power label 96 Wear safety glasses Wear protective gloves Wear safety boots Wear ear protection Wear protective overalls Beware of sharp elements 24 24 FR EN ...

Page 25: ...ou reach a better understanding of the processes involved The following symbols are used in this manual Class II Double insulation The product complies with the applicable European directives and an evaluation method of conformity for these directives was done Protection against splashed water from all directions SignofproductcirculationinthemarketoftheCustomsUnionmemberstates Recycling symbol IPX...

Page 26: ...letely assembled Before switching on the tool always check the connection cable for signs of damage only an undamaged connection cable may be used Damaged connection cables are highly dangerous gTheelectricaldataoftheelectricalsupplymustbethesame asthatindicatedintheratingplateofthistool Pleasedonot use the tool if the electrical data is different gInsert the main plug of the unit connection cable...

Page 27: ...ECTING THE SUPPLY Do not use the machine if the cord is damaged or worn gOperate the machine only in daylight or in good artificial light gAvoid operating the machine in wet grass gAlways be sure of your footing on slopes gWalk never run gMow across the face of slopes never up and down gExercise extreme caution when changing direction on slopes gDo not mow excessively steep slopes gUseextremecauti...

Page 28: ...ng parts have come to a complete stop whenever you leave the machine before clearing blockages or unclogging chute before checking cleaning or working on the machine after striking a foreign object gInspect the machine for damage and make repairs before restarting and operating the machine if the machine starts to vibrate abnormally check immediately inspect for damage replace or repair any damage...

Page 29: ... can still be moved gThe extension cable plug and socket must be watertight and intended for outdoor use gAlways allow the machine to cool down before storing gThemachineshouldbesuppliedviaaresidualcurrentdevice RCD with a tripping current of not more than 30 mA Caution An inadequate extension cable can be dangerous and can cause accidents Please contact a qualified electrician for advice if in an...

Page 30: ...omagnetic field during operation This field may under some circumstancesinterferewithactiveorpassivemedicalimplants Toreducetheriskofseriousorfatalinjury werecommendthat people with medical implants consult their doctor and the medical implant manufacturer before operating this product SAFETY INSTRUCTIONS 30 30 FR EN ...

Page 31: ...n mower 2 Description 3 Technical data 4 Before putting the equipment into Operation 5 Operation 6 Maintenance 7 Trouble Shooting 8 Disposal and recycling 9 Warranty 10 Exploded view and part list 11 EC declaration of conformity 31 31 FR EN ...

Page 32: ...ppingthepacking makesurethattheproductiscomplete with its accessories if any If the product is damaged or has any defect please do not use it and bring back it to your dealer If you give this tool to another people please give him also this instruction manual Pleasenotethatourequipmenthasnotbeendesignedforuse in commercial trade or industrial applications Our warranty will be voided if the machine...

Page 33: ...k Clamp 6 Grass Collection Box Handle 7 Grass Collection Box 8 Rear Discharge Door 9 Lower Handle 10 RearWheels 11 Blade Height Adjustment Handle 12 Motor Cover Handle 13 Motor Cover 14 Blade Height Adjustment Knob 15 RotateWheel 12 13 14 15 6 7 8 9 11 10 1 2 3 4 5 33 33 FR EN ...

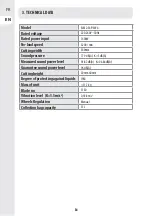
Page 34: ...60mm Sound pressure 77 9 dB A K 3 dB A Measured sound power level 93 82 dB A K 0 686dB A Guarantee sound power level 96 dB A Cutting height 30mm 60mm Degree of protecting against liquids IPX4 Mass of unit 11 7 kg Blade no 5130 Vibration level K 1 5m s2 0 928 m s2 Wheels Regulation Manual Collection bag capacity 35L 34 34 FR EN ...

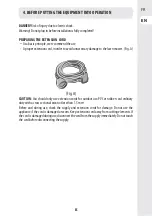
Page 35: ...tothelawnmower Fig A CAUTION You should only use extension cords for outdoor use PVC or rubber cord ordinary duty with a cross sectional area not less than 1 5 mm2 Before and during use check the supply and extension cords for damage Do not use the appliance if the cord is damaged or worn Keep extension cord away from cutting elements If thecordisdamagedduringuse disconnectthecordfromthesupplyimme...

Page 36: ...h a wire clip 4 Setting up your lawn mower There are three different handle gears on the side of the lower handle 9 to vary the height If the height seems too tall or too short open the quick clamp 5 on the side of the lower handles 9 adjust the upper handle 3 properly then tighten the quick clamp 5 to secure the lower handle 9 Adjust the handle height Before installing make sure the grass box has...

Page 37: ...utton 2 to start the mower To stop the mower release the switch bar 1 Let the blade come to a complete stop before making any adjustments to the mower Firmly hold the handle with both hands when mowing Start mowing near the power socket to ensure that the extension cord does not become an obstacle Do not allow the extension cord to pass under or become entangled beneath the machine Do not try to c...

Page 38: ... from turning freely Using a wrench loosen the blade nut on the bottom of the unit Remove the blade nut the washer and the blade from the machine Put the new blade onto the shaft and replace the blade washer and the blade nut Tighten the blade nut Torque the blade nut to 25 30 N m Once the blade is secure check by hand that everything rotates as it should Examine the unit thoroughly for worn loose...

Page 39: ...not starting Power supply not connected Connect to power supply Mower cutting grass unevenly Lawn is rough or cutting height not set properly Adjust the cutting height Mowernotmulchingproperly Wet grass clippings sticking to the underside of the deck Wait until the grass dries before mowing Mower hard to push High grass rear of mower housing and blade dragging in heavy grass or cutting height too ...

Page 40: ...sed on the most rigorous quality standards for products intended for the general public The products are covered with a warranty of 3 years starting from the date of purchase This warranty covers all manufacturing or material defects gIf purchasing a Sterwins lawn mower with a deck made of galvanised steel the deck is covered with a 10 year warranty against corrosion In the event of a breakdown pl...

Page 41: ...embled or opened gThat the tool battery charger have never been in a wet environment dew rain submerged in water gThat no incorrect parts have been used parts not made by STERWINS whereas they prove to be the cause of deterioration gThatthetoolhasnotbeenusedimproperly overloadingthetool oruseofnon approved accessories gThat no damage has resulted from external causes or foreign bodies such as sand...

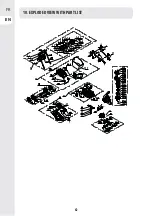
Page 42: ...10 EXPLODED VIEW WITH PART LIST 42 42 FR EN ...

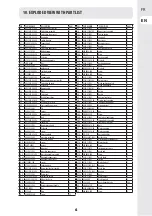
Page 43: ...02 989101 00 corrugated gasket 2 13 4 8440 513001 00 Wheel shaft assy 1 13 5 8SQDD05 12D Bolt 2 13 6 8440 513002 Height adjustment handle 1 13 7 8NE 05D01 Nut 2 13 8 8CC 10B Ring 2 14 8SNAB50 16Q Screw 15 15 8304 511002 Fixing board 2 16 8440 513007 00 Upper cover assembly 1 16 1 8342 513001 Torsion spring 1 16 2 8081 513002 rear shaft 1 16 3 8020 513004 Rear cover 1 16 4 8020 513002 decorative co...

Page 44: ...ues Restricción de sustancias peligrosas en equipos eléctricos Restrição de substâncias perigosas em equipamentos elétricos Product Brand Marque Produit Producto de marca Marca do produto STERWINS Serial number coding or batch number Codification du numéro de série ou de lot Codificación del número de serie Codificação do número de série SN SSSSSS XX DDMMYY nn PPPPPP SN Serial No SSSSSS Supplier c...

Page 45: ...5HVWULF LRQDUHD VXEVWDQ HORU SHULFXORDVH vQ HFKLSDPHQWHOH electrice 0DUFD GHO SURGRWWR_0DUND SURGXNWX_ȂȐȡțĮ ʌȡȠȧȩȞIJȠȢ_0DUFă D SURGXVXOXL _ STERWINS RGLILFD GHO QXPHUR GL VHULH_ RGRZDQLH QXPHUX VHU MQHJR_ȀȦįȚțȠʌȠȓȘıȘ ıİȚȡȚĮțȠȪ ĮȡȚșȝȠȪ_ RG GH QXPHUH GH VHULH_ SN SSSSSS XX DDMMYY nn PPPPPP SN Serial No SSSSSS Supplier code XX Factory ID DDMMYY Production date nn number of version of product PPPPPP In...

Page 46: ...1 2 FR Montage ES Montaje PT Montagem IT Montaggio EL Συναρμολόγηση PL Montaż RU Сборка KZ Монтаждау UA Збiрка RO Montaj EN Assembly 46 ...

Page 47: ...2 3 4 5 6 7 1 3 47 ...

Page 48: ...6 8 7 4 Clic 5 48 ...

Page 49: ...9 10 13 11 12 1 2 3 4 4 3 2 1 1 FR Préparation ES Preparación PT Preparação IT Preparazione EL Προετοιμασί PL Przygotowanie RU Подготовка KZ Дайындау UA Пiдготування RO Pregatire EN Preparation 49 ...

Page 50: ...15 14 110 cm 95 cm 1 2 3 4 1 2 3 4 50 ...

Page 51: ...16 1 2 5 3 4a 4b 51 ...

Page 52: ...17 1 3 cm 1 3 cm 1 3 cm 18 1 3 cm 1 3 cm 1 3 cm 4 3 2 1 19 1 3 cm 1 3 cm 1 3 cm 4 3 2 1 52 ...

Page 53: ...20 21 15 53 ...

Page 54: ...22 54 ...

Page 55: ...24 360 25 1 2 3 easy 26 FR Utilisation ES Utilización PT Utilização IT Uso EL Χρήση PL Użytkowanie RU Использование KZ Пайдала UA Використання RO Utilizare EN Use 55 ...

Page 56: ...27 15 28 56 ...

Page 57: ...29 30 FR Entretien ES Mantenimiento PT Manutenção IT Manutenzione EL Συντήρηση PL Konserwacja RU Уход KZ Жәнетехникалыԕԕызметкԧрсету UA Догляд RO Întreţinere EN Maintenance 57 ...

Page 58: ...34 FR Hivernage ES Duranteelinvierno PT Preparaçãoparaoinverno IT Rimessaggio EL Αποθήκευσητοχειμώνα PL Przechowywanie RU Зимнийпериод KZ Ԕысԕысаԕтау UA Зимовийперіод RO Păstrarepeperioadaiernii EN Winterstorage 58 ...

Page 59: ...37 38 35 36 25 30 N m 5130 included 59 ...

Page 60: ...OR 1 2 3 39 4 60 ...

Page 61: ......

Page 62: ......

Page 63: ......

Page 64: ...таушы Тауардың сапасы бойынша наразылықтарды қабылдауға өкілетті тұлға Леруа Мерлен Қазақстан ЖШС Қазақстан Республикасы 050000 Алматы қ Қонаев көшесі 77 ParkView БО 6қ 07 кеңсе Импортер Продавец Лицо уполномоченное принимать претензии по качеству товара ООО Леруа Мерлен Бел 220020 Республика Беларусь город Минск проспект Победителей 100 офис 503 Garantie 3 ans 3 años de garantía Garantia de 3 ano...

Reviews: