background image

PARA  SMD

MULTÍMETRO DIGITAL  

Manual de instrucciones

FUNC

REL

Vcc

- - -

MAX Input 36 V DC / 

AC

V0.0

MUL-030

0218m

Summary of Contents for MUL-030

Page 1: ...PARA SMD MULT METRO DIGITAL Manual de instrucciones FUNC REL Vcc MAX Input 36 V DC AC V0 0 MUL 030 0218m...

Page 2: ...e Siempreretireloscablesdepruebaantesdereemplazarlasbater as Compruebeelestadodeloscablesdepruebaydelmedidormismoantesdeoperarlo Nuncauseelmult metroencircuitosvivos Nolouseenelambientecongases vapore...

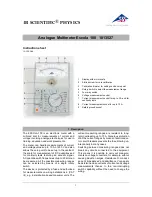
Page 3: ...2 CONTENIDO FUNC REL IL 10 m A Mult metro Cables de prueba Puntas de repuesto...

Page 4: ...TES 1 Pantalla LCD 2 Bot n REL Modo relativo 3 Bot n FUNC Seleccionar funci n 4 Selector de tipo de medici n 5 Soporte de puntas 6 Punta de prueba Terminal de entrada 7 Punta de prueba Terminal COM 8...

Page 5: ...vo El valor mostrado se grabar en memoria despu s mostrar un nuevo valor que es la diferencia entre el valor de entrada y los datos almacenados Nota Despu s de que el mult metro se apague autom ticame...

Page 6: ...iente directa 3 Prueba relativa 4 Diodo 5 Medici n de continuidad 6 Unidad de capacitancia nano faradio micro faradio 7 Unidad de resistencia kilo ohm mega ohm ohm 8 Unidad de voltaje 9 Bater a baja 1...

Page 7: ...tapa para cerrar el compartimento de bater as Inserte 2 bater as AAA Aseg resedecolocarlaspolaridadescorrectamente El mult metro encender autom ticamente despu s de colocar las bater as Si aparece el...

Page 8: ...a a 10 60 se genera un sonido beep de 2 kHz para indicar continuidad MODO DE USO MEDICI N DE RESISTENCIA 1 Deslice el selector a la posici n 2 Presioneelbot nFUNC hastaqueaparezcaenpantallaels mbolo 3...

Page 9: ...a el s mbolo 3 Coloqueelcabledepruebarojoenlaterminaldeentrada Coloqueel cablenegroenlaterminalCOM comosemuestraenlaimagen 4 Conecte la punta del cable rojo al nodo conecte la punta del cable negro al...

Page 10: ...s componente La lectura aparecer autom ticamente en pantalla Para evitar da os en el mult metro desconecte la alimentaci n y descargue todos los condensadores de alto voltaje antes de medir la capacit...

Page 11: ...arojoenlaterminaldeentrada Coloque el cable negro en la terminal COM como se muestra en la imagen 3 Conecte la punta del cable rojo al nodo conecte la punta del cable negro al c todo La lectura se mos...

Page 12: ...e el cable de prueba rojo en la terminaldeentrada Coloque 3 Conecte la punta del cable rojo a la terminal positiva conecte la punta del cable negro a la terminal negativa La lectura se mostrar autom t...

Page 13: ...ter a DC V carga a 10 mA 1 5 5 d Resistencia 400 4 k 40 k 400 k 4 M 2 5 d 40 M 2 5 5 d Capacitancia f 4 n 40 n 400 n 4 u 2 5 5 d 40 u 200 u 3 5 d Prueba de diodo 1 5 V 2 mA Temperatura de operaci n 0...

Page 14: ......

Page 15: ...SMD DIGITAL MULTIMER Instruction manual FUNC REL Vcc MAX Input 36 V DC AC V0 0 MUL 030 0218m...

Page 16: ...rereplacingbatteries Checktheconditionof thetestcablesandthemeasureritself beforeoperating Neverusethemultimeterinlivecircuits Donotuseitintheenvironmentwithexplosivegases vaporsordust Alwaysdischarge...

Page 17: ...2 CONTENT FUNC REL IL 10 m A Multimeter Test cables Spare tips...

Page 18: ...NC REL IL 10 mA PARTS 1 LCD screen 2 REL button Relative mode 3 FUNC button Select function 4 Measurement type selector 5 Tip holder 6 Test tip Input terminal 7 Test tip COM terminal 8 Batteries compa...

Page 19: ...mode The displayed value will be recorded in memory then it will show a new value that is the difference between the input value and the stored data Note After the multimeter automatically turns off...

Page 20: ...ge 2 Direct current 3 Relative test 4 Diode 5 Continuity measurement 6 Capacitance unit nano farad micro farad 7 Resistance unit kilo ohm mega ohm ohm 8 Voltage unit 9 Low battery 10 Capacitance measu...

Page 21: ...over to close the batteries compartment Insert 2 AAA batteries Besuretoplacethepolaritiescorrectly The multimeter will turn on automatically after placing batteries If the symbol appears on the screen...

Page 22: ...n 10 60 a 2 kHz sound beep is generated to indicate continuity HOW TO USE RESISTANCE MEASUREMENT 1 Slide the selector to the position 2 PresstheFUNC buttonuntilthe symbolappearsonthescreen 3 Touch the...

Page 23: ...n 3 Place the red test lead in the input terminal Place the black test cable in the COM terminal as shown in the image 4 Connectthetipof theredtestcabletotheanode Connectthetipof the blacktestcabletot...

Page 24: ...the component tips The reading will automatically appear on the screen To avoid damages in the multimeter disconnect power and discharge all high voltage capacitors before measuring the capacitance W...

Page 25: ...in the input terminal Place the black cable in the COM terminal as shown in the image 3 Connectthetipof theredtestcabletotheanode Connectthetipof the blacktestcabletothecathode Thereadingwillbeautoma...

Page 26: ...erminal Place the black test cable in the COM terminal as shown in the image 3 Connect the tip of the red test cable to the positive terminal connectthetipof theblackcabletothenegativeterminal Theread...

Page 27: ...AAA DC V battery load at 10 mA 1 5 5d Resistance 400 4 k 40 k 400 k 4 M 2 5 d 40 M 2 5 5 d Capacitance f 4 n 40 n 400 n 4u 2 5 5 d 40 u 200 u 3 5d Diode test 1 5 V 2 mA Operating temperature 0 to 40...

Page 28: ......

Reviews: