Quick-Start Guide
To view manuals, FAQs, videos, drivers, downloads, technical drawings, and more, visit www.startech.com/support.
Manual Revision: October 29, 2019 9:46 AM
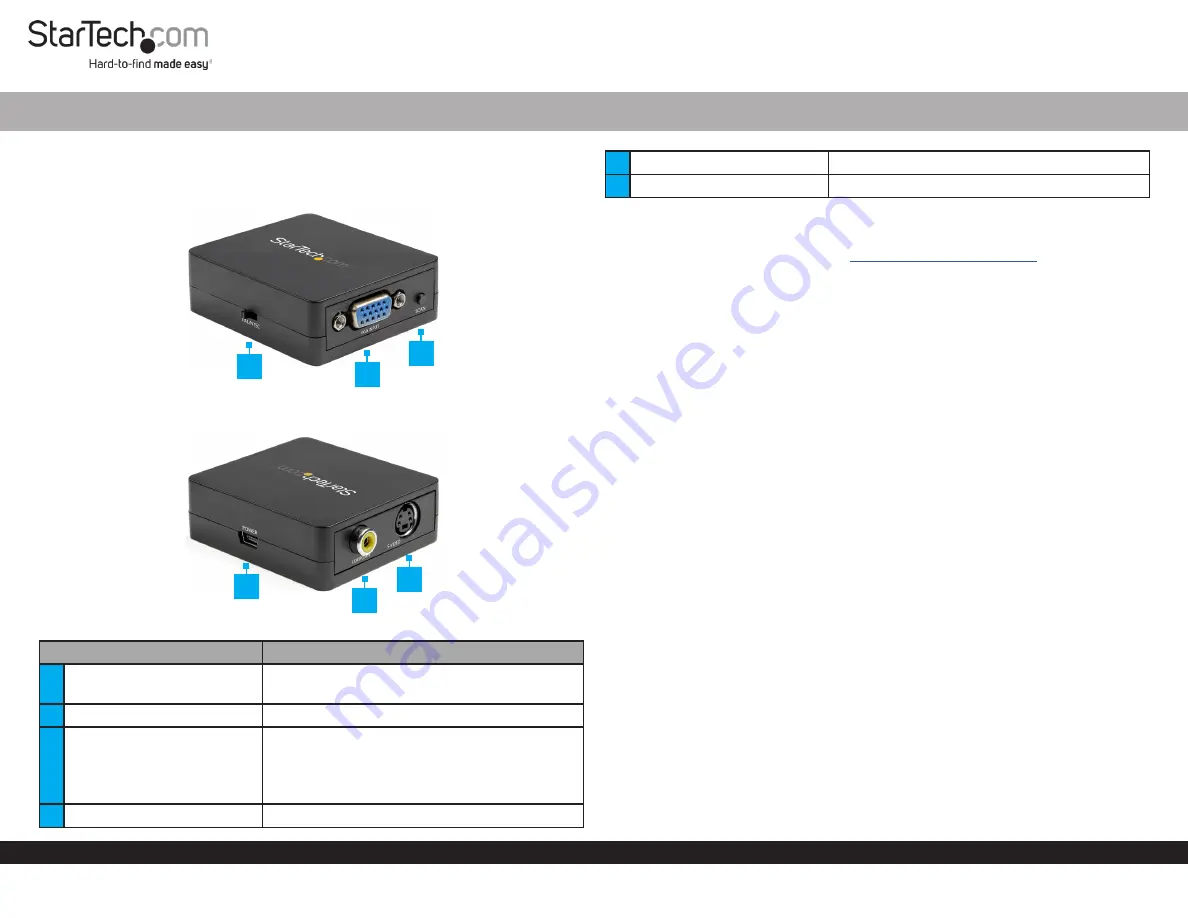
Product Diagram (VGA2VID2)
Front and Side Profile
Rear and Side Profile
Component
Function
1
PAL/NTSC Switch
• Select the
Display Device
video output
standard
2
VGA Input Port
• Connect a
VGA Video Source Device
3
Scan Button
• Fix underscan (video does not fill the
Display
)
and overscan (video is cut off around the
edges of the
Display
)
• 7 Image adjustments available
4
Power Port
• Connect a
USB Power Source
VGA to S-Video and Composite Video Converter
5
Composite Video Output Port
• Connect a
Composite Video Display Device
6
S-Video Output Port
• Connect an
S-Video Display Device
Requirements
For the latest requirements, please visit
.
• VGA Video Source Device x 1
• VGA Cable x 1
• Composite Video or S-Video Display Device x 1
• Composite Video or S-Video Cable x 1
• USB Power Source x 1
Installation and Operation
1. Ensure all of the
Devices
are powered off.
2. Toggle the
PAL/NTSC Switch
to match your
Display Device
video output standard.
Note:
NTSC is the standard in North America and some parts of South America.
3. Connect a
Composite Video Cable
to the
Composite Video Output Port
and to
the
Composite Video Display Device
.
Or
Connect an
S-Video Cable
to the
S-Video Output Port
and to the
S-Video Display
Device
.
4. Connect a
VGA Cable
to the
VGA Input Port
on the
Video Converter
and to the
VGA Video Source Device
.
5. Connect the
USB-A to USB Mini Cable
to an available
USB
Power Source
and to
the
Power Port
.
6. Power on the
Source
and
Display
Devices
.
7. If the video on the
Display
is too large or too small: press the
Scan Button
until the
desired aspect ratio is met and the video fills the
Display
.
5
6
4
3
2
1


