MR2-B31BP Series User Manual
3
4. Hardware Installation
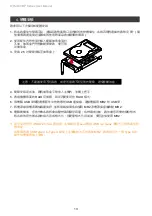
Please follow the steps below to complete the hardware installation process:
1. Place the system on a stable surface. Ensure that the vent is not blocked and that it is installed in a
well-ventilated area. (Please keep the product away from moisture and other environment that might
be harmful to the product)
Note: Please avoid using hard disk drives from different manufacturers or different
models from the same manufacturer as this may impact system performance.
4. When the HDD installation has been completed, insert the tray into the system horizontally and
secure the latch into place.
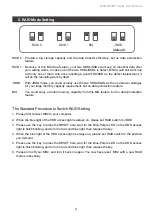
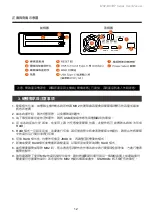
5. Use the RAID switch on the back of MR2 to set the RAID mode to be used.
6. Depending on the computer's USB port type, select the corresponding USB cable in the accessory
to connect the computer to the MR2's USB port.
7. Connect the power cord to the power adapter, connect the connectors at both ends to the MR2 and
the power socket, and then start the MR2.
8. After the computer is turned on, your operating system will automatically recognize the storage
capacity; after the recognition is successful, format the system according to your desired storage
format and follow the instructions of the operating system. After the hard disk is formatted, the MR2
can be used directly.
2. Use the ejector pin included in the
accessory kit to eject the HDD enclosure
handle, and then pull tray handle to
remove it.
3. Mount the 2.5" HDD onto the removable
tray.
※
If you are using a USB 3.2 C to A cable, the Type-A on the host side needs to be USB 3.2 Gen2
for best access performance.
If the MR2 cannot be powered after connecting to the host through the USB Type C to Type A
cable alone, please use another Type C port to provide additional power before connecting to
the host.


