


Installation and Reference Manual
System Operation
58
Installation and Reference Manual v3.2/0410/6
•
To return to using DHCP follow the same instructions above. Enter
d
when asked how the IP address
will be assigned.
•
At any prompt you may enter a
?
for help on that option or
q
to quit.
•
For further information on working with Telnet please refer to page 270.
•
Setnet can be used to set the Time Zone to be used by a specific IP phone
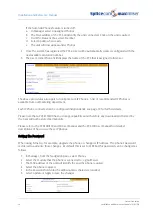
Connect to the Call Server remotely
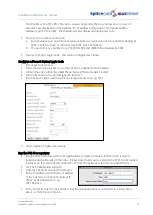
If the PCS 410/400/100 is to be installed at a remote location, eg via a VPN connection, the phone should
be configured with the IP address of the Call Server it is to connect to as follows.
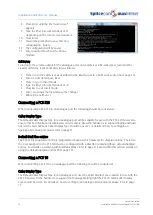
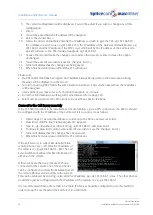
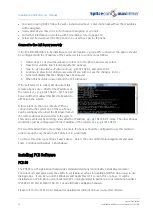
1
Follow steps 1-7 as described above to telnet on to the phone and access Setnet.
2
Press Enter until the line “Startup arguments” appears.
3
Type in
–gk <ip address of call server>
eg –gk 192.168.0.1, and press Enter
4
Continue to press Enter until you are asked if you wish to save the changes. Enter
y
.
5
Telnet will display that the changes have been saved.
6
When finished enter
poweroff
and the PCS will reboot.
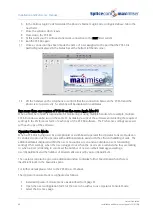
If the Call Server is to collect BLF data from this
remote phone enter
–blf
after the IP address of
the call server, eg –gk 192.168.0.1 –blf. The Call
Server will then multicast this BLF information to
all PCSs on the system.
If there are more than one remote IP Phone
connected to the system one of these phones
can be configured to collect the BLF data from all
the remote phones and send this to the system.
This can be achieved by entering
–relay
after the IP address, eg –gk 192.168.0.1 –relay. The other phones
would then just be configured with the IP address of the call server, eg –gk 192.168.0.1.
It is recommended that no more than 5-6 remote IP phones should be configured to use this facility in
order to keep the overhead on the Call Server to a minimum.
To remove this entry repeat steps 1 and 2 above. Delete the entry within Startup arguments and press
Enter. Continue with steps 4, 5 and 6 above.
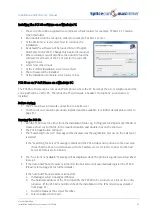
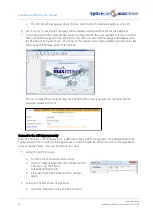
Installing PCS Software
PCS 60
The PCS 60 is a PC application that provides standard telephony functionality, CLI display, Operator
Console mode and gives Users the ability to set features such as forwarding and DND via an easy to use
dialogue box. It can be run on MS Windows and Apple Mac OS X version 10.4 or above. It can be
installed as an IP soft phone on a multi-media PC or programmed to partner a User’s telephone handset
(PCS 580, 570, 560, 410/400, 100, 10, 5 or an alternative analogue handset).
Please refer to the PCS 60 User Manual for detailed descriptions on how to use this software.