background image

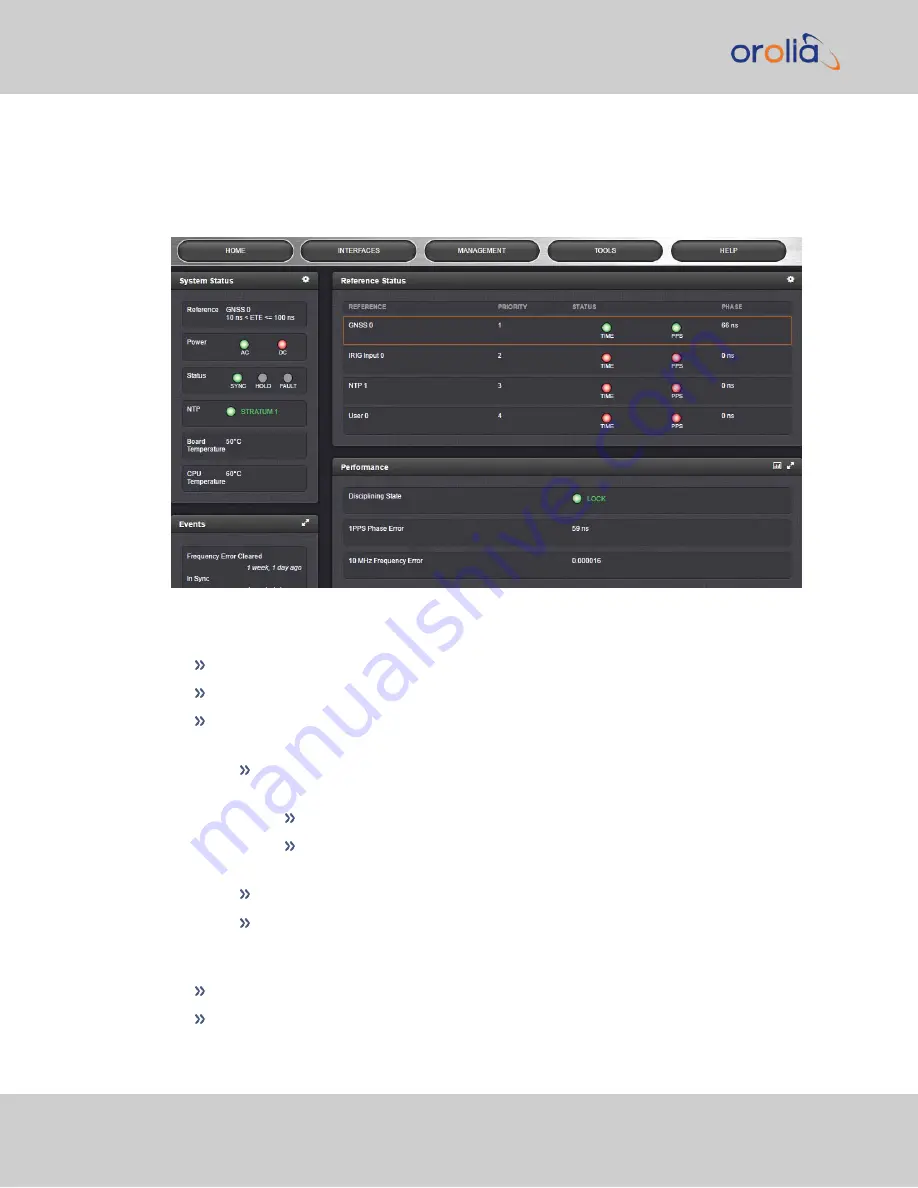
Status Monitoring via the HOME Screen

The 

HOME 

screen of the VelaSync Web UI provides a system status overview (see also 

"The Web UI HOME Screen" on page 13

).

The 

HOME 

screen is divided into 

four panels

:

System Status panel

Reference

—Indicates the status of the current synchronizing reference, if any.

Power

—Indicates whether the power is on.

Status

—Indicates the status of the network’s timing. There are three indicators 

in the Status field:

Sync

—Indicates whether VelaSync is synchronized to its selected input ref-

erences.

Green

 indicates VelaSync is currently synchronized to its references.

Orange

 indicates VelaSync is not currently synchronized to its ref-

erences.

Hold

—When lit, VelaSync is in Holdover mode.

Fault

—Indicates a fault in the operation of the VelaSync. See 

"Troubleshooting via Web UI Status Page" on page 210

 for instructions for 

troubleshooting faults.

Alarm Status

: If a major or minor alarm is present, it will be displayed here.

NTP

—Current STRATUM status of this VelaSync unit.

188

CHAPTER

4

VelaSync User's Manual Rev. 3

4.7  Quality Management

Summary of Contents for VelaSync 1225

Page 1: ...VelaSync User Manual Spectracom Part No 1232 5000 0050 Revision 3 Date 26 Oct 2018 spectracom com...

Page 2: ......

Page 3: ...cense agreement or nondisclosure agreement The software may be used or copied only in accordance with the terms of those agreements No part of this publication may be reproduced stored in a retrieval...

Page 4: ...Blank page II VelaSync User s Manual...

Page 5: ...4 2 1 Timing Connector 6 1 4 2 2 Communication Ports 9 1 4 3 Environmental Specifications 9 1 4 4 Size Weight Power 9 1 5 Front Panel Overview 10 1 5 1 Control Buttons 10 1 5 2 Control Panel LEDs 10 1...

Page 6: ...et connection 32 2 7 2 Setting Up an IP Address via the Serial Port 33 2 7 3 Subnet Mask Values 35 2 8 Advanced Timing Connections 35 2 8 1 TSync I O Signals 35 2 8 1 1 Timing Interface Adapter Cable...

Page 7: ...s 84 2 10 11 Spectracom Technical Support for NTP 86 2 11 Configuring PTP 86 2 11 1 The PTP Screen 87 2 11 1 1 The PTP Settings Panel 87 2 11 1 2 The PTP Statistics Panel 90 2 11 2 Enabling Disabling...

Page 8: ...erence Status 124 3 3 3 2 Determining Your GNSS Receiver Model 128 3 3 3 3 Selecting a GNSS Receiver Mode 129 3 3 3 4 Setting GNSS Receiver Dynamics 132 3 3 3 5 Performing a GNSS Receiver Survey 133 3...

Page 9: ...user Account Permissions 175 4 5 1 3 Rules for Usernames 177 4 5 1 4 Adding Deleting Changing User Accounts 177 4 5 2 Managing Passwords 180 4 5 2 1 Configuring Password Policies 180 4 5 2 2 The Admin...

Page 10: ...ng GNSS Reception 212 5 1 6 Troubleshooting Hardware Issues 213 5 1 6 1 Power Supply Failure 213 5 1 7 Troubleshooting 1PPS 10 MHz Outputs 214 5 1 8 Troubleshooting Network PCs Cannot Sync 214 5 1 9 T...

Page 11: ...240 5 9 Return Shipments 241 5 10 License Notices 241 5 10 1 NTPv4 2 6p5 241 5 10 2 OpenSSH 245 5 10 3 OpenSSL 248 5 11 List of Tables 253 5 12 List of Images 254 5 13 Document Revision History 254 I...

Page 12: ...BLANK PAGE X VelaSync User s Manual TABLE OF CONTENTS...

Page 13: ...topics are included in this Chapter 1 1 Product Overview 2 1 2 About this Manual 2 1 3 Designated Use of this Product 4 1 4 Technical Specifications 5 1 5 Front Panel Overview 10 1 6 Rear Panel Overvi...

Page 14: ...s a 1U server comprised of a standard chassis and motherboard as well as a GNSS receiver plus oscillator OCXO or Rubid ium two hard disks RAID two power supplies and several time frequency and com mun...

Page 15: ...ectracom VelaSync Quick Reference Guide PN 1232 5000 0051 a printed copy of which is shipped with the unit and the user documentation for the Supermicro SuperO SuperServer 5018R WR which can be found...

Page 16: ...Use of this Product This product has been designed and built in accordance with state of the art standards and the recognized safety rules Nevertheless its use may constitute a risk to the oper ator o...

Page 17: ...power supplies 100 240 VAC auto switch 50 60 Hz 500 W each with IEC60320 C14 inlet coupler Connectivity I O connectors See Rear Panel Overview on page 12 1 4 1 2 GPS GNSS Receiver Connector SMA 5V to...

Page 18: ...nnectors 1 4 2 1 Timing Connector The pre installed TSync model 25 pin Micro D Sub Connector when combined with the adaptor cable and breakout cable both included provides the following I O options In...

Page 19: ...um between pulses Repetition rate More than 10 000 events per second Resolution 5 ns Outputs 1 PPS Outputs 1Hz pulse rising edge or falling edge active selectable 40 ns to 900 ms active pulse width se...

Page 20: ...50 user settable 1Vp p to 12 Vp p into 600 Output impedance 50 nominal Output load 50 minimum Modulation ratio 3 1 nominal Accuracy 2 to 200 microseconds IRIG format dependent IRIG DCLS Output Outputs...

Page 21: ...ly 4x or 2x 10 Gb plus 2x 40 Gb1 2x 1GbE RJ 45 with hardware time stamping 1x IPMI V 2 0 1x RS 232 Fast UART 4x USB 2 0 1x VGA 1 4 3 Environmental Specifications Operation 10 C to 35 C RH 8 to 90 non...

Page 22: ...rver Note Standby power continues to be supplied to the system i e the power supplies and the IPMI remain energized HDD Release Lever Pull to release one of the two hot swap RAID hard disks 1 5 2 Cont...

Page 23: ...d indicates drive failure you should also receive an automatic message from your system management software To release a hard disk drive carrier in order to remove the hot swappable hard disk drive pu...

Page 24: ...ctacom TSync timing connector 2 Includes rear status LED s Status LEDs on page 42 10 USB 4x 11 IPMI 12 Serial 13 14 Power supplies Note VelaSync does not support having multiple network interfaces on...

Page 25: ...eb UI are Internet Explorer 9 or higher Firefox or Chrome 1 7 1 The Web UI HOME Screen Note Screens displayed in this manual are for illustrative purposes Actual screens may vary depending upon the co...

Page 26: ...onfigurations you may be required to furnish when contacting Spectracom Ser vice 1 7 2 The INTERFACES Menu The INTERFACES menu on the Main screen provides access to VelaSync s External REFERENCES e g...

Page 27: ...so avail able Reference Priority Define the order of priority for timing inputs Notifications Configure the notifications triggered by VelaSync s events A noti fication can be a combination of a mask...

Page 28: ...16 CHAPTER 1 VelaSync User s Manual Rev 3 1 7 The VelaSync Web UI...

Page 29: ...fety symbols Symbol Signal word Definition DANGER Potentially dangerous situation which may lead to per sonal injury or death Follow the instructions closely CAUTION Potential equipment damage or dest...

Page 30: ...t connections to the branch circuit i e the use of powerstrips etc Caution CIRCUIT OVERLOADING Consideration should be given to the connection of the equipment to the power supply circuitry and the ef...

Page 31: ...amiliarize yourself with the location of the ON OFF switch on the unit the closest disconnection switch in the room and electrical outlet so that you can quickly remove power from the unit in the even...

Page 32: ...se a grounded wrist strap to prevent static discharge Put components and PCBs back into their antistatic bags while not in use Touch a grounded metal object before removing a PCB from its antistatic b...

Page 33: ...interference in which case the user may be required to take adequate measures Safety This product has been tested and meets the requirements specified in IEC EN UL CSA 62368 1 2014 EMC Compliance This...

Page 34: ...BLANK PAGE 1 9 Regulatory Compliance 22 CHAPTER 1 VelaSync User s Manual Rev 3...

Page 35: ...and Inventory 24 2 2 Selecting the Right Installation Location 24 2 3 Rack Mounting SAFETY 25 2 4 Rack Installation 26 2 5 Basic Connections Setup 29 2 6 Accessing the Web UI 31 2 7 Configuring IP Add...

Page 36: ...ssemblies Two 2 rail mounting brackets extension elements and mounting hardware Front bezel and keys Two 2 power cables Spectracom Ancillary Kit containing one 1 antenna cable one 1 TSync standard bre...

Page 37: ...w before familiarizing yourself with the procedure for the Rack Installation on the next page 2 3 Rack Mounting SAFETY Read YOUR SAFETY on page 17 Before installing VelaSync in the fully extended rail...

Page 38: ...ch of which consists of two sections the inner rail which is pre installed to the server chassis the outer rail assembly which faces the rack Figure 2 1 Rack rail assembly Optional inner rail extensio...

Page 39: ...l with two screws and the long bracket to the rear side of the outer rail with three screws Installing the server into the rack Once all the rails have been installed to the VelaSync chassis and the r...

Page 40: ...Determine how far forward the unit will extend out of the front of the rack Determine a balanced front to back position of the chassis 2 Remove the bezel from the VelaSync Attach the two front bracket...

Page 41: ...ng a GNSS Antenna Location on page 235 1 Connect the GPS GNSS antenna to the GNSS RF connector see illustration above item number 7 using the supplied Type N adapter cable and an LMR 400 equivalent ca...

Page 42: ...t check the front indicator lamps they will remain dark 3 Switch the unit on by pressing the ON OFF button on the front panel Wait for the device to boot up Note If only one power supply is running an...

Page 43: ...want to change the default IP address of the ETH ports you plan on using This procedure is described in the next topic You will need an Ethernet cable or a serial null modem cable for this For more de...

Page 44: ...ynamic IP address Once you are connected to the Web UI you can manually adjust the IP addresses for each ethernet port and enable or disable DHCP 2 7 1 Changing the IP address using an Ethernet connec...

Page 45: ...order to apply a static IP address to any Ethernet port DHCP must be disabled To update network settings using a serial connection please see Setting Up an IP Address via the Serial Port below 2 7 2...

Page 46: ...lator on page 216 2 Login to VelaSync with a user account that has admin group rights such as the default spadmin account the default password is admin123 3 Disable DHCP type dhcp4set 0 off Enter Note...

Page 47: ...255 224 0 0 22 255 255 252 0 10 255 192 0 0 21 255 255 248 0 9 255 128 0 0 20 255 255 240 0 8 255 0 0 0 19 255 255 224 0 2 8 Advanced Timing Connections Figure 2 6 TSync timing card connections 2 8 1...

Page 48: ...connector on the card to the breakout cable Figure 2 7 Adapter cable Table 2 2 Adapter pinout timing connector END A END B PIN 1 PIN 1 PIN 2 PIN 2 PIN 3 PIN 3 PIN 4 PIN 4 PIN 5 PIN 5 PIN 6 PIN 6 PIN 7...

Page 49: ...CT PIN 26 SHIELD 2 8 1 2 Basic Breakout Cable The basic breakout cable breaks out a subset of features from the 26 pin timing con nector to separate BNC and DB 9 connectors for use The basic breakout...

Page 50: ...nector 3 GPIO Output 0 11 IRIG AM Input 5 Ground 16 GPIO Output 1 Reserved 6 GPIO Input 0 18 Ground 7 External 1PPS Input 21 Ground 8 Ground 24 IRIG DCLS Input 9 IRIG AM Output 25 IRIG DCLS Input 10 I...

Page 51: ...BNC Female 1 External 1PPS Input BS Ground P6 1PPS Output BNC Female 1 1PPS Output BS Ground 2 8 1 3 Premium Breakout Cable Note The premium breakout cable must be purchased separately Contact Spectr...

Page 52: ...GPIO Output 0 16 GPIO Output 1 Reserved 4 GPIO Input 2 Reserved 17 GPIO Input 3 Reserved 5 Ground 18 Ground 6 GPIO Input 0 19 GPIO Input 1 Reserved 7 External 1PPS Input 20 1PPS Output 8 Ground 21 Gro...

Page 53: ...IRIG AM Input BS IRIG AM Input P6 IRIG AM Output BNC Female 1 IRIG AM Output BS Ground P7 1PPS Input BNC Female 1 External 1PPS Input BS Ground P8 GP Input DB 9 Female 1 GPIO Input 0 7 Ground 2 GPIO I...

Page 54: ...rd oscillator is not disciplined by an external reference but continues to provide time frequency for the duration of the user set holdover time default 7200 seconds 2 hours red ALARM The unit does no...

Page 55: ...to flash 4 Self test failure 5 Timing system failure 2 9 Configuring Network Settings Before configuring the network settings you need to setup access to VelaSync web user interface Web UI For more i...

Page 56: ...b UI login page and the CLI Note There is a 2000 character size limit SSH This button takes you to the SSH Setup window For details on set ting up SSH see SSH on page 50 IPMI Enable Disable IPMI ADMIN...

Page 57: ...ions Panel on the left click General Settings 2 Populate the fields Hostname This is the server s identity on the network or IP address Default Port Unless you specify a specific Port to be used as De...

Page 58: ...low CABLE UNPLUGGED the port is enabled but there is no cable attached Red DISABLED Locate the port you want to configure and click the GEAR button to enable configure the port or the INFO button to v...

Page 59: ...matically once DHCP is enabled Alternatively you may configure your DHCP server to NOT use a DNS address When DHCP is disabled DNS Primary is set manually using the format with no leading zeroes or sp...

Page 60: ...needed or wanted out of concern for potential security risks tcpdump can be disabled permanently Once toggled to OFF and after executing a page reload tcpdump will be deleted from the system The togg...

Page 61: ...will allow only 10 2 100 29 access I P a d d r e s s n o m e n c l a t u r e IPv4 10 10 0 0 16 where 10 10 0 0 is the IP address and 16 is the subnet mask in prefix form See the table Subnet Mask Valu...

Page 62: ...gure a static IP address or to view the current IP address assigned to the IPMI un check the DHCP box and the IP address Gateway and Netmask fields will be visable 2 9 6 SSH The SSH or Secure Shell pr...

Page 63: ...and all key bit sizes are set to 0 You may choose to delete existing keys and request the creation of new keys but it is often simpler to make these requests separately You can create individual RSA...

Page 64: ...rk account These keys may be RSA or DSA and may be any key bit length as supported by the SSH client tool These public keys are stored in a file in the ssh directory named authorized_keys The file is...

Page 65: ...ll open to the Host Keys tab by default 2 Should you want to change the key length of any host key enter the desired length in the text field corresponding to the length you wish to change 3 Check the...

Page 66: ...a public key into VelaSync This public key must match the private key found in the users account and be accessible to the SSH SCP or SFTP client program The user must then enter the Passphrase after a...

Page 67: ...zed_key File via CLI Secure shell sessions using an SSH client can be performed using the admin or a user defined account The user may use Account Password or Public Key with Passphrase authentication...

Page 68: ...sphrase Example output from OpenSSH SCP and SFTP client commands are shown below Perform an SCP file transfer to the device using Account Password authen tication scp authorized_keys scp 10 10 200 5 s...

Page 69: ...putty SSH Timeout The keep SSH alive timeout is hard set to 7200 seconds This value is not configurable 2 9 7 SNMP SNMP Simple Network Management Protocol is a widely used application layer pro tocol...

Page 70: ...Screen See SNMP V1 V2c on page 61 SNMP V3 This panel allows configuration of SNMP v3 functionality including the user name read write permissions authorization pass words as well as privilege Types a...

Page 71: ...elow Description A simple product description This is not editable in the SNMP Status Restoring the Default SNMP Configuration To restore the VelaSync to its default SNMP configuration 1 Navigate to t...

Page 72: ...Support MIB Files Spectracom s private enterprise MIB files can be extracted via File Transfer Protocol FTP from VelaSync using an FTP client such as FileZilla or any other share ware freeware FTP pr...

Page 73: ...e not already present Spectracom s private enterprise MIB files can be requested and obtained from the Spectracom Customer Service department via email at techsupport spectracom com Note By default te...

Page 74: ...eld VelaSync uses the sys tem default address SNMP Community names should be between 4 and 32 characters in length Permissions may be Read Only or Read Write The Version field provides a choice of V1...

Page 75: ...contextually according to the information in the entry chosen 4 To edit the settings enter the new details you want to edit and click Submit OR To delete the entry click Delete 2 9 7 2 SNMP V3 SNMP V...

Page 76: ...ides a choice between AES and DES The Priv Passphrase must be between 8 and 32 characters in length The Permissions field provides a choice between Read Write and Read Only 5 Click Submit The created...

Page 77: ...r trap is sent because VelaSync either entered or exited the Holdover mode the trap varbind will indicate that VelaSync is either currently in Holdover mode or not currently in Holdover mode For testi...

Page 78: ...mber such as 0x1234 The Id ori ginates from the MIB Browser SNMP Manager v3 1 Auth Type provides a choice between MD5 the default and SHA v3 The Auth Password must be between 8 and 32 characters in le...

Page 79: ...enterprise identifier 18837 3 For detailed descriptions of the objects and traps supported by the VelaSync please refer to the Spectracom VelaSync MIB files See Accessing the SNMP Support MIB Files o...

Page 80: ...it is not necessary to modify the NTP factory default con figuration settings It is possible however to change most of the settings in order to support specific NTP applications which may require a no...

Page 81: ...uests only Note In order to configure NTP you need to access the NTP Setup screen which requires ADMINISTRATOR rights 2 10 1 Checklist NTP Configuration The following is a list of configuration settin...

Page 82: ...s See NTP Peers Adding Configuring Removing on page 79 For more information on NTP servers clients and Stratums see NTP Servers and Peers on page 75 The Actions panel is in the top left hand corner of...

Page 83: ...Default NTP Configuration on page 73 The NTP Services panel is the second panel on the left hand side of the NTP screen NTP ON OFF This switch enables and disables NTP See Dis Enabling NTP on the next...

Page 84: ...p 2 In the NTP Services panel set the ON OFF toggle switch to OFF 3 A notification window will confirm the status change 4 In the NTP Services panel set the ON OFF toggle switch to ON again Changes ma...

Page 85: ...um 1 operation with no other servers or peers no broadcasting and no access restrictions External queries or modifications are not permitted while generally all IPv4 and IPv6 client connections are al...

Page 86: ...cale should it be different Note IMPORTANT Make sure you select your desired timescale Using the wrong timescale will inevitably result in an undesired time error in your NTP clients To change the sys...

Page 87: ...timing network to be configured as potential fallback input time references for VelaSync System Time syn chronization In the event that a current reference becomes unavailable VelaSync can fallback t...

Page 88: ...on about Holdover see Holdover Mode on page 148 2 10 8 1 The NTP Servers and NTP Peers Panels The NTP Servers and NTP Peers panels display which servers in the network are set up at higher or equal St...

Page 89: ...eference PTP PTP reference ATC ASCII time code reference USER User provided time LOCL Local reference synced to itself INIT NTP on server peer is initializing STEP NTP on server peer is performing ini...

Page 90: ...dress Note that System servers cannot be edited or deleted To ADD a new server click the PLUS icon in the upper right hand corner and proceed to the next step Note In order for other NTP Servers to be...

Page 91: ...r to pub lic NTP configuration documentation Mark as Preferred Click here to make this server the preferred server For more information see NTP Timing System Reference Selection and Preference page 1...

Page 92: ...the Minimum and Maximum Poll rate for NTP packets can be configured Enable Symmetric Key Click the checkbox to enable disable Symmetric Key See also Configuring NTP Symmetric Keys on the facing page N...

Page 93: ...with NTP for authentication purposes VelaSync supports authenticated NTP packets using an MD5 authenticator This fea ture does not encrypt the time packets but attaches an authenticator which consists...

Page 94: ...ll display Fill in or edit the fields Trusted checkbox Check this box to use MD5 authentication with trus ted key ID Note To use the MD5 authentication with trusted key ID both the NTP client and the...

Page 95: ...e Submit button The changes will be reflected in the table of the NTP Symmetric Keys window which is displayed after clicking the Submit button 6 The key s you have set up will now appear as options i...

Page 96: ...both VelaSync and any network client with which VelaSync is to communicate Only those keys for which the Trusted box has been checked will appear in the dropdown menus on the NTP References screen 2...

Page 97: ...ose either Allow or Deny If you select Deny the configured portion of the network will not have NTP access to VelaSync but the rest of the network will have access to VelaSync If you select allow the...

Page 98: ...Spectracom Technical Sup port 2 11 Configuring PTP Precision Time Protocol PTP is a time protocol that can be used to synchronize com puters on an Ethernet network VelaSync supports PTP Version 1 and...

Page 99: ...le PTP functionality ON or OFF You can also access the Settings panel and the Statistics panel for each port see below 2 11 1 1 The PTP Settings Panel The Settings Panel provides access to the configu...

Page 100: ...ets received by the PTP Clocks are then filtered from the Domain Number the Port Identity Clock Identity Port Number of the transmitter When the Master Clock is set in Multicast mode this module will...

Page 101: ...t as an active master no matter whether or not other masters are present This may be required for certain PTP profiles Clock Priority 1 0 to 255 0 is highest priority Default is 128 for both priority...

Page 102: ...PTP Node IP address of PTP node Clock Identity e g a0 36 9f ff fe 37 b9 5d Domain Domain number of the selected PTP node Unicast 0 1 OFF or ON 1 Last Time e g 2016 08 12 18 19 15 The last time a packe...

Page 103: ...ence Status Note that in order to operate properly as a Master Clock VelaSync must be synchronized to a non PTP reference The built in GNSS reference provides all information needed with no user inter...

Page 104: ...BLANK PAGE 2 11 Configuring PTP 92 CHAPTER 2 VelaSync User s Manual Rev 3...

Page 105: ...refers not only to the concept of VelaSync s System Time but also to ref erence configuration as well as distribution of time and fre quency The following topics are included in this Chapter 3 1 The...

Page 106: ...he top right corner This window is used to select the time scale and to manually set a user time if so required See System Time on page 96 Offsets panel The Timescales UTC TAI and the GPS supplied tim...

Page 107: ...ime to all of the available time of day outputs such as NTP time stamps time stamps in the log entries ASCII data outputs etc By default the System Time is synchronized to VelaSync s input references...

Page 108: ...e battery backed RTC time can be used as System Time until an external ref erence become available 3 2 1 1 Configuring the System Time To configure the System Time 1 Navigate to MANAGEMENT OTHER Time...

Page 109: ...in the GPS ground control stations The UTC GPS offset as of 26 Oct 2018 is 18 seconds For more information on Timescales see Timescales below 4 If you want to override the system time with a manually...

Page 110: ...offset value in order for the time on the output reference to be correct Some references like GNSS provide the timescale offset to the system In the event that the input reference being used does not...

Page 111: ...o use this functionality see The User User Reference on page 116 Note If synchronization to UTC is NOT required it is advisable to set a time in the past or future so as to avoid users inadvertently c...

Page 112: ...ou are using does not provide a YEAR field Synchronize to Battery Backed Time on Startup See Using Battery Backed Time on Startup on the facing page 4 Click Submit at the precise moment desired 5 Navi...

Page 113: ...erred to as the time main tained by the integrated Real Time Clock RTC This will result in VelaSync providing a System Time before one of the external ref erences becomes available and valid This will...

Page 114: ...the battery backed RTC to drift i e the battery backed time will become increasingly inaccurate The battery used for the RTC is designed to last for the lifetime of the product Distributing battery ba...

Page 115: ...ll display Enter the desired GPS Offset in seconds and click Submit Note Since the GPS Offset and the TAI Offset have a fixed rela tionship only the GPS Offset can be set If only the TAI offset is kno...

Page 116: ...the UTC and Local timescales Leap Seconds do NOT affect the GPS and TAI timescales However a Leap Second event will change the GPS to UTC and TAI to UTC time offsets When a Leap Second occurs VelaSyn...

Page 117: ...ut of sync and in this condition NTP does NOT indicate Leap Seconds The Sync state indicates Leap Seconds by indicating sync can be 00b 01b or 10b PTP Packets provide leap indication with a 12 hour no...

Page 118: ...cond is pending and VelaSync has obtained this information auto matically from the GPS data stream b A leap second had been configured previously by a user via the Edit Leap Second window 2 To access...

Page 119: ...NT OTHER Time Management 2 Click the PLUS icon in the Local Clocks panel in the Time Management screen 3 The Local Clock pop up window will display 4 Enter a Name for your local clock The name must be...

Page 120: ...cal clock will always be standard time DST options will appear in the Local Clock window 6 Set DST Rules by Region Check this box to apply regional DST rules A regions drop down menu with the followin...

Page 121: ...ronized to an input reference e g IRIG input VelaSync needs to know the timescale of the input time Local Timescale or UTC Timescale in order to provide proper internal con version from one Timescale...

Page 122: ...Set DST Rules by Region checkbox 6 From the DST Region drop down list select US Canada 7 Review the changes made and click the Submit button The unit will display the status of the change 3 2 4 3 DST...

Page 123: ...This allows VelaSync to gracefully fall back upon a lower ranking 1PPS or Time ref erence without transitioning into Holdover in case a reference becomes unavailable or invalid The priority order you...

Page 124: ...nes the order or priority for each index row The range is 1 to 16 with 1 being the highest priority and 16 being the lowest priority The highest pri ority reference that is available and valid is the...

Page 125: ...riority of VelaSync s references in a table form In this panel you can Add and configure new references Delete references Enable disable references Reorder the priority of VelaSync s references c The...

Page 126: ...eference Status table 1 Navigate to the Configure Reference Priorities screen via MANAGEMENT OTHER Reference Priority 2 In the Configure Reference Priorities table click the Delete button on the right...

Page 127: ...button 3 3 1 2 The Local System Reference The Local System reference is a Self reference i e VelaSync uses itself as an input reference for Time or as a 1PPS reference The Local System is a unique in...

Page 128: ...ansition to the Local System Time without going into Holdover Use case Local System 1PPS The Local System reference can also be used for 1PPS This allows VelaSync to operate using an external ToD for...

Page 129: ...eference priority number other than 1 Note that a Time jump and or 1PPS jump are likely to happen once the primary reference becomes valid Combining a User Time reference with a non User 1PPS referenc...

Page 130: ...erwise the large time correction that needs to be bridged when switching from a lost reference to a valid reference or from a valid reference to a higher priority ref erence that has become available...

Page 131: ...ck the Enabled checkbox 3 For all other references uncheck the Enabled checkbox so that they are all dis abled Since both of these references are default references no additional references need to be...

Page 132: ...the Time column and User 0 in the 1PPS column to the top of the table with a Priority value of 1 Click the Enabled checkbox 3 For all other references uncheck the Enabled checkbox so that they are al...

Page 133: ...not be both Time and 1PPS input together in this example the GNSS input will be set as the 1PPS reference other use cases may require using dif ferent references e g IRIG As there is no default entry...

Page 134: ...ence Monitoring by comparing the phase data of references against the System Ontime Point The phase values shown are the filtered phase dif ferences between each input reference 1PPS and the internal...

Page 135: ...ost applications VelaSync will be setup such that it utilizes a GNSS signal as the primary if not the only timing reference VelaSync s GNSS receiver utilizes the signal provided by the GNSS antenna Th...

Page 136: ...FO button or the GEAR button to configure the GNSS settings or review GNSS reference status information 3 3 3 1 Reviewing the GNSS Reference Status To view the current status of your GNSS reference 1...

Page 137: ...ain tab the following information will display Note Detailed information on the different parameters can be found in the subsequent GNSS topics 3 3 Managing References CHAPTER 3 VelaSync User s Manual...

Page 138: ...remains at 1 if no satellites are in view COMPLETE green Number of Tracked Satellites The number of satellites currently being tracked Offset As set by the user in nanoseconds Antenna Sense OK green O...

Page 139: ...ellite number and signal strength Letter Symbol GNSS Constellation G GPS R GLONASS E Galileo J QZSS C BeiDou I IRNSS The Satellite Data tab Under the Satellite Data tab there are two graphs Number of...

Page 140: ...er Model Note All VelaSync models are currently shipped with a u blox M8T Receiver To determine which GNSS receiver model is installed in a VelaSync unit 1 Navigate to TOOLS SYSTEM Upgrade Backup 2 In...

Page 141: ...GLONASS Beidou X X X X X X X X X X X X X X X X X X Note The augmentation systems SBAS and QZSS can be enabled only if GPS operation is configured 3 3 3 3 Selecting a GNSS Receiver Mode When connected...

Page 142: ...orner The GNSS 0 configuration window will open 3 Select the desired Receiver Mode and click Submit GNSS Receiver Modes The receiver modes are Standard GNSS Receiver Mode The default GNSS receiver mod...

Page 143: ...o complete the GNSS survey i e obtain a 3 D fix In such cases VelaSync cannot operate in Standard Mode This occurs frequently in areas with limited view of the sky e g urban canyons In Single Satellit...

Page 144: ...on and hence provide an incorrect time For more information about the GNSS Survey see Performing a GNSS Receiver Sur vey on the facing page For more information on Receiver Modes see Selecting a GNSS...

Page 145: ...raphic position with high accuracy An accurate geographic position is required to calculate a precise system time from the GNSS reference During a GNSS survey the position will be iteratively recalcul...

Page 146: ...ered and displayed in nano seconds By setting the correct Offset value you can offset the system s on time point by the Offset value to compensate for the antenna and in line amplifier delays Under ty...

Page 147: ...anoseconds of delay per every foot of cable To calculate the Offset value cable delay multiply the length of the entire cable run by 1 2 and then enter this value into the Offset field E x a m p l e s...

Page 148: ...ubmit 3 3 3 8 Deleting the GNSS Receiver Position The VelaSync timing system requires the exact geographic position in order to calculate the exact system time from the GNSS signal The Delete Position...

Page 149: ...he GNSS position To delete the GNSS position 1 Disconnect the GNSS antenna from the VelaSync unit this is required only when sanitizing the unit 2 Navigate to Interfaces References GNSS Reference 3 Cl...

Page 150: ...ending on where your GNSS antenna is installed and thus how good the reception is the self survey may be adequate for most applications Setting a Manual Position however i e manually applying your cur...

Page 151: ...gle Maps 2 In Google Maps locate your building and the location of your antenna 3 Right click on the location Select What s here At the bottom you will see a card with the coordinates 4 Take note of y...

Page 152: ...example you can determine if you want GLONASS satellites to be tracked besides GPS Selecting GNSS Constellations Your VelaSync is capable of tracking multiple GNSS constellations simultaneously To ve...

Page 153: ...r is capable of receiving multiple GNSS con stellations simultaneously the table below shows which combinations are possible GPS Galileo GLONASS BeiDou X X X X X X X X X X X X X X X X X X Note The aug...

Page 154: ...imulator such as Spectracom GSG 5 or 6 Ser ies QZSS is not considered a standalone constellation and while VelaSync allows you to enable QZSS by itself it is recommended to use it in combination with...

Page 155: ...thereby reducing the time for the receiver to acquire and track the actual satellite signals This may lead to a significantly shorter time for VelaSync to deliver a GNSS based timing signal upon a co...

Page 156: ...equired Enable A GPS Client This feature will schedule assistance data to be collected and updated every hour On startup if data is present it will be sent to the receiver Apply A GPS Data If this opt...

Page 157: ...meters WGS 84 of your antenna VelaSync can use this data during the satellite track ing adjustment process which typically leads to a quicker fix It is recommended to enter the position as accurately...

Page 158: ...sign a 4 character Station Name to be used in the files gen erated by this unit so that their location can later be identified Under Record Duration you can determine after how many days the history f...

Page 159: ...icking on Status and confirming that the indicator lamp for Server A GPS Status is green ENABLED The Server A GPS Data indicator will be green if the RINEX server is running and the GPS receiver is va...

Page 160: ...longer valid or present The more stable the oscil lator is without an external reference the longer this holdover period can be and have it still maintain very accurate outputs The benefit of Holdover...

Page 161: ...onized state until at least one valid Time and 1PPS input reference becomes available again While in this state NTP will be Stratum 15 and outputs will not be usable If the input references are restor...

Page 162: ...ception has been lost The length of time is really based on the type of oscillator installed in a unit and what the typical accuracy requirements are for the NTP clients The longer it can run in Holdo...

Page 163: ...Hol dover timeout period can be set to Table 3 3 Estimated Phase Drifts 1PPS Phase Drift in Holdover no reference available OCXO OCXO high performance CSAC 4 hours 3 s 2 8 s 1 s 24 hours 40 s 30 s 7 s...

Page 164: ...later the Holdover timer starts again with its full value If its set to one week in this case it then gets another week of Holdover operation before NTP goes to Stratum 16 if GPS remained unavailable...

Page 165: ...VelaSync may become an NTP Stratum 2 or higher reference If so configured VelaSync can use a reference such as an NTP daemon referred to as a Host Reference If the Host Reference becomes active it wi...

Page 166: ...s 2 hours For more information on holdover timeouts see Typical Holdover lengths in seconds on page 151 For additional information on holdover see What is Holdover Timeout on page 149 Phase Error Lim...

Page 167: ...gned to the 1PPS The estim ated error is referred to as the 1PPS Phase error TFOM values are ranges of these phase errors The larger the phase error estimate the larger the TFOM value will be For exam...

Page 168: ...OM is now exceeding MaxTFOM This condition will cause a 1PPS out of specification alarm to be asserted and the oscillator disciplining will change in order to speed up the alignment of the system 1PPS...

Page 169: ...nt scaled time in ns or ms of the internal 1PPSs phase error with respect to the selected input reference Long holdover periods or an input reference with excessive jitter will cause the phase error t...

Page 170: ...ed with its 1PPS input that is used to perform disciplining If this estimated error is too large it could adversely affect the performance of oscillator disciplining The available TFOM range is 1 thro...

Page 171: ...h will focus in on the time interval you choose in real time Clicking on the Delete icon in the top right hand corner will erase all current oscillator log data Clicking on the Download arrow icon wil...

Page 172: ...To delete the log file click the TRASH CAN icon and confirm 160 CHAPTER 3 VelaSync User s Manual Rev 3 3 4 Managing the Oscillator...

Page 173: ...included in this Chapter 4 1 Issuing the HALT Command Before Removing Power 162 4 2 Rebooting the System 163 4 3 Hardware Tasks 163 4 4 Notifications 166 4 5 Managing Users and Security 175 4 6 Miscel...

Page 174: ...ommand before removing power Issuing a HALT Command via the Web UI 1 Navigate to TOOLS SYSTEM Reboot Halt 2 The Reboot Halt window will display Select the Shutdown the Unit checkbox 3 Click Submit 4 W...

Page 175: ...Tasks 4 3 1 Replacing a Power Supply For redundancy purposes the server is equipped with two hot swap power supply mod ules Should either of the modules fail the other will take the full load and supp...

Page 176: ...you hear a click 5 Plug the AC power cord back into the new power supply Note For additional information on the power supplies see https www supermicro com manuals superserver 1U MNL 1771 pdf Chapter...

Page 177: ...er requires cleaning or replacement Figure 4 2 Removing the front bezel Removing the HDD carrier 1 The HDDs are installed in carriers To release a carrier press down its red release button next to the...

Page 178: ...tify users that a specific event has occurred In some situations two events are generated One event occurs in the transition to a specified state and then another event occurs when transitioning back...

Page 179: ...ically trigger a notification are listed in the Event column It is possible to Mask the alarm generation for specific events prevent the alarm Enable SNMP to send out an SNMP trap Send an email to the...

Page 180: ...ion cards 2 In the Events panel choose the Timing GPS or System tab Configure your Noti fications see below and click Submit The columns under each tab are Event This is the event that will trigger th...

Page 181: ...Setting Up Email Notifications on page 172 For each event only the notification options available can be configured For example a mask alarm can be set for an In Sync event and a Not in Sync event but...

Page 182: ...Timing System Software Error Timing System Hardware Error High Temperature Temperature alarms are based on the CPU temperature Minor Alarm High Temperature Minor Cleared High Temperature Major Alarm H...

Page 183: ...GNSS receiver mode it is not advisable To determine how many satellites your VelaSync unit is currently receiving navigate to INTERFACES REFERENCES GNSS 0 See also Reviewing the GNSS Reference Status...

Page 184: ...umber of Minimum Satellites you specified above 4 4 4 Setting Up SNMP Notifications SNMP Notifications are SNMP traps that occur on a change of a monitored event To configure SNMP notifications 1 Navi...

Page 185: ...mments from each line and replace the with the appropriate values for your par ticular email server such as the user name and password for your Email server E x a m p l e I S M T P i n t e r f a c e t...

Page 186: ...123 gmail com set smtp auth password password set smtp auth login 5 Click the Submit button at the bottom of the window 6 To test your settings In the Test Email Address field enter an email address C...

Page 187: ...dmin accounts to the pre installed administrator account spadmin factory The default factory account with the username spfactory is meant to provide access to Spectracom technical support personnel Yo...

Page 188: ...unts can view and modify all settings in these pages can view edit GNSS receiver Outputs and Option Cards MANAGEMENT Menu Network While the toggle switches in the Network Services panel are displayed...

Page 189: ...ogs user can view only the listed logs Upgrade Backup user cannot perform any updates Reboot Halt user cannot reboot shutdown halt the unit 4 5 1 3 Rules for Usernames Length Usernames can be between...

Page 190: ...per sonnel While the spfactory account can be deleted by an admin istrator it should be noted that this may potentially limit remotely provided technical support User accounts can be created to have e...

Page 191: ...nt the user to belong to user or admin The user permission level assigns permission to access and change all settings with the following exceptions that are limited to the admin accounts Changing netw...

Page 192: ...group select the group from the drop down menu For more information see also Managing Passwords below 4 5 2 Managing Passwords Caution For security reasons it is advisable to change the default cre de...

Page 193: ...d in Lost Password on the next page If the password has already been changed from the default value but the current value is no longer known the administrator password can be reset back to the factory...

Page 194: ...been forgotten or lost you can reset the spadmin password back to the factory default value of admin123 Resetting the spadmin account password does not reset any user created account passwords This p...

Page 195: ...t password via the serial port or SSH 1 Connect a PC to the port and log in using an account with admin group rights such as the spadmin account 2 Type resetpw Enter The spadmin account password is no...

Page 196: ...log off and then log back in again This setting affects all users not just the user changing the value 4 6 Miscellanous Typical Configuration Tasks 4 6 1 REST API Configuration REST Representational S...

Page 197: ...eck the box Enable Custom Banner 4 In the Plain Text Banner text box type in your custom text Note The Plain Text Banner is used to create a message for all interactive login interfaces Web UI telnet...

Page 198: ...he ban ner on the actual login page 4 6 3 Show Clock Instead of the Web UI a large digital clock can be displayed on your computer screen Next to the system status the screen clock will display the UT...

Page 199: ...d details about using the Spectracom PresenTense NTP client software 4 7 Quality Management 4 7 1 System Monitoring 4 7 1 1 Status Monitoring via the Web UI status information can be accessed via the...

Page 200: ...us field Sync Indicates whether VelaSync is synchronized to its selected input ref erences Green indicates VelaSync is currently synchronized to its references Orange indicates VelaSync is not current...

Page 201: ...s currently being disciplined steered to an input reference 1PPS Phase Error An internal measurement in nanoseconds of the internal 1PPSs phase error with respect to the selected input reference if th...

Page 202: ...and this number is 70 or higher it is recommended to clear logs and stats in order to free up memory space Navigate to TOOLS SYSTEM Upgrade Backup and click the cor responding buttons in the lower le...

Page 203: ...download monitoring data In the Status panel on the left information pertaining to the given Ethernet port is dis played including throughput statistics and error statistics The Mode field indicates w...

Page 204: ...s usually 00 See Leap Second Alert Notification on page 105 Delay ms The measured one way delay between VelaSync and its selec ted reference Offset ms Displays the configured 1PPS offset values Jitter...

Page 205: ...ement scaled time in ns or ms of the internal 1PPSs phase error with respect to the selected input reference Long holdover periods or an input reference with excessive jitter will cause the phase erro...

Page 206: ...gned with its 1PPS input that is used to perform disciplining If this estimated error is too large it could adversely affect the performance of oscillator disciplining The available TFOM range is 1 th...

Page 207: ...racom you may be asked for a copy of your logs to facilitate remote diagnosis Logs stored internally are being kept automatically while the storage of log files in a remote location has to be set up b...

Page 208: ...nization E X A M P L E GNSS is the highest priority reference with IRIG input being a lower priority VelaSync is synced to GNSS and so GNSS is the selected reference The GNSS antenna is disconnected a...

Page 209: ...Input references were not restored before the Holdover period expired Time Sync alarm is asserted In Sync VelaSync is synchronized to its Time and 1PPS inputs Not In Sync VelaSync is not synchronized...

Page 210: ...SS reception may be displayed as cyclic in nature A cyclic 12 hour pattern of decreased GNSS reception typically indicates that the GNSS antenna has an obstructed view of the horizon The GNSS satellit...

Page 211: ...ower than 3600 about every 12 hours the issue is likely caused by the GNSS antenna having an obstruc ted view of the sky E x a m p l e G P S Q u a l i f i c a t i o n L o g E n t r y 6 151 7 1894 8 48...

Page 212: ...s that apply to all logs To access the Logs Screen 1 Navigate to MANAGEMENT OTHER Log Configuration 2 The Logs screen will appear It is divided into two panels The Logs Actions panel The Actions panel...

Page 213: ...the bundled logs to remotely investigate a technical concern To save bundle and download all logs 1 Navigate to MANAGEMENT OTHER Log Configuration 2 On the left side of the screen in the Actions pane...

Page 214: ...iplining 2 Click on the ARROW icon in the top right corner of the screen Save the csv file to your computer 3 If so asked by Spectracom Technical Support attach the oscillator status log file typicall...

Page 215: ...leting a remote log server 1 Navigate to MANAGEMENT OTHER Log Configuration 2 In the Remote Log Server panel locate the remote server you wish to change or delete 3 Choose the MINUS button to delete t...

Page 216: ...Spectracom website If you register your product you will be notified of software updates To carry out a software update 1 In the Web UI navigate to Tools Upgrade Backup 2 Determine your System softwa...

Page 217: ...ade and remove the uploaded software bundle from the system Perform update Perform the software upgrade Perform clean update Factory settings will be applied during the upgrade any custom settings you...

Page 218: ...Note In the event that the update failed see Troubleshooting Soft ware Update on page 215 206 CHAPTER 4 VelaSync User s Manual Rev 3 4 8 Updates and Licenses...

Page 219: ...ifications 221 5 4 Choosing a GNSS Antenna Location 235 5 5 Maintenance and Service 237 5 6 Product Registration 237 5 7 Links to External Information 238 5 8 Technical Support 240 5 9 Return Shipment...

Page 220: ...S satellites 1st threshold The GNSS receiver has been tracking less than the minimum number of satellites for too long of a duration Refer to Troubleshooting GNSS Reception on page 212 for information...

Page 221: ...nical Sup port Select TOOLS Upgrade Backup The screen displayed will provide information on System configuration Disk status memory status Software versions and Recent log entries 5 1 2 1 System Troub...

Page 222: ...elaSync and other end of net work cable VelaSync ICMP test is passing VelaSync is con nected to PC via Ethernet con nection 1 Disconnect VelaSync s network cable and ping its assigned address to ensur...

Page 223: ...S antenna installation if applicable See Troubleshoot ing GNSS Reception on the next page MANAGEMENT NTP Setup page NTP Status Sum mary panel Stratum row Stratum 15 NTP is not syn chronized to its ava...

Page 224: ...ellites in order for GNSS to be an available input reference Many factors can prevent the ability for the GNSS receiver to be able to track the minimum number of satellites With the GNSS antenna insta...

Page 225: ...the front bezel is installed Check bezel filter for contamination see Maintenance and Ser vice on page 237 System Status window on HOME screen of Web UI lists RAID fail ure One of the two RAID hard d...

Page 226: ...bled based on desired priority 2 Make sure desired input ref erences are still connected to the correct input port of VelaSync 3 Verify GNSS antenna installation if applicable Navigate to INTERFACES O...

Page 227: ...Port 123 NTP traffic for example 4 NTP in VelaSync must be in sync and at a higher Stratum level than Stratum 15 such as Stratum 1 or 2 for example This requires VelaSync to be either synced to its in...

Page 228: ...s not replace the VelaSync Web UI Spectracom does not distribute or support its own terminal emulator and newer Microsoft operating systems no longer include HyperTerminal However there are sev eral t...

Page 229: ...ously typed commands e Commands need to be typed in all lower case letters f Where eth0 is the base network port and eth1 and higher are used with the optional Gigabit Ethernet module for multiple net...

Page 230: ...ts the GPSD service port gpsinfo Applicable to SAASM equipped VelaSync units only gpsloc Displays GNSS latitude longitude and antenna height gpsmdl Displays the GNSS Manufacturer and Model gpssat Disp...

Page 231: ...network status netnum Displays the number of general purpose network interfaces net4 Displays IPv4 network status net6 Displays IPv6 network status options Displays configured options installed if an...

Page 232: ...o the default value admin123 routes4 Displays the current IPv4 routing table s routes6 Displays the current IPv6 routing table s rt4add Adds an IPv4 static route rt4del Deletes an IPv4 static route rt...

Page 233: ...et command to retrieve the configured timescale unrestrict Used for clearing access control restrictions to VelaSync version Displays the installed main VelaSync and timing system software versions ye...

Page 234: ...primarily mil itary and government associated Today IRIG is commonly used to synchronize voice log gers recall recorders and sequential event loggers found in emergency dispatch centers and power uti...

Page 235: ...Hz BCDTOY BCDYEAR and SBS 1000 pps 0 1 sec IRIG B IRIG B B000 DCLS N A BCDTOY CF and SBS 100 pps 1 sec IRIG B B001 DCLS N A BCDTOY CF 100 pps 1 sec IRIG B B002 DCLS N A BCDTOY 100 pps 1 sec IRIG B B00...

Page 236: ...CLS N A BCDTOY BCDYEAR CF and SBS 10 pps 1 sec IRIG E E005 DCLS N A BCDTOY BCDYEAR and CF 10 pps 1 sec IRIG E E006 DCLS N A BCDTOY BCDYEAR 10 pps 1 sec IRIG E E007 DCLS N A BCDTOY BCDYEAR and SBS 10 p...

Page 237: ...pps 10 msec IRIG G G005 DCLS N A BCDTOY BCDYEAR and CF 10000 pps 10 msec IRIG G G006 DCLS N A BCDTOY BCDYEAR 10000 pps 10 msec IRIG G G141 AM 100 kHz BCDTOY CF 10000 pps 10 msec IRIG G G142 AM 100 kHz...

Page 238: ...ed the allocated control bits to 18 for format B and 36 for format E Note DCLS is DC Level Shifted output pulse width modulated with a position identifier having a positive pulse width equal to 0 8 of...

Page 239: ...year 1 366 and the time of day including seconds The hour of the day is expressed in 24 hour format The SBS time is the number of seconds elapsed since midnight The Control Function field contains yea...

Page 240: ...time synchronization status bit Element 55 is a Binary 1 when the unit is in sync and a Binary 0 when it is not Year information consists of the last two digits of the current year i e 97 98 99 etc E...

Page 241: ...frequency 1kHz when modulated Table 5 5 IRIG B control function field C F Element Digit Function 50 1 Space 51 2 Space 52 3 Space 53 4 Space 54 5 Space 55 6 Time Sync Status 56 7 Space 57 8 Space 58...

Page 242: ...nds Code Digit Weighting Binary Coded Decimal time of year Code world 26 binary digits Tens of seconds minutes hours and days Recycles yearly Code Word Structure BCD word tens of seconds digits begin...

Page 243: ...significant bit occurs first Elements 80 through 97 are encoded with the Straight Binary Seconds SBS time data The SBS time data is incremented in 10 second steps and recycles every 24 hours Pulse ra...

Page 244: ...s and the binary one has a duration of 50 ms The leading edge is the 10 pps on time ref erence point for all elements The binary coded decimal BCD time of year code word consists of 26 digits beginnin...

Page 245: ...ACE 52 3 SPACE 53 4 SPACE 54 5 SPACE 55 6 TIME SYNC_STATUS 56 7 SPACE 57 8 SPACE 58 9 SPACE 59 PID P6 POSITION IDENTIFIER 60 10 YEAR UNITS Y1 61 11 YEAR UNITS Y2 62 12 YEAR UNITS Y4 63 13 YEAR UNITS Y...

Page 246: ...33 SBS 25 86 34 SBS 26 87 35 SBS 27 88 36 SBS 28 89 PID P9 POSITION IDENTIFIER 90 37 SBS 29 91 38 SBS 210 92 39 SBS 211 93 40 SBS 212 94 41 SBS 213 95 42 SBS 214 96 43 SBS 215 97 44 SBS 216 98 45 SPAC...

Page 247: ...800 ns IRIG E 1 5 s 5 4 Choosing a GNSS Antenna Location Listed below are requirements for selecting an optimal installation location for your GNSS antenna For instructions on how to install a GPS GNS...

Page 248: ...llic materials close to the antenna can create shadows which can shield the antenna from receiving in that particular direction Separation between multiple antennas If the antennas are installed too c...

Page 249: ...is also available from Andrews Corporation USA phone 1 800 255 1479 5 5 Maintenance and Service We recommend to clean the front bezel filter regularly Remove the front bezel by unlocking it with the k...

Page 250: ...ectracom com 5 7 Links to External Information To learn more about the following hardware related subjects see the Server OEM User s Manual at https www supermicro com manuals superserver 1U MNL 1771...

Page 251: ...Server management System specifications VelaSync User s Manual 239 APPENDIX...

Page 252: ...for your cooperation 5 8 1 Regional Contact Spectracom operates globally and has offices in several locations around the world Our main offices are listed below Table 5 7 Spectracom contact informatio...

Page 253: ...16 UTC _______________________________________________________ The following copyright notice applies to all files collectively called the Network Time Protocol Version 4 Distribution Unless specifica...

Page 254: ...PARTICULAR PURPOSE ARE DISCLAIMED IN NO EVENT SHALL THE AUTHORS OR CONTRIBUTORS BE LIABLE FOR ANY DIRECT INDIRECT INCIDENTAL SPECIAL EXEMPLARY OR CONSEQUENTIAL DAMAGES INCLUDING BUT NOT LIMITED TO PR...

Page 255: ...lisade reference clock driver NT adj residuals integrated Greg s Winnt port 16 John A Dundas III dundas at salt jpl nasa gov Apple A UX port 17 Torsten Duwe duwe at immd4 informatik uni erlangen de Li...

Page 256: ...nny Mayer mayer at ntp org Network I O Windows Port Code Main tenance 37 David L Mills mills at udel edu Version 4 foundation precision kernel clock drivers 1 3 4 6 7 11 13 18 19 22 36 38 Wolfgang Moe...

Page 257: ...oftware The licences which components of this software fall under are as follows First we will summarize and say that all components are under a BSD licence or a licence more free than that OpenSSH co...

Page 258: ...D BY APPLICABLE LAW EXCEPT WHEN OTHERWISE STATED IN WRITING THE COPYRIGHT HOLDERS AND OR OTHER PARTIES PROVIDE THE PROGRAM AS IS WITHOUT WARRANTY OF ANY KIND EITHER EXPRESSED OR IMPLIED INCLUDING BUT...

Page 259: ...aced in the public domain THIS SOFTWARE IS PROVIDED BY THE AUTHORS AS IS AND ANY EXPRESS OR IMPLIED WARRANTIES INCLUDING BUT NOT LIMITED TO THE IMPLIED WARRANTIES OF MERCHANTABILITY AND FITNESS FOR A...

Page 260: ...ug Song Aaron Campbell Damien Miller Kevin Steves Daniel Kouril Per Allansson Redistribution and use in source and binary forms with or without modification are permitted provided that the following c...

Page 261: ...nt This product includes software developed by the OpenSSL Project for use in the OpenSSL Toolkit http www openssl org THIS SOFTWARE IS PROVIDED BY THE OpenSSL PROJECT AS IS AND ANY EXPRESSED OR IMPLI...

Page 262: ...FTWARE IS PROVIDED BY ERIC YOUNG AS IS AND ANY EXPRESS OR IMPLIED WARRANTIES INCLUDING BUT NOT LIMITED TO THE IMPLIED WARRANTIES OF MERCHANTABILITY AND FITNESS FOR A PARTICULAR PURPOSE ARE DISCLAIMED...

Page 263: ...D WARRANTIES OF MERCHANTABILITY AND FITNESS FOR A PARTICULAR PURPOSE ARE DISCLAIMED IN NO EVENT SHALL THE COPYRIGHT HOLDERS OR CONTRIBUTORS BE LIABLE FOR ANY DIRECT INDIRECT INCIDENTAL SPECIAL EXEMPLA...

Page 264: ...ESS OR IMPLIED WARRANTIES INCLUDING BUT NOT LIMITED TO THE IMPLIED WARRANTIES OF MERCHANTABILITY AND FITNESS FOR A PARTICULAR PURPOSE ARE DISCLAIMED IN NO EVENT SHALL THE COPYRIGHT HOLDERS OR CONTRIBU...

Page 265: ...accuracy 7 Table 1 3 Spectracom safety symbols 17 Table 2 1 Subnet mask values 35 Table 2 2 Adapter pinout timing connector 36 Table 2 3 Pinout basic breakout cable unspecified pins in the table are n...

Page 266: ...1 Edit PTP Settings panel 88 Figure 2 12 PTP Statistics Panel 90 Figure 3 1 How the System Time is derived 96 Figure 3 2 Host disciplining 153 Figure 4 1 Power supply removal 164 Figure 4 2 Removing t...

Page 267: ...VelaSync User s Manual 255 APPENDIX...

Page 268: ...BLANK PAGE 256 VelaSync User s Manual...

Page 269: ...01 Bezel removing 165 237 BIOS error beep codes 238 BIOS setup 238 Breakout Cable Basic 37 Premium 39 Breakout cable basic 37 Browser support 209 C Cable delay 135 Chassis 238 Chipset 238 CLI 217 Comm...

Page 270: ...215 Host disciplining 153 Host keys SSH 51 I IP address configuration 32 IP address static lease 47 IP addresses default 47 IPMI 50 IPv4 47 IRIG output accuracy 234 Standards 221 IRIG Carrier Frequenc...

Page 271: ...d NTP Peer 80 Preferred NTP Server 79 Primary Navigation menu 14 Private keys SSH 53 Public keys SSH 54 R Rack installation 26 Rack mounting 238 RAID 164 Real Time Clock 101 Rear panel 12 Recalibrate...

Page 272: ...ss 47 Subnet mask values 35 Subnet default 47 Summer Time 108 Survey GNSS 130 133 136 Symmetric keys 70 Synchronizing Windows computers 187 System interface 238 System specifications 239 System Time 7...

Reviews: