Sovereign 310091 Original Instruction Manual Download Page 1

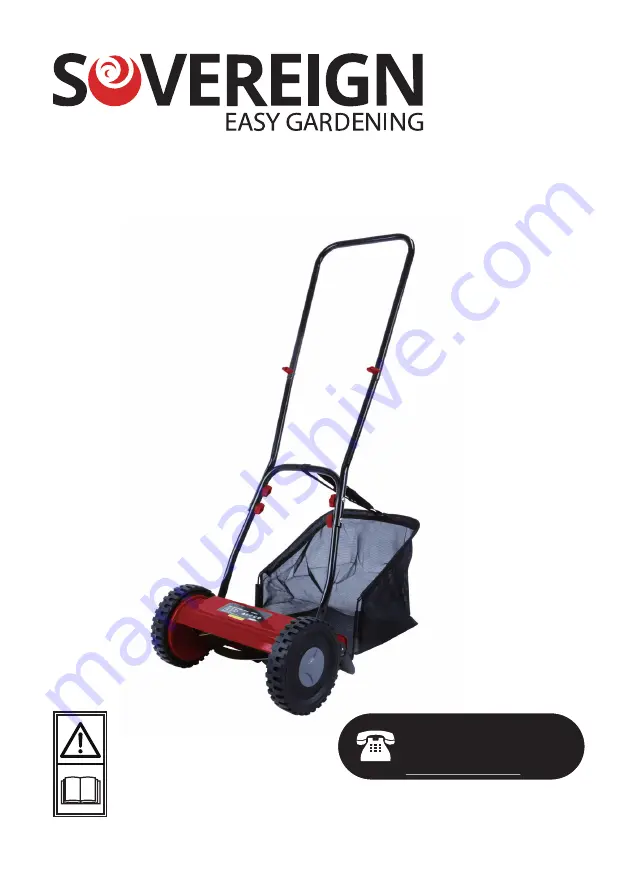
30CM PUSH LAWN MOWER

Item No. 310091
Model No. GT5614

HHGL Limited, MK9 1BA.  HHGL (ROI) Limited, D02 X576                                     Sep. 20   

ORIGINAL INSTRUCTION MANUAL

Please read these instructions fully before starting assembly.

www.coreservice.co.uk


Technical Support & Parts

01904 727509

Mon-Fri 9am-5pm Sat-Sun 11am-4pm


Summary of Contents for 310091

Page 1: ...GT5614 HHGL Limited MK9 1BA HHGL ROI Limited D02 X576 Sep 20 ORIGINAL INSTRUCTION MANUAL Please read these instructions fully before starting assembly www coreservice co uk Technical Support Parts 01...

Page 2: ...TENTS General safety warnings 3 Intended use 7 Warning symbols 8 In the box 9 Assembly 10 Maintenance 16 Troubleshooting 17 Technical data 17 Sharpening the blade 18 Disposal 19 Getting help 19 Warran...

Page 3: ...ior to assembling maintaining or operating the mower Perform assembly operations as described in this manual Failure to observe this warning may lead to serious injury death or damage to the mower Alw...

Page 4: ...where the equipment is to be used and remove all objects which can be thrown by the mower Before using always visually inspect to see that the blades blade bolts and cutter assembly are not worn or d...

Page 5: ...or grass collectors Do not put hands or feet near rotating parts while the mower is being operated Work area safety Keep work areas clean and well lit Cluttered or dark areas invite accidents Keep ch...

Page 6: ...jewellery or long hair can be caught in moving parts Use and care Do not force the mower Use the correct tool for your application The correct tool will do the job better and safer at the rate for whi...

Page 7: ...with sharp cutting edges are less likely to bind and are easier to control INTENDED USE This lawn mower has been designed for cutting grass and soft vegetation in private and hobby garden areas It sho...

Page 8: ...tructions within this operator s manual including all safety alert symbols such as DANGER WARNING and CAUTION before using this tool Failure to follow all instructions listed below may result in elect...

Page 9: ...BOX Parts 1 Upper handle 2 Handle extensions 3 Lower handle 4 Cylinder blade 5 Mower body 6 Grass collecting box 7 Cutting height adjustment knob 8 Wheels 9 Grass collecting box support strap 5 3 8 4...

Page 10: ...handle extensions until the holes are lined up then secure using the nuts and screws provided see Fig A Align the two holes on one of the handle extensions with those on the lower handle Secure them t...

Page 11: ...To attach the handle insert one of the large holes in the handle arm over the lug then repeat the same process with the other side It may be required to use some force to squeeze the two arms togethe...

Page 12: ...12 Insert the metal frames into the plastic holes see Fig D2 D3 and D4 Wrap the metal frames with the plastic hems see Fig D5 D6 and D7 Fig D2 Fig D3 Fig D4 Fig D5 Fig D6 Fig D7...

Page 13: ...Attach the box to the lawn mower body by sliding the holes in the front of the box over the attachment hooks in front of the cutting height roller You will also need to fit the grass box support strap...

Page 14: ...t be set correctly in order for the lawn mower to work efficiently Carefully tighten the two adjusting knobs by turning them slowly in the clockwise direction When the cylinder blade just makes contac...

Page 15: ...cutting height pull the cutting height adjustment knobs on both sides away from the mower body and then move them forward or backward to adjust the cutting height WARNING Make sure the knobs are at t...

Page 16: ...s before using If the lawn mower should happen to fail despite the care taken in manufacture and testing repair should be carried out by an authorised service agent After mowing storage clean the exte...

Page 17: ...em yourself Suspected malfunctions disturbances or damages are often due to causes that the user can fix themselves Therefore check the product using this section In most cases the problem can be solv...

Page 18: ...ut of alignment adjust using the adjustment knobs on the ends of the bar 5 Using your fingers or a soft paint brush cover the blades with a thin even coat of automotive valve grinding compound availab...

Page 19: ...lations GETTING HELP Our dedicated UK based customer helpline is open 7 days a week to assist you with assembly parts queries and technical support We are open during office hours but you can always s...

Page 20: ...free repair of the item where this is possible or a replacement or a refund Your statutory rights remain unaffected in particular any rights you may have under the Consumer Rights Act 2015 This warra...

Reviews: