background image


TRAK Machine Tools 

Southwestern Industries, Inc. 

The ProtoTRAK DXF Converter Operating Manual 

20 

*We recommend that you use the centerline of the part as the ABS 0 reference point. 


Note:

 The back key (Alt + B) can be used to return to this screen from any subsequent 

screens, however, programmed information will be lost. 

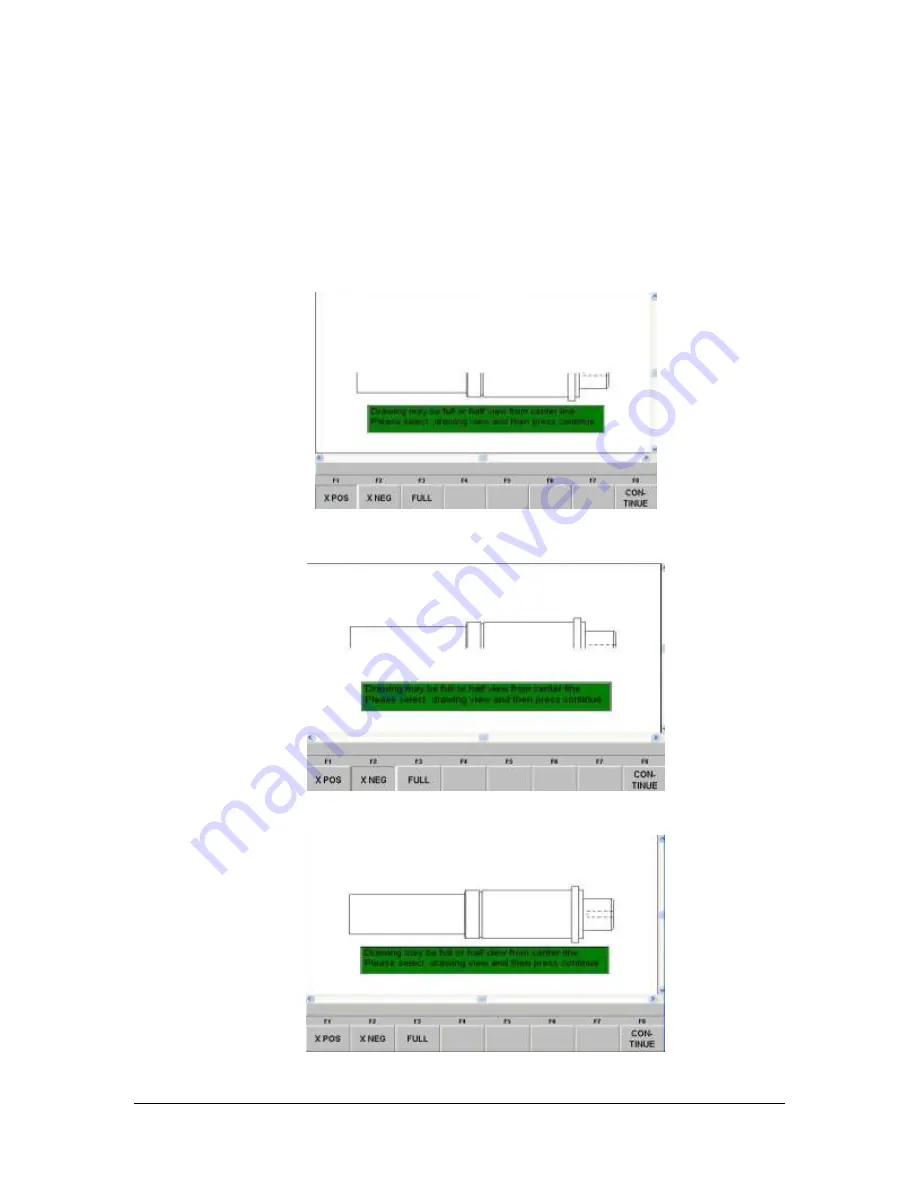
4.6  Positive Half, Negative Half and Full Drawing Display 

The ProtoTRAK DXF Lathe converter allows you to display the Positive X potion of the drawing, 

the negative X portion of the drawing or the entire drawing.  The converter will use the ABS 0 
you specified to determine where to divide the positive or negative side of the drawing. 


FIGURE 4.6.1 The X Pos button will display the portion of the drawing from the ABS 0 

point you specified, down.


FIGURE 4.6.2 The X neg button will display the portion of the drawing from the ABS 0 

point you specified, up. 


FIGURE 4.6.3 The FULL button, will restore the drawing to its entirety. 

Summary of Contents for ProtoTRAK CONV-DXF

Page 1: ...epartment 800 367 3165 e mail sales southwesternindustries com service southwesternindustries com web southwesternindustries com The ProtoTRAK DXF Converter Operating Manual DXF for Mills and Lathes C...

Page 2: ...o include all the information required for the purposes of this guide Southwestern Industries Inc assumes no responsibility for inaccuracies or omission and accepts no liability for damages resulting...

Page 3: ...pes 9 3 6 2 Functions in the Status Line 10 3 6 3 Event Groups 10 3 6 4 Chaining 11 3 6 5 Color Schemes and Status Flags 11 3 6 6 Completing the Event 12 3 7 Sample Exercise 12 3 8 Creating a DXF File...

Page 4: ...Manual ii 4 8 1 Event Types 25 4 8 2 Chaining 26 4 8 3 Color Schemes and Status Flags 26 4 8 4 Completing the Event 26 4 9 Sample Exercise 27 4 10 Creating a DXF File from a ProtoTRAK Program 32 5 0 T...

Page 5: ...tional seat pricing as long as you order them both at the same time See your Southwestern Industries Sales Representative 1 2 DXF Defined DXF stands for Drawing Exchange File It is an invention of Aut...

Page 6: ...refore files created with this product should also work with this converter as long as those files are saved with the DXF or DWG extension The ProtoTRAK DXF Converter may be used with 2D drawings it i...

Page 7: ...toTRAK SMX SLX and PMX versions will run with the DXF software When installing the DXF software make sure to load in the correct version according to your control For the ProtoTRAK SM VM SL and VL use...

Page 8: ...bers shown on the screen and call SWI Customer Support After taking the serial numbers SWI Customer Support will give you your password Please note this option is not free If you have not placed an or...

Page 9: ...le with the DXF or DWG extension When you select a file with an extension of DXF or DWG the Open As field automatically changes to ACAD DXF Press Open File and the DXF Converter will begin to process...

Page 10: ...pending on the background you choose Colors used in the drawing that are other than black or white will stay the same regardless of background Zoom In Zoom Out and Auto Fit Drawing Buttons Press Conti...

Page 11: ...red while programming a profile or pocket 3 3 2 Closing Gaps As They Are Identified During Programming Once you begin the programming of a pocket or profile you will be prompted to resolve a gap betwe...

Page 12: ...mark will appear to show you where the absolute zero is now set This choice also allows the use of the intersection of two lines that meet off of the given geometry If this is the case you will not b...

Page 13: ...ting the events With the ProtoTRAK DXF Converter you have total control over how the part is made just like regular ProtoTRAK programming The basic steps are 1 Pick the event type 2 Pick the geometry...

Page 14: ...complete the programming of the event by adding data like RPM Feed Rate Tool Number and Z axis dimensions that are not available from the CAD drawing When you pick your event and geometry click the Ev...

Page 15: ...olerance see Section 3 3 3 An intersection or branch that requires a decision from you If this is encountered the system will prompt you to select the direction by clicking the next line or arc segmen...

Page 16: ...prompts you would have to fill in the same information for every drill event 3 7 Sample Exercise If you haven t already done it open the file named BALLPARK DXF located in the SWI TEST PROGRAMS folde...

Page 17: ...ll profile like this it is not a big deal A profile made up of dozens of lines and arcs would make the chaining feature more useful 11 Click on the first line of the profile The ProtoTRAK will machine...

Page 18: ...scard any information generated during the DXF conversion session 4 2 Functions of the Status Line During the conversion process there are some new buttons that don t appear elsewhere on the ProtoTRAK...

Page 19: ...lick the Event key to fill in the rest of the data needed 4 3 Choose the Layers That You Want Displayed CAD files are made for printing not machining Therefore DXF and DWG files usually contain inform...

Page 20: ...ok connected on a print but really have tiny gaps between them The gap tolerance of the DXF Converter is an elegant solution to this problem You enter a single value a tolerance and the DXF Converter...

Page 21: ...nt will remain unselected If Apply All is chosen the gap will be closed and this new gap value will replace the previous one as the new gap tolerance value You will not be prompted again unless a gap...

Page 22: ...t your own Absolute zero reference The DXF Converter provides three choices for choosing the Absolute zero reference point that are described below 4 5 2 Choice A Intersection of Two Lines or Arcs Thi...

Page 23: ...t of the drawing 4 5 5 Continue Use the Drawing s Absolute Zero If CONTINUE is pressed without selecting an absolute zero reference point with one of the methods above then the reference point given i...

Page 24: ...ay The ProtoTRAK DXF Lathe converter allows you to display the Positive X potion of the drawing the negative X portion of the drawing or the entire drawing The converter will use the ABS 0 you specifi...

Page 25: ...s you to make simple edits to your drawing in order to accommodate those situations Note These edits will not be saved onto your original drawing file Figure 4 7 The Edit Screen 4 7 1 Add Line The Add...

Page 26: ...second end point where ever you like To add a line using the New Point feature first click on New Point then click on the existing line where you would like the new line to begin You will then notice...

Page 27: ...irst highlight the entire line then click on portion of line to hide Figure 4 7 3 2 Top portion of the line has been hidden 4 7 4 Using the Drawing Edit Features The Add Line New Point and Hide Line f...

Page 28: ...profile Use the Hide Line feature to get rid of the lines Figure 4 7 4 3 Use the Hide Line feature to eliminate drawing lines that are not needed 4 8 Converting Geometry into a ProtoTRAK Program After...

Page 29: ...s into a Cycle event When selecting a Cycle event the first line clicked determines where the Cycle starts and the second line clicked determines the direction of the Cycle X stock The cycle event ins...

Page 30: ...process on a Cycle simply select the Event button to fill in the additional event data or select the same or a different event type You can use the Undo button to un select any number of steps in the...

Page 31: ...a bit easier to keep things straight Defining the event in its entirety before moving to the next event makes it unnecessary to remember event numbers later on 4 9 Sample Exercise Open the program nam...

Page 32: ...at is furthest to the right as your ABS 0 reference press continue Press the X POS button to display the positive half of the drawing Press Continue Use the Zoom feature to get a better view of the gr...

Page 33: ...ch line that has an arrow next to it in the general area of the arrow One click is to select the line the second click is to hide that portion of the line After you have hidden all the lines the part...

Page 34: ...ollows the first line You will receive another Please click to continue message click on the line we created earlier 3 You will immediately receive another Click to continue message click on the line...

Page 35: ...n to the event definition screen Use the zoom function to get a better view of the front of the part Select Drill and click anywhere on the vertical line at the front of the part Click on Event and yo...

Page 36: ...rt should be green and the periphery white You may want to save the program under a different name after it has been converted In the Program In Out Mode press Save The file will be the same name unle...

Page 37: ...that is not needed for the conversion process can be hidden You want to be able to isolate the geometry to be programmed from the other things like page borders that appear in a drawing file Avoid Com...

Page 38: ...ing problems when brought into the DXF converter If your file experiences layering problems simply have your CAD programmer open it with AutoCAD and save it as DXF or an earlier version of AutoCAD i e...

Page 39: ...terial you can machine that last corner in a separate operation with a different tool Creating New Intersection Points The valuable chaining feature of the cycle event uses points of intersection to t...

Page 40: ...ick on the short side of the line and it is hidden Now click on the Undo button to restore the short side of the line because we will need it later to program that corner with a different tool Now the...

Page 41: ...nty of merchantability or fitness for a particular purpose and of any other obligations or liability on the part of SWI or any producing entity if different Warranty repairs exchanges do not cover inc...

Reviews: