South Bend Tools
For Machines Mfd. Since 12/21
Model SB1007
-47-
O P E R A T I O N
Threading
The following subsections describe how to use
the threading controls and charts to set up
the lathe to cut threads. If you are unfamiliar
with how to cut threads on a lathe, we strongly
recommend that you read books, review industry
trade magazines, or get formal training before
attempting any threading tasks.
Headstock Threading Controls
The threading charts on the headstock show the
settings for inch and metric threading.
Using the controls on the lathe, follow along with
the example below to understand how to set up
the lathe headstock controls for threading.
To set up a thread pitch of 13 TPI:
1.
DISCONNECT LATHE FROM POWER!
2.
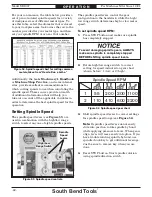
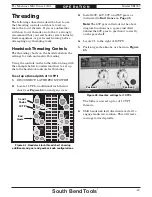
Locate 13 TPI on additional inch thread
chart (see Figure 64) on end gear cover.
3.
Install 40T, 60T, 90T, and 95T gears as
instructed in End Gears on Page 45.
Note:
The 65T gear called out in the above
diagram functions as a spacer installed
behind the 60T gear to position it correctly
on the gear shaft.
Figure
Figure 64. Headstock inch thread chart showing
. Headstock inch thread chart showing
additional end gear and gearbox knob configurations.
additional end gear and gearbox knob configurations.
13 TPI
13 TPI
4.
Locate C1 to the right of 13 TPS.
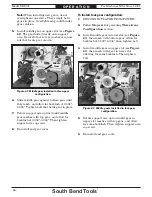
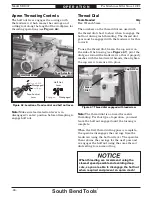
5. Position gearbox knobs, as shown in Figure
65.
The lathe is now set up to cut 13 TPI
threads.
6. Shift headstock feed direction lever left to
engage leadscrew rotation. This will move
carriage toward spindle.
Figure
Figure 65. Gearbox settings for 13 TPI.
. Gearbox settings for 13 TPI.
Position 1
Position 1
Position C
Position C
C and 1
C and 1
Knobs
Knobs
End
End
Gears
Gears


