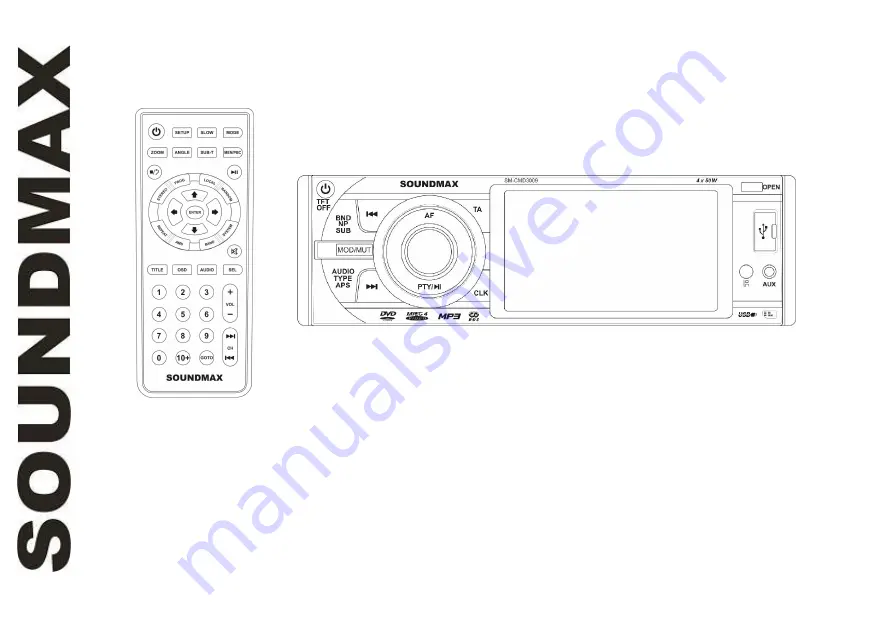
background image

SM-CMD3009

MULTIMEDIA DVD/CD/MP3 RECEIVER with built-in 3.5” TFT display
Instruction manual

 DVD/CD/MP3-

 3.5” TFT-

Summary of Contents for SM-CMD3009

Page 1: ...SM CMD3009 MULTIMEDIA DVD CD MP3 RECEIVER with built in 3 5 TFT display Instruction manual DVD CD MP3 3 5 TFT...

Page 2: ...justing the product and keep the manual for reference in the future Table of contents Table of contents 2 Important safeguards 3 Accessories 4 Installation connection 5 Unit controls 11 General operat...

Page 3: ...o the operation temperature Using the unit with the temperature that goes beyond the operation temperature greatly decreases the operation resource of the screen and other components of the unit and c...

Page 4: ...oller 1 pc Front panel protective case 1 pc ISO cable 1 pc Installation parts Release keys 2 pcs Screw 5 1 pc Screw 25 1 pc Flat washer 2 pcs Spring washer 2 pcs Metal strap 1 pc Nut 1 pc Consumer inf...

Page 5: ...gency stop If installation angle exceeds 30 from horizontal the unit may not perform properly Avoid installing the unit where it would be subject to high temperature such as from direct sunlight or fr...

Page 6: ...the unit Trim frame Frame uninstall direction Release key insertion 1 Switch off the unit and detach the front panel 2 Insert your fingers into the groove in the front side of the trim frame apply som...

Page 7: ...therwise error symbols may be displayed and some buttons may not function To detach the front panel press OPEN button then distract the left side of the panel from the fastening of the unit Anti theft...

Page 8: ...B 1 1 Rear right speaker 2 2 Rear right speaker 3 3 Front right speaker 4 Memory 12V 4 Front right speaker 5 Auto antenna output 5 Front left speaker 6 6 Front left speaker 7 12 V to ignition key 7 R...

Page 9: ...ite Note Power antenna wire is intended for power supply of the antenna and for remote control of an additional amplifier Parking wire connection If parking cable is connected to hand brake switch the...

Page 10: ...ving cable connection If the rear view video camera is connected the unit automatically switches to camera picture during reverse driving The unit returns to the original work mode after the reverse d...

Page 11: ...BND NP SUB button 3 PREVIOUS button 4 AF button 5 TA button 6 Display 7 OPEN button 8 USB port 9 AUDIO TYPE APS button 10 MOD MUT button 11 NEXT button 12 PTY PLAY PAUSE button 13 VOLUME regulator SE...

Page 12: ...emory card slot 3 RESET button hole 4 Panel status indicator 5 EJECT button Pressing RESET hole will erase the clock setting and stored stations Panel status indicator lights up when you flip down the...

Page 13: ...buttons 9 REPEAT button 10 AMS button 11 TITLE button 12 OSD button 13 Number buttons 14 SLOW button 15 MODE button 16 SUB T button 17 MEN PBC button 18 PLAY PAUSE button 19 LOCAL button 20 RANDOM but...

Page 14: ...accidentally swallows the battery consult a doctor immediately Do not recharge short disassemble or heat the battery or dispose it in a fire Do not expose or bring into contact the battery with other...

Page 15: ...panel or MODE button on the RC to select a mode Radio DVD USB SD AUX Or in the Main menu touch the icon of the needed mode The Main menu is available on the touch screen after you touch the yellow arr...

Page 16: ...r in SOUND page After you have reached your desired effect leave the unit idle in order for the new setting to take effect Note If the equalizer is set on bass and treble are not adjustable EQ modes P...

Page 17: ...f After you have reached your desired effect leave the unit idle in order for the new setting to take effect Button backlight color Press repeatedly SELECT button on the panel or SEL button on the RC...

Page 18: ...mplifier is required to operate the subwoofer AUX in jack AUX in jack is intended for connecting external audio equipment to amplify the sound If connection is made correctly the audio signal from the...

Page 19: ...cally Repeat this action to seek for other desired stations To stop automatic search press NEXT or PREVIOUS button on the panel or on the RC or touch and icon on the screen Programming tuner stations...

Page 20: ...r press LOCAL button on the RC or touch LOC DX icon on the screen to switch between local and distant station reception RDS function RDS Radio Data System service availability varies with areas Please...

Page 21: ...en press 1 6 number buttons to choose different speech programs Each number button will show 2 or 3 different speech programs for you to choose see table below Button Music type programs Speech type p...

Page 22: ...AF function tries to scan alternative frequency RETUNE S L RETUNE refers to the time period the unit allows for radio scan when reception is interrupted SHORT represents a time period of 30 seconds a...

Page 23: ...revious LEFT cursor Subtitle Next RIGHT cursor NUM number pad Back to main menu OK confirmation Zoom To next page To next page To next page Note The operations are detailed below Insert Eject disc Ope...

Page 24: ...icon to go to playback of corresponding files Note Manufacturer guarantees regular playback of licensed discs only Some AVI files cannot be played due to their parameters and recording conditions Vide...

Page 25: ...chapter track time track title chapter number or time Press cursor buttons to navigate between the parameters and use number buttons to input needed settings Press ENTER button on the RC to start pla...

Page 26: ...one using number buttons on the RC Changing angle for DVD only Press ANGLE button on the RC or touch Angle icon to playback images at different camera angles If a disc doesn t support multi angle play...

Page 27: ...n the RC or touch OK icon to confirm the selected item and start playing When playing a DVD press TITLE button on the RC or touch Title icon to go to the title list of the disc Note Title and menu are...

Page 28: ...sert an MMC SD card or a USB device into MMC SD slot or USB slot Then the playing mode will be changed into Card or USB mode automatically The first card USB device track playback will start If the un...

Page 29: ...inutes TV type Select TV type to watch wide screen movies 4 3 PS For 4 3 TV left and right edges will be cut 4 3 LB For 4 3 TV black bars will appear on top and bottom 16 9 For 16 9 wide screen TV Pas...

Page 30: ...or the Menu You can select a preferred audio from those included on the DVD Audio setup Key Select key up down according to your preference Audio out SPDIF OFF Analog or optical output has no output s...

Page 31: ...p pens may damage its surface Do not touch the unlabeled side Do not attach any seal label or data protection sheet to either side of a disc Cleaning the cabinet Wipe with a soft cloth If the cabinet...

Page 32: ...an the compact disc try to play a new one The unit already contains a disc Remove the disc in the player then put a new one Disc cannot be loaded or ejected Moisture condensation Leave the unit idle f...

Page 33: ...0 x 294 x 100 mm 2 35 kg ESP function 8 sec ESP for DVD 40 sec ESP for Audio CD 120 sec ESP for MP3 Temperature range 200 C 600 C TFT display Screen 3 5 inch touch screen Resolution 960 x 240 Aspect r...

Page 34: ...34 34 35 36 37 44 48 52 57 USB SD MMC 62 63 65 66 68...

Page 35: ...35 1 1 20...

Page 36: ...36 1 1 1 1 ISO 1 2 5 1 25 1 2 2 1 1 1 1 1...

Page 37: ...37 30 DIN DIN...

Page 38: ...38 1 2 3 4 5 6 7 8 1 2 3 4 5...

Page 39: ...39 1 2 3 1 3 2 2 3 4 5...

Page 40: ...40 OPEN...

Page 41: ...41 A B 1 1 2 2 3 3 4 12 4 5 5 6 6 7 12 7 8 8...

Page 42: ...42 ISO A B 1 2 3 4 12 5 6 7 8 Warning Please stop watch video player...

Page 43: ...43...

Page 44: ...44 1 POWER TFT OFF 2 BND NP SUB 3 PREVIOUS 4 AF 5 TA 6 7 OPEN 8 USB 9 AUDIO TYPE APS 10 MOD MUT 11 NEXT 12 PTY PLAY PAUSE 13 VOLUME SELECT 14 CLK 15 16 AUX...

Page 45: ...45 1 2 SD MMC 3 RESET 4 5 EJECT RESET...

Page 46: ...E 4 ZOOM 5 STOP 6 PROG 7 STEREO 8 9 REPEAT 10 AMS 11 TITLE 12 OSD 13 14 SLOW 15 MODE 16 SUB T 17 MEN PBC 18 PLAY PAUSE 19 LOCAL 20 RANDOM 21 ENTER 22 SYSTEM 23 BAND 24 MUTE 25 SEL 26 AUDIO 27 VOL VOL...

Page 47: ...47 1 2 CR 2025 3V 6...

Page 48: ...48 RESET RESET OPEN POWER TFT OFF POWER MODE MOD MUT DVD USB SD AUX Main USB Bluetooth TV SETTINGS SOUND SETTINGS SETUP SETTINGS Aux SOUND SOUND Radio Aux...

Page 49: ...49 MOD MUT MUTE MUTE SOUND MUTE ON VOL VOL VOLUME VOL SOUND SELECT SEL BAS TRE BAL FAD VOL VOL VOLUME SOUND SELECT SEL EQ OFF VOL VOL VOLUME POP ROCK CLASS FLAT EQ OFF EQ SOUND...

Page 50: ...SOUND BMP Best Music Position Double Bass SOUND MBP L R DBAS Double bass CLK VOLUME VOL VOL SEL SELECT VOLUME VOL VOL CLK HOUR MIN SOUND Beep SEL BEEP ON OFF VOL VOL BEEP ON BEEP OFF BEEP SOUND Beep S...

Page 51: ...51 POWER TFT OFF SETTINGS Brightness Contrast Color Hue SELECT SEL SUB ON SUB OFF VOLUME VOL VOL SUB ON SUB OFF BND NP SUB AUX AUX MP3...

Page 52: ...52 BND NP SUB BAND BND 3 FM FM1 FM2 FM3 2 W AM MW1 AM1 MW2 AM2 6 30 PREVIOUS NEXT CH CH PREVIOUS NEXT CH CH 6 1 6 6 P1 P6 AUDIO TYPE APS AMS APS SCAN 6...

Page 53: ...53 1 6 AUDIO TYPE APS AMS APS INTRO 5 FM SELECT SEL ST ON ST OFF VOLUME VOL VOL ST ON ST OFF STEREO MO ST SELECT SEL LOC ON LOC OFF VOLUME VOL VOL LOC ON LOC OFF LOCAL LOC DX RDS RDS RDS AF...

Page 54: ...54 AF AF AF AF AF RDS RDS AF TA TA TA TA TA TA PTY FM RDS PTY PLAY PAUSE PTY 1 6 PTY PLAY PAUSE PTY 1 6 1 Pop Rock News Affairs Info 2 Easy Light Sport Educate Drama 3 Classics Culture Science Varied...

Page 55: ...Weather Finance Children 5 Nation Oldies Social Religion Phone IN 6 Folk Travel Leisure Document PTY SELECT SEL VOLUME VOL VOL TA SEEK TA ALARM TA SEEK TA TA ALARM TA ALARM TA SEEK TASET PI SOUND MUT...

Page 56: ...56 PI mute RETUNE L RETUNE S RETUNE S L RETUNE L RETUNE S RETUNE Retune TA TA SEEK MASK DPI MASK ALL AF MASK DPI MASK DPI MASK ALL RDS MASK DPI MASK ALL MASK...

Page 57: ...57 USB USB 3 Play pause Audio Menu Stop OSD Angle Rewind Repeat Fast forward Title Previous Subtitle Next NUM OK Zoom...

Page 58: ...58 EJECT MP3 DivX JPEG MP3 DivX JPEG 1 2 3 4 5 6 ENTER OK ENTER OK AVI AVI 2 PLAY PAUSE Play pause STOP Stop...

Page 59: ...59 PREVIOUS Previous NEXT Next 0 9 PREVIOUS NEXT Rewind Fast Forward PREVIOUS NEXT x2 x4 x8 x20 PLAY PAUSE Play Pause REPEAT Repeat RANDOM GOTO ENTER PROG...

Page 60: ...60 PLAY PAUSE ENTER ENTER PROG OSD OSD ZOOM Zoom X2 X3 X4 X1 2 X1 3 X1 4 SLOW 1 2 1 3 1 4 1 5 1 6 1 7 PLAY PAUSE Play Pause PBC VCD VCD PBC MEN PBC PBC DVD ANGLE Angle...

Page 61: ...61 DVD AUDIO Audio DVD SUB T Subtitle VCD CD AUDIO Audio SYSTEM BND NP SUB NTSC PAL PAL60 DVD MEN PBC Menu ENTER OK DVD TITLE Title ID3 MP3 ID3 tag...

Page 62: ...62 USB SD MMC USB SD MMC USB USB 2 0 32 SD MMC 32 USB SD MMC USB USB SD MMC MOD MUT MODE USB USB...

Page 63: ...63 SETUP ENTER ENTER NTSC PAL 4 3 PS 4 3 4 3 LB 4 3 16 9 16 9 0000 0000...

Page 64: ...64 DVD DVD SPDIF RAW Dolby Digital DTS MPEG SPDIF PCM 2...

Page 65: ...65...

Page 66: ...66 35 35...

Page 67: ...67 RESET...

Page 68: ...SB SD MMC DVD video DVD audio SVCD VCD CDDA HDCD MP3 Picture CD Photo CD JPEG MPEG4 DivX XviD 178 178 51 2 1 220 294 100 2 35 8 DVD 40 CD 120 3 200 C 600 C 3 5 Touch screen 960 x 240 16 9 400 1 300 2...

Reviews: