background image

ning timecode is sensed. When stopped timecode is sensed, recording stops. (

See “Meter Ballistics”, 

page 20

)

Timecode Frame Rate

The frame rate of the timecode generator is set with the Setup Menu option 

TIMECODE > Frame Rate

. When using an external timecode mode, ensure that the 633’s frame rate 

is equal to (or cross-jam compatible) the external frame rate. When the incoming timecode frame 

rate differs from the 633’s frame rate, the frame rate indicator on the L, R, X,1, X2, X3, X4, RTN Meter 

View will flash the incoming frame rate in red and 633’s frame rate in white.

Jam Menu

The Setup Menu option 

TIMECODE > Jam Menu

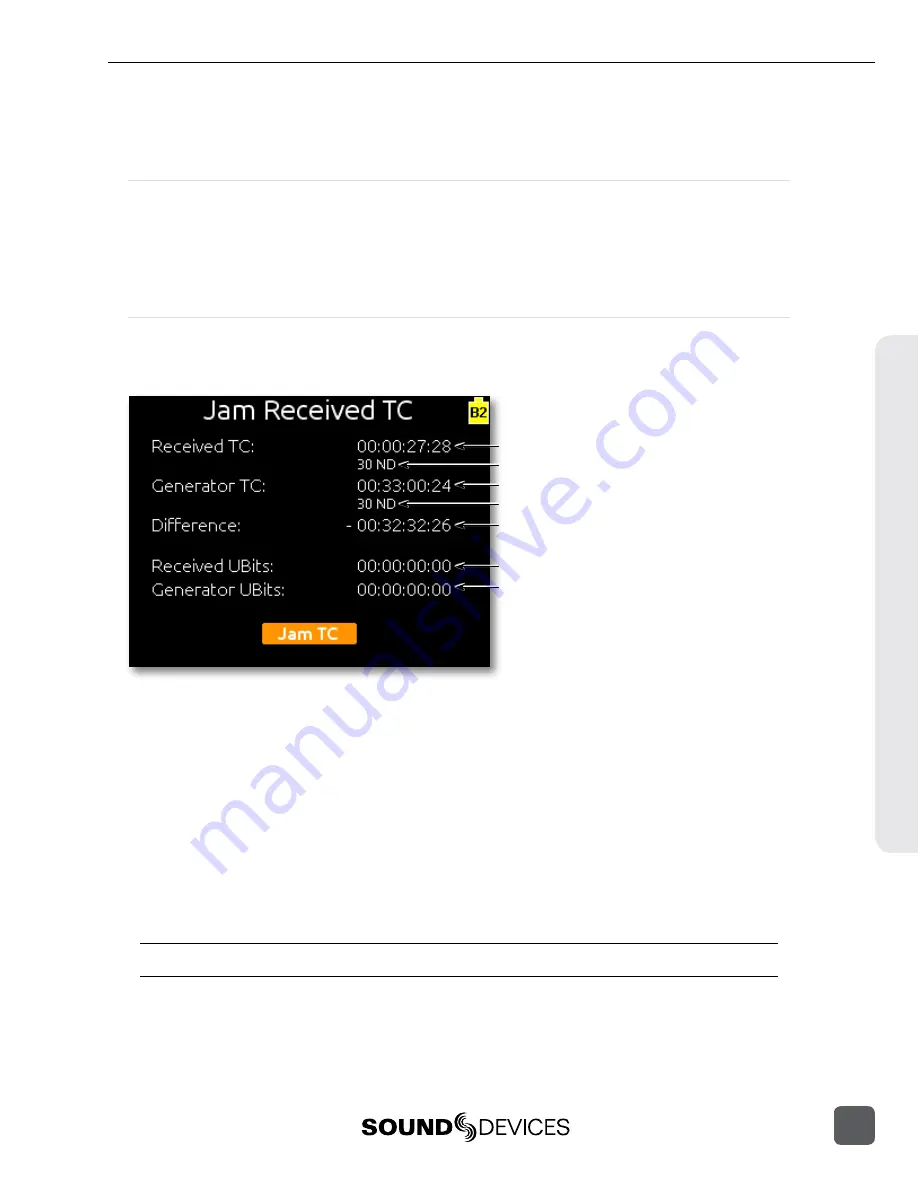
 displays the timecode Jam Menu. This special 

screen displays detailed information about the 633’s internal SMPTE timecode generator and SMPTE 

timecode present on the 633’s timecode input.

External timecode value
External timecode frame rate
Internal timecode value
Internal timecode frame rate
The difference between external and internal timecode.

External user bits
Internal user bits

To jam the 633’s internal timecode (and User Bits) to external timecode, press the Headphone Con-

troller while the Jam Menu is displayed. To leave the Jam Menu without jamming to external time-

code, press the Menu Button, Meters Button, or Stop Button.

The Difference field is useful for checking timecode drift between the 633 and external timecode 

devices.

User Bits

To set User Bits, use Setup Menu option 

TIMECODE/SYNC > Set Generator UBits

. Using the head-

phone encoder, set any 

UU

 fields to the desired value. Bits are not saved until 

Done

 is pressed. User 

bits can be set manually or generated dynamically from date values by setting the 

User Bits Mode

When User Bits Mode is set to uu:uu:uu:uu, values can be set manually. Other modes will populate 

the user bits value with year (“yy”), month (“mm”), and day (“dd”) values.

“UU” values are retained with the PowerSafe battery and will be reset 2 hours after shutdown. 

Timecode

633 User Guide and Technical Information

49

Summary of Contents for 633

Page 1: ...2 Sound Devices LLC E7556 State Highway 23 and 33 Reedsburg WI USA 53959 1 608 524 0625 fax 1 608 524 0655 Toll Free 800 505 0625 www sounddevices com support sounddevices com UDMA interstage Phistersvej 31 2900 Hellerup Danmark Telefon 3946 0000 fax 3946 0040 www interstage dk pro audio with a smile ...

Page 2: ......

Page 3: ...t Trim Digital 15 Input Fader 16 Phantom Power 16 Digital Inputs 16 High pass Filter 17 Polarity 17 Input Linking 18 M S Matrixing 18 Limiters 19 Limiter Knee 19 Linking Limiters 19 Metering 20 Meter Ballistics 20 VU 20 Peak VU 20 Peak Only 20 Peak Hold 21 Input Activity LED 21 Headphone Clipping LED 21 Headphone Monitoring 22 Headphone Gain 22 Headphone Source Selection 22 Headphone Encoder Mode ...

Page 4: ... 41 Metadata in MP3 Files 42 Sound Reports 42 Sound Report Setup 43 Overview Section 43 Take List Section 43 Generating Sound Reports 44 Take Management 44 Take List 44 Take Number 45 False Take 45 Scene Name 45 Scene Increment 46 Take Notes and Phrases 46 Phrases 46 Timecode 47 Timecode Modes 47 Record Run 48 Free Run 48 Free Run Auto Mute 48 24h Run 24 hour Run 48 24h Run Auto Mute 48 External T...

Page 5: ...anel Button Shortcuts 65 Connector Pin Assignments 66 Specifications 67 Analog Inputs 67 Digital Inputs 67 Analog Outputs 68 Digital Outputs Recorder 68 Timecode and Sync 69 Power 69 Environmental 69 Dimensions and Weight 69 Accessories 70 Wave Agent 71 Index 72 Declaration of Conformity 74 Warranty and Technical Support 75 Table of Contents 633 User Guide and Technical Information iii ...

Page 6: ... INCIDENTAL DAMAGES PUNITIVE DAMAGES SPECIAL DAMAGES CONSEQUENTIAL DAMAGES OR OTHER DAMAGES OF ANY KIND OR NATURE WHATSOEVER ARISING OUT OF OR RELATING TO THE PRODUCTS THESE TERM S AND CONDITIONS OR THE PARTIES RELATIONSHIP INCLUDING WITHOUT LIMITATION DAMAGES RESULTING FROM OR RELATED TO THE DELETION OR OTHER LOSS OF AUDIO OR VIDEO RECORDINGS OR DATA REDUCED OR DIMINISHED AUDIO OR VIDEO QUALITY O...

Page 7: ... altered when INPUTS PFL Toggle Mode is set to 3ch See Inputs page 14 4 Input Activity LED Indicates input signal activity Illuminates in various colors and intensities to show signal level and activity Green signal presence pre fader yellow limiter activity pre and post fader red signal overload clipping pre and post fader flashing yellow input PFL Input LED s for Inputs 1 2 and 3 are located abo...

Page 8: ...ide right to activate the headphone preset that has been marked as favorite See Favorite Headphone Source page 24 16 Mic Tone Switch Slide left to activate the Slate Microphone slide again to deactivate For momentary action hold for one second or longer Slide right to activate the Tone Oscillator Tone will latch if held for one second or longer slide again to deactivate 17 Slate Mic Tone LED Illum...

Page 9: ...rom 30 dB mic level up to 0 dB sufficient for driving headphones See AUX 3 4 Outputs TRS page 26 3 Battery Compartment Holds 6 AA batteries Three batteries in two rows held by screw cap Top row batteries inserted with negative end facing out Bottom row batteries inserted with positive end facing out 4 TA3 Analog Line Inputs 4 6 Analog line inputs 4 6 Pin 1 ground pin 2 pin 3 Float pin 3 to unbalan...

Page 10: ...ts approved CompactFlash cards with the label side toward the rear of the 633 Compatible with Type I and Type II cards High speed UDMA cards are recommended for higher track count re cording See http www sounddevices com approved for a list of approved media 9 SD Card Slot Accepts approved SD SDHC SDXC cards with the notched corner oriented toward the top of the 633 Insert until it clicks securely...

Page 11: ...r external powering connect a DC powering source not in cluded to the DC connector on the Right Panel For internal powering from AA batteries unscrew the battery cap counter clockwise insert six AA NiMH batteries not included the battery tubes Orient the top three batteries with the positive side facing in and the bottom three batteries with the nega tive side facing in 2 Power On the 633 Slide th...

Page 12: ...m knob is recessed pop it up by pushing it in If the trim knob is rotated fully counter clockwise the input is powered off To power the input on rotate the trim knob clockwise until it clicks 633 User Guide and Technical Information 6 v 1 02 Features and specifications are subject to change Visit www sounddevices com for the latest documentation Quick Start Guide ...

Page 13: ...ct an input type and press the Headphone Encoder to select that type Choose MIC for a dynamic micro phone MIC PH for microphones requiring phantom power or LINE for analog line level sources Slide Input 1 s the Input Select Switch left again to return to the Main Screen 6 Connect Headphones Connect headphones to the 1 4 inch headphone output on the right panel Quick Start Guide 633 User Guide and ...

Page 14: ...tacts visible facing toward the rear of the 633 Insert the CF card with the top of the card the side with the manufacturer s branding label facing the rear of the 633 SD card slot CF card slot 9 Format Media The SD or CF card must be formatted before recording This will erase all data on the card 1 Press the Menu Button to access the Setup Menu 2 Rotate the Headphone Encoder to highlight FILE STOR...

Page 15: ...ol up to begin recording The background color of the Take name on the top of the Main Screen will become red and the absolute time counter on the bottom of the Main Screen will run to indicate recording is taking place Stop push in Record slide up 11 Remove Media to Transfer Files When finished recording open the Media Door and remove the SD or CF card To remove the SD card push it in to release T...

Page 16: ... Meter View SMPTE Timecode Absolute recording time Unarmed track Powered off Input This screen shot shows default settings Meter Style can be changed to solid See Metering page 20 and track names can optionally be shown in the meters See Track Naming page 32 Meter Views Pressing the Meters Button from the Main Screen will cycle through different Meter Views on the Main Screen There are 3 views to ...

Page 17: ...ne Source is changed to PFL of the selected Input The Headphone Source changes back to its previous source when the Input Settings Screen is exited The Input Settings Screen can be entered without altering the Headphone Source by holding the Select Encoder down while sliding the input Select Switch This behavior is reversed when Setup Menu option INPUTS PFL Toggle Mode is set to 3ch See PFL Toggle...

Page 18: ...ndicated by a red background and unrouted signal by a black background See Input Routing page 14 7 Limiter Activity Indicates that limiting is occurring on the Input See Limiters page 19 8 Input Source Displays the selected input type To change the input type press the Head phone Encoder turn it to make a selec tion then press it again to confirm the selection See Input Types page 14 9 Headphone S...

Page 19: ...y 2 Press the Headphone Encoder to toggle the assigned state of the highlighted box On some Routing Screens additional options are available and can be accessed with the Mic Tone Switch or the RTN FAV Switch These options will be displayed directly above the respective switches Destinations Sources Mic Tone Switch options RTN FAV Switch options LCD Daylight Mode When engaged LCD Daylight Mode chan...

Page 20: ...t with power activated for AES42 Mode 1 digital microphones AES3 1 2 Digital input AES42 and AES3 input source option only appears in input 2 when selected as a source for input 1 Input 1 XLR 3F connector is used for digital input Input Routing Each input of the 633 has a corresponding ISO Track that it is permanently routed to Addition ally each Input can be independently routed to the Left L Rig...

Page 21: ...a course gain control and the Input Fader as the fine gain control Input 1 Fader Input 2 Fader Input 3 Fader Input 1 Trim Input 2 Trim Input 3 Trim Inputs 4 5 and 6 Trim Input 4 Fader Input 5 Fader Input 6 Fader Input Trim Analog Analog input sensitivity for Inputs 1 2 and 3 is set with the pop up Trim control knob Analog input sensitivity for line level Inputs 4 5 and 6 is set by rotating the Sel...

Page 22: ...n 3 The phantom voltage is selectable between 12 and 48 Volts from the Setup Menu item INPUTS Phantom Voltage The selected voltage level applies to all inputs with phantom power enabled The factory default phantom power voltage is 48 V Digital Inputs The 633 accepts AES3 AES EBU balanced AES42 Mode 1 balanced and AES3 unbalanced digital signals on the Input 1 XLR 3F connector The 633 auto detects ...

Page 23: ...rner 3 dB frequency over a range from 80 to 240 Hz Below 80 Hz the filter s slope is 12 dB octave At higher corner frequency settings the slope is 6 dB octave The purpose for this compound slope is to give additional roll off at the 80 Hz setting to reduce wind noise and low frequency rumble The higher settings can be used to counter act the proximity effect of directional microphones where a more...

Page 24: ... The limiters of both inputs are linked The background label of both inputs is connected on the Main Screen Linked Unlinked M S Matrixing When input pairs are linked M S the odd channel is used for the Mid signal and the even channel is used for the Side signal To produce a stereo signal from an M S configuration the signal from both microphones must be processed Mid side M S matrixing is a method...

Page 25: ...Input 1 6 PostFade Threshold LIMITERS L R Threshold and LIMITERS X1 X2 Threshold In normal operation with a properly set gain structure the threshold of the Input Limiter is rarely reached Without Input Limiters high signal conditions can overload a channel and cause distor tion The Input limiter is working when the respective input s Input Activity LED illuminates yellow Limiting activity will al...

Page 26: ...meter ballistics correspond closely to how the human ear perceives loudness This provides a good visual indication of how loud a signal will be In VU mode the attack and decay of the meter signal is 300 mS VU meters provide good visual indication of how loud a signal will be but provide poor information of actual signal peaks Peak VU The 633 can simultaneously display VU and Peak level information...

Page 27: ...arious colors and intensities to represent the signal level appearing at its respective input Green pre fader signal activity yellow pre and post fader limiter activity red pre and post fader sig nal overload clipping Reduce the trim level control if the LEDs continuously illuminate yellow or red The Input Activity LED will flash yellow when the Input PFL is latched See PFL Input Solo page 24 Head...

Page 28: ...extremes Headphone Source Selection Named custom headphone preset Custom headphone preset Default Headphone Sources By default to select the Headphone Source Press the Headphone Encoder while viewing the Main Screen See Headphone Encoder Mode page 23 This will display the Headphone Source selection menu Turn the Headphone Encoder to change the source and press the Headphone Encoder to exit the men...

Page 29: ...Main Screen press the Headphone Encoder and then turn the Headphone Encoder to adjust headphone gain Turning the Headphone Encoder will continue to adjust gain until 2 seconds have elapsed with no gain adjustment at which point turning the Head phone Encoder will once again select Headphone Sources Custom Headphone Presets Ten custom Headphone Sources are available These headphone presets can be e...

Page 30: ... LR Mono L Mono R Mono LR M S ST or X1X2 3 Slide the Slate Tone switch left or right The background of the SET FAV text on the LCD will become blue to indicate that the highlighted Headphone Source is now the Favorite Head phone Source Slide the RTN FAV right in the Preset Editing Screen to set a Custom Headphone Preset as favorite See Custom Headphone Presets page 23 PFL Input Solo When any input...

Page 31: ...ng the RTN FAV switch left The Monitor Mode RTN will be displayed on the Main Screen in the lower left corner In Meter Views See Meter Views page 10 that do not include a large RTN meter a smaller RTN meter is displayed directly under the Headphone Source The RTN level can be padded from 0 dB down to 30 dB To adjust the RTN level 1 Ensure that one of the chosen Meter Views in Setup Menu option SYS...

Page 32: ...s input Settings screen by slid ing the Mic Tone Switch left or right Signal can also be routed to the X1 and X2 buses from the X1 X2 Routing Screen See Rout ing Screens page 13 The X1 X2 Routing Screen is accessed from Setup Menu option OUTPUTS X1 X2 Routing ISO tracks or L and R tracks can be routed individually to X1 and X2 buses routing any ISO track to a bus will unroute tracks L and R to tha...

Page 33: ...ted to X3 and X4 buses When Headphone signal is routed to X3 or X4 and RTN signal is routed to the headphone preset RTN signal will be present in the headphone output but not in X3 or X4 AES3 Digital Outputs XLR 3M There is a total of 4 available channels of digital output on 2 connections Each of the XLR 3M outputs can be configured to output AES3 digital signals from the Setup Menu options OUTPU...

Page 34: ... the meter label of the output to be adjusted 3 Press the Select Encoder The background of the output s meter label will become yellow to indicate that level adjustment mode is accessed 4 Rotate the Select Encoder to adjust the level The dB value will be displayed in the lower right corner of the LCD during adjustment 5 Press the Select Encoder again or wait 2 seconds The background color of the m...

Page 35: ...again to deactivate The Slate Mic Tone LED will illuminate green to indi cate tone is activated Default tone is a continuous 1000 Hz sine wave at a level of 0 dBu These parameters can be changed with Setup Menu options SYSTEM Tone Level 0 dBu 20dBu in 1 dB increments and SYSTEM Tone Frequency 100 Hz 10 000 Hz in 10 Hz increments Hold down the Select Encoder while sliding the Mic Tone Switch right ...

Page 36: ...hannels unless the current Headphone Source is RTN This is to allow calibrating levels with another device A camera for example by monitoring output signal of the device while sending the 633 s tone to that same device Slate signal is not present on AES digital outputs 633 User Guide and Technical Information 30 v 1 02 Features and specifications are subject to change Visit www sounddevices com fo...

Page 37: ...display next take name Play Tilt the Transport Control Down Begins playback of the last file recorded or file currently loaded See Playback page 37 Rewind Load Previous Take Tilt the Transport Control Left While in Stand by tilt left to load the previous take While in playback tilt and hold left to rewind Fast Forward Load Next Take Tilt the Transport Control Right While in Stand by tilt right to ...

Page 38: ...V file Wav Poly LR only Armed L and R tracks 0 2 tracks Polyphonic WAV file Wav Poly X1X2 only Armed X1 and X2 tracks 0 2 tracks Polyphonic WAV file MP3 LR Armed L and R tracks 0 2 tracks 2 track MP3 file MP3 X1X2 Armed X1 and X2 tracks 0 2 tracks 2 track MP3 file Wav Mono Armed Tracks 0 6 tracks Mono WAV files Wav Mono ISOs only Armed ISO Tracks 0 10 tracks Mono WAV files Track to Media routing a...

Page 39: ...hat take 3 Slide the RTN FAV Switch to enter the take s Metadata Edit screen 4 Rotate the Headphone Encoder to highlight the Track to be edited then push the Headphone Encoder to edit that track s name 5 Rotate the Headphone Encoder to select a Track Name from the list If the desired Track Name is not in the list scroll to the bottom of the list and select Add New Entry The list of track names is ...

Page 40: ...and iXML data chunks See Metadata Fields page 41 Software that does not recognize these additional broadcast wave data chunks will simply ignore them MP3 File Format MPEG Layer III is a lossy compression algorithm often used for transcription recording purposes The 633 records two channel MP3 audio files with data rates of 320 kb s 192 kb s or 128 kb s MP3 files do not utilize the any standard con...

Page 41: ...ds The 633 can write to one or both of these cards at the same time Visit www sounddevices com approved for an up to date list of tested and approved cards The SD card is inserted with the bottom of the card the side with metal contacts visible facing toward the rear of the 633 Press until it clicks To remove push in again to release the spring loaded connector then pull the SD card out The CF car...

Page 42: ...s a specific compatibility mode for use with the Fostex DV40 software 1 74 and previous Avid Final Cut Pro and other post production environments that do not recognize audio files written at 48 048 kHz In this mode files are recorded at a 48 048 kHz sampling rate but are stamped at 48 kHz When played they will play back 0 1 slower than real time One use for the 48 048kF mode is to force a 0 1 spee...

Page 43: ...the file being played back Pressing the Stop button will pause playback and pressing the Stop button when playback is paused will stop playback The media that files will be played back from is highlighted with a green background on the Main Screen and RTN Screen To toggle the default playback card press and hold the Headphone Encoder then press the slide the Transport Control down Play By default ...

Page 44: ...or an up to date list of tested and approved cards File List The File List displays all files on the CF or SD card To access the File List select Setup Menu option FILE STORAGE File List The File List can also be accessed by sliding the Slate Tone Switch left or right while viewing the Take List When entering the File List the first view is the Root Menu In the Root Menu of the File List use the H...

Page 45: ...e 633 can record to MP3 format Recording WAV or MP3 is selectable per media from the Setup Menu items RECORDER Record to CF and RECORDER Record to SD The 633 can write files to both cards simultaneously See Digital Audio Format File Format page 34 File Structure The 633 records polyphonic or monophonic audio files A polyphonic take consists of one file with multiple tracks whereas a monophonic tak...

Page 46: ...older one level below it If the folder one level below the target folder is set to None the target folder will reside in the next level folder that is set to something other than None Each folder level has a corresponding list of available names that can be edited manually by the user To add an entry to the list of folder names of any folder level 1 Access Setup Menu option FILE STORAGE FOLDER OPT...

Page 47: ... don t recognize bEXT or iXML this information is ignored The following chart details the supported metadata parameters iXML Metadata stored in the Broadcast Wave iXML chunk bEXT Metadata stored in the Broadcast Wave bEXT chunk FMT Metadata stored in the Broadcast Wave Format chunk 4 supported Metadata Type Notes U Entered by User M Automatically Entered by the Machine Read Write General Informati...

Page 48: ... inside the ID3 tags Metadata in MP3 files can not be edited with the 633 The following table shows the ID3 fields that metadata is stored in and the format in which it is stored Square brackets denote variables and are not included in actual metadata Metadata ID3 Field Format Timecode value Artist Name TC HH MM SS FF Scene name and Take number Track Title SC scene name TK take number Frame rate a...

Page 49: ...cs used NONE Comments Miscellaneous comments NONE Roll The roll daily identifier NONE Media Media type NONE File Type File type Options are Current Selection WAV Poly or MP3 or None Current Selection File Type File type Options are Current Selection WAV Poly or MP3 or None Current Selection Sample Rate Sample rate of recorded audio Options are Current Selection At time of report generation or None...

Page 50: ...s created in a subfolder will be named with the last six characters of that folder followed by _REPORT CSV Take Management Take List The Take List consists of recorded takes on all media Takes are listed in the left column in the order they were recorded with the most recent take at the top The right column displays details about the highlighted take including TC Start timecode value of the take C...

Page 51: ... take and all files for this take will be renamed to reflect the new take number False Take To mark the last recorded take as a false take and decrement the Take number press and hold the Headphone Encoder then slide the Transport Control left Rewind A dialog will appear to confirm the false take action When a take is confirmed as a false take it will be moved to the FALSETAKES folder on each medi...

Page 52: ... Phrases The Notes metadata field is used to provide extra information about a take that is not accounted for with the other metadata fields Phrases Often a particular phrase will be used in the notes field of many different takes To save data entry time the 633 provides the ability to save phrases that can be entered into the notes field quickly To edit create and use phrases 1 Enter the Take Lis...

Page 53: ...is dynamically applied to accomplish this This simplifies synchroni zation in post production Sound Devices Wave Agent Beta for Mac OS and Windows computers allows users to add or edit Begin ning Timecode Stamps See Wave Agent page 71 The timecode value is always displayed on the all Meter Views By default the timecode frame rate is displayed on the L R X1 X4 RTN Meter View only and the recorder s...

Page 54: ...3 is in stopped mode This allows rec run functionality when Rec Run mode is not suitable e g Multi camera shoots External Timecode Ext TC Reader mode The internal timecode generator follows an external timecode signal appear ing at the timecode input If the external timecode is removed the internal generator stops as well Recording is triggered manually with the Transport Control External Timecode...

Page 55: ...e Internal timecode frame rate The difference between external and internal timecode External user bits Internal user bits To jam the 633 s internal timecode and User Bits to external timecode press the Headphone Con troller while the Jam Menu is displayed To leave the Jam Menu without jamming to external time code press the Menu Button Meters Button or Stop Button The Difference field is useful f...

Page 56: ...ot trigger a recording on the 633 Things to consider when using Timecode Hold Off This feature only applies in Ext TC Auto Rec and Ext TC Auto Rec Cont If Pre Roll is set it will be applied See Pre Roll page 36 Pre Roll will only capture au dio from the initial detection of a timecode signal If no Pre Roll is selected the file will begin after the Hold Off time expires It is best practice to set P...

Page 57: ...ct GMT time zone and daylight savings values is important for correct data stamping on the exFAT file system These settings are configured with Setup Menu options SYSTEM Daylight Savings Time and SYSTEM Time Zone The following map displays the GMT time zones Time and Date Format The format of the date as displayed in BWF metadata and as used in the naming of the Daily folder can be in a month day ...

Page 58: ...Menu option POWER Ext DC Ref Setting the external DC reference to a value appropriate for the type of battery being used for external powering will maximize runtime with that battery The 633 can be configured to power down instead of switching power sources when the external voltage drops below the external DC reference by setting Setup Menu option POWER Ext DC Loss to Shutdown This option allows ...

Page 59: ...riting files and shut the 633 down The PowerSafe Battery will power the 633 during this time Power Screen Specific numeric voltage levels of all connected power sources can be monitored from the Power Screen The Power Screen is accessed from the Setup Menu POWER Power source in use Disconnected power source Each power source and its voltage level is displayed on the Power Screen Disconnected power...

Page 60: ...y is enabled for 2 hours after the 633 is powered down During this time the 633 can turn on and start recording in less than 2 seconds Each time the 633 is turned on and off this 2 hour timer is reset After 2 hours of being powered down QuickBoot is deactivated and powering up will result in a normal slightly longer boot process The TC LED on the front panel will blink every 2 seconds to indicate ...

Page 61: ... current depending on what model micro phone is used Two identical phantom powered microphones draw twice as much current as one Microphones vary widely in their current draw depending on type and phantom voltage applied 2 Audio Recorder the recorder whether in record or playback increases power consumption 3 Digital Outputs disable digital outputs in the Setup Menu when they are not needed since ...

Page 62: ...n Meter Views Menu Button Accesses the Setup Menu Ctrl R Record Ctrl S Stop Spacebar Play Left Arrow Main Screen Rewind Input Settings Screen Toggle phase inversion Right Arrow Main Screen Fast Forward Input Settings Screen Toggle LR Mix assignment Up Down Arrows Main Screen Adjusts headphone volume In menus Moves highlighter While editing parameters Changes value Enter Main Screen Accesses HP Hea...

Page 63: ...write any settings previously stored there Saving a Setup File to the CF or SD card will create a folder named SETTINGS If it is not already present and place the Setup File in that directory If a Setup File with the entered named already exists the previous Setup File will be overwritten Setup Files stored on the CF or SD card can be deleted from the File List To delete a Setup File from the CF o...

Page 64: ...power enabled 48V 12V 4 PFL Toggle Mode Change the behavior of Input Select Switches See PFL Toggle Mode page 25 6ch 3ch 5 Input to ISO Routing Displays a sub menu where inputs 1 through 6 can be set to route to their respective ISO track pre or post fader independently Prefade Postfade 6 Input Delays Displays a sub menu where inputs 1 through 6 can be delayed independently 0 0 to 30 0 ms 0 1 ms i...

Page 65: ...0 to 10 0 frames 0 1 frame increment 0 0 frames Limiters Parameter Name Description Options 1 Limiter Enable Globally disable input and output limiters and select hard or soft knee See Limiters page 19 Off Hard Knee Soft Knee 2 Input 1 6 PostFade Thresh old Set the level at which input limiters will begin limiting 4 to 18 dBu 1 dBu increment 16 dBu 3 L R Linking Links limiters for L and R tracks O...

Page 66: ...s 1 second when using 192k sample rate 0 to 6 seconds 1 second increment 0 s Timecode Parameter Name Description Options 1 Timecode Mode Sets the running mode for the internal timecode generator and or the method which the 633 receives SMPTE timecode Off Rec Run Free Run Free Run Auto Mute 24h Run 24h Run Auto Mute Ext TC Ext TC Auto Rec Ext TC Cont Ext TC Auto Rec Cont 2 Frame Rate Sets the frame...

Page 67: ...Parameter Name Description Options 1 Take List Displays the Take List 2 File List Displays the File List 3 Folder Options Allows the user to organize files in root and sub folders For no folders select None on every level Top Level Mid Level Bottom Level 4 Sound Report Info Allows the user to enter default values for sound report fields The default values are indicated in parenthesis Project None ...

Page 68: ... the slate mic and tone signal can be routed to various destinations 3 Tone Level The level of the 633 s internal tone generator 0 20 dBu 1 dBu increment 0 dBu 4 Tone Frequency The audio frequency of the 633 s internal tone gen erator 100 10000 Hz 10 Hz increment 1000 Hz 5 Tone Mode Continuous tone generates tone a the set tone level to all bus tracks L Ident mode pulses the amplitude of tone to t...

Page 69: ...e Encoder to highlight a field and press Headphone Encoder to edit When highlighter is blue turn Headphone Encoder to change the value and press Headphone Encoder to accept the value 19 Time Zone Set the GMT time zone See Time Zone and Daylight Savings page 51 All GMT time zones GMT 20 Daylight Savings time Set whether or not daylight savings is in effect On Off 21 Fader Pan Calibration Calibrates...

Page 70: ...gs to INT2 Saves settings to internal setup storage location 2 4 Save Settings to INT3 Saves settings to internal setup storage location 3 5 Save Settings to INT4 Saves settings to internal setup storage location 4 6 Save Settings to CF Saves settings to CF card 7 Save Settings to SD Saves settings to SD card 633 User Guide and Technical Information 64 v 1 02 Features and specifications are subjec...

Page 71: ...me When used during record edits the current scene name When used during stop edits the next scene name Alternate Tone Mode Press and hold the Select Encoder then slide the Slate Tone Switch right Engages the tone with the alternate Tone Mode The alternate Tone Mode is the mode that Setup Menu option SYSTEM Tone Mode is not set to Toggle Playback Card Press and hold the Headphone Encoder then slid...

Page 72: ... Signal is unbalanced 2 TA3M X1 X2 Outputs 1 ground 2 signal 3 signal Active balanced output level is selectable in Setup Menu as Line 10 or Mic level For unbalanced pin 1 ground pin 2 positive pin 3 float no connect Mates with Switchcraft TA3F type connector 1 3 5 mm X3 X4 Output tip signal L ring signal R sleeve signal ground Mates with 3 5 mm TRS jack Signal is unbalanced 1 1 4 inch Female Head...

Page 73: ...Bu 80 Vrms RTN 3 5 mm 24 dBu 12 4 Vrms High Pass Filters Sweepable 80 Hz to 240 Hz 12 dB oct at 80 Hz 6 dB octave at 240 Hz Microphone Powering each analog Input selectable 12 V Phantom through 680 ohm resistors 10 mA per mic available 48 V Phantom through 6 8k resistors 10 mA per mic available Pre Fader Input Limiters Inputs 1 3 Affects the output of the mic preamps only Trim stage 16 dBu thresho...

Page 74: ... dB steps 20 1 limiting ratio 1 mS attack time 500 mS release time Maximum Gain Typical Trim Fader Master Phones RTN fully up MIC Level Input LINE Level Input RTN Master Outs XLR 3M LINE 91 dB 51 dB Master Outs XLR 3M 10 77 dB 37 dB Master Outs XLR 3M MIC 51 dB 11 dB X3 X4 Outs 3 5 mm 77 dB 37 dB Headphones 1 4 107 dB 67 dB 5 dB Digital Outputs Recorder AES3 Output AES Out A B on XLR 3M 110 ohm 2 ...

Page 75: ...with gold Hirose HR10A 7P 4P DigiKey HR110 ND or silver Hirose HR10 7P 4P DigiKey HR100 ND locking connector Internal Power Supply 5 10 V range Accepts 6 AA sized LR6 batteries NiMH rechargeable recommended There are similar sized 3 V Lithium cells that are not compatible Idle Current Draw 447 mA 12V 5 36 W Inputs 1 6 powered on CF and SD media Environmental Operation and Storage Operating 20 C to...

Page 76: ... XLR 3M cable used to connect 633 TA3 Aux out puts to third party devices with XLR 3F inputs package of two XL 2F 25 inch XLR 3F to TA3F cable used to connect mixers and other devices with XLR 3M outputs to the 633 TA3 4 6 inputs package of two XL 4 Bag of four 4 TA3 F type connectors XL H Bare Hirose 4 pin locking DC connector HR10 7P 4P XL NPH NP type battery cup with 24 inch cable terminated in...

Page 77: ...roadcast Wave files from any source Viewing and editing file metadata Changing of sampling rate frame rate and start timecode metadata stamps Splitting and combining polyphonic and monophonic files with selectable track assignments Batch editing Generating customized PDF and CSV Sound Reports Large timecode display Monitor mixer with faders pans solos mutes and meters Drag and drop operation Compr...

Page 78: ... 15 16 17 22 24 25 26 32 33 56 Input Source 12 Input Trim 12 15 ISO 12 14 24 26 27 31 32 37 58 74 iXML 34 39 40 41 42 44 47 L LCD Daylight Mode 13 63 65 Limiter Knee 19 Line Inputs 3 L Series 4 52 M Main Screen 1 2 5 7 9 10 18 19 20 22 23 24 25 31 33 35 37 51 53 56 61 65 Menu Button 2 8 33 35 44 45 46 49 54 56 57 65 metadata 32 33 34 38 39 40 41 42 43 44 45 46 51 71 Meters Button 1 2 9 10 24 25 28...

Page 79: ...code 1 2 3 10 36 42 43 44 47 48 49 50 51 60 61 65 66 69 71 Timecode LED 2 Tone Oscillator 2 29 Track Name 11 12 20 33 40 42 Transport Control 1 9 31 37 45 46 48 62 65 U USB 3 24 33 56 63 V VU 12 20 21 62 W Wave Agent 47 70 71 X X1 2 4 10 11 12 14 19 26 28 29 31 32 34 40 47 56 58 59 63 66 X2 2 4 10 12 14 19 26 28 29 31 32 34 40 49 56 58 59 63 66 X3 2 14 15 26 27 28 29 49 59 66 68 X4 2 11 14 15 26 2...

Page 80: ...roducts complies with the essential requirements of the following applicable European Directives and carries the CE marking accordingly EMC Directive 2004 108 EC EN 55022 2006 A1 2007 EN 55103 2 2009 First date of CE approval July 18 2013 This Declaration of Conformity applies to the above listed products placed on the EU market after July 18 2013 Date Matt Anderson Director of Engineering 633 Use...

Page 81: ...ding warranty repair please contact Sound Devices for an RMA return mer chandise authorization before sending your unit in for repair Product returned without an RMA number may experience delays in repair When sending a unit for repair please do not include ac cessories including SSD drives CF cards batteries power supplies carry cases cables or adapters unless instructed by Sound Devices Sound De...

Page 82: ......

Page 83: ......

Page 84: ...633 Rev 1 Printed in the U S A interstage Phistersvej 31 2900 Hellerup Danmark Telefon 3946 0000 fax 3946 0040 www interstage dk pro audio with a smile ...

Reviews: