

PERSONAL AUDIO SYSTEM
Operating Instructions
©2012 Sony Corporation Printed in China
ZS-BTY50
4-440-743-
11
(2)
WARNING
The following FCC/IC
statement applies only to the
version of this model
manufactured for sale in the
U.S.A. and Canada. Other
versions may not comply with
FCC/IC technical regulations.
NOTE:
This equipment has been tested and found to
comply with the limits for a Class B digital device,
pursuant to Part 15 of the FCC Rules. These limits
are designed to provide reasonable protection
against harmful interference in a residential
installation.
This equipment generates, uses and can radiate
radio frequency energy and, if not installed and
used in accordance with the instructions, may
cause harmful interference to radio
communications. However, there is no guarantee
that interference will not occur in a particular
installation. If this equipment does cause
harmful interference to radio or television
reception, which can be determined by turning
the equipment off and on, the user is
encouraged to try to correct the interference by
one or more of the following measures:
Reorient or relocate the receiving antenna.
Increase the separation between the
equipment and receiver.
Connect the equipment into an outlet on a
circuit different from that to which the
receiver is connected.
Consult the dealer or an experienced radio/
TV technician for help.
CAUTION
You are cautioned that any changes or
modifications not expressly approved in this
manual could void your authority to operate this
equipment.
This equipment must not be co-located or
operated in conjunction with any other antenna
or transmitter.
This equipment complies with FCC/IC radiation
exposure limits set forth for an uncontrolled
environment and meets the FCC radio frequency
(RF) Exposure Guidelines in Supplement C to
OET65 and RSS-102 of the IC radio frequency (RF)
Exposure rules.
This equipment has very low levels of RF energy
that it deemed to comply without maximum
permissive exposure evaluation (MPE). But it is
desirable that it should be installed and operated
keeping the radiator at least 20 cm or more away
from person’s body (excluding extremities:
hands, wrists, feet and ankles).
This symbol is intended to alert
the user to the presence of
uninsulated “dangerous voltage”
within the product’s enclosure
that may be of sufficient
magnitude to constitute a risk of
electric shock to persons.
This symbol is intended to alert
the user to the presence of
important operating and
maintenance (servicing)
instructions in the literature
accompanying the appliance.
This graphical symbol is located on the bottom
of the unit.
Basic Operations
To reduce the risk of fire or electric shock, do
not expose this apparatus to rain or moisture.
To reduce the risk of fire or electric shock, do not
expose this apparatus to dripping or splashing,
and do not place objects filled with liquids, such
as vases, on the apparatus.
As the main plug is used to disconnect the unit
from the mains, connect the unit to an easily
accessible AC outlet. Should you notice an
abnormality in the unit, disconnect the main plug
from the AC outlet immediately.
The unit is not disconnected from the AC power
source (mains) as long as it is connected to the
wall outlet, even if the unit itself has been turned
off.
Do not install the appliance in a confined space,
such as a bookcase or built-in cabinet.
Excessive sound pressure from earphones and
headphones can cause hearing loss.
Do not expose the batteries (battery pack or
batteries installed) to excessive heat such as
sunshine, fire or the like for a long time.
The nameplate is located on the bottom exterior.
Owner’s Record
The model and serial numbers are located on the
bottom of the unit. Record these numbers in the
space provided below. Refer to them whenever
you call upon your Sony dealer regarding this
product.
Model No. ZS-BTY50
Serial No.
Important Safety Instructions
1) Read these instructions.
2) Keep these instructions.
3) Heed all warnings.
4) Follow all instructions.
5) Do not use this apparatus near water.
6) Clean only with dry cloth.
7) Do not block any ventilation openings. Install
in accordance with the manufacturer’s
instructions.
8) Do not install near any heat sources such as
radiators, heat registers, stoves, or other
apparatus (including amplifiers) that produce
heat.
9) Do not defeat the safety purpose of the
polarized or grounding-type plug. A polarized
plug has two blades with one wider than the
other. A grounding type plug has two blades
and a third grounding prong. The wide blade
or the third prong are provided for your
safety. If the provided plug does not fit into
your outlet, consult an electrician for
replacement of the obsolete outlet.
10) Protect the power cord from being walked on
or pinched particularly at plugs, convenience
receptacles, and the point where they exit
from the apparatus.
11) Only use attachments/accessories specified
by the manufacturer.
12) Use only with the cart, stand, tripod,
bracket, or table specified by the
manufacturer, or sold with the
apparatus. When a cart is used, use
caution when moving the cart/
apparatus combination to avoid
injury from tip-over.
13) Unplug this apparatus during lightning
storms or when unused for long periods of
time.
14) Refer all servicing to qualified service
personnel. Servicing is required when the
apparatus has been damaged in any way,
such as power-supply cord or plug is
damaged, liquid has been spilled or objects
have fallen into the apparatus, the apparatus
has been exposed to rain or moisture, does
not operate normally, or has been dropped.
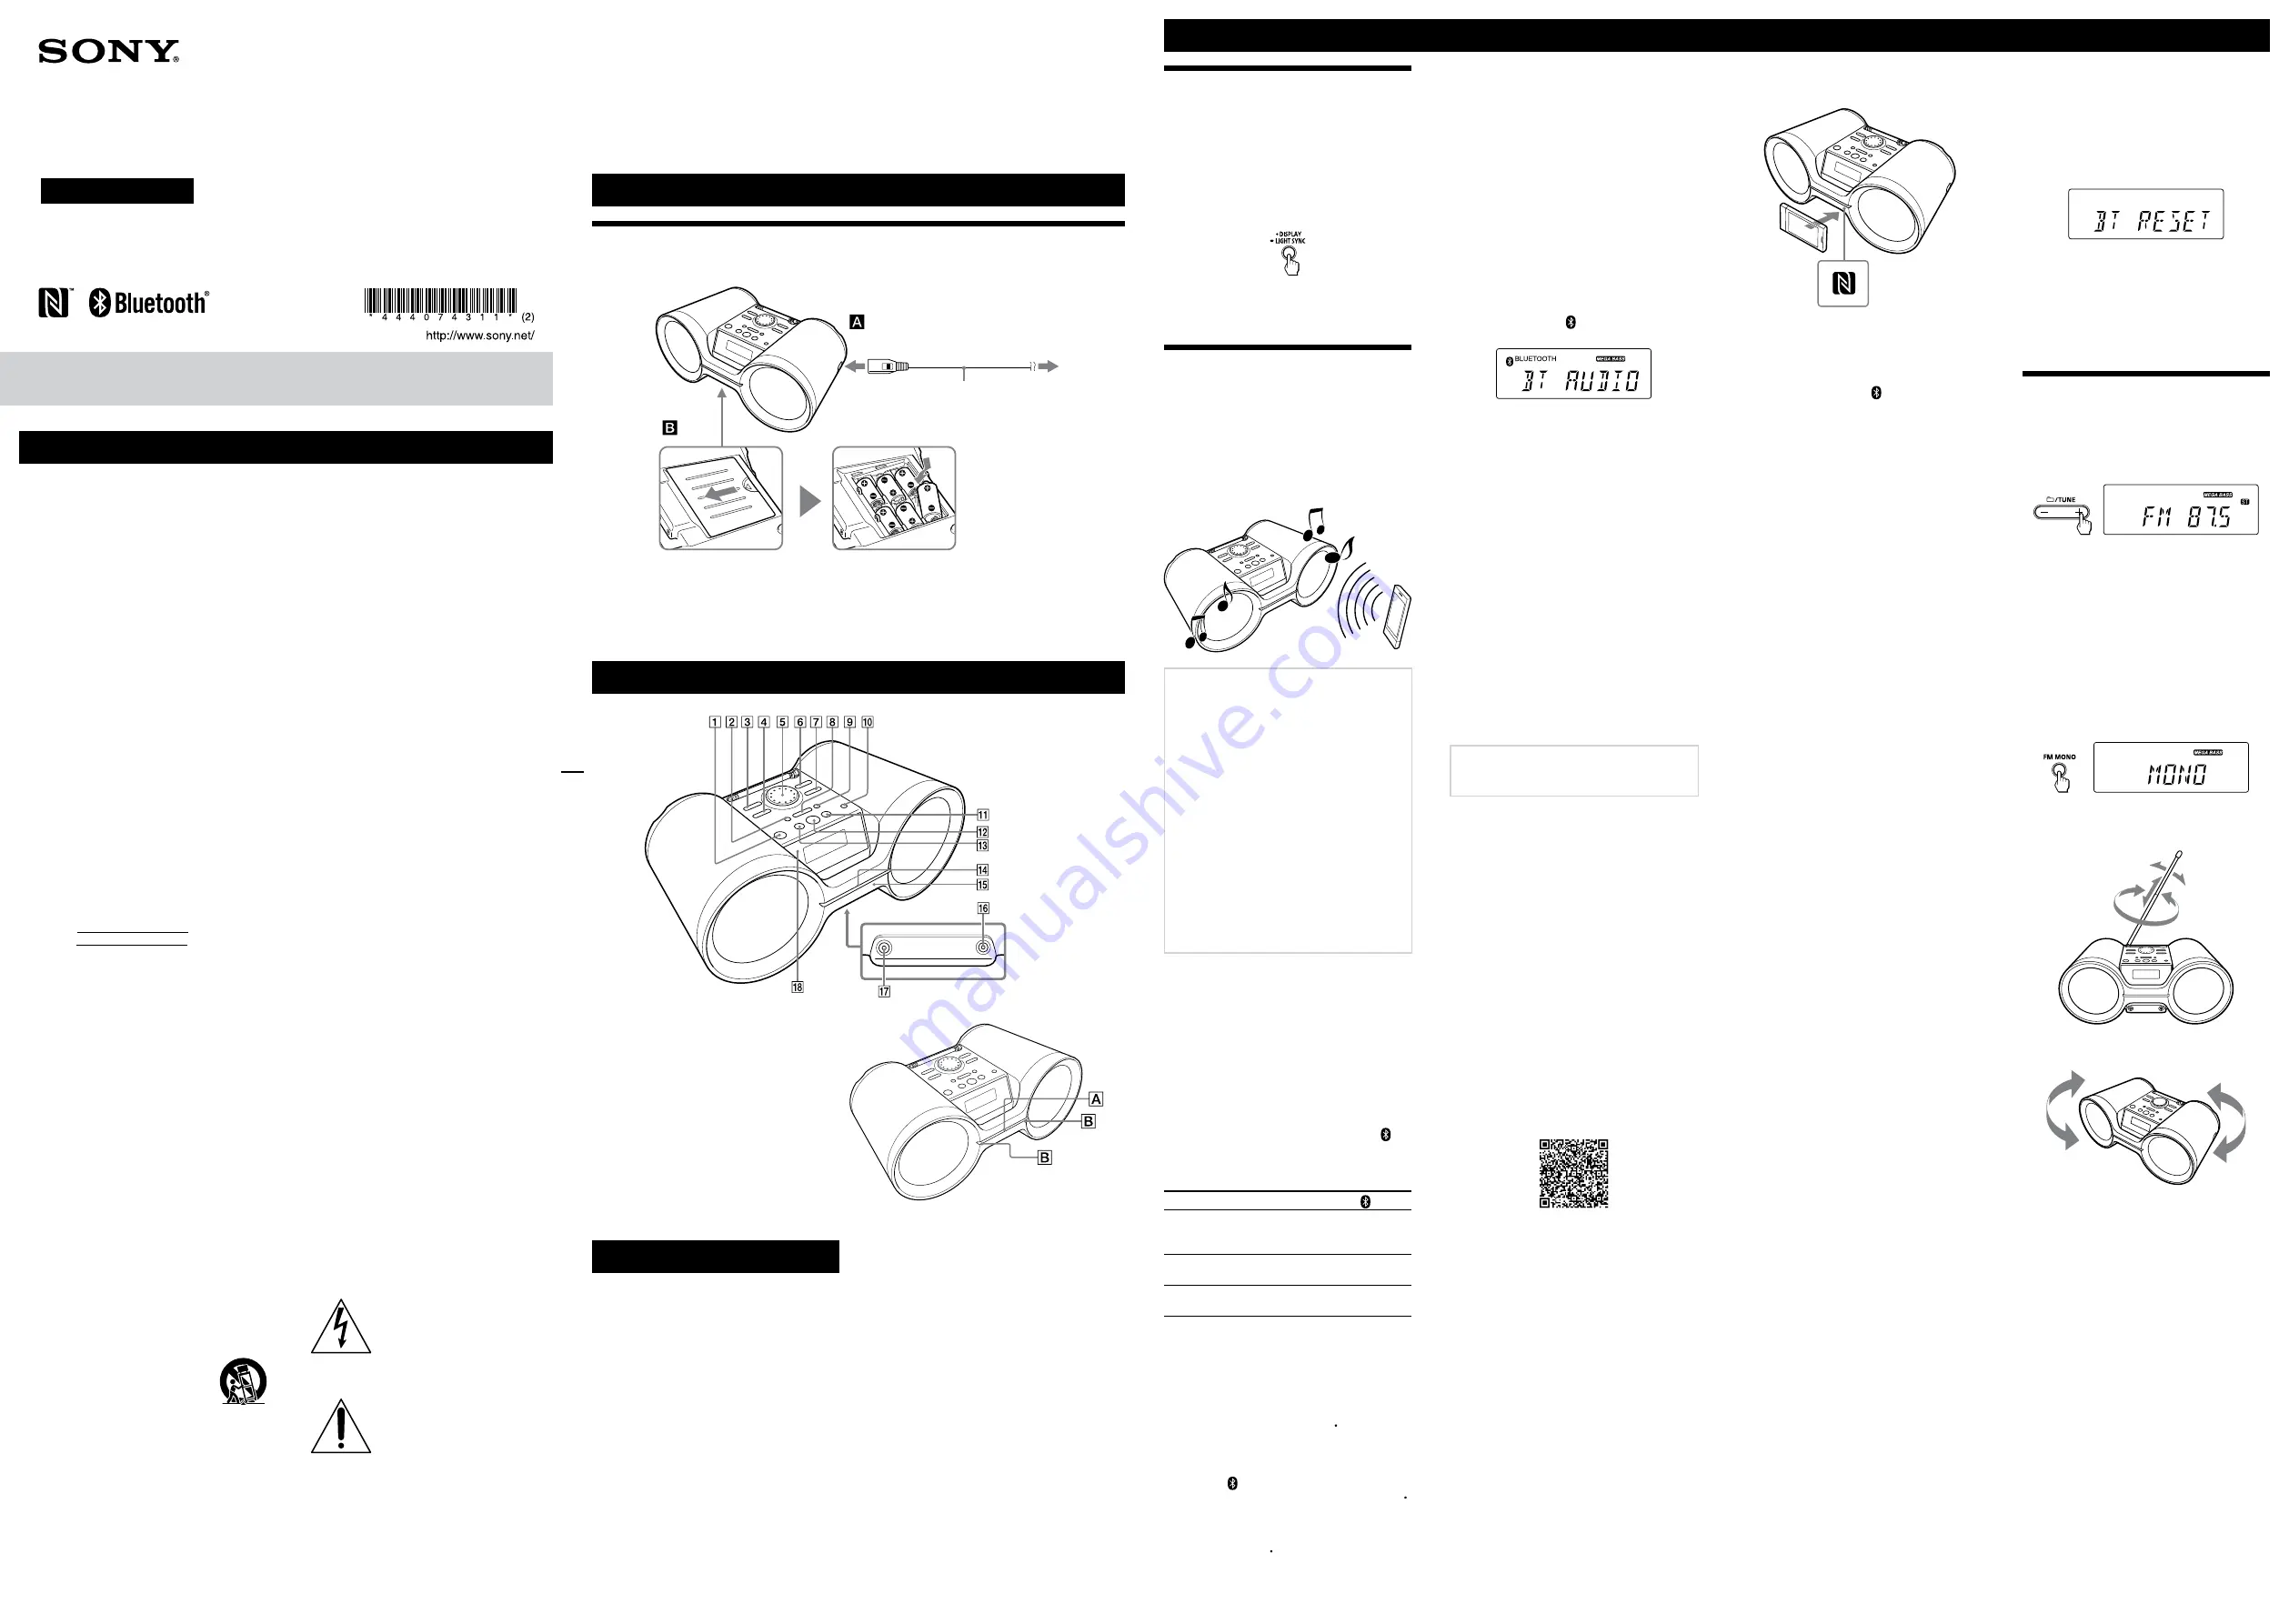
Power Sources
Using the AC power cord
Connect the AC power cord
, or insert six R14 (size C) batteries (not supplied) into the battery
compartment
.
To a wall outlet
To AC IN
AC power cord
(supplied)
Notes
Replace the batteries when the OPR/BATT indicator
dims, or when the unit becomes inoperable. Replace all
the batteries with new ones. Before you replace the batteries, be sure to disconnect any optional component
from the unit.
To use the unit on batteries, disconnect the AC power cord from the unit and the wall outlet.
Location of Controls
*
/ENTER
has a
tactile dot.
Illumination
The illumination on the handle has the
following two features.
Indication of function change (
)
When you switch to one of four functions, the
illumination increases in intensity to notify
the user of function change. The illumination
is blue for Bluetooth and white for other
functions.
Lighting effects for audio output (
)
Lighting effects, in red, are created that
synchronize with the music source. You can
turn this function on or off as desired (See
“Turning off the light sync function”).
Turning off the light sync
function
The light sync function of this unit creates
lighting effects that synchronize with the music
source. By default, this function is on but you can
turn it off as desired.
Press LIGHT SYNC
until “LIGHT SYNC OFF”
appears on the display.
To turn on the function, press the button again
until “LIGHT SYNC ON” appears while a music
source is being output in any function.
Listening to music wirelessly
on a Bluetooth device
Using the Bluetooth connection, you can listen to
music from wirelessly connected Bluetooth
devices such as mobile phones, smartphones,
music players, etc.
This unit supports non-NFC compatible
Bluetooth devices (hereafter “Bluetooth
device(s)”) and NFC-compatible smartphones.
Compatible Bluetooth devices
Compatibility requirements for the devices are as
follows. Before using with this unit, check that
your device meets the requirements.
Devices must conform to Bluetooth
Standard version 3.0.
Devices must support A2DP (Advanced
Audio Distribution Profile) and AVRCP
(Audio/Video Remote Control Profile).
NFC capability (required only when using
the NFC pairing function of the unit).
For the latest information on compatible
Bluetooth devices, including NFC-compatible
smartphones, check the website below.
For customers in the U.S.A.:
http://www.esupport.sony.com/
For customers in Canada:
(English)
http://www.sony.ca/ElectronicsSupport/
(French)
http://fr.sony.ca/ElectronicsSupport/
Pairing
Bluetooth devices must be “paired” with each
other beforehand. Once Bluetooth devices are
paired, there is no need for pairing again, unless
pairing information is cleared. With this unit, up
to 9 Bluetooth devices can be paired.
If your device is an NFC-compatible smartphone,
the manual pairing procedure is not necessary.
Use the smartphone with this unit along with the
procedures described under “To connect with a
smartphone by one touch (NFC).”
When using the Bluetooth function, pay
attention to the Bluetooth status indicator ( ) on
the display, which tells you the network status
between the unit and your device.
Indications for the Bluetooth function
Status
Bluetooth indicator ( )
Bluetooth
connection is
off
Off
Pairing or
communicating
Flashes
Connection is
established
Constantly on
To pair with a Bluetooth device
Keep the Bluetooth device and the unit within 1
meter (39
3
/
8
in) of each other for this operation.
1
Press BLUETOOTH
to turn on the
Bluetooth function.
2
Press and hold BLUETOOTH PAIRING
to activate the pairing mode of the unit.
When pairing mode is activated, a
double-beep will sound and the Bluetooth
indicator ( ) will flash on the display.
If activation fails, press and hold BLUETOOTH
PAIRING
again, and try to activate the
pairing mode again.
To cancel the pairing mode after activation,
press BLUETOOTH PAIRING
at least 2
seconds.
3
Perform the pairing procedure on the
Bluetooth device.
Turn on the Bluetooth device and activate the
Bluetooth function on your device. For details,
refer to the instruction manual of your
Bluetooth device.
When the Bluetooth function of your device is
activated, your device will search for pairable
devices and display a list of detected devices
on the device display. Select this unit from the
list. This unit appears as “ZS-BTY50/52/55.”
If “ZS-BTY50/52/55” is not displayed, repeat
the procedure from step 2.
If a passcode is required
Some Bluetooth devices may require a 4-digit
passcode. If your device requires the
passcode, enter “0000.”
When pairing of the device is completed and
the Bluetooth connection is established, the
Bluetooth indicator ( ) stops flashing and “BT
AUDIO” appears on the display.
If you want to pair with another Bluetooth
device, repeat steps 1 to 3.
Notes on pairing with a Bluetooth device
If you turn off the unit or power off the Bluetooth
device before the Bluetooth connection is
established, pairing information will not be stored,
and pairing will not be completed.
Pairing mode is canceled after about 5 minutes. If
pairing mode is canceled halfway, start over from
step 2.
The operation and display may differ depending
on the Bluetooth device or the version of
Bluetooth software installed.
“Passcode” may be called “Passkey,” “PIN code,”
“PIN number” or “Password,” etc., depending on
the Bluetooth device. For details on the passcode,
refer to the
instruction manual
of your device.
To connect with a smartphone by one
touch (NFC)
By touching the unit with an NFC-compatible
smartphone, the unit is turned on automatically,
and then proceeds to complete pairing and the
Bluetooth connection automatically.
Compatible smartphones
Smartphones with a built-in NFC function
(OS: Android 2.3.3 or later, excluding Android 3.x)
What is “NFC”?
NFC (Near Field Communication) is a technology
enabling short-range wireless communication
between various devices, such as mobile phones
and IC tags. Thanks to the NFC function, data
communication can be achieved easily just by
touching the designated touchpoint on the
NFC-compatible devices.
1
Download and install the app “NFC Easy
Connect.”
“NFC Easy Connect” is a free app for Android
smartphones that can be obtained on Google
Play. Search for the app using the keyword
“NFC Easy Connect” on the site, or access the
download site directly by reading the
two-dimensional code below.
Note that “NFC Easy Connect” is free but data
communication fees when downloading are
charged separately.
Two-dimensional code* for direct access
* Use a two-dimensional code reader app.
Note
The App may not be available in some countries
and/or regions.
2
Start the app “NFC Easy Connect” on the
smartphone.
Make sure that the application screen is
displayed.
3
Touch the smartphone to the N-marked
part
of the unit until the smartphone
vibrates.
Vibration cue is provided
when the smartphone is
recognized by the unit.
After being recognized by the unit, follow the
on-screen instructions displayed on the
smartphone, and complete the procedure for
Bluetooth connection.
When the Bluetooth connection is established,
the Bluetooth indicator ( ) stops flashing and
the message “BT AUDIO” appears on the
display.
Tip
If pairing and the Bluetooth connection fail, do the
following.
Relaunch “NFC Easy Connect” and move the
smartphone slowly over the N-marked part
.
Remove the case from the smartphone if
using a commercially available smartphone
case.
To listen to audio
Keep the Bluetooth device (or NFC-compatible
smartphone) and the unit within 10 meters
(393
3
/
4 in
) of each other, and check the
following before operation.
The Bluetooth function of the device is
activated.
Pairing and the Bluetooth connection are
completed correctly. If not, perform the pairing
procedure beforehand. (See “To pair with a
Bluetooth device” or “To connect with a
smartphone by one touch (NFC)”).
Ą
For a Bluetooth device
1
Press BLUETOOTH
to turn on the
Bluetooth function.
The last connected device will be connected
automatically.
2
Start playback of an audio source such as
music, videos, games, etc., on the device.
Refer to the instruction manual of your device
for details on playback operations.
Ą
For an NFC-compatible smartphone
Start playback of an audio source such as music,
videos, games, etc., on the smartphone.
Refer to the instruction manual of your
smartphone for details on playback operations.
Note
The Bluetooth function turns off when:
you press POWER
to turn off the unit.
you switch to a function other than Bluetooth
function.
Tip
If the volume level is low, adjust the volume of the
unit first. If the volume level is still too low, adjust
the volume level on the connected Bluetooth device
or the smartphone.
Tip for the Bluetooth devices
If the last connected device does not connect
automatically, reselect the Bluetooth function by
pressing BLUETOOTH
after POWER
, FM
, AM
or AUDIO IN
is pressed. If it still does not
connect, select the model name of this unit from the
device list (perform step 3 in “To pair with a
To terminate a Bluetooth connection
You can terminate the Bluetooth connection
using any of the following operations.
Ą
For a Bluetooth device
Turn off the unit.
Turn off the device.
Press POWER
, FM
, AM
or AUDIO IN
.
Disable the Bluetooth function on the device.
Ą
For an NFC-compatible smartphone
Touch the smartphone to the N-marked part
again.
Turn off the unit.
Turn off the device.
Press POWER
, FM
, AM
or AUDIO IN
.
Disable the Bluetooth function on the
smartphone.
To clear the paired device
information stored in the unit
1
Press BLUETOOTH
to turn on the
Bluetooth function.
2
Press FM MONO
, DISPLAY
and
TUNE
at the same time.
“BT RESET” appears on the display.
3
Press ENTER
to reset and clear the
paired device information.
When the paired device information is cleared,
“COMPLETE” appears on the display.
To cancel this reset operation, press FM MONO
, DISPLAY
and TUNE
again before
pressing ENTER
.
Listening to the radio
1
Press FM
or AM
to select the band.
2
Press and hold TUNE + or
until the
frequency digits begin to change on the
display.
The unit automatically scans the radio
frequencies and stops when it finds a clear
station.
If you cannot tune to a station using the
automatic tuning mode, press TUNE + or
repeatedly to change the frequency step by
step.
When an FM stereo broadcast is received, “ST”
lights up on the display.
Tip
If the stereo FM reception is noisy, press FM MONO
until “MONO” appears on the display. You will
lose the stereo effect, but the broadcast will
improve.
To improve radio reception
Reorient the antenna to improve FM reception.
Reorient the unit itself to improve AM
reception.
Before Using the Unit
To turn the power on or off
Press POWER
. You can also turn on the power
of this unit using the direct power-on function
(below).
In this manual, operations are mainly explained
using the direct power-on function.
To use the direct power-on function
Press BLUETOOTH
, FM
, AM
or AUDIO IN
while the unit is turned off. The power turns
on directly in the selected function.
To adjust the volume
Turn VOLUME control
clockwise (+) or counter
clockwise (
).
The volume level of this unit is adjustable in
steps from 0 to 31. For the 31st step, “VOL MAX” is
displayed.
To listen through headphones
Connect headphones to the
(headphones) jack
.
To reinforce the bass
Press MEGA BASS
.
“MEGA BASS” lights up on the display.
To return to normal sound, press the button
again.
Notice for the customers in
Canada
This device complies with Industry Canada
licence-exempt RSS standard(s).
Operation is subject to the following two
conditions: (1) this device may not cause
interference, and (2) this device must accept any
interference, including interference that may
cause undesired operation of the device.
Under Industry Canada regulations, this radio
transmitter may only operate using an antenna
of a type and maximum (or lesser) gain approved
for the transmitter by Industry Canada. To reduce
potential radio interference to other users, the
antenna type and its gain should be so chosen
that the equivalent isotropically radiated power
(e.i.r.p.) is not more than that necessary for
successful communication.


