background image

7

Overview / Features

Overview

The XDCU-50 HD Camera Extension Unit (called “the 
unit” below) can be combined with a camcorder fitted with 
a XDCA-53 or XDCA-55 HD Camera Adaptor and 
equipment such as a remote control unit to configure a 
recording and long-distance transmission system. The 
maximum transmission distance is 100 m (328 feet). (In 
this manual, a system that includes this unit is called “this 
system”.)

The following table lists the camcorder/camera adaptor 
combinations that can be used in the system.

a) An optional CBK-CE01 50 Pin Interface and Digital Extender is required.
b) An optional CBK-HD02 SDI/COMPOSITE Input and 50 Pin Interface is 

required.

Before transmission, this unit can perform format 
conversion of video signals received from the camcorder 
via the camera adaptor. You can also supply power to the 
camcorder from this unit, by connecting this unit and the 
camera adaptor with a special power cable (CCZ-A cable).

Features

HD digital transmission

This unit supports bidirectional transmission of 
uncompressed HD digital signals between this unit and a 
camera adaptor.
The maximum transmission distance is 100 m (328 feet). 
You can transmit high-quality video signals regardless of 
cable length.

Internal downconverter

You can convert HD signals received from the camera 
adaptor to SD output signals.

Internal upconverter

When return video is SD signals, you can upconvert it to 
HD signals for transmission to the camera adaptor.

External sync signals

You can genlock this unit to sync signals input from an 
external device.
As the external sync signals, you can use either HD 
tri-level sync or SD sync signals (black burst).

Communication and control interfaces

• Intercom
• Tally (red and green)
• Trunk line (one line)
• Remote control line

Rack mountable

You can mount this unit in an EIA standard 19-inch rack.

Camcorder

Camera adaptor

PMW-EX3

XDCA-53

PMW-350K/350L

a)

XDCA-55

PMW-320K/320L

a)

PMW-500

b)

Summary of Contents for XDCU-50

Page 1: ...HD Camera Extension Unit Operating Instructions Before operating the unit please read this manual thoroughly and retain it for future reference XDCU 50 4 260 666 11 1 2010 Sony Corporation 4260666110 ...

Page 2: ...rate normally or has been dropped Attention when the product is installed in Rack 1 Prevention against overloading of branch circuit When this product is installed in a rack and is supplied power from an outlet on the rack please make sure that the rack does not overload the supply circuit 2 Providing protective earth When this product is installed in a rack and is supplied power from an outlet on...

Page 3: ...ceive power from this unit must not exceed 70 W For kundene i Norge Dette utstyret kan kobles til et IT strømfordelingssystem Suomessa asuville asiakkaille Laite on liitettävä suojamaadoituskoskettimilla varustettuun pistorasiaan For kundene i Norge Apparatet må tilkoples jordet stikkontakt För kunderna i Sverige Apparaten skall anslutas till jordat uttag For the customers in the U S A This equipm...

Page 4: ...NMB 003 du Canada Pour les clients en Europe Ce produit portant la marque CE est conforme à la Directive sur la compatibilité électromagnétique EMC émise par la Commission de la Communauté européenne La conformité à cette directive implique la conformité aux normes européennes suivantes EN55103 1 Interférences électromagnétiques émission EN55103 2 Sensibilité électromagnétique immunité Ce produit ...

Page 5: ...ommission Angewandte Normen EN55103 1 Elektromagnetische Verträglichkeit Störaussendung EN55103 2 Elektromagnetische Verträglichkeit Störfestigkeit Für die folgenden elektromagnetischen Umgebungen E1 Wohnbereich E2 kommerzieller und in beschränktem Maße industrieller Bereich E3 Stadtbereich im Freien und E4 kontrollierter EMV Bereich z B Fernsehstudio Der Hersteller dieses Produkts ist Sony Corpor...

Page 6: ...onnections 17 Attaching Rack Mount Brackets 18 Exchanging the Number Plate of the Tally Lamp 18 Starting the System 19 Setting the System Format 19 Genlocking the System 20 Appendix 21 Return Video Signal Input and Output 21 Switching the Monitor Output of the XDCA 55 XDCA 53 21 Alarms when the XDCA 55 is used 21 Important Notes on Operation 22 Specifications 23 General 23 Connectors 23 Supplied A...

Page 7: ...ecting this unit and the camera adaptor with a special power cable CCZ A cable Features HD digital transmission This unit supports bidirectional transmission of uncompressed HD digital signals between this unit and a camera adaptor The maximum transmission distance is 100 m 328 feet You can transmit high quality video signals regardless of cable length Internal downconverter You can convert HD sig...

Page 8: ...e Reader are trademarks of Adobe Systems Incorporated in the United States and or other countries To read the documents Do the following 1 Insert the CD ROM in your CD ROM drive A cover page appears automatically in your browser If it does not appear automatically in the browser double click on the index htm file on the CD ROM 2 Select and click on the manual that you wish to read This opens the P...

Page 9: ...cable max 100 m 328 feet CCZ A cable max 100 m 328 feet XLR 5 pin cable 8 pin cable Intercom headset Intercom headset VCT U14 Tripod adaptor Portable camera tripod Video monitor DXF C50W 51 Viewfinder PMW EX3 with the XDCA 53 attached optional camcorder support To switcher RM B150 B750 Remote control unit RCP 700 900 series Remote control panel BNC cable max 100 m 328 feet CCZ A cable max 100 m 32...

Page 10: ...stem Configurations To check return video signals on the PMW EX3 you must mount a monitor on the PMW EX3 or XDCA 53 For information about mountable monitors contact your dealer or a Sony service representative Note ...

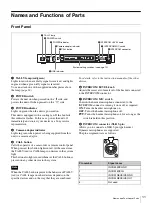
Page 11: ... red whenever the CALL button is pressed on any other device in the system When the CALL button is pressed the behavior of TALLY red or CALL lamps on other devices depends on the specific devices and on the way that they are combined For details refer to the instruction manuals of the other devices f INTERCOM LEVEL knob Adjusts the receiver volume level of the headset connected to the INTERCOM con...

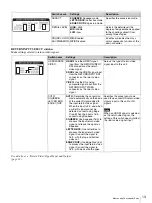
Page 12: ...I connectors and to SD analog composite signals output from the VIDEO OUTPUT and REMOTE connectors The settings of these switches do not affect the signals output from the OUTPUT SDI connectors when those signals are HDSDI signals Front cover Front cover attachment screws Switch name Settings Description 1080i 720p 1080i Interlace mode 1080 lines 720p Progressive mode 720 lines Sets the number of ...

Page 13: ...he SD analog composite signal input from the RETURN INPUT VIDEO connector as the return video signal Selects the type of return video signal input to this unit AUTO SQUEEZE LETTER BOX EDGE CROP AUTO Determine the conversion mode automatically on the basis of the wide ID signal added to the input return video signal When the input is 4 3 and when a wide ID signal cannot be detected convert using Ed...

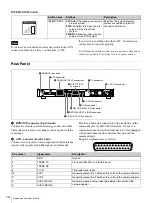
Page 14: ...with general purpose lines between this unit and the camera adaptor The pin assignments are as follows Switch name Settings Description INTERCOM IF 4W Select this when you are using a 4 wire system 2W C C Select this when you are using a 2 wire Clear Com system 2W RTS Select this when you are using a 2 wire RTS system Specifies the type of intercom system connected to the AUX connector of this uni...

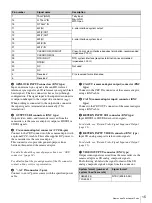
Page 15: ...tor output connector BNC type Connect to the CEU IN connector of the camera adaptor using a BNC cable h CA IN camera adaptor input connector BNC type Connect to the CEU OUT connector of the camera adaptor using a BNC cable i RETURN INPUT SDI connector BNC type Input HDSDI or SDSDI return video signals For details see Return Video Signal Input and Output page 21 j RETURN INPUT VIDEO connector BNC t...

Page 16: ...ctor and the video output pin of the REMOTE connector and the SDSDI signals output from the OUTPUT SDI connector are SD signals that have been internally down converted from HD signals by this unit 1080 50i PAL 625 50i 720 50P System format number of system lines frame rate Signal format ...

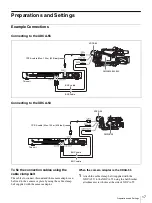
Page 17: ...can be fixed to the camera or plate by using the cable clamp belt supplied with the camera adaptor When the camera adaptor is the XDCA 55 1 Attach the cable clamp belt supplied with the XDCA 55 to the XDCA 55 using the belt bracket attachment screw holes at the side of XDCA 55 XDCA 55 CCZ A cable Max 100 m 328 feet BNC cable PMW 320 350 500 BNC cable This unit XDCA 53 CCZ A cable Max 100 m 328 fee...

Page 18: ...ameters of the cables Attaching Rack Mount Brackets You can attach the supplied rack mount brackets and mount this unit on a rack This allows other devices to be mounted above and below this unit without impeding adequate heat dissipation Exchanging the Number Plate of the Tally Lamp Using a flat blade screwdriver you can exchange the TALLY lamp number plate as shown in the figure below Belt brack...

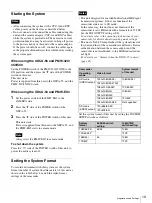
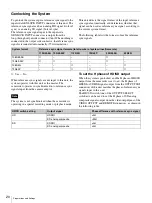
Page 19: ...ire sytem off Setting the System Format To record and transmit with this system set the system format number of system lines frame rate of this unit as shown in the table below to match the video format settings of the camcorder This unit designed for use with bi directional HD digital transmission systems It does not function if the camcorder side is set to SD mode In the same way this unit does ...

Page 20: ...nit as the master The camcorder operates in synchronization to reference sync signals input from the camera adaptor The system is not synchronized when the camcorder is operating in a special recording mode or playback mode To set the H phase of HD SD output When the system is genlocked and the H phase of HD SD output from the camcorder is set to 0 the H phase of HDSDI or SDHDI signals output from...

Page 21: ...ynchronizer of this unit Switching the Monitor Output of the XDCA 55 XDCA 53 The monitor output from the MONITOR OUT SDI connector of the XDCA 55 or MONITOR OUT connector and MONI OUT SDI connector of the XDCA 53 can be switched between return video signals sent from this unit and the shooting or playback signals sent from the camcorder The monitor output from the XDCA 55 53 is switched as shown i...

Page 22: ...to rain Locations subject to violent vibration Near strong magnetic fields Close to radio or TV transmitters producing strong electromagnetic fields In direct sunlight or close to heaters for extended periods Do not subject to strong shocks Do not drop the unit or subject it to strong shocks The unit may be damaged Do not wrap in a cloth or other covering during operation Internal temperatures may...

Page 23: ... p sync negative 75 Ω unbalanced OUTPUT SDI BNC type 1 each 0 8 Vp p 75 Ω Camera adaptor input output connectors CA IN OUT BNC type 1 each 0 8 Vp p 75 Ω CA CCZ 26 pin 1 male Other connectors INTERCOM XLR 5 pin 1 female AUX D sub 25 pin 1 female REMOTE 8 pin round 1 female Supplied Accessories Operating Instructions Japanese 1 English 1 CD ROM 1 Rack mount brackets 2 Rack mount bracket attachment s...

Page 24: ...Printed in China ...
Reviews: