background image

Mounting the Lens

41

Cha

p

te

r 2  

P

rep
ar

at

ions

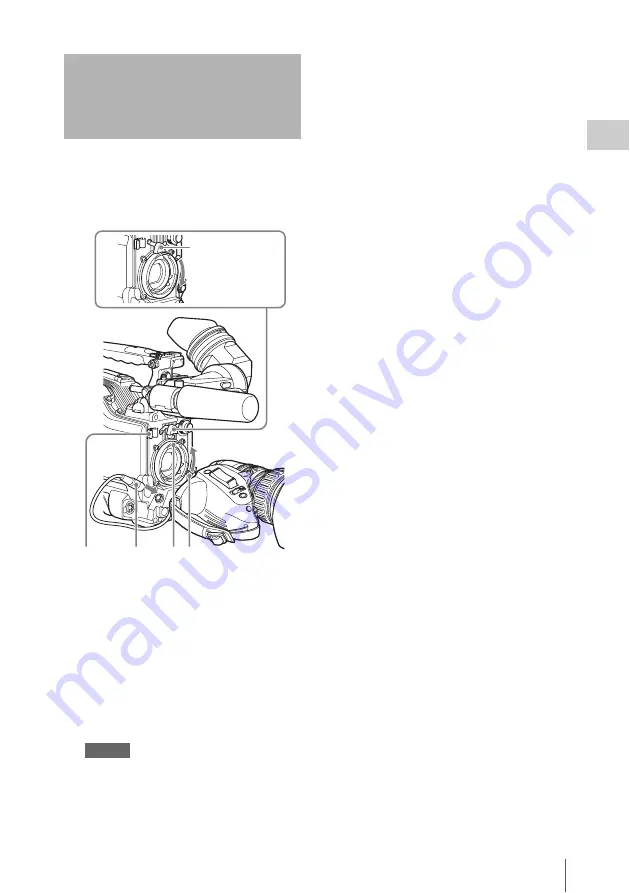
First power off the camcorder, and then mount the 
lens using the following procedure.

For information about using the lens, refer to the 
operation manual for the lens.

1

Push the lens locking lever up and 
remove the lens mount cap from the 
lens mount.

2

Align the center pin on the lens with the 
center slot in the lens mount, and insert 
the lens into the mount.

3

Holding the lens in place, push the lens 
locking lever down to lock the lens.

Caution

If the lens is not firmly locked, it may come off 
while the camcorder is being used. This could cause 
a serious accident. Make sure the lens is firmly 
locked. It is recommended that the lens mount 

securing rubber be put on the lens locking lever as 
illustrated above.

4

Connect the lens cable to the LENS 
connector.

5

Secure the lens cable with the cable 
clamps.

Mounting the Lens

3

1

2

4

5

Lens mount 
securing rubber

Summary of Contents for XDCAM PDW-850

Page 1: ...PROFESSIONAL DISC CAMCORDER PDW 850 OPERATION MANUAL English 1st Edition ...

Page 2: ...200 C35W C30WR 34 Adjusting the viewfinder position 35 Moving the viewfinder shoe up 35 Using the BKW 401 Viewfinder Rotation Bracket 36 Detaching the eyepiece 37 Adjusting the viewfinder focus and screen 37 Setting the Area of Use 38 Setting the Date Time of the Internal Clock 39 Mounting the Lens 41 Adjusting the Flange Focal Length 42 Preparing the Audio Input System 43 Connecting a microphone ...

Page 3: ...ng the Reference Value for Automatic Iris Adjustment 64 Adjusting the Audio Level 66 Manually adjusting the audio levels of the audio inputs from the AUDIO IN CH1 CH2 connectors 66 Manually adjusting the audio level of the MIC IN connector 67 Recording audio on channels 3 and 4 67 Setting Time Data 69 Setting the timecode 69 Setting the user bits 69 Synchronizing the timecode 70 Chapter 4 Shooting...

Page 4: ...ing planning metadata 96 Recording video from external devices 98 Using the Live Logging function 99 Recording proxy data 100 Obtaining GPS location information 103 Chapter 5 Operations in GUI Screens Overview 105 Switching between GUI screens 105 Information and controls in thumbnail screens 107 Displaying menus 110 GUI screen operations 114 Thumbnail Operations 115 Selecting thumbnails 115 Searc...

Page 5: ... menu 187 DIAGNOSIS menu 191 Menu Operations 193 Displaying menus 193 Basic menu operations 193 Using the USER menu example menu operation 196 Editing the USER menu 197 Resetting USER menu settings to the standard settings 200 Setting the Status Display on the Viewfinder Screen and the LCD Monitor 201 Selecting the display items 201 Change confirmation adjustment progress messages 203 Setting the ...

Page 6: ...ding Scene Files 223 Saving a scene file 223 Loading scene files 225 Returning the scene file settings to the standard settings 226 Jumping to a File Related Menu Page when Connecting a USB Flash Drive 226 Chapter 8 File Operations Overview 228 Directory structure 228 File operation restrictions 229 FTP File Operations 233 Making FTP connections 234 Command list 235 Recording Continuous Timecode v...

Page 7: ...tion 260 Supplied accessories 261 Additional equipment 261 Chart of Optional Components and Accessories 263 List of Supported USB Keyboards 264 Recommended USB Flash Drives As of April 2014 267 Trademarks and Licenses 267 MPEG 4 Visual Patent Portfolio License 267 MPEG 2 Video Patent Portfolio License 268 About IJG Independent JPEG Group 268 Character display software iType 268 About libupnp 268 A...

Page 8: ...he region of use Unless this setting is made the unit will not operate For details of these settings see Setting the Area of Use page 38 Note Before attaching removing optional components or accessories to from the camcorder be sure to turn the power of the camcorder off Before Using the Unit ...

Page 9: ...stems A multi format conversion function enables up and down conversion between SD and HD and cross conversion between 1080 and 720 Squeeze or edge cropping can be selected as the aspect pattern in up and down conversion between SD and HD Note It is not possible to combine material recorded in different frame frequency groups on single disc see page 54 Recording of more than 90 minutes of high qua...

Page 10: ...tter function A maximum of 16 frames can be accumulated using the slow shutter function In low light levels this allows clear and noiseless video to be shot and provides a fantasy video effect with ghost images Time lapse function interval recording Using this function slow moving subjects can be shot with the movement compressed in time This is convenient for many applications such as monitoring ...

Page 11: ...ware downloads When the unit is used with a PC connection download device drivers plug ins and application software where applicable from the Sony Professional products web site Sony Professional products and solutions site homepage U S A http pro sony com Canada http www sonybiz ca Latin America http sonypro latin com Europe Middle East and Africa http www pro sony eu Japan http www sonybsc com A...

Page 12: ... about how to attach the battery or AC adaptor see Preparing a Power Supply page 33 For information about attaching a synthesized tuner see Attaching a UHF portable tuner for a UHF wireless microphone system page 45 Note For your safety and to ensure proper operation of the camcorder Sony recommends the use of the following battery packs BP L80S and BP FL75 a Shoulder strap fitting Attach the supp...

Page 13: ...ted see page 48 l Lens cable clamp Clamp a lens cable m MIC IN microphone input 48 V connector XLR type 5 pin female Connect a stereo microphone to this connector The power 48 V is supplied via this connector n LENS connector 12 pin Connect a lens cable to this connector Note When connecting the lens cable to this connector power off this unit first o Tripod mount When using the unit on a tripod a...

Page 14: ...EARPHONE jack monaural minijack You can monitor the E E 1 sound during recording and playback sound during playback When an alarm is indicated you can hear the alarm sound through the earphone You can use this with the EARPHONE jack on the rear of the unit at the same time Plugging an earphone into the jack automatically cuts off the built in speaker 1 E E Abbreviation of Electric to Electric In E...

Page 15: ... item on the AUDIO 1 page of the MAINTENANCE menu is set to SET the alarm tone is audible even when this volume control is at the minimum position d MONITOR monitor volume adjustment knob Controls the volume of the sound other than the warning tone that is output via the built in speaker or optional earphones When the knob is turned to the minimum position no sound can be heard e MONITOR audio mon...

Page 16: ...ive in the following cases Shooting people in the shade on a sunny day Shooting a subject indoors against a background through a window Any high contrast scene i WHITE BAL white balance memory switch Controls adjustment of the white balance PRST Adjusts the color temperature to the preset value the factory default setting 3200K Use this setting when you have no time to adjust the white balance A o...

Page 17: ...p to this position again cancels the previous settings or resets the settings to their initial values ESCAPE Use this switch when the menu page which has a hierarchical structure is opened Each time the switch is flicked to this position the page returns to one stage higher in the hierarchy m Cover Right side near the rear a Built in speaker The speaker can be used to monitor E E sound during reco...

Page 18: ... the first frame of the current clip During the jump the F REV indicator flashes If you press this together with the F REV button the jump is to the first frame of the first recorded clip on the disc l STOP button Press this button to stop disc playback m NEXT button This jumps to the first frame of the next clip During the jump the F FWD indicator flashes If you press this together with the F FWD...

Page 19: ...e sequence COUNTER TC and U BIT COUNTER Display the elapsed recording playback time hours minutes seconds frames TC Display timecode U BIT Display user bit data For details see Status display on the LCD monitor page 19 r BRIGHT brightness button Switches the brightness of the LCD monitor backlight Each press of the button selects the next setting in the order shown in the following table Status di...

Page 20: ...de is displayed in the format shown below When the HOLD CHAPTER button is pressed again to release the hold the timecode is displayed in the normal format h Warning indicator area Displays warnings when trouble with recording or moisture condensation occurs For details see Operation Warnings page 246 Also when it is possible to set clip names by using planning metadata see page 96 displays as clip...

Page 21: ... minutes DISC E x x x x x x x B 5 to 10 minutes DISC E x x x x x x x B 2 to 5 minutes DISC E x x x x x x x B flashing 0 to 2 minutes DISC E x x x x x x x B flashing 0 minutes Indication Battery voltage BP L90A L60S L80S Other batteries a BATT E x x x x x x x F 15 5 V or more 17 0 V or more BATT E x x x x x x x F 15 1 to 15 5 V 16 0 to 17 0 V BATT E x x x x x x x F 14 6 to 15 1 V 15 0 to 16 0 V BAT...

Page 22: ...g state of the VDR Use this setting when synchronizing the timecode with an external timecode SET Sets the timecode or user bits R RUN Timecode advances only during recording Use this setting to have a consecutive timecode on the disc For details see Setting the timecode page 69 and Setting the user bits page 69 f LEVEL CH 1 CH 2 audio channel 1 2 recording level knobs Adjusts the audio levels to ...

Page 23: ...the MIC IN connector R REAR Audio input signals from an audio device connected to the AUDIO IN CH1 CH2 connectors W WIRELESS Audio input signals from the UHF portable tuner not supplied if it is installed Left side and upper section a ASSIGNABLE 3 4 switches You can assign the desired functions to these switches on the ASSIGNABLE SW page of the OPERATION menu Nothing is assigned to these switches ...

Page 24: ...e OUTPUT 1 page of the OPERATION menu If the output signal is set to one of R G or B then this setting changes to HD Y when the camcorder is powered off and on again Depending on menu settings menus timecode and shot data can be superimposed on the image on the monitor This connector can also be used to synchronize the timecode of an external VTR with the timecode of the camcorder g TC OUT timecod...

Page 25: ...ne to use an external power supply OFF For a microphone to use an internal power supply g REMOTE connector 8 pin Connect an RM B170 B750 remote control unit which makes it possible to control the camcorder remotely Note Before connecting disconnecting the Remote Control Unit to from the camcorder be sure to turn off the camcorder POWER switch h SDI OUT 1 connector BNC type Outputs an HDSDI or SDSD...

Page 26: ... the viewfinder h PEAKING control Turning this control clockwise adjusts the picture sharpness and makes focusing easier This control has no effect on the output signals of the camcorder i CONTRAST control Adjusts the contrast of the screen This control has no effect on the output signals of the camcorder j BRIGHT control Adjusts the brightness of the screen This control has no effect on the outpu...

Page 27: ...g in the consecutive mode of Manual Interval Rec mode 4 flashes per second Set to the single shot mode of Manual Interval Rec mode or recording in that mode 2 flashes per second b BATT battery indicator This indicator starts flashing when the battery connected to the camcorder is nearly exhausted and stays lit when the battery is completely exhausted To prevent interruption during operation replac...

Page 28: ...and adjustment progress messages see Change confirmation adjustment progress messages page 203 For details about marker display see Setting the marker display page 203 All items that can be displayed on the viewfinder screen are shown below Top of viewfinder screen a Color temperature Displays a color temperature calculated from the gain of R and B in the range 0 0 K to 99 9 K in steps of 0 1 K Th...

Page 29: ...to z A to Z The following symbols comma period colon semicolon _ Space f System frequency and frame rate During Slow Quick Motion shooting and playback displays the system frequency and the frame rate The frame is rounded to a 2 digit integer and displayed in brackets see page 88 This display does not appear during normal shooting and playback g Wireless microphone reception level When a UHF porta...

Page 30: ...rength 1 to 4 White segments light The number of white segments 1 to 4 indicates the reception signal level 1 to 4 When the optional CBK WA100 Wireless Adaptor is connected via USB the remaining media capacity on the CBK WA100 is displayed if Wi Fi ETHER_RM is set to RM or ALL on the CAM CONFIG 3 page of the MAINTENANCE menu n Wireless adaptor reception status Displays the reception status of the ...

Page 31: ...ppears to the right side of the ND filter display 1 to 4 f White balance memory Indicates the currently selected white balance automatic adjustment memory A Displayed when the WHITE BAL switch is set to A B Displayed when the WHITE BAL switch is set to B P Displayed when the WHITE BAL switch is set to PRST or when the preset button on an RM B170 has been pushed T Displayed when ATW is being used g...

Page 32: ...Remaining clips display Displays the remaining number of clips that can be recorded The display flashes once per second when the number of remaining clips is less than 10 n Iris setting auto iris override Indicates the F value iris setting of the lens Auto iris override is shown by an indicator made up of two segments each on the upper and lower sides For details see Changing the Reference Value f...

Page 33: ... charging procedure refer to the battery charger operation manual Note on using the battery pack A warm battery pack may not be able to be fully recharged To attach the battery pack 1 Press the battery pack against the back of the camcorder aligning the line on the side of the battery pack with the matching line on the camcorder 2 Slide the battery pack down until its LOCK arrow points at the matc...

Page 34: ...re Note The viewfinder is supplied separately Note When attaching the viewfinder make notes of the following points Be sure to the power off the camcorder before coupling the viewfinder connector to the camcorder s VF connector If you make this connection when the camcorder power is on the viewfinder may not function properly Couple the viewfinder connector firmly to the camcorder s VF connector I...

Page 35: ... right positioning ring and to adjust the front back position loosen the front to back positioning knob 1 Loosen the front to back viewfinder positioning levers and the front to back viewfinder positioning knobs and then pull the viewfinder slide assembly forward 2 Using a 2 5 mm diameter hexagonal wrench detach the viewfinder slide assembly and handle front cover Adjusting the viewfinder position...

Page 36: ...while you are carrying the camcorder 1 Carry out steps 1 and 2 of the previous section Moving the viewfinder shoe up to detach the viewfinder slide assembly 2 Attach the BKW 401 with the supplied bolts 3 Adjust the front to back position so that the arm of the BKW 401 does not touch the handle when it is raised Handle front cover Bolt with hexagonal hole Viewfinder slide assembly To attach the vie...

Page 37: ...end with the red marks on the eyepiece locking ring and the viewfinder barrel Then insert the eyepiece into the viewfinder barrel 3 Turn the eyepiece locking ring clockwise until its LOCK arrow points at the red mark on the viewfinder barrel When the eyecup is worn out replace it with a new one For details of a replacement eyecup contact a Sony service representative To adjust the viewfinder focus...

Page 38: ...area of use 1 Set the POWER switch to the ON position The screen for setting the area of use appears in the viewfinder 2 Press the MENU knob z on the left of NOT SELECTED changes to and you can now select the area of use 1 2 3 PEAKING CONTRAST BRIGHT TALLY HIGH LOW OFF ZEBRA ON MOMENT OFF DISPLAY ASPECT 1 PEAKING control 2 CONTRAST control 3 BRIGHT control Setting the Area of Use MENU knob POWER s...

Page 39: ...MENU knob to move b to the desired item 1 Display the TIME DATE page of the DIAGNOSIS menu and press the MENU knob For details on menu operations see Basic menu operations page 193 2 Press the MENU knob The TIME ADJUST setting window appears HOUR Sets the hour value MIN Sets the minutes value SEC Sets the seconds value YEAR Sets the year MONTH Sets the month DAY Sets the day 3 Turn the MENU knob t...

Page 40: ... discarded and the TIME DATE page of the DIAGNOSIS menu appears Note When you set the time also set TIME ZONE Set TIME ZONE on the UMID SET page of the OPERATION menu For details see Setting the UMID data page 218 Setting the Clock to GPS Time You can set the camcorder clock using clocks on GPS satellites Note The following actions are required on the camcorder in order to use this function GPS mu...

Page 41: ...in the lens mount and insert the lens into the mount 3 Holding the lens in place push the lens locking lever down to lock the lens Caution If the lens is not firmly locked it may come off while the camcorder is being used This could cause a serious accident Make sure the lens is firmly locked It is recommended that the lens mount securing rubber be put on the lens locking lever as illustrated abov...

Page 42: ...al 2 Open the iris Place the flange focal length adjustment chart about 3 m 10 ft away from the camera lit well enough to provide a satisfactory video output level 3 Loosen the fixing screws on the F f or F B ring flange focal length adjustment ring 4 Use manual or power zoom to set the lens to telephoto 5 Point the camera at the chart by turning the focus ring and focus on it 6 Set the zoom ring ...

Page 43: ...r so that UP is at the top 3 Close the microphone holder 4 Tighten the screw On how to perform this operation refer to the operation manual for the microphone 3 Plug the microphone cable into the MIC IN connector then set the AUDIO IN switch for the channel on which you want to record the audio from this microphone to FRONT for CH 1 CH 2 or F for CH 3 CH 4 4 Secure the microphone cable with the ca...

Page 44: ...Set the LINE AES EBU MIC selector to MIC Set the 48V OFF switch indicated below depending on the power supply type of the microphone Internal power supply Set the 48V OFF switch to OFF External power supply Set the 48V OFF switch to 48V Set the AUDIO IN CH 1 CH 2 CH 3 CH 4 switch for the channel to which the microphone is connected to REAR for CH 1 CH 2 or R for CH 3 CH 4 4 Switch the input level ...

Page 45: ...or WRR 855S into the housing slot and fasten the four fixing screws 3 Set the AUDIO IN switch for the channel to which you want to input audio signal to WIRELESS see page 23 Notes When the XLR connection automatic detection function is on even if the AUDIO IN CH 1 or CH 2 switch is set to WIRELESS the signal input to the AUDIO IN CH1 or CH2 connector is automatically selected when an audio cable i...

Page 46: ...d Connect the audio output connector of the audio equipment that supplies the line input signal to the AUDIO IN CH1 or CH2 connector Switch settings Set the LINE AES EBU MIC selector for the channel to which the audio signal source is connected to LINE Selecting the audio inputs to be recorded With the XLR connection automatic detection function being off the factory default setting A signal must ...

Page 47: ...unt the camcorder on the tripod adaptor 3 Try to move the camcorder back and forth to confirm that it does not slip off the attachment 2 1 3 4 1 AUDIO IN CH 1 CH 2 switches 2 To AUDIO IN CH1 or CH2 connector 3 Audio equipment 4 LINE AES EBU MIC selectors Tripod Mounting Tripod adaptor Camera mount Slide the camcorder forward along the groove in the adaptor until it clicks ...

Page 48: ... switch to AUTO you can turn the light on and off automatically as you start and stop the VDR operation The output of the LIGHT connector on the camcorder is controlled to 12 V even when the camcorder is supplied with over 12 V power through the DC IN connector or battery pack The brightness or color temperature of the light will not change according to voltage increase Notes Do not use a video li...

Page 49: ...to a shoulder strap fitting 2 Fit the other clip to the shoulder strap fitting on the other side of the grip in the same way as in step 1 To remove the shoulder strap Using the Shoulder Strap g Clip Pull up the strap to lock the fitting g Press here and pull in the direction shown by the arrow to release ...

Page 50: ...ontrol Unit enables remote control of the principal camera functions Connecting the remote control unit to the REMOTE connector 8 pin automatically puts the camcorder into remote control mode If you disconnect the remote control unit the remote control mode is cancelled Camcorder switch functions when the remote control unit is connected The following switches on the camcorder do not function GAIN...

Page 51: ...low one is the independent data region that is used when a remote control unit is not connected and the other is the remote control data region that is used when a remote control unit is connected Paint adjustment data is automatically selected and output to the camera section depending on whether or not a remote control unit such as the RM B170 is connected Thus when a remote control unit is conn...

Page 52: ...NTENANCE menu is set to ON you can use settings of the paint adjustment data stored in the independent data region even if you connect the remote control unit In this case the settings stored in the independent data region will be renewed when you change the settings on the remote control unit Thus the settings of the paint data made with the remote control unit can be retained even if the remote ...

Page 53: ...unit can record up to four channels of audio If you select a format with eight channels of audio silence is recorded in channels 5 to 8 1 Display the FORMAT page of the OPERATION menu For details on menu operations see Basic menu operations page 193 2 Select SYSTEM FREQUENCY and turn the MENU knob to select the desired system frequency Chapter3 Adjustments and Settings for Shooting Setting the Rec...

Page 54: ... referred to as mixed format recording mode 1 The recording format is regarded as different whenever the system frequency video resolution video codec bit rate or number of audio channels or number of bits does not match Notes Regardless of frame frequency group matching it is not possible to mix clips with different video resolutions number of system lines in the same clip list When the unit is i...

Page 55: ... USER menu It is not usually necessary to adjust the black balance when using the camcorder after it has been off White balance adjustment Always readjust the white balance when the lighting conditions change Viewfinder screen displays If the black balance or white balance adjustment is started messages that report on the progress and results are displayed on the viewfinder screen when the VF DISP...

Page 56: ...ppears If the error message occurs again an internal check is necessary For information about this internal check refer to the Maintenance Manual Note If the lens cable is not firmly connected to the LENS connector it may not be possible to adjust the lens iris If this happens the black balance will be incorrect Black balance memory Values stored in memory are held until the black balance is next ...

Page 57: ...er screen in display mode 3 3 Place a white test card under the same lighting conditions as for the subject to be shot and zoom up to it Alternatively any white object such as a cloth or a wall can be used The absolute minimum white area is as follows Note Make sure there are not bright spots in the rectangle 4 Adjust the lens iris Manually adjusted lens set the iris to an appropriate setting Lens...

Page 58: ...ted There are two sets of white balance memories A and B and adjustments for each of the CC filters can be automatically stored in the memory corresponding to the setting A or B of the WHITE BAL switch The camcorder has four built in CC filters so a total of eight 4 2 adjustments can be stored However the memory contents are not linked to the CC filter settings in the following cases When the numb...

Page 59: ...e control unit setting A B or C If a memory error occurs If the error message STORED DATA NG flashes on the viewfinder screen when the camcorder is turned on the white balance and black balance memory contents have been lost Adjust the white balance and black balance again Contact a Sony representative if this message continues to appear even after the white balance and black balance have been adj...

Page 60: ...ities are actually changing in synchronization with the frequency of the power supply causing flicker Using an electronic shutter under such lighting could make the flicker even worse Color flicker is particularly likely to happen when the power supply frequency is 60 Hz However if the power frequency is 50 Hz setting the shutter speed to 1 100 can reduce this flicker When a bright object is shot ...

Page 61: ...red mode or speed appears When all modes and speeds are displayed the display changes in the following order If you have changed the configuration only the selected modes and speeds appear When the unit is shipped from the factory it is configured to display all of the modes and speeds in Shutter modes page 60 except SLS mode You can change this configuration by selecting only the required modes a...

Page 62: ...t SHUTTER ECS and SHUTTER SLS 1 Display the SHUTTER SELECT page of the MAINTENANCE menu and press the MENU knob For details on menu operations see Basic menu operations page 193 2 Select SHUTTER SELECT and turn the MENU knob to display DEGREE Six shutter speeds appear A registered shuttle angle appears in the DEGREE field of each line A shutter speed exposure time in units of seconds appears in th...

Page 63: ...shutter angle 144 0 was added and then the list was sorted so that the angle 144 0 is registered as item number 3 To add more user defined settings If there is no empty number in the list Repeat steps 1 to 4 If there is an empty number in the list Repeat steps 3 and 4 Deleting unneeded settings When you are selecting shutter speeds the unit skips numbers that do not have assigned settings You will...

Page 64: ...f the setting changes to 3 Turn the MENU knob until ON appears then press the MENU knob z on the left of the selected item changes to b and on the left of the setting changes to z The IRIS OVERRIDE item is set to ON 4 Set the MENU ON OFF switch to OFF The AUTO IRIS page disappears from the screen 5 Turn the MENU knob to change the reference value Note Be sure to confirm that the current shutter mo...

Page 65: ...nges to b and changes to z If you select VARIABLE the following items become effective and you can set the window of the desired size Set each item to the desired size 6 Set the MENU ON OFF switch to OFF The menu disappears from the screen and the display indicating the current status of the camcorder appears along the top and bottom of the screen To counter problems with very bright highlights If...

Page 66: ...IN CH1 or CH2 connector set the AUDIO IN CH 1 or CH 2 switch to REAR To adjust both input signals set both switches to REAR 2 Set the AUDIO SELECT switch es corresponding to the channel s selected in step 1 to MANUAL 3 With the LEVEL control s for the channel s selected in step 1 adjust so that the audio level meter shows up to 20 dB for a normal input volume Correspondence between recording level...

Page 67: ...ents and audio level controls On the AUDIO 3 page of the MAINTENANCE menu you can select which audio level control controls the audio recording level of the front microphone input The correspondences between the settings of the menu items and the controls are as follows MIC CH1 LEVEL Audio recording level of channel 1 MIC CH2 LEVEL Audio recording level of channel 2 Note When you have operation of...

Page 68: ...enu to STREO or MONO To adjust manually 1 Set AU CH34 AGC MODE on the AUDIO 2 page of the MAINTENANCE menu to OFF 2 Set AUDIO CH3 LEVEL for audio channel 3 and AUDIO CH4 LEVEL for audio channel 4 on the AUDIO 3 page of the MAINTENANCE menu to FRONT The levels of audio channels 3 and 4 can now be adjusted with the MIC LEVEL control To set to a fixed value In step 2 of the previous procedure To adju...

Page 69: ...ode consecutive When the F RUN SET R RUN switch is set to R RUN recording a number of scenes on the disc normally produces consecutive timecode However once you remove the disc and record on another disc the timecode will no longer be consecutive when you use the original disc again for recording In this case to make the timecode consecutive set the PRESET REGEN CLOCK switch to REGEN Saving the re...

Page 70: ...en when the power is turned off You can synchronize the internal timecode generator of this camcorder with an external generator for the regeneration of an external timecode You can also synchronize the timecode generators of other camcorders VTRs with the internal generator of this camcorder Connections for timecode synchronization Connect both the reference video signal and the external timecode...

Page 71: ...ch to TC 5 Supply a timecode signal and a reference video signal complying with the SMPTE standard and in proper phase relationship to the TC IN connector and to the GENLOCK IN connector respectively 1 2 3 4 1 2 3 4 1 2 1 TEST OUT 2 TC OUT 3 TC IN 4 GENLOCK IN a To another camcorder to be synchronized Reference camcorder AUTO FRONT WIRELESS THUMBNAIL SET S SEL SHIFT ESSENCE MARK CLIP MENU SUB CLIP...

Page 72: ... MAINTENANCE menu the timecode cannot be synchronized with the reference video signal In this case set the GENLOCK item to ON on the GENLOCK page of the MAINTENANCE menu User bit settings during timecode synchronization When the timecode is synchronized only the time data is synchronized with the external timecode value Therefore each camcorder can have its own user bit settings You can lock the u...

Page 73: ... and stored carefully Do not touch the surface of the disc itself within the cartridge Deliberately opening the shutter may cause damage Do not disassemble the cartridge The supplied adhesive labels are recommended for indexing discs Apply the label in the correct position Storage Do not store discs where they may be subjected to direct sunlight or in other places where the temperature or humidity...

Page 74: ...t another disc close the disc compartment lid To unload a disc when the power supply is off If the battery is exhausted it is not possible to remove the disc by pressing the EJECT button In such cases use the following emergency procedure to remove the disc manually 1 Turn off the POWER switch 2 Carry out the operation shown in the following figure 1 Open this rubber cover 2 Using a screwdriver or...

Page 75: ...exhaustion is detected because the unit does not become powered off until after the end of recording processing Notes Do not disconnect the battery pack or power cord until recording processing has finished and the ACCESS indicator has gone out This function salvages as much recorded material as possible after an unforeseen accident but 100 restoration cannot be guaranteed Even when this function ...

Page 76: ... when the camcorder is powered on again Notes If salvage processing is not done sections which were recorded normally can be played back but no new recording can be done on the disc Full salvage of discs recorded by this camcorder can be performed with the PDW F1600 PDW HD1500 PDW F800 PDW 700 PDW 740 or PDW HR1 Full salvage cannot be performed with any other XDCAM device The following message may...

Page 77: ...ndicator shows at least five segments x If it does not replace the battery pack with a fully charged one 4 Check that there are no obstructions such as cables near the disc compartment lid Then press the EJECT button to open the disc compartment lid 5 After checking that the disc is not write protected see page 73 load it and close the disc compartment lid Basic procedure for shooting from adjusti...

Page 78: ...g for recording may not finish properly which may cause the last few seconds of recording to be lost For details see Handling of discs when recording does not end normally salvage function page 75 6 To stop recording press the REC START button or the VTR button on the lens again The REC indicator in the viewfinder goes off The material recorded from step 5 to step 6 is saved as a single clip To ch...

Page 79: ...mecode of the frozen frame is displayed in the counter display and the PLAY PAUSE indicator now flashes one flash second To restart playback Press the PLAY PAUSE button once again Clip playback modes You can set the clip playback mode to either of the following Continuous playback mode The playback target is all of the clips on the disc factory default setting Single clip playback mode The playbac...

Page 80: ...ns have deteriorated Read errors occur when playback conditions continue to deteriorate When a read error occurs the message DISC ERROR appears the video freezes and the audio output is suppressed If this happens check the following points Whether the disc displays the same playback condition on other XDCAM devices If so the surface of the disc may be dirty or scratched or the performance of the r...

Page 81: ...n from BOTTM bottom LEFT TOP and RIGHT FOCUS AREA MARK Turn the display of the frame around the focus detection range OFF hide or ON display Notes The focus assist indicator is not displayed when the gain is set to 18 dB or higher When you display the focus assist indicator the display of effective pixels which you select by setting 100 MARKER in the MARKER 1 page of the OPERATION menu to ON is hi...

Page 82: ...age 209 If you connect a Windows USB keyboard to the USB connector you can record shot marks from Shot Mark0 up to Shot Mark9 by pressing the 0 to 9 keys on the numeric keypad You can set three types of clip flags OK NG KEEP during recording immediately after recording or during playback Setting these flags in each clip that you record makes it easy for editors and other colleagues to find and sel...

Page 83: ...ture Cache time determines the number of seconds recorded from the Picture Cache counting back from the time when you press the REC START button or the VTR button on the lens to start recording However the number of seconds actually recorded from the Picture Cache may be shorter immediately after the setting of the VDR SAVE STBY switch is changed and in the special situations explained in the foll...

Page 84: ... performing playback or recording review the picture data for the duration of the Picture Cache time will not be stored in memory Thus the time disc access stops after the STOP button is pressed becomes shorter than the Picture Cache time In Picture Cache mode you cannot set the F RUN SET R RUN switch to SET to make timecode settings To make timecode settings first exit Picture Cache mode When pow...

Page 85: ...ode and the consecutive mode of Manual Interval Rec mode The EJECT F REV F FWD NEXT PREV PLAY PAUSE and STOP buttons are disabled To use these buttons stop recording by pressing the REC START button or the VTR button on the lens The single shot mode of Manual Interval Rec mode The F REV F FWD NEXT PREV PLAY PAUSE and STOP buttons are disabled To use these buttons exit the Interval Rec mode by pres...

Page 86: ...e maintained You do not need to set them again the next time you use Auto Interval Rec mode To shoot and record 1 After performing the basic procedures for shooting and recording following the instructions in Basic Procedure for Shooting page 77 secure the camcorder so that it will not move 2 Press the REC START button or the VTR button on the lens The camcorder starts recording in Auto Interval R...

Page 87: ...e and the TALLY green tally indicator in the viewfinder flashes 3 Select NUMBER OF FRAME and turn the MENU knob to select the desired number of frames to be recorded in each shot As you turn the MENU knob the setting changes as follows 1 y 3 y 6 when SYSTEM LINE is set to 720 and REC FORMAT is set to HD422 50 HD420 HQ or HD420 SP 2 y 6 y 12 4 Select TRIGGER INTERVAL and turn the MENU knob to selec...

Page 88: ...ooting page 77 secure the camcorder so that it will not move 2 Press the REC START button or the VTR button on the lens The camcorder starts recording in Manual Interval Rec mode When you use the PRE LIGHTING function recording starts after the light is switched on While recording in Manual Interval Rec mode the TALLY green tally indicator in the viewfinder flashes 2 or 4 flashes second and the me...

Page 89: ...king settings the system frequency and the frame rate appear at the top of the viewfinder screen You can change the frame rate with the MENU knob while viewing this display Even if you run out of free disc capacity while recording you can continue recording by using the Disc Exchange Cache function This function enables seamless recording over extended recording sessions too long to fit on one dis...

Page 90: ... large number of clips As a result the video and audio may be interrupted Normally a clip is created as an independent file each time that you start and stop recording But this function allows you to start and stop recording while continuously recording to the same clip for as long as the function remains enabled This is convenient when you do not want to generate a large number of short clips and...

Page 91: ...hen the camcorder is in the recording pause state In this case the message RE TAKE NOT ALLOWED appears When you want to replace the last clip with a new clip delete the clip see page 125 Once you carry out a retake operation the last clip is deleted even if you do not carry out a recording operation afterwards About the automatic title generation function By default clips on each disc are assigned...

Page 92: ... field and the serial number in the NUMERIC field To create a list of title prefix strings Prepare the data beforehand according to the following rules File name Assign the name TITLES TXT to the file Input format Enter title prefixes one at time separated by newline CRLF characters Prefixes can be up to 10 characters long A prefix file can contain up to 20 prefixes Allowable characters Digits 0 t...

Page 93: ...fix string appears 3 Move x onto the character you want to change and then press the MENU knob 4 Turn the MENU knob to move x onto the desired character in the list of selectable characters and then press the MENU knob 5 Repeat steps 3 and 4 to enter the remaining characters 6 When you have finished entering the prefix turn the MENU knob to move x to END and then press the MENU knob The camcorder ...

Page 94: ...nding on the value setting Care should be taken when setting the serial number The following standard format names are assigned automatically to clips and clip lists that are created or recorded by XDCAM devices Clips C0001 MXF to C9999 MXF Clip lists E0001E01 SMI to E0099E01 SMI When you record or create clips and clip lists you can assign user defined names instead of the standard format names A...

Page 95: ... other than ASCII characters Command prompt FTP commands do not support UTF 8 When the first letter of the title setting on the CLIP AUTO TITLING menu is a space or period the clip name is the title string minus the first letter To use clip names and clip list names via FTP Carry out steps 2 to 4 of To assign clip names on this unit page 94 It is possible to write transfer and rename clips and cli...

Page 96: ...load the files correctly if more than 100 are saved For greater convenience in planning metadata operations you can use the optional CBK WA01 Wi Fi Adaptor and the supplied Sony Planning Metadata Add in application software For details refer to the operation manual of the CBK WA01 Wi Fi Adaptor To set clip names by using planning metadata The following two types of clip name strings can be written...

Page 97: ...ff or exchange discs newly generated numbers are continuous on the old ones If the ASCII format clip name string is longer than 14 characters it is displayed in the viewfinder as the first 7 characters x abbreviated the last 5 characters for a total of 13 characters You can change the serial numbers by using Planning Clip Name Suffix in the Disc Menu see page 112 To specify user disc IDs by using ...

Page 98: ...e 2009 04 15T15 00 00Z spversion 1 00 3 Properties propertyId assignment sp class original spupdate 2009 04 15T15 00 00Z spmodifiedBy Chris 3 Title usAscii Football Game spxml lang en Football Game 15 04 2009 Title 3 Meta name _ShotMark1 spcontent 3 Meta name _ShotMark2 spcontent 3 Meta name _ShotMark3 spcontent 3 Meta name _ShotMark4 spcontent 3 Meta name _ShotMark5 spcontent 3 Meta name _ShotMar...

Page 99: ...SDI signals selected in step 3 to the SDI IN connector Recording analog composite signals You can record analog composite signals input to the GENLOCK IN connector When an HD recording format MPEG HD422 50 or MPEG HD420 HQ SP is selected analog composite signals are upconverted to HD signals before recording Note Even if the GENLOCK item on the GENLOCK page of the MAINTENANCE menu is set to OFF th...

Page 100: ...the proxy data recording function You can connect a USB flash drive to the USB connector and use it to save proxy data Here proxy data refers to proxy AV data for the clips on the disc as well as to metadata 1 You can then connect this USB flash drive to a computer to view the recorded proxy AV data to edit and enter metadata titles comments essence marks and so on and to create clip lists 1 When ...

Page 101: ...nect it again The message MEM REC NG appears if you start recording without a USB flash drive connected After recording stops connect a USB flash drive refer to To copy the proxy data of a clip on a disc to a USB flash drive and copy the proxy data that could not be written to the USB flash drive during recording It is not possible to record proxy data to a USB flash drive while the Clip Continuou...

Page 102: ...the message COMPLETE appears The proxy data of all clips on the disc is copied to the USB flash drive Note The message M Shortage appears when the mount of data to be copied exceed the free capacity of the USB flash drive The copy is not executed Exchange the USB flash drive for one with enough free capacity To cancel a copy to a USB flash drive 1 Select ABORT COPY in the MEMORY REC page of the OP...

Page 103: ...rrupted depending on the strength of the received signal even if a positioning icon is displayed To display the state of GPS data reception in the viewfinder Set DISP GPS to ON on the VF DISP 2 page of the OPERATION menu to display the GPS data reception status at all times in the viewfinder Verifying the GPS location When recording or playing video with GPS data you can check the location on the ...

Page 104: ...ys the time using a crystal operated clock within the module During playback the calculated date and time recorded on the disc is displayed When shooting without available GPS data is displayed Problems when using GPS GPS signals cannot be received The signals from GPS satellites may not be received due to interference caused by obstructions In this case move to a location with a clear view of the...

Page 105: ...en Displays thumbnails of sub clips in a clip list Clip List is displayed as the title at the upper left of the screen see page 106 There are also two playback screens Clip playback screen Playback screen for normal video Clip list playback screen Playback screen for clip list video You will use the THUMBNAIL ESSENCE MARK button 1 and the SUB CLIP DISC MENU button 2 to switch between these four sc...

Page 106: ... 26 22 10 TC 00 28 22 02 TC 00 24 45 11 TC 00 27 19 04 TC 00 23 34 18 TC 00 25 06 14 TC 00 27 51 09 TC 00 23 54 22 2 2 1 1 THUMBNAIL ESSENCE MARK SUB CLIP DISC MENU THUMBNAIL ESSENCE MARK SUB CLIP DISC MENU THUMBNAIL ESSENCE MARK SUB CLIP DISC MENU THUMBNAIL ESSENCE MARK SUB CLIP DISC MENU Clip playback screen a Clip thumbnail screen Clip list playback screen a b Clip list thumbnail screen b Unlit...

Page 107: ... move the frame see page 115 Multiple selection frames appear when multiple thumbnails are selected see page 114 c Clip number total number of clips Displays the total number of clips on the disc and the number of the selected clip d Scrollbar When not all of the thumbnails can be displayed in the thumbnail display area the position of the slider shows the relative position of the currently displa...

Page 108: ...Menu see page 120 The factory default selection is the timecode of the first frame or the timecode of the thumbnail frame f Lock icon This icon appears when the clip is locked protected see page 124 Clips cannot be deleted and their clip information cannot be changed when this mark is displayed Clip list thumbnail screen This screen displays thumbnails of the clips in the current clip list You can...

Page 109: ...isplays the time from the selected thumbnail to the next one Chapter thumbnail screen Chapters are the sections between the shot marks Rec Start marks and other essence marks that have been recorded in clips This screen allows you to display thumbnails of the chapters in the selected clip Note Shot marks can be set by the user during recording and playback They can be deleted and moved Essence mar...

Page 110: ...is the total number of essence marks that have been set in all clips on the disc d Scrollbar See the description in Clip thumbnail screen page 107 e Clip date and time Displays the date and time when the clip that contains the selected thumbnail was recorded or last modified f Clip name Displays the name or a title of the clip that contains the selected frame see page 107 Thumbnail Menu The Thumbn...

Page 111: ...ands for thumbnail searches The Thumbnail View Menu contains the basic commands for moving to other menus Clip Navigeting sibiling relati 018 036 TC 00 29 19 23 TC 00 30 40 13 TC 00 24 34 27 DATE TIME 30 NOV 2005 14 14 DUR 0 23 22 26 TC 00 29 38 25 TC 01 01 28 25 TC 00 24 46 22 TC 00 29 50 04 TC 00 09 43 14 TC 00 25 42 08 TC 00 30 25 11 TC 00 24 24 29 TC 00 25 49 07 Clip Information Select Index P...

Page 112: ...c or drive and load planning metadata into this unit s memory Planning Metadata Properties Display the properties of the currently loaded planning metadata Planning Clip Name Suffix Change the serial number added to clip names created by using planning metadata Clear Planning Metadata Clear the currently loaded planning metadata from the unit s memory Lock or Delete All Clips Sub Item Lock All Cli...

Page 113: ...isplay the title in the following order of priority Title1 Title2 Clip name or Clip list name On Title2 title2 Display the title in the following order of priority Title2 Title1 Clip name or Clip list name Off Do not display the title Always display the clip name or clip list name Planning Clip Name in Clip Info Area Selects how to display in the video monitor screen the title contained in a plann...

Page 114: ...AL AUDIO SELECT AUDIO IN F W R F W R LEVEL 0 10 0 10 CH 2 CH 3 CH 4 PRESET F RUN REGEN SET CLOCK R RUN BRIGHT DISPLAY RESET HOLD DISP SEL COUNTER RC U BIT EXPAND CHAPTER MENU DISC MENU RETURN 1SHIFT button 3 RESET RETURN button 2 SUB CLIP DISC MENU button Load Clip List Save Clip List Save Clip List as Delete Clip List Clear Clip List Load Planning Metadata Select Drive Planning Metadata Propertie...

Page 115: ...ls provide visual confirmation of these and other operations The thumbnail selection frame see page 107 indicates the currently selected thumbnail To move the thumbnail selection frame Turn the MENU knob or press the arrow buttons To skip quickly through thumbnails Skip Scroll function When you have a large number of thumbnails like in expand thumbnail screen you can use the Skip Scroll function t...

Page 116: ...s Note The maximum number of blocks may be other than 1728 when the recorded duration of the clip is short In this case the frame interval of expanded thumbnails is fixed at 1 frame This allows you to view expanded thumbnails at equal intervals See page 114 for more information about thumbnail screen operations 1 In the clip thumbnail screen select the thumbnail of the clip that contains the scene...

Page 117: ...delete 2 Display the Thumbnail Menu 3 Select Delete Essence Mark A message appears asking if you are sure that you want to delete the shot mark 4 Select OK to delete the mark or Cancel to cancel the deletion and then press the SET S SEL button or the MENU knob To adjust the position of shot marks at chapter positions You can use the chapter thumbnail screen to adjust the position of shot marks Sho...

Page 118: ...n To return to the clip thumbnail screen from the Rec Start essence mark thumbnail screen press the RESET RETURN button In the clip playback screen the PREV and NEXT buttons jump to the previous or next recording start points After finding a clip with one of the methods explained in the previous section Searching with thumbnails page 116 you can cue up and play the clip that you have found To sear...

Page 119: ...ip filtering condition 6 Press the SET S SEL button or the MENU knob A filter thumbnail screen appears showing only clips that meet the specified condition The filtering condition appears at the lower left of the screen 7 If you want to filter the clips again with a different filtering condition to narrow down the filtering results repeat steps 2 to 6 The command name selected in step 4 changes to...

Page 120: ...f first frame Duration Playback time Sequence Number Thumbnail sequence number The selected information will appear at the bottom of the thumbnails when you display a thumbnail screen The clip thumbnail screen displays thumbnails as index pictures for clips Normally the index picture is the first frame in a clip but you can set any frame in the clip as the index picture Note You can only change in...

Page 121: ...elect Set Index Picture A message appears asking you to confirm that you want to set the current frame as the index picture 4 Select OK and then press the SET S SEL button or the MENU knob After pressing the RESET RETURN button to return to the clip thumbnail screen check to make sure that the newly selected frame is displayed as the index picture You can check clip properties such as the title ti...

Page 122: ... symbols are disabled when you are editing a clip name See page 114 for more information about GUI screen operations 1 In the Clip Properties screen turn the MENU knob to select the item you want to edit Name Title1 1 or Title2 1 Only ASCII characters can be used for Title1 2 Press the SET S SEL button or the MENU knob An input screen appears for the selected item A keyboard appears that correspon...

Page 123: ...the characters that can be entered on the various language keyboards Note The keyboard language cannot be changed in the following cases When the area of use is set to NTSC J AREA When the area of use is set to NTSC AREA or PAL AREA and the Disc Menu item Settings Select Font is set to Korean Simplified Chinese or Traditional Chinese The keyboard icon on the software keyboard is highlighted when a...

Page 124: ...bnail screen operations 1 In the clip thumbnail screen select the thumbnail of the clip where you want to set a flag 2 Display the Thumbnail Menu 3 Select Set Clip Flag The clip flag setting screen appears 4 Select the clip flag that you want to set OK NG KP KEEP A clip flag icon see page 108 appears for clips that have clip flags set To clear clip flags Carry out steps 1 to 3 selecting a clip tha...

Page 125: ...MENU knob You can delete clips while checking their contents Notes Clips cannot be deleted when the Write Inhibit tab of the disc is set to the recording disabled position Locked clips cannot be deleted If a deletion target clips is referenced by clip lists on the disc all of those clip lists are deleted as well If a deletion target clip is referenced in the current clip list only those referencin...

Page 126: ...tions In scene selection you create a clip list editing data Since the material itself is not affected you can repeat this any number of times You can play back the edit list created by scene selection on this unit In scene selection you can add whole clips or add parts of a clip You can add scenes using chapters change the playback sequence and amend or delete In and Out points All of these opera...

Page 127: ...is always the target of sub clip creation and editing Clip list playback also uses the current clip list After creating and editing a clip list you need to save it to disc Clip list playback Clips and clip lists are saved together on a disc To play a clip list insert a disc into the unit load the clip list that you want to play and press the PLAY PAUSE button Clips are played according to the data...

Page 128: ...e Selection window indicates the location where the currently selected sub clip s will be inserted To display the total duration after addition of the selected clip Press the SHIFT button 4 In the Scene Selection window move the I cursor to the location where you want to insert the clip The existing thumbnails arrange themselves to the left and right of the I cursor 5 Press the SET S SEL button or...

Page 129: ... existing thumbnails arrange themselves to the left and right of the I cursor 6 Press the SET S SEL button or the MENU knob The sub clips are added at the I cursor position and you return to the clip list thumbnail screen You can check the results of the addition in that screen 7 Repeat steps 1 to 6 as required to add more clips 8 Save the clip list see page 131 In step 1 you can also perform a sh...

Page 130: ... Total total duration and DUR clip duration displays are updated To cue up the In point or Out point Display the Thumbnail Menu select Cue up Inpoint or Cue up Outpoint and then press the SET S SEL button or the MENU knob To cancel the In point or Out point setting Display the Thumbnail Menu select Reset Inpoint or Reset Outpoint and then press the SET S SEL button or the MENU knob The In point or...

Page 131: ...ange 4 Turn the MENU knob to change the value of the digit 5 Repeat steps 3 and 4 as required To reset the timecode to 00 00 00 00 Select Reset to Zero in the Thumbnail Menu and then press the SET S SEL button or the MENU knob To preset the frequently used timecode Select Save Preset TC in the Thumbnail Menu and then press the SET S SEL button or the MENU knob The timecode set in steps 3 and 4 is ...

Page 132: ...p list See page 114 for more information about thumbnail screen operations 1 In the clip list thumbnail screen display the Disc Menu 2 Select Load Clip List and then press the SET S SEL button or the MENU knob A list of clip lists stored on the disc appears 3 Select the desired clip list and then press the SET S SEL button or the MENU knob The name of the clip list selected here appears in the cli...

Page 133: ... displayed in the specified order the next time that you carry out an operation such as loading a clip list See page 114 for more information about GUI screen operations 1 Display the Disc Menu 2 Select Disc Properties and then press the SET S SEL button or the MENU knob The Disc Properties screen appears User Disc ID User disc ID Title1 Title 1 Title2 Title 2 1 Total DUR Total recording time Rema...

Page 134: ...g the USB flash drive In this case connect the USB flash drive again or exit the menu and try again The data will then appear correctly 4 Select the desired planning metadata file and then press the SET S SEL button or the MENU knob The selected planning metadata file is loaded into the unit s memory and the Planning Metadata Properties screen appears 5 Check the information that appears and press...

Page 135: ...nu 2 Select Planning Clip Name Suffix change the serial number added to clip names created by using planning metadata and then press the SET S SEL button or MENU knob The Planning Clip Name Suffix screen appears 3 Press the left or right arrow button to select a digit to change 4 Press the up or down arrow button or turn the MENU knob to change the digit 5 Repeat steps 3 and 4 as required 6 Press ...

Page 136: ... UTF 8 format maximum 32 bytes 1 Display the Planning Metadata Properties screen see page 134 for the planning metadata loaded into this unit The button is enabled when the planning metadata contains user defined essence marks see page 98 2 Press and then turn the SET S SEL button or the MENU knob The User Defined Essence Marks screen appears See page 114 for more information about GUI screen oper...

Page 137: ...ey For example if the IP address of this unit is 192 168 001 010 enter http 192 168 1 10 If the connection succeeds you will be prompted to enter a user name and a password 3 Enter your user name and password and then press the Enter key The user name and password are set to the following when the unit is shipped from the factory User name admin Password Model name pdw 850 After the user name and ...

Page 138: ...ile proxy AV data LOW resolution file or metadata Clip NRT metadata click the FTP Download or HTTP Download button to the right of the item that you want Then click Save in the dialog that appears and specify the save destination The specified data is downloaded to the specified location in your computer FTP download limitations The following limitations apply to FTP download operations They do no...

Page 139: ... LIVE MENU ON OFF switch OFF 2 Display the Planning Metadata page of the XDCAM web pages in the web browser of your computer To display the Planning Metadata page proceed in the same way as described in To display the unit s XDCAM web pages page 137 However in step 2 enter http IP_address_of_this_unit mobile htm in the address bar 3 Click Browse to open the Choose File dialog 4 Select the planning...

Page 140: ...t files To transfer files of other types proxy AV data files in the General and User Data directories and so on operate after establishing an FTP connection see page 228 Transferring clips Direct FTP function Transfer direction Transfer target Function Upload One or more clips put Multiple clips with clip list Part of one clip partial put Download One clip get Upload clip put Download clip get Net...

Page 141: ...formation about thumbnail screen operations 1 In the clip thumbnail screen select the clip to upload multiple selections possible To upload all clips and clip lists on the disc start from step 2 2 Display the Thumbnail Menu 3 Select Upload Clips via Direct FTP and then press the SET S SEL button or the MENU knob The Select Transfer Type screen of the Upload Clips via Direct FTP command appears 4 S...

Page 142: ...nnection with the selected remote host the network settings are saved in Remote Host 4 From the next time that you select Remote Host 4 UPnP the remote host that you select here will be connected To check the network settings of this unit Select Network Config and then press the SET S SEL button or the MENU knob The following network settings appear a An IP address determined by a DHCP server appe...

Page 143: ... XDCAM device make sure that it is not displaying a GUI screen If the remote host is an XDCAM device make sure that a disc is inserted Device Type The type of the remote host If the remote host is an XDCAM device select the model name or Other XDCAM model if the model name is not in the list from the list of model names a If the remote host is a computer select Others PC Server from the list of mo...

Page 144: ...ly and then press the SET S SEL button or the MENU knob If you are transferring multiple clips select Abort After this clip and then press the SET S SEL button or the MENU knob The transfer of subsequent clips will be cancelled after transfer of the current clip finishes Set the ETHERNET USB item on the POWER SAVE page of the OPERATION menu to DSABL Note When several files are to be transferred th...

Page 145: ...ectory appear When more 301 or more clips are stored on a remote host the denominator indicating the clip total at the upper right is shown as and the names of the 301st and following clips are not displayed File names containing other than ASCII characters kanji and so on are not displayed 4 Select a clip to download and then press the SET S SEL button or the MENU knob The download starts When th...

Page 146: ...iscovered via UPnP screen 10 Press the SET S SEL button or the MENU knob Detailed information about the connection destination device the PDW HD1500 appears 11 With Connect selected press the SET S SEL button or the MENU knob Transfer of the clip begins as soon as the connection is established During transfer of the clip NETWORK appears in the display of the connection destination device the PDW H...

Page 147: ...EXPAND Chapter Thumbnail display chapter thumbnail screen HOLD CHAPTER Essence Mark Thumbnail display essence mark thumbnail screen SHIFT THUMBNAIL ESSENCE MARK Add Sub Clip add sub clip SHIFT SET S SEL Delete Clip delete clip SHIFT RESET RETURN Lock Unlock Clip lock or unlock clip SHIFT STOP Set Inpoint set In point Left arrow SET S SEL Set Outpoint set Out point Right arrow SET S SEL Cue up Inpo...

Page 148: ...UTPUT 1 OUTPUT 2 SUPERIMPOSE LCD REC FUNCTION ASSIGNABLE SW VF DISP 1 VF DISP 2 LED MARKER 1 GAIN SW VF SETTING VF DETAIL AUTO IRIS SHOT ID SHOT DISP SET STATUS LENS FILE USER FILE OPERATION OUTPUT 1 OUTPUT 2 SUPERIMPOSE LCD REC FUNCTION ASSIGNABLE SW POWER SAVE VF DISP 1 VF DISP 2 VF DISP 3 VF DISP 4 LED LED STD MARKER 1 MARKER 2 FOCUS ASSIST GAIN SW VF SETTING VF DETAIL AUTO IRIS SHOT ID SHOT DI...

Page 149: ...er you need them This menu is normally displayed when the MENU ON OFF switch is set to ON PAINT SW STATUS WHITE BLACK FLARE GAMMA BLACK GAMMA KNEE 1 KNEE 2 DETAIL 1 DETAIL 2 SD DETAIL SKIN DETAIL MTX LINEAR MTX MULTI V MODULATION SATURATION SATURATION MODE NOISE SUPPRESS SCENE FILE MAINTENANCE WHITE SHADING BLACK SHADING LEVEL ADJUST BATTERY 1 BATTERY 2 AUDIO 1 AUDIO 2 AUDIO 3 WRR SETTING TIMECODE...

Page 150: ... files see Saving and Recalling User Files page 220 ALL files ALL files saves the setting data of all of the menus You can save up to 100 ALL files on a USB flash drive Once a camcorder is set up according to your preferences and you save an ALL file on a USB flash drive you can easily set other camcorders to those settings by loading the data from the USB flash drive Note Device specific data out...

Page 151: ... 1 connector SDI OUT 2 SELECT OFF HDSDI SDSDI VF Selects the output signal from the SDI OUT 2 connector SDI OUT 2 SUPER OFF ON Sets the superimposed information output from the SDI OUT 2 connector Note Text information is always displayed regardless of this setting when SDI OUT 2 SELECT is set to VF TEST OUT SELECT VBS Y R G B Selects the output signal from the TEST OUT connector Note When R G or ...

Page 152: ... of text superimposed information from the SDI OUT 2 or TEST OUT connector on or off for each item SUPER MENU OFF ON SUPER TC OFF ON SUPER MARKER OFF ON Turns the marker display on or off in the output from the following connectors SDI OUT 2 connector when SDI OUT 2 SELECT on the OUTPUT 1 page is set to HDSDI SDSDI and SDI OUT 2 SUPER is set to ON TEST OUT connector when TEST OUT SUPER on the OUTP...

Page 153: ...15H 20H 30H 40H 50H 70H 100H REC TIME 5SEC 10SEC 15SEC 20SEC 30SEC 40SEC 50SEC 1MIN to 85MIN PRE LIGHTING OFF 2SEC 5SEC 10SEC NUMBER OF FRAME When SYSTEM LINE is set to 720 and REC FORMAT is set to HD422 50 HD420 HQ or HD420 SP 2 6 12 When either SYSTEM LINE or REC FORMAT is set to another setting 1 3 6 TRIGGER INTERVAL M 1SEC to 10SEC 15SEC 20SEC 30SEC 40SEC 50SEC 1MIN to 10MIN 15MIN 20MIN 30MIN ...

Page 154: ...F DISP MODE 1 2 3 DISP EXTENDER OFF ON DISP FILTER OFF ON DISP WHITE OFF ON DISP GAIN OFF ON DISP SHUTTER OFF ON DISP AUDIO OFF ON DISP DISC OFF ON DISP IRIS OFF ON 09 VF DISP 2 DISP ZOOM OFF ON DISP COLOR TEMP OFF ON DISP BATT REMAIN INT VOLT AUTO DISP DC IN OFF ON DISP 16 9 4 3 ID OFF ON DISP WRR RF LVL OFF ON DISP REC FORMAT OFF ON DISP CLIP NO PB OFF ON DISP TIMECODE OFF ON DISP ALAC OFF ON 10...

Page 155: ... OFF ON EXTENDER OFF ON FILTER ND 1 2 3 4 FILTER CC A B C D OVERRIDE OFF ON 14 MARKER 1 MARKER OFF ON For details see Setting the marker display page 203 CENTER OFF ON CENTER MARK 1 2 3 4 SAFTY ZONE OFF ON SAFTY AREA 80 90 92 5 95 ASPECT OFF ON ASPECT SELECT 15 9 14 9 13 9 4 3 1 85 2 35 ASPECT MASK OFF ON ASPECT MASK LVL 0 to 12 to 15 100 MARKER OFF ON 15 MARKER 2 USER BOX OFF ON USER BOX WIDTH 3 ...

Page 156: ...o 70 to 107 ZEBRA1 APT LVL 1 to 10 to 20 ZEBRA2 DET LVL 52 to 100 to 109 VF DETAIL LEVEL 99 to 99 VF ASPECT SD When the REC FORMAT item is set to IMX50 IMX40 IMX30 or DVCAM AUTO 16 9 19 VF DETAIL VF DETAIL OFF ON VF DETAIL LEVEL 99 to 99 CRISP 99 to 99 FREQUENCY 9M 14M 18M FAT MODE OFF ON FLICKER OFF ON COLOR DETAIL OFF ON COLOR SEL BLUE RED YELL PEAK COLOR OFF ON CHROMA LEVEL 0 25 50 100 20 AUTO ...

Page 157: ...OT DATE OFF ON For details see Recording shot data superimposed on the color bars page 205 SHOT TIME OFF ON SHOT MODEL NAME OFF ON SHOT SERIAL NO OFF ON SHOT ID SEL OFF ID 1 ID 2 ID 3 ID 4 SHOT 16 9 CHARA OFF ON SHOT BLINK CHARA OFF ON 23 SET STATUS STATUS ABNORMAL OFF ON For details see Displaying the status confirmation screens page 206 STATUS SYSTEM OFF ON STATUS FUNCTION OFF ON STATUS AUDIO OF...

Page 158: ... memory OFF Not saved ON Saved For details see To save white balance settings obtained by ATW page 58 ATW SPEED 1 2 3 4 5 Switches the transition speed of auto tracing white balance ATW 1 is fastest AWB FIXED AREA OFF ON Executes AWB auto white balance at the center of the screen FILTER WHT MEM OFF ON Specifies whether to allocate a white balance memory slot for each position number of the FILTER ...

Page 159: ...ON SHUTTER 1 2000 OFF ON 27 LENS FILE LENS FILE SELECT 1 to 32 For details see Selecting the lens file page 217 F ID Display only L ID Display only L MF Display only 28 FORMAT SYSTEM LINE 1080 720 The selectable SYSTEM FREQUENCY settings differ depending on the setting of SYSTEM LINE For details see Setting the Recording Format page 53 SYSTEM FREQUENCY 59 9i 29 9P 50i 25P 23 9P 59 9P 50P REC FORMA...

Page 160: ...ion when recording SD When wide picture information is not detected set the up converter operating mode to edge crop mode and do not record wide picture information 16 9 Always treat the signal as a wide signal and set the up converter operating mode to squeeze mode Record wide picture information when recording SD SETUP REMOVE When the COUNTRY item is set to NTSC J AREA or NTSC AREA 0 0 7 5 Selec...

Page 161: ...ITLE up to 10 characters NUMERIC When the TITLE item is set to ENABL 00001 to 99999 32 FILE NAMING NAMING FORM C FREE For details see Assigning user defined names to clips and clip lists page 94 AUTO NAMING When the NAMING FORM item is set to FREE C TITLE PLAN 33 MEMORY REC MEMORY REC DSABL ENABL For details see Recording proxy data page 100 COPY CURRENT CLP EXEC COPY ALL CLIPS EXEC ABORT COPY EXE...

Page 162: ...RE OFF ON Turns the flare function on or off TEST SAW OFF ON Selects the test signal 02 WHITE COLOR TEMP A Displays reference color temperature Sets the color temperature of WHITE A C TEMP BAL A 99 to 99 Adjusts the value more precisely when the color temperature adjustment through COLOR TEMP is not satisfactory R GAIN A 99 to 99 Only the value of R GAIN is changed B GAIN A 99 to 99 Only the value...

Page 163: ...STER GAMMA 99 to 99 Sets the master gamma correction curve R GAMMA 99 to 99 Sets the R gamma correction curve G GAMMA 99 to 99 Sets the G gamma correction curve B GAMMA 99 to 99 Sets the B gamma correction curve TEST OUT SELECT VBS Y R G B Selects the output signal of TEST OUT connector GAMMA TABLE STD HG USER Selects the gamma type STD Standard gamma HG Hyper gamma USER User gamma GAM TABLE STD 1...

Page 164: ...9 0 Adjusts the white clipping level 07 KNEE 2 KNEE SATURATION OFF ON Turns the Knee Saturation function on and off KNEE POINT R 45 0 to 0 0 to 14 0 When KNEE SATURATION is set to OFF set the RGB knee point levels and knee slope levels individually KNEE SLOPE R 99 to 99 KNEE POINT G 45 0 to 0 0 to 14 0 KNEE SLOPE G 99 to 99 KNEE POINT B 45 0 to 0 0 to 14 0 KNEE SLOPE B 99 to 99 08 DETAIL 1 DETAIL ...

Page 165: ...nd decrease in inverse proportion V V DTL only enabled 10 SD DETAIL SD DETAIL OFF ON Turns the SD detail correction on or off SD DETAIL LEVEL 99 to 99 Sets the general level of the SD detail signal SD CRISPENING 99 to 99 Sets the SD crispening level SD DTL WHT LIMIT 99 to 99 Sets the SD detail white limiter SD DTL BLK LIMIT 99 to 99 Sets the SD detail black limiter SD LEVEL DEPEND OFF ON Turns the...

Page 166: ...to ON and either SUPER MENU or SUPER ZEBRA on the SUPER IMPOSE page is set to ON TEST OUT connector when both of the following are true TEST OUT SUPER on the OUTPUT 1 page is set to ON and SUPER MENU or SUPER ZEBRA on the SUPER IMPOSE page is set to ON SKIN DTL SELECT 1 2 3 Selects the skin detail channel SKIN DETAIL OFF ON Sets CH 1 2 3 selected avobe on off SKIN DETAIL LVL 99 to 99 Sets the leve...

Page 167: ...0M equivalent 2 ITU 709 equivalent 3 SMPTE WIDE equivalent 4 NTSC equivalent 5 EBU equivalent 6 ITU 601 equivalent MATRIX USER R G 99 to 99 Sets the arbitrary R G user set matrix coefficients MATRIX USER R B 99 to 99 Sets the arbitrary R B user set matrix coefficients MATRIX USER G R 99 to 99 Sets the arbitrary G R user set matrix coefficients MATRIX USER G B 99 to 99 Sets the arbitrary G B user s...

Page 168: ... MG MG MG R R YL YL YL G G G CY CY B Sets 16 hue axes as the targets of the multi matrix correction function MTX MULTI HUE 99 to 99 Sets hue correction values for each of the 16 axis modes MTX MULTI SAT 99 to 99 Sets saturation correction values for each of the 16 axis modes 14 V MODULATION V MOD OFF ON Turns the V modulation function on or off MASTER VMOD 99 to 99 Adjusts the master V modulation ...

Page 169: ... L KEY 17 NOISE SUPPRESS NOISE SUPPRESS OFF ON Turn on and off the noise suppression function NOISE SUP LEVEL OFF LOW HIGH Selects the level of the noise suppression function 18 SCENE FILE 1 STANDARD Recalls the scene file saved in the memory of the camcorder 2 STANDARD 3 STANDARD 4 STANDARD 5 STANDARD STANDARD Clears all current detail adjusted settings and switch settings and returns the setting...

Page 170: ...ST Selects the channel adjusted by this menu If TEST is selected the setting is the same as the setting of TEST OUT SELECT TEST OUT SELECT VBS Y R G B Selects the signal output of the TEST OUT connector R G B BLK H SAW 99 to 99 H Saw black shading compensation R G B BLK H PARA 99 to 99 H Parabola black shading compensation R G B BLK V SAW 99 to 99 V Saw black shading compensation R G B BLK V PARA ...

Page 171: ...l of the battery at which the END warning should be issued b Other BEFORE END 11 5V to 11 8V to 17 0V in 0 1V steps Used when a battery pack other than a Sony battery pack is used Sets the voltage level of the battery at which the BEFORE END warning should be issued Other END c 11 0V to 14 0V in 0 1 V steps Used when a battery pack other than a Sony battery pack is used Sets the voltage level of t...

Page 172: ...eps When the battery type judgment is OTHER sets the voltage level below which the battery status indicator segment No 5 should turn off SEGMENT NO 4 11 0V to 14 0V to 17 0V in 0 1 V steps When the battery type judgment is OTHER sets the voltage level below which the battery status indicator segment No 4 should turn off SEGMENT NO 3 11 0V to 13 0V to 17 0V in 0 1 V steps When the battery type judg...

Page 173: ...STREO Selects whether to make the rear earphone monaural or stereo 07 AUDIO 2 AU DATA LEN IMX 16bit 24bit For details see Setting the Recording Format page 53 AU REF LEVEL 20dB 18dB 16dB 12dB EBUL Sets the output level of the 1 kHz test signal AU REF OUT 0dB 4dB 3dB EBUL Sets the output reference level AU CH12 AGC MODE MONO STREO Selects whether to perform automatic input level adjustment of analo...

Page 174: ...NT MIC LEVEL control F S2 LEVEL control right side or the MIC LEVEL control The two controls are linked to each other REAR1 WRR LEVEL SIDE1 FRONT F S1 Selects any of these controls to adjust the audio level of the equipment that is connected to the wireless microphone and whatever is connected to the AUDIO IN CH1 connector on the rear panel SIDE 1 LEVEL control left side FRONT MIC LEVEL control F ...

Page 175: ...s and Detailed Settings 08 AUDIO 3 AUDIO CH4 LEVEL e FIX FRONT Selects the audio level recorded on channel 4 FIX Fixed FRONT Level as adjusted by the MIC LEVEL control on the front panel of the camcorder No Page Item Settings Description ...

Page 176: ...transmitter whose signals are being received on the channel selected by WRR CH SELECT is over the peak TX INPUT LEVEL channel number f MIC LINE Displays whether the input level of the transmitter whose signals are being received on the channel selected by WRR CH SELECT is set to MIC or LINE TX ATT LEVEL channel number f Sets the ATT level of the transmitter whose signals are being received on the ...

Page 177: ...tup value locks to an INT or an EXT source when the timecode is locked to an external source INT Internal lock EXT External lock LTC UBIT FIX TIME Sets the data to be recorded in U BIT of LTC FIX Records the data that is set by the user TIME Records the present time VITC UBIT SD FIX TIME Sets the data to be recorded in U BIT of VITC FIX Records the data that is set by the user TIME Records the pre...

Page 178: ... RET SHOT MARK 2 OFF ON INDEX PIC POS 0SEC to 10SEC in 1 sec steps For details see Setting the thumbnail image at recording time page 83 FIND MODE R ST CLIP Specify the frame to be cued up when the PREV or NEXT button is pressed R ST The frame where a Rec Start essence mark is set CLIP The first frame of the clip No Page Item Settings Description ...

Page 179: ...finder see page 30 G TLY Use the function and indicate by the TALLY indicator in the viewfinder R TLY Use the function and indicate by the REC recording red tally indicator in the viewfinder Note When R TLY is selected the TALLY indicator lights even when the unit is not recording MATCH CLIP NAME OFF ON Specifies whether to superimpose clip name information on the HDSDI output on the SDIOUT 1 2 co...

Page 180: ...s F value display type on remote control units such as the MSU 900 CTRL Display based on control value from camera RET Display based on position value from lens FAN CONTROL AUTO R MIN MIN Specifies the control method for the cooling fan This setting is retained even when the unit is powered off AUTO Control the rotation of the cooling fan automatically R MIN Rotate the cooling fan at low speed dur...

Page 181: ... more information about lenses that support aberration correction Wi Fi ETHER_RM OFF RM ALL Selects remote control of the camera using a Wi Fi or Ethernet connection OFF Remote control disabled RM Remote control operation of the camera is supported via an CBK WA100 but main line output broadcast is not supported ALL Remote control of the camera and main line output broadcast is supported 15 PRESET...

Page 182: ...N Turns on and off the function which displays a frame marker for the auto iris detection window IRIS LEVEL 99 to 99 Adjusts the level of the auto iris target value IRIS APL RATIO 99 to 99 Adjusts the mix ratio of auto iris detection peak value and average value IRIS VAR WIDTH 20 to 240 to 479 Adjusts the width of detection frame when the auto iris detection window is set to VAR IRIS VAR HEIGHT 20...

Page 183: ...shading correction function If executed when in SLS slow speed shutter mode this performs only fine compensation on edge portions of the screen RESET BLK SHD EXEC Clear black shading compensation values TEST OUT SELECT VBS Y R G B Selects the signal output of the TEST OUT connector MASTER GAIN TMP 6dB 3dB 0dB 3dB 6dB 9dB 12dB 18dB 24dB 30dB 36dB 42dB Temporarily sets the master gain value 21 APR A...

Page 184: ...and 2 cannot be set when DHCP is set to ENABLE To check automatically acquired settings close the menu and open it again IP ADDRESS xxx xxx xxx xxx 192 168 1 10 Set the IP address of this unit SUBNET MASK xxx xxx xxx xxx 255 255 255 0 Sets the subnet mask DEF GATEWAY xxx xxx xxx xxx 0 0 0 0 Set the address of the default gateway LINK SPEED AUTO 10Mbps 100Mbps Sets the communications speed DUPLEX A...

Page 185: ...s display only Network name NETWORK TYPE INFRA ADHOC display only Connection mode CH 1 to 14 display only 13 and 14 are for automatically detected channels only Wireless channel AUTH OPEN SHARED WPA WPA2 display only Network authentication ENCRYPTION DISABLE WEP TKIP AES display only Data encryption Wi Fi SETTING Note This menu is not used when using the CBK WA100 Wireless Adaptor SCAN NETWORKS EX...

Page 186: ...edge enhancement by the upconverter 27 SHUTTER SELECT SHUTTER SELECT SECOND DEGREE Selects the shutter speed display unit SECOND Second units DEGREE Degree units shutter opening angle See page 62 for more information about degree unit settings ADD only when SHUTTERSELECT is set to DEGREE 360 0 to 180 0 to 4 5 upper limit of shutter angle degrees Registers a shutter degree setting in an empty numbe...

Page 187: ...function If No More White Pixel appears after the APR function is executed then there are no more detectable white flecks 28 META OUT META DATA ITEM OUT OFF ON Sets whether to put recorded VANC packet information in DATA ITEM in MXF files when transferring files via FTP OFF Do not include VANC packet information ON Include VANC packet information 29 HEADSET SELECT CA FB70 CA TX70 Camera Adaptors o...

Page 188: ...PAGE OFF ON Selects whether to load data for items on the pages beyond USER FILE in the USER menu when USER FILE LOAD on the USER FILE page is executed USER LOAD WHITE OFF ON Selects whether to load white balance data when USER FILE LOAD on the USER FILE page is executed 03 ALL FILE ALL FILE LOAD EXEC Load ALL file ALL FILE SAVE EXEC Save ALL file F ID Blank up to 16 characters Name ALL file ALL P...

Page 189: ...RENCE SAVE EXEC Save reference file on the USB flash drive F ID Blank up to 16 characters Enter reference file name SCENE WHITE DATA OFF ON Selects whether to load white balance data when SCENE RECALL or STANDARD on the SCENE FILE page is executed 06 USER GAMMA USER GAMMA LOAD EXEC Loads user created gamma table data a user gamma file from a USB flash drive into internal memory USER GAMMA RESET EX...

Page 190: ...ommunicated load the lens file corresponding to the lens model name same as the ON setting L ID Display the name of the connected lens that supports serial communications L MF Display the manufacturer of the connected lens that supports serial communications 08 LENS FILE 2 LENS M VMOD a 99 to 99 Adjusts the lens file V SAW shading compensation LENS CENTER H a 480 to 0 to 479 Compensates the horizo...

Page 191: ...B IN JUMP TO OFF USER ALL SCENE LENS REFER USER1 For details see Jumping to a File Related Menu Page when Connecting a USB Flash Drive page 226 No Page Item Settings Description DIAGNOSIS menu No Page Item Description 01 HOURS METER OPERATION Displays the total time that this unit has been powered on in units of hours LASER Displays the total number of output parameters to the optical heads OPERAT...

Page 192: ...status of each internal device of this unit D A DCP1 DCP2 EEPROM CN DCP DR FRAM AT FAN MB LSI DCP1 DCP2 TG SCI SY RM 07 CA STATUS CA FB70 Camera Adaptor only CA CA FB70 Displays the version information and signal level of the camera adaptor SERIAL XXXXXXXX VER VX XXXXXX APR 30 2014 COMMENTXXXXX XXXX OPTICAL LEVEL CCU t CAM NOSIGNAL CAM t CCU NOSIGNAL 07 CA STATUS CA TX70 Camera Adaptor only CA CA ...

Page 193: ...n the DISPLAY of the DISPLAY ASPECT switch on the viewfinder is set to on the display indicating the current status of the camcorder appears on the viewfinder screen For details see Selecting the display items page 201 To display the TOP menu With no menu displayed on the screen hold down the MENU knob and set the MENU ON OFF switch to ON Depending on the internal switch settings display of the TO...

Page 194: ...DISC EXCHG CACHE OFF CLIP CONT REC OFF LIVE LOGGING OFF When blinks turn the MENU knob to switch pages TOP 001 OUTPUT1 SDI OUT1 SELECT OFF SDI OUT2 SELECT OFF SDI OUT2 SUPER OFF TEST OUT SELECT VBS TEST OUT SUPER OFF TOP 001 OUTPUT1 SDI OUT1 SELECT OFF SDI OUT2 SELECT OFF SDI OUT2 SUPER OFF TEST OUT SELECT VBS TEST OUT SUPER OFF When b appears turn the MENU knob to move b up and down TOP 001 OUTPU...

Page 195: ...SW 07 POWER SAVE 08 VF DISP 1 09 VF DISP 2 10 VF DISP 3 TOP 000 CONTENTS 01 OUTPUT 1 02 OUTPUT 2 03 SUPERIMPOSE 04 LCD 05 REC FUNCTION 06 ASSIGNABLE SW 07 POWER SAVE 08 VF DISP 1 09 VF DISP 2 10 VF DISP 3 TOP 001 OUTPUT1 SDI OUT1 SELECT OFF SDI OUT2 SELECT OFF SDI OUT2 SUPER OFF TEST OUT SELECT VBS TEST OUT SUPER OFF TOP 001 OUTPUT1 SDI OUT1 SELECT OFF SDI OUT2 SELECT OFF SDI OUT2 SUPER OFF TEST O...

Page 196: ... FILE and DIAGNOSIS menus move b to the menu that contains the desired item in the TOP menu and then press the MENU knob 2 Turn the MENU knob until the desired page appears 3 Press the MENU knob b and z appear 4 Turn the MENU knob to move b to the desired item and then press the MENU knob b changes to z and z changes to 5 Turn the MENU knob to change the setting Depending on the direction of turni...

Page 197: ...b to the page number and press the MENU knob Then turn the MENU knob to switch pages The USER MENU CUSTOMIZE menu allows you to configure a USER menu that consists only of pages and items that you need by adding deleting or replacing the pages To add a new page The USER MENU CUSTOMIZE menu allows you to add a new page to the USER menu While the EDIT page contains factory preset items the EDIT USER...

Page 198: ...osition The message DELETE ITEM OK appears 4 Flick the CANCEL PRST ESCAPE switch to the CANCEL PRST position again To delete items from a page by using the menu 1 Follow steps 1 to 3 in To add a new page page 197 2 Press the MENU knob Then select the item that you want to delete and press the MENU knob The EDIT FUNCTION page appears 3 Select DELETE and press the MENU knob The previously displayed ...

Page 199: ...ed page appears 3 If the CONTENTS page is displayed press the MENU knob Then select EDIT PAGE and press the MENU knob If a different page is displayed turn the MENU knob until the EDIT PAGE screen appears 4 Press the MENU knob Then select the position where you want to add the page and press the MENU knob The EDIT FUNCTION page appears 5 Select INSERT and press the MENU knob The CONTENTS page appe...

Page 200: ...f the USER MENU CUSTOMIZE menu EDIT PAGE NAME1 To rename USER1 to USER10 EDIT PAGE NAME2 To rename USER11 to USER19 For details on menu operations see Basic menu operations page 193 2 Select the page that you want to rename USER 1 to USER 19 and press the MENU knob A character table appears 3 Follow steps 3 and 4 described in Setting the shot ID page 205 to enter characters 4 When you have finishe...

Page 201: ...menu How to select an item in the menu screen Turn the MENU knob to move b to the desired item 1 Display the VF DISP 1 VF DISP 2 or VF DISP 3 page of the OPERATION menu and press the MENU knob For details on menu operations see Basic menu operations page 193 2 Select the desired setting item and press the MENU knob On the VF DISP 1 VF DISP 2 and VF DISP 3 pages you can select any of the following ...

Page 202: ...DISP DISC Remaining disc capacity indicator DISP IRIS Iris opening indicator Item Description DISP ZOOM Zoom position indicator DISP COLOR TEMP Displays the color temperature DISP BATT REMAIN a Displays the battery voltage remaining capacity of an internal battery pack or an external battery connected to the DC IN connector DISP DC IN Displayed when the power is supplied from an external battery c...

Page 203: ...b You can set the following items on the MARKER 1 and MARKER 2 pages MARKER 1 page a 100 MARKER is disabled when the focus assist indicator is displayed Change confirmation adjustment progress messages Message display condition Message Display mode setting 1 2 3 When the filter selection has been changed FILTER n where n 1 2 3 4 N N Y When the gain setting has been changed GAIN n where n 6dB 3dB 0...

Page 204: ...t of the box cursor distance from center to top or bottom edge USER BOX H POS Sets the horizontal position of the center of the box cursor USER BOX V POS Sets the vertical position of the center of the box cursor CENTER H POS Sets the horizontal position of the center marker CENTER V POS Sets the vertical position of the center marker ASPECT SAFE ZONE Turns the display of the aspect safety zone on...

Page 205: ...OT DISP page set the OUTPUT DCC switch to BARS DCC OFF The items selected for superimposed recording appear on the screen and are recorded superimposed on the color bars Example display when SHOT DATA is set to ON You can set a shot ID of up to 12 alphanumeric characters spaces and symbols When the OUTPUT DCC switch is set to BARS DCC OFF this shot ID is output with the color bar signal You can se...

Page 206: ...ress the MENU knob To delete a character In step 3 of Setting the shot ID page 205 move the x mark over DEL and press the MENU knob This deletes the character under the x mark in the shot ID row To cancel deleting the character move the x mark over RET and press the MENU knob To cancel changing shot ID Before executing step 5 of Setting the shot ID page 205 move the b mark over ESC then press the ...

Page 207: ...t the status confirmation screens are displayed To display the status confirmation screens You can use the CANCEL PRST ESCAPE switch as the STATUS ON SEL OFF switch when the MENU ON OFF switch is set to OFF when the cover of the menu operating section is closed OFF is automatically selected To disable display of the status confirmation screens How to select an item in the menu screen Turn the MENU...

Page 208: ...ents and Settings from Menus Setting gain values for the GAIN selector positions Item Description GAIN LOW Sets the gain value corresponding to the L position of the GAIN selector GAIN MID Sets the gain value corresponding to the M position of the GAIN selector GAIN HIGH Sets the gain value corresponding to the H position of the GAIN selector GAIN TURBO Sets the gain value corresponding to TURBO G...

Page 209: ...Selects the output signal from the TEST OUT connector VBS Output composite video signal When you select VBS connect to the VIDEO IN connector of your monitor Y Output HD Y signal R G B Output HD RGB signal TEST OUT SUPER Selects whether to superimpose ON or not superimpose OFF text information on the signal output from the TEST OUT connector Assigning functions to ASSIGN switches Item Setting Item...

Page 210: ...n REC SWITCH Assigns the function that starts and stops recording TURBO SWITCH Assigns the turbo gain function ZEBRA Assigns the zebra pattern display function FREEZE MIX Assigns the function that mixes a still picture monochrome and camera video color effective for framing shots CC 5600K Assigns the function that applies an electrical 5600 K filter ZOOM TELE WIDE e For use with a lens that suppor...

Page 211: ... Operations page 193 Function Content OFF Assigns no function FRONT MIC Assigns the function that switches between stereo and monaural when a stereo microphone is connected PICTURE CACHE Assigns execution of recording in picture cache mode SUPER VFDISP M ENU Assigns a mixing switch function that selects mixing or no mixing of superimposed viewfinder and menu text data into the video signals output...

Page 212: ...after the last operation You can limit the function of some output connectors to save power consumption How to select an item in the menu screen Turn the MENU knob to move b to the desired item 1 Display the POWER SAVE page of the OPERATION menu and press the MENU knob For details on menu operations see Basic menu operations page 193 2 Select the desired item and press the MENU knob You can set th...

Page 213: ... recording function is disabled automatically whenever you enable the wireless LAN connection function If using the CBK WA100 the following menu settings are not required Before starting set ETHERNET USB and Wi Fi on the POWER SAVE page of the OPERATION menu to ENABL How to select an item in the menu screen Turn the MENU knob to move b to the desired item 1 Display the Wi Fi page of the MAINTENANC...

Page 214: ...ce has priority and the camcorder cannot be controlled using the Wi Fi remote control To display the Wi Fi remote control on the camcorder 1 Set Wi Fi to ENABL on the POWER SAVE page of the OPERATION menu 2 Set Wi Fi ETHER_RM to RM on the CAM CONFIG 3 page of the MAINTENANCE menu To configure the remote device Configure the following on the smartphone tablet or other device 1 Connect the camcorder...

Page 215: ...Internet Explorer 8 or 9 Mac OS 10 7 4 Safari 5 1 6 Smartphone Android 2 3 3 Standard browser iOS 5 1 1 Safari Tablet Android 4 0 3 Standard browser iOS 5 1 1 Safari Item name Setting SSID network name Up to 32 alphanumeric characters or symbols NETWORK TYPE connection mode INFRA Infrastructure mode ADHOC Ad hoc mode CH wireless channel 1 to 11 can be specified only in ad hoc mode AUTH network aut...

Page 216: ...PS START and then press the MENU knob WPS setup starts During execution the progress and results appear after WPS STATUS SCANNING Scanning for an access point OK Detection successful NG Detection failed When execution finishes the screen changes to the ACCESS PNT page 5 Select the desired connection destination from the detected access points and then press the MENU knob You can manually adjust th...

Page 217: ...menu screen Turn the MENU knob to move b to the desired item 1 Display the LENS FILE page of the USER menu and press the MENU knob For details on menu operations see Basic menu operations page 193 The LENS FILE page shows the name F ID of the currently selected lens file The lens name L ID and manufacturer L MF appear when a lens that supports serial communications is mounted B GAIN A Changes only...

Page 218: ...Recording based on the UTC The UTC is used when recording the UMID This enables uniform control of source material recorded all over the world based on the universal timecode Calculating the date difference among source materials The source material is recorded based on the MJD Modified Julian Date which enables easy calculation of date difference among source materials To set UMID ownership infor...

Page 219: ...are no problems in recording or playing back audio video signals if ORGANIZATION is not set USER CODE Enter the 4 byte alphanumeric strings for user identification The user code is registered with each organization locally It is usually not centrally registered When the user code is less than 4 bytes enter the user code from the beginning of the 4 bytes and enter the space character 20h in the rem...

Page 220: ...E SAVE and press the MENU knob The USER SAVE page appears Up to 20 pages from P00 to P19 can be used to save user files on the USB flash drive Each page can hold up to five files 3 Turn the MENU knob until the page which contains the desired file number appears and press the MENU knob 4 Select the desired file number and press the MENU knob The message SAVE OK YES b NO appears If a file number is ...

Page 221: ...sh drive Otherwise the file ID is not saved with the other data How to select an item in the menu screen Turn the MENU knob to move b to the desired item 1 Display the USER FILE page of the FILE menu For details on menu operations see Basic menu operations page 193 2 Select F ID and press the MENU knob A character table appears 3 Follow steps 3 and 4 described in Setting the shot ID page 205 to en...

Page 222: ...nob 4 Select the desired file number and press the MENU knob The message LOAD OK YES b NO appears 5 To carry out the load select YES and press the MENU knob To cancel press the MENU knob leaving b pointing to NO The access indicator lights When the load is completed the message COMPLETE appears and the access indicator goes off If data cannot be loaded If one of the following error messages appear...

Page 223: ...speed settings made in the standard mode and ECS mode The white balance data included in a scene file depends on the SCENE WHITE DATA setting on the REFERENCE page of the FILE menu To save a scene file on a USB flash drive connect the USB flash drive into the USB connector before starting the following operation How to select an item in the menu screen Turn the MENU knob to move b to the desired i...

Page 224: ...nformation items to be displayed page 222 To save scene files stored in the camcorder memory on a USB flash drive All five scene files stored in the camcorder memory can be saved on a USB flash drive in a single operation How to select an item in the menu screen Turn the MENU knob to move b to the desired item 1 Display the SCENE FILE page of the FILE menu and press the MENU knob For details on me...

Page 225: ...eturns to the settings before selecting this scene file To load a scene file saved on a USB flash drive 1 Select SCENE RECALL and press the MENU knob The SCENE RECALL page appears 2 Turn the MENU knob until the page which contains the desired file number appears then press the MENU knob 3 Select the desired file number and press the MENU knob The message RECALL OK YES b NO appears 3 To carry out t...

Page 226: ...es lens files reference files and ALL files The camcorder menu system allows you to make a setting so that when a USB flash drive holding these files is connected while in menu operating mode a menu page relating to the desired file is automatically displayed on the screen Thus you can proceed to file operation quickly This is very convenient especially when you manage data files using USB flash d...

Page 227: ...Chapter 7 Saving and Loading User Setting Data When OFF is selected on the USB IN JUMP TO page When any of the following menu pages is already displayed A file related page such as the USER FILE page of the FILE menu USB MEMORY ALL FILE SCENE FILE LENS FILE or REFERENCE page ...

Page 228: ...remote computer using a network cable see page 233 The following figure shows the directory structure of discs visible to a remote computer Note This structure is not the same as the actual structure recorded on the disc a Root directory b Only when NAMING FORM on the FILE NAMING page of the OPERATION menu is set to FREE c Files generated when voice over editing is executed on the PDW HR1 Chapter8...

Page 229: ...nly when the Write Inhibit tab of the disc is set to recording enabled Root directory Continued File operation restrictions File name Content Operations Read Partial read Write Partial write Rename Create Delete INDEX XML Contains data for management of the material on the disc Yes No No No No ALIAS XML a Contains conversion tables for assigning user defined names to clips and clip lists Yes No No...

Page 230: ...hanged a C M01 XML file or a C M02 KLV file with the same name in the C part is also changed automatically h When a C MXF file is created a C M01 XML file with the same name in the C part is created automatically i When a C MXF file is deleted the C M01 XML file or a C M02 KLV file with the same name in the C part is also deleted automatically Note Directories cannot be created in the Clip directo...

Page 231: ... a E E01 SMI is changed an E M01 XML file with the same name in the E part is also changed automatically f When an E E01 SMI file is created an E M01 XML file with the same name in the E part is also generated automatically g When an E E01 SMI file is deleted an E M01 XML file with the same name in the E part is also deleted automatically Note Directories cannot be created in the Edit directory Fi...

Page 232: ...n the character type file names including extension may be limited to 21 characters The following directory operations are possible in the General directory Directory creation up to 63 levels including the General directory Deletion and renaming of directories Notes The maximum number of files that can be created on one disc including directories is 5 000 for a single layer disc and 6 000 for a du...

Page 233: ... menu set the IP address and other network setting items for this unit 1 For details on menu operations see Basic menu operations page 193 If network settings have already been made Check the IP address of this unit 1 This unit is able to acquire an IP address automatically from a DHCP server It also supports an Auto IP function to assign an IP address automatically when access from this unit to t...

Page 234: ...in is not possible unless the unit is in the state described above 2 Start the command prompt 3 Enter ftp SP IP address and press the Enter key SP refers to a space For example if the IP address of this unit is set to 192 168 001 010 enter ftp 192 168 1 10 Refer to the Windows help for more information about the FTP command If the connection succeeds you are prompted to enter a user name 4 Enter t...

Page 235: ...byte to h4 least significant byte IP address p1 most significant byte p2 least significant byte Port address Input example PORT 10 0 0 1 242 48 IP address 10 0 0 1 Port number 62000 PASV This command requests this unit to Listen on a data port which is not its default data port It puts this unit into passive mode waiting for the remote computer to make a data connection Syntax PASV CRLF TYPE Speci...

Page 236: ...r of a copy of a file in the specified path on this unit to the current directory on the remote computer Syntax RETR SP path name CRLF Input example RETR Clip C0001 MXF STOR Begins transfer of a copy of a file in the specified path on the remote computer to the current directory on this unit Depending on the type of file transferred the following items are created C MXF file 1 3 C M01 XML file met...

Page 237: ...sferred depending on whether a command name is specified with command name Command name specified Explanation of the specified command No specification Command list Input example HELP RETR NOOP Does nothing except return a response Used to check whether this unit is running Syntax NOOP CRLF PWD Displays the current directory if the directory is the root directory Syntax PWD CRLF CWD Changes the cu...

Page 238: ...rame 6 to frame 150 SITE REPFL Sends an MXF file from the specified path on this unit to the remote computer This command allows you to specify a segment in the body of the MXF file composed of video and audio data for transfer of the required segment only Note A segment greater than the file size cannot be specified Syntax SITE REPFL SP path name SP start frame SP transfer size CRLF path name spe...

Page 239: ...pied with the STOR command Specify the timecode in the format ffssmmhh ff frames ss seconds mm minutes hh hours Notes This command remains in effect until a STOR command is executed or if no STOR command is executed until the FTP connection is terminated If a SITE UMMD command is executed after this command the SITE UMMD command takes priority and this command is discarded If this command is execu...

Page 240: ...t and then press the EJECT button to open the disc compartment lid 4 After confirming that the disc is not write protected load the disc and close the disc compartment lid Set the switches and selectors as follows Testing the viewfinder 1 Adjust the position of the viewfinder 2 Check that the color bars are displayed on the viewfinder screen and adjust the BRIGHT CONTRAST and PEAKING controls to g...

Page 241: ... at a suitable subject focus the camera and check the picture on the viewfinder screen 8 Set both of the AUDIO IN switches to FRONT and check that when sound is input to a microphone connected to the MIC IN connector on the front of the camcorder the audio level indicators appear on the viewfinder screen 9 Check that setting the ZEBRA switch to ON and OFF makes the zebra pattern appear and disappe...

Page 242: ...ks of steps 5 and 6 this time using the VTR button on the lens Press the RESET RETURN button and check that the indication in the counter display on the LCD monitor is 00 00 00 00 8 Press the F REV button then press the PLAY PAUSE button Check that fast reverse playback and normal playback are performed 9 Press the STOP button then press the F FWD button Check that playback stops and fast forward ...

Page 243: ...to check remove the front microphone connected to the MIC IN connector if it is connected 1 Perform the operations of steps 1 and 2 explained in 5 Testing external microphones 2 Set the AUDIO IN CH 1 CH 2 switches to FRONT 3 Perform the operations of steps 4 and 5 explained in 5 Testing external microphones If the audio level meters on the color and monochrome LCDs and the audio level indicators i...

Page 244: ...an the lens and protecting filter with a commercially available lens cleaner Caution Never use organic solvents such as thinners Disassembling the eyepiece for cleaning 1 Detach the eyepiece from the viewfinder barrel For the detaching procedure see Detaching the eyepiece page 37 2 Remove the eyecup from the eyecup holder 3 Remove the protecting filter together with the packing ring from inside th...

Page 245: ...so that the reassembled eyepiece is waterproof Note When cleaning the fog proof filter wipe it very gently with a soft cloth to avoid damaging the anti fogging coating The battery terminal of this unit the connector for battery packs and AC adaptors is a consumable part Power may not be supplied to the unit properly if the pins of the battery terminal are bent or deformed by shock or vibrations or...

Page 246: ...ones D In the viewfinder a warning message A and an indicator above or below the viewfinder screen E The volume of the warning sound can be adjusted with the ALARM knob Set the ALARM knob to the minimum position to suppress the sound Layout of the table of warning messages The operation of the WARNING indicator and the indicators in the viewfinder is represented by graphic symbols as follows Conti...

Page 247: ... Problem VDR operation Action to take Input sync error Recording continues but may be substandard Turn off the power and contact a Sony service representative This indication may be given momentarily when a GENLOCK signal is connected or disconnected but this does not indicate a problem Verify ERR Warning indication State WARNING indicator Warning sound REC TALLY BATT b b b Problem VDR operation A...

Page 248: ... WARNING indicator Warning sound REC TALLY BATT b only when recording the 300th clip Problem VDR operation Action to take Nine or fewer clips remain Operation continues Be prepared to exchange the disc DISC FULL d Warning indication State WARNING indicator Warning sound REC TALLY BATT DISC and E flash g d d d Problem VDR operation Action to take Disc full Recording stops Exchange the disc 100GB Di...

Page 249: ...LLY BATT d d d Problem VDR operation Action to take The upper limit of files reached Cannot record Exchange the disc LOW BATT h Warning indication State WARNING indicator Warning sound REC TALLY BATT BATT flash f e e Problem VDR operation Action to take Battery almost exhausted Operation continues Replace the battery BATT EMPTY Warning indication State WARNING indicator Warning sound REC TALLY BAT...

Page 250: ...tative AUTO INTERVAL M S The unit is operating in Auto Interval Rec mode M S Indicates the shooting interval in minutes and seconds MANU INTERVAL FRAME The unit is operating in the single shot mode of Manual Interval Rec mode FRAME Indicates the number of frames recorded in one shot INTERVAL S M H FRAME The unit is operating in the consecutive mode of Manual Interval Rec mode S M H Indicates the t...

Page 251: ...ecording operations exchange the disc or change the recording format of this unit or enable mixed format recording mode System FREQ This appears when the current system frequency of this unit does not match the system frequency of clips recorded on the inserted disc To carry out recording operations exchange the disc or change the system frequency of this unit Mixed REC This appears when mixed for...

Page 252: ... upper limit 300 Resolution An attempt was made to register a clip in a clip list with a different resolution CL OVER DUR The total duration of sub clips in the current clip list is over the upper limit 24 hours FAN Stopped DR FAN Stop The main unit or drive fan has stopped Avoid use under high temperatures turn off the power and contact a Sony service representative NVRAM NG An error was detected...

Page 253: ...Delete Sub Clips see page 130 or Set Start Time Code see page 131 operation with no sub clips in the current clip list Clip List does not Exist An attempt is made to execute a Delete Clip List operation see page 132 when there are no clip lists on the disc Move is Invalid An attempt is made to execute a Move Sub Clips operation see page 129 when there are no sub clip in the current clip list or wh...

Page 254: ...disc cannot be recorded or played This unit can record and play Professional Discs Insert a Professional Disc The Disc Write Protect TAB is set to Save An attempt was made to format a write protected disc Try formatting the disc after moving the write protect tab away from the Save position Auto Formatting was not Completed Automatic disc formatting failed Video Resolution Differ from it on Clip L...

Page 255: ...car with the windows closed can easily exceed 50 C 122 F In damp or dusty locations Locations where the unit may be exposed to rain Locations subject to violent vibration Near strong magnetic fields Close to radio or TV transmitters producing strong electromagnetic fields In direct sunlight or close to heaters for extended periods To prevent electromagnetic interference from portable communication...

Page 256: ...hese problems are not a malfunction Note that any such problems have no effect on recorded data Phenomena specific to image sensors Note The following phenomena that may occur in images are specific to image sensors They do not indicate a malfunction White flecks Although the image sensors are produced with high precision technologies fine white flecks may be generated on the screen in rare cases ...

Page 257: ...th peripheral devices attached to the camcorder ensure that the total power consumption1 does not exceed 60 W Connect only devices with current consumption of 1 0 A or lower to the DC OUT connector 1 The power consumption of the optional CA FB70 CA TX70 is not included in the total Operating temperature 5 C to 40 C 23 F to 104 F Storage temperature 20 C to 60 C 4 F to 140 F Humidity 10 to 90 relat...

Page 258: ...85 min PFD50DLA Approx 85 min PFD23A Recording frame rate MPEG HD422 50 Mbps 1920 1080 59 94i 29 97p 50i 25p 23 98p 1280 720 59 94p 50p MPEG HD420 HQ 35 Mbps SP 25 Mbps 1440 1080 59 94i 29 97p 50i 25p 23 98p 1280 720 59 94p 50p MPEG HD420 LP 18 Mbps 1440 1080 59 94i 29 97p 50i 25p 23 98p playback only MPEG IMX 50 40 30 Mbps DVCAM mode 720 486 59 94i 29 97p 720 576 50i 25p Lens mount 2 3 inch type ...

Page 259: ...E 802 3u 10BASE T IEEE 802 3 USB For proxy recording on USB flash drive and firmware version update 1 Frequency response 20 Hz to 20 kHz 0 5 dB 1 0 dB Dynamic range 93 dB or higher Distortion 0 08 or lower at 1 kHz reference level Crosstalk 70 dB or lower at 1 kHz reference level Wow and flutter Below measurable limit Headroom 12 16 18 20 dB selectable Imager 3 chip 2 3 inch type HD PowerHAD FX CC...

Page 260: ... shutter Off White balance Preset 3200K Memory A Memory B ATW Gain selection 6 3 0 3 6 9 12 18 24 30 36 42 dB S N ratio 62 dB 58 dB without noise suppressor Horizontal resolution 1000 TV lines or more 1920 1080i mode Registration 0 02 or less for entire screen area excluding distortion due to lens Modulation depth screen center 45 or higher at 27 5 MHz typical Digital extender x2 x3 x4 Viewfinder ...

Page 261: ...r WRT 850 860 UHF Synthesized Transmitter DWT B01 Digital Wireless Transmitter DMX P02 Portable Digital Mixer Other peripheral devices CBK WA01 Wi Fi Adaptor CBK WA100 Wireless Adaptor PDW HR1 XDCAM HD422 Field Station CA FB70 Camera Adaptor CA TX70 Camera Adaptor Equipment for maintenance and easier handling LC H300 Hard Carrying Case LC DS300SFT Soft Carrying Case VCT 14 Tripod Adaptor Maintenan...

Page 262: ...DING BUT NOT LIMITED TO COMPENSATION OR REIMBURSEMENT ON ACCOUNT OF THE LOSS OF PRESENT OR PROSPECTIVE PROFITS DUE TO FAILURE OF THIS UNIT EITHER DURING THE WARRANTY PERIOD OR AFTER EXPIRATION OF THE WARRANTY OR FOR ANY OTHER REASON WHATSOEVER SONY WILL NOT BE LIABLE FOR CLAIMS OF ANY KIND MADE BY USERS OF THIS UNIT OR MADE BY THIRD PARTIES SONY WILL NOT BE LIABLE FOR THE LOSS REPAIR OR REPRODUCTI...

Page 263: ...itor BVM L230 LMD series monitor XDCAM HD series recorder PDW HD1500 HDCAM series recorder HDW 2000 series recorder HDW S280 WRR 855S UHF Synthesized Tuner Unit DWR S02D Digital Wireless Receiver PDW 850 RM B170 B750 Remote Control Unit VCT 14Tripod adaptor Tripod LC DS300 SFT Soft carrying case a AC DN10 DN2B AC Adaptor BC L500 Battery Charger BC L160 Battery Charger BC L70 Battery Charger BP L80...

Page 264: ...orted by the keyboards listed below Select the corresponding language by selecting Settings Select USB Keyboard Language in the Disc Menu see page 122 1 When the font setting is Simplified Chinese or Traditional Chinese a keyboard with the same layout as the English United States keyboard is selected automatically English United Kingdom English United States French France List of Supported USB Key...

Page 265: ...List of Supported USB Keyboards 265 Appendix German Germany Italian Italy Polish Programmers Poland Russian Russia Spanish Spain ...

Page 266: ... The keyboard is fixed as the Korean keyboard and you can enter Hangul characters Note The keyboard language cannot be changed When the area of use is set to NTSC J AREA The keyboard is fixed as the Japanese keyboard Notes The keyboard language cannot be changed It is not possible to enter Japanese hiragana katakana and kanji ...

Page 267: ...ENGAGED IN A PERSONAL AND NON COMMERCIAL ACTIVITY AND OR WAS OBTAINED FROM A VIDEO PROVIDER LICENSED BY MPEG LA TO PROVIDE MPEG 4 VIDEO NO LICENSE IS GRANTED OR SHALL BE IMPLIED FOR ANY OTHER USE ADDITIONAL INFORMATION INCLUDING THAT RELATING TO PROMOTIONAL INTERNAL AND COMMERCIAL USES AND LICENSING MAY BE OBTAINED FROM MPEG LA LLC SEE HTTP WWW MPEGLA COM MPEG LA is offering licenses for i manufac...

Page 268: ...met Redistributions of source code must retain the above copyright notice this list of conditions and the following disclaimer Redistributions in binary form must reproduce the above copyright notice this list of conditions and the following disclaimer in the documentation and or other materials provided with the distribution Neither name of Intel Corporation nor the names of its contributors may ...

Page 269: ...permission For written permission please contact openssl core openssl org 5 Products derived from this software may not be called OpenSSL nor may OpenSSL appear in their names without prior written permission of the OpenSSL Project 6 Redistributions of any form whatsoever must retain the following acknowledgment This product includes software developed by the OpenSSL Project for use in the OpenSSL...

Page 270: ...tual message at program startup or in documentation online or textual provided with the package Redistribution and use in source and binary forms with or without modification are permitted provided that the following conditions are met 1 Redistributions of source code must retain the copyright notice this list of conditions and the following disclaimer 2 Redistributions in binary form must reprodu...

Page 271: ...TS OR BUSINESS INTERRUPTION HOWEVER CAUSED AND ON ANY THEORY OF LIABILITY WHETHER IN CONTRACT STRICT LIABILITY OR TORT INCLUDING NEGLIGENCE OR OTHERWISE ARISING IN ANY WAY OUT OF THE USE OF THIS SOFTWARE EVEN IF ADVISED OF THE POSSIBILITY OF SUCH DAMAGE The licence and distribution terms for any publically available version or derivative of this code cannot be changed i e this code cannot simply b...

Page 272: ...onditions where signals from GPS satellites cannot be received In tunnels indoors or beside buildings In narrow roadways between buildings and skyscrapers Underground in dense areas of vegetation under overhead structures or near power lines or other equipment that generate magnetic fields Near 1 5 GHz band mobile phones or other equipment that emit radio waves of the same frequency Errors in posi...

Page 273: ...switch 14 B BATT indicator 27 Battery attachment shoe 12 Battery pack 33 Black balance adjusting 55 BRIGHT button 19 BRIGHT control 26 Built in speaker 17 C CA camera adaptor connector 13 Camera operator tally indicator 26 CANCEL PRST ESCAPE switch 17 CC 5600K function 210 Chapter thumbnail screen 109 Chapter function 117 Clip 126 assigning user defined name 94 assigning user defined title 91 chan...

Page 274: ...Menu 112 DISP SEL EXPAND button 18 DISPLAY switch 19 DISPLAY ASPECT switch 27 E EARPHONE jack 14 25 ECS Extended Clear Scan mode 61 E E Electric to Electric 14 EJECT button 18 Electric color temperature filter 31 Electronic shutter 60 Essence mark finding scenes 117 recording 82 thumbnail screen 110 Ethernet connector 24 Expand thumbnail screen 109 Expand function 116 Extender 28 External battery ...

Page 275: ...T switch 11 LINE AES EBU MIC selectors 25 Line input audio equipment connecting 46 Live Logging function 99 M Maintenance 244 MAINTENANCE menu 150 170 Marker display setting 203 Memory symbol and remaining memory capacity 30 Menu disc menu 112 setting menu list 151 setting menu operations 193 setting menu organization 148 thumbnail menu 110 MENU button 22 MENU knob 14 MENU ON OFF switch 17 Message...

Page 276: ...dicator 21 REMOTE connector 25 Remote control unit connecting 50 RESET RETURN button 19 Resolution 19 Retake function 91 S Scene editing 126 finding 116 117 playback 118 Scene file loading 225 saving 223 Scene selection 126 Scrollbar 107 SDI IN OPTION connector 23 SDI OUT 1 connector 25 SDI OUT 2 connector 25 SET S SEL button 22 Setting change and adjustment progress message display area 31 SHIFT ...

Page 277: ...B flash drive jumping to file related menu page 226 loading saved data 222 saving user menu data 220 User bits setting 69 User gamma file 189 USER menu 149 editing 197 resetting 200 USER MENU CUSTOMIZE menu 150 User menu data loading 222 saving 220 V VDR SAVE STBY switch 16 VF connector 13 Video format 20 28 setting 54 Video from external devices recording 98 Video light connecting 48 Viewfinder a...

Page 278: ...ettings obtained by ATW 58 specifying offset 217 White balance memory 31 Wireless LAN setting 213 Wireless microphone reception level 29 X XLR connectionautomatic detection function 44 Z ZEBRA switch 26 Zoom position 28 ...

Page 279: ... for use by the purchasers of the equipment described in this manual Sony Corporation expressly prohibits the duplication of any portion of this manual or the use thereof for any purpose other than the operation or maintenance of the equipment described in this manual without the express written permission of Sony Corporation ...

Page 280: ...PDW 850 SYM CN 4 544 825 11 1 Sony Corporation 2014 ...

Reviews: