Cha
p
te
r 7
Men
u
Dis
pla
y
s
and
Det
a
iled Se
tt
ing
s
142
7-3 Adjustments and Settings From Menus
Setting the CCD scan mode
The scan mode of the camcorder has been set to the
interlace scan mode at the factory. The FORMAT page of
the OPERATION menu allows you to change the CCD
scan mode to the progressive scan mode or 24P mode
(PDW-510/530 only).
1
Follow the procedures given in steps
1
to
3
described
in
7-3-4 “Specifying an Offset for the Auto White
, to display the
FORMAT page of the OPERATION menu.
2
Turn the MENU knob to move the
b
mark to “SCAN
MODE”, and press the MENU knob.
The
b
mark on the left of “SCAN MODE” changes to
a
z
mark and the
z
mark on the left of the setting
changes to a ? mark.
3
Turn the MENU knob to display “PsF” or “24P”, and
press the MENU knob.
The
z
mark changes to a
b
mark and the ? mark
changes to a
z
mark.
4
To end the menu operation, set the MENU ON/OFF
switch to OFF.
7-3-10 Using UMID Data
To perform operations from interviewing to editing
effectively and to detect audio-visual materials easily
when reusing them, metadata that provides additional
information is recorded along with audio-visual data on a
disc. As one of application of metadata, the UMID
(Unique Material Identifier) is internationally
standardized.
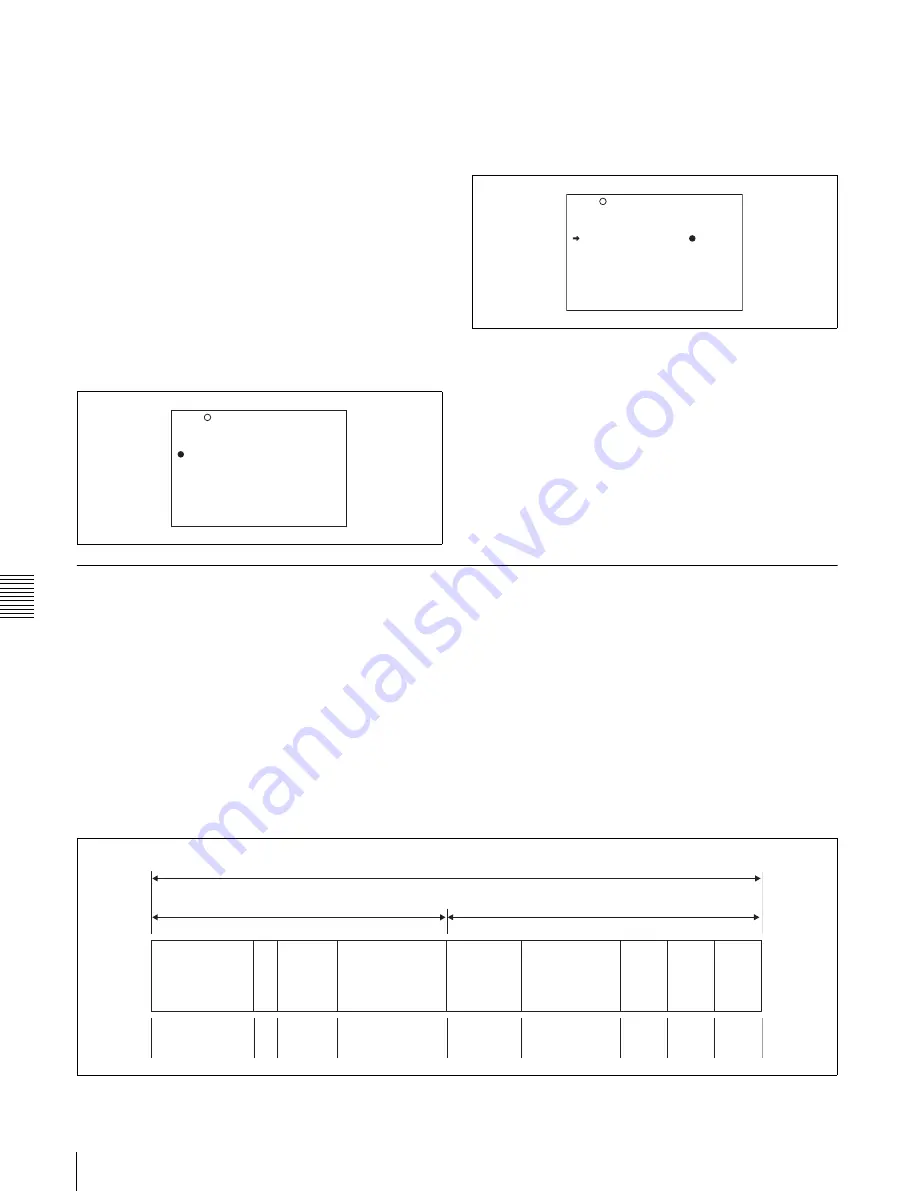
What is a UMID?
The UMID (Unique Material Identifier) is a unique
identifier for audio-visual material defined by the
SMPTE330M-2003 standard.
The UMID may be used either as the 32-byte Basic UMID
or as the extended UMID, which includes an additional 32
bytes of Source Pack to make a total 64 bytes.
For details, refer to SMPTE 330M.
19 FORMAT
16:9/4:3 SELECT : 16:9
SCAN MODE :? I
UC/J SELECT : UC
19 FORMAT
16:9/4:3 SELECT : 16:9
SCAN MODE : PsF
UC/J SELECT : UC
Extended UMID (64 bytes)
Basic UMID (32 bytes)
Source Pack (32 bytes)
Universal label
L
Inst. No.
Material Number
Time/Date
Spatial
Co-ordinates
Country
Org
User
12 bytes
1
3 bytes
16 bytes
8 bytes
12 bytes
4 bytes 4 bytes 4 bytes
Summary of Contents for XDCAM PDW-510
Page 8: ...8 ...
Page 12: ...12 Table of Contents ...
Page 20: ...Chapter 1 Overview 20 1 5 MPEG 4 Visual Patent Portfolio License ...
Page 86: ...Chapter 4 Scene Selection 86 4 4 Using the PDZ 1 Proxy Browsing Software ...
Page 116: ...Chapter 6 File Operations 116 6 4 Recording Continuous Time Code With FAM and FTP Connections ...
Page 174: ...Chapter 9 Setting Up the Camcorder 174 9 9 Connecting the Remote Control Unit ...
Page 220: ...Index 220 Index ...


