C
h
an
gi
ng
th
e
S
e
tt
in
gs
Settings
46
• [Printers] button
Touch this button to update the firmware of the
printers connected to the system. When you touch the
button, you are prompted to select a printer, and a
message appears prompting you to confirm whether
you want to update the firmware. Follow the
instructions on the screen to proceed. Touch the
[Cancel] button to return to the Administration screen.
For details, consult your retailer.
Note
After the version update is completed, be sure to turn
off all printers connected to the unit and the unit itself,
and then turn on the equipment again. Follow the
instructions on the screen.
Notes about version updates
The following notices apply to each FIRMWARE
PROGRAM supplied by Sony Corporation (hereafter
referred to as Sony). Read the following before
updating the firmware. By updating the firmware, you
accept the following terms and conditions.
– Execute the update procedure carefully. Failure to
update the firmware properly could cause the
equipment to malfunction.
– Sony is not liable for any damages or losses caused
by a procedural error by the customer during the
firmware update.
– Cost to repair damage to the product caused by
updating the firmware incorrectly shall be borne by
the customer, even if the product is still under
warranty.
– Sony authorized service facilities provide firmware
update assistance on request for a fee. If you require
assistance, please contact your dealer or any Sony
authorized service facility.
• [Settings] button
Touch this button to import an Administration screen
settings file, export the Administration screen settings,
or reinitialize the Administration screen. When you
touch the button, a message appears prompting you to
confirm whether you want to import or export the
Administration screen settings, or reinitialize the
Administration screen. Touch the [Cancel] button to
return to the Administration screen.
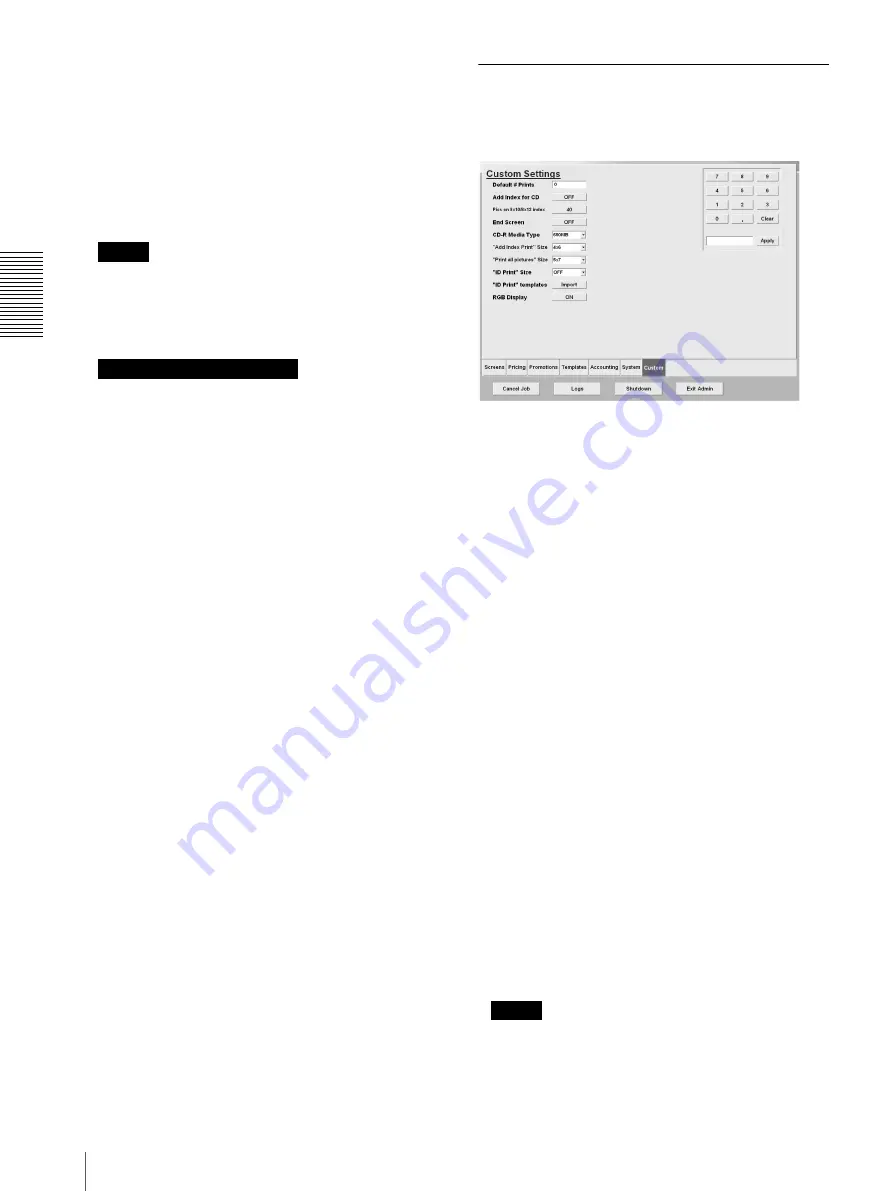
[Custom] Tab
By touching this tab, you can set default values for
number of prints, CD-R media type, and the output size
for the [Print all pictures] function.
Custom Settings
• [Default # Prints]
This box contains the initial number of copies printed
when a picture is selected. To modify this number,
touch the text box to highlight it, and then use the
keypad to type the desired value (range: 0 to 10). To
apply the desired value, touch the [Apply] button.
• [Add Index for CD]
With this set to [ON], the [Add Index Print] button on
the screen used to specify number of copies is
automatically activated when pictures are written to a
CD-R. With this set to [1 CD Index], an index is
automatically included when pictures are written to a
CD-R, and the first page of the index is free of charge.
If the index has more than one page, the fee specified
in [Index] applies from the second page. With this set
to [OFF], an index can be printed for a fee by touching
the [Add Index Print] button on the screen used to
specify number of copies.
• [Pics on 8 × 10 / 8 × 12 index]
This sets the number of thumbnail images that will
print on an 8 × 10 / 8 × 12 index page.
• [End Screen]
With this set to [ON], a screen to verify fees appears
after all output services are complete.
• [RGB Display]
This setting allows you to hide the RGB adjustment
buttons on the [Color / Contrast] screen that appears
when the [Light / Dark] button is pressed.
Note
Applies only when [Background Printing] in the
[System] tab is set to [OFF].


