background image

38

Adjusting Your Setup (MENU)

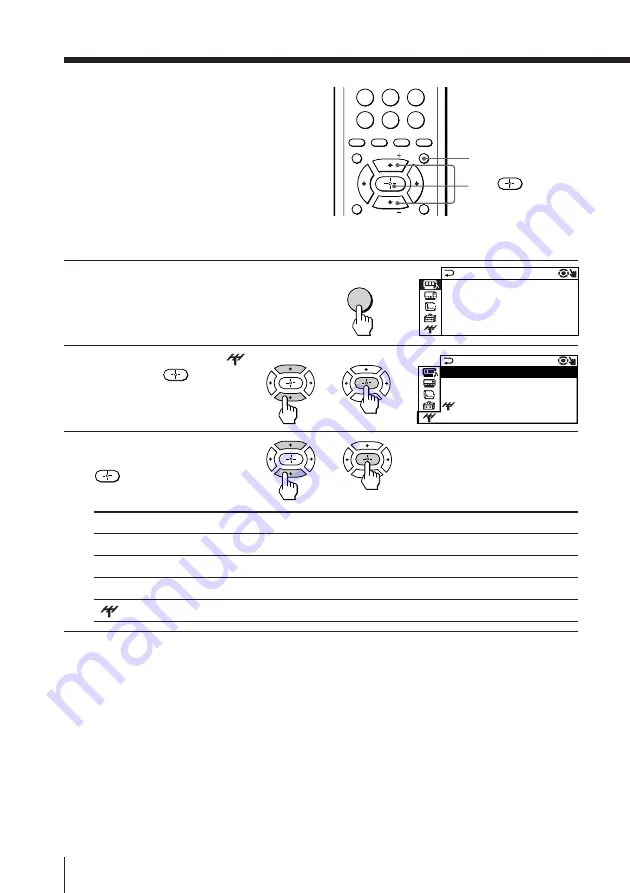
Changing the “CH
PRESET” setting

The “CH PRESET” menu allows you to
adjust the setup of your TV to receive
either CABLE TV or VHF or UHF
broadcast or you can manually tune in a
channel with a weak signal that fails to
be tuned in by automatic presetting.

MENU

1

Press MENU.

2

Press 

V

 or 

v

 to select 

,

then press 

.

3

Press 

V

 or 

v

 to select the

desired option, then press

.

To return to the normal screen

Press MENU.

Tip

• For details on the menu system and how to use the menu, refer to

“Introducing the menu system” on page 25.

A / V CONTROL

DRC-MF: DRC1050

SURROUND: OFF
DIGITAL IN : OFF

PICTURE MODE: DYNAMIC

SOUND MODE: DYNAMIC

Select

“AUTO PROGRAM”

“CABLE”

“ADD/ERASE”

SENS”

To

Preset channels automatically.

Select the cable TV.

Select the desired channel.

Adjust the TV reception sensitivity.

b

MENU

8

9

7

0

ENTER

JUMP

TV/VIDEO

TWIN

FREEZE

SWAP

PIP

MENU

FAVORITE

CH

INDEX

PIP CH

ZOOM

IN

LEFT

ZOOM

IN

RIGHT

PIP CH

CH PRE S E T

CA B L E : ON
ADD / ERA S E : CH 0 0 1 ADD

S ENS : H I GH

AU TO PROGRAM

V

/

v

/

b

b

b

Summary of Contents for Tinitron KV-ES29

Page 1: ...Trinitron Color TV 2000 Sony Corporation KV ES34 KV ES29 3 867 756 92 1 Operating Instructions K90 GB Before operating the unit please read this manual thoroughly and retain it for future reference ...

Page 2: ...ll the TV in a confined space such as a bookcase or built in cabinet Do not block the ventilation openings of the TV Install the TV in a stable position Do not allow children to climb onto it Do not plug in too many appliances to the same power socket Do not damage the power cord Clean the TV with a dry and soft cloth Do not use benzine thinner or any other chemicals to clean the TV Do not scratch...

Page 3: ... A V CONTROL setting 28 Changing the MULTI PICTURE setting 31 Changing the FEATURE setting 33 Changing the SET UP setting 35 Changing the CH PRESET setting 38 Additional Information Self diagnosis function 41 Troubleshooting 42 Identifying parts and controls 45 Specifications Back cover The features you will enjoy include DRC MF for viewing higher quality pictures page 15 FAVORITE CH for quick and...

Page 4: ...ress VIDEO see page 11 Using Your New TV Signal flow F connector not supplied or Antenna cable not supplied Rear of TV To video and audio outputs To S video output Audio Video cable not supplied S video cable not supplied Signal flow To S VIDEO input VCR Antenna cable To antenna output To antenna R L 2 3 Y CB CR VIDEO VIDEO IN VIDEO OUT AUDIO R L R VIDEO IN MONITOR OUT COMPONENT VIDEO DVD IN AUDIO...

Page 5: ...ideo cable Step 2 Insert the batteries into the remote Note Do not use old batteries or different types of batteries together Step 3 Preset the channels automatically Notes To stop the automatic channel presetting press MENU If your TV has preset an unwanted channel or cannot preset a particular channel then preset your TV manually see page 40 To open the side panel of your TV push on it until you...

Page 6: ...tically selected To view the video input to VIDEO 4 INPUT disconnect the S video cable Connecting audio video equipment using the MONITOR OUT output jacks Note If you select DVD on your TV screen no signal will be output at the MONITOR OUT jacks see page 11 Signal flow To S video output Side panel Camcorder Video game equipment To video and audio outputs To S VIDEO input To VIDEO 4 INPUT or Audio ...

Page 7: ... cable not supplied Signal flow To coaxial digital output Coaxial digital connecting cord not supplied To DIGITAL IN digital input R L Y CB CR COMPONENT VIDEO DVD IN DIGITAL IN DOLBY DIGITAL PCM VIDEO COAXIAL OPTICAL R AUDIO L LINE OUT Y COMPONENT VIDEO OUT S VIDEO OUT CB CR DIGITAL OUT continued Notes Some DVD player terminals may be labeled differently When connecting to COMPONENT VIDEO DVD IN i...

Page 8: ...L MONO white AUDIO R red To VIDEO IN 1 2 or 3 Signal flow Audio Video cable not supplied Connecting optional components continued Notes Since the high quality pictures on a DVD disc contain a lot of information picture noise may appear In this case adjust the sharpness SHARP under PERSONAL ADJUST in the PICTURE MODE menu see page 29 Connect your DVD player directly to your TV Connecting the DVD pl...

Page 9: ...e following methods A With the supplied screws attach the stabilizer band to the TV stand and to the rear of the TV using the provided hole OR B Pass a cord or chain through the clamps and secure them to the rear of the TV and a wall or pillar Note Use only the supplied screws Use of other screws may damage the TV OR 3 8 mm ...

Page 10: ...n the TV is lit red press POWER on the remote or STANDBY on the TV 2 To select the TV program press the number buttons and then press ENTER or press CH Note When you turn on the TV either the program number or video mode is displayed for approximately 40 seconds The ECO MODE icon will also appear if ECO MODE in the FEATURE menu is set ON see page 34 To select a TV program quickly 1 Press and hold ...

Page 11: ...ter about 3 seconds CHANNEL ENTER STANDBY MAIN POWER TV VIDEO MENU VOLUME DISPLAY POWER VIDEO TV Press POWER The STANDBY indicator on the TV lights up red MAIN POWER on the TV VOL MUTING VIDEO or TV VIDEO on the TV to select VIDEO 1 VIDEO 2 VIDEO 3 VIDEO 4 or DVD To return to the TV screen press TV or TV VIDEO on the TV JUMP DISPLAY 2 3 1 5 6 4 8 9 7 0 ENTER JUMP MUTING MTS VIDEO PIC MODE TV VIDEO...

Page 12: ...then press 4 Press V or v to select the desired language e g then press The selected menu language appears To return to the normal screen Press MENU Watching the TV continued b b SET UP ENGL I SH CH I LD LOCK CH0 0 1 OF F P I C ROTAT I ON FAVOR I TE CH LANGUAGE b MENU b b b A V CONTROL DRC MF DRC1050 SURROUND OFF DIGITAL IN OFF PICTURE MODE DYNAMIC SOUND MODE DYNAMIC SET UP ENGL I SH CH I LD LOCK ...

Page 13: ...tons or controls are pressed for more than two hours after the TV is turned on using the Wake Up timer the TV automatically goes into standby mode To resume watching the TV press any button or control on the TV or the remote Setting the Sleep timer Press SLEEP until the desired period of time appears The Sleep timer starts immediately after you have set it To cancel the Sleep timer Press SLEEP unt...

Page 14: ...OFT PERSONAL To listen to dynamic and clear sound that emphasizes both the low and high tones listen to sound that emphasizes voice and high tones receive soft sound receive the last adjusted sound setting from the ADJUST option in the A V CONTROL menu see page 29 Tip You can also set the picture and sound modes using the menu see Changing the A V CONTROL setting on page 28 Selecting the picture a...

Page 15: ...in PICTURE MODE then adjust SHARP to reduce the sharpness see page 29 Note The DRC MF mode is not selectable when using the CHANNEL INDEX or FAVORITE CH feature or when the GAME MODE Picture In Picture PIP or TWIN mode is turned ON The DRC MF logo and DRC MF are trademarks of Sony Corporation Select DRC1050 DRC PROGRESSIVE To select higher resolution pictures reduce jitter of any small areas or sc...

Page 16: ...n page 37 Selecting a favorite channel 1 Press FAVORITE 2 Press either V b v or B to select the desired channel e g CH 8 then press 3 Press again Note When you use your TV for the first time seven preset channels appear FAVORITE FAVORITE CH 7 PR 12 6 PR 10 5 PR 08 4 PR 06 3 PR 04 2 PR 03 1 PR 01 8 1 3 4 12 10 8 6 FAVORITE CH 0 ENTER JUMP TV VIDEO TWIN FREEZE SWAP PIP CH VOL MENU FAVORITE CH INDEX ...

Page 17: ...creen or TWIN when in the TWIN picture screen Tips You can also display the PIP screen or TWIN pictures using the menu see Changing the MULTI PICTURE setting on page 31 You can change the position of the PIP screen see Changing the MULTI PICTURE setting on the page 31 continued 2 3 1 5 6 4 8 9 7 0 ENTER JUMP MUTING MTS VIDEO PIC MODE TV VIDEO TWIN FREEZE SWAP PIP TV DISPLAY DRC MF POWER MENU FAVOR...

Page 18: ...wer speed the picture may be disrupted depending on the VCR type In the TWIN picture screen you can only operate and hear the sound of the main left screen appears on the screen When the TWIN button is pressed the TV screen flickers or goes blank for about one second before the TWIN pictures appear This does not indicate a malfunction of the TV Press V or v For a video input press TV VIDEO SWAP FR...

Page 19: ...t the first seven preset programs appear one by one clockwise from the upper right corner Tip When you press the CH INDEX button in the TWIN pictures mode the left picture appears as the main screen of the CHANNEL INDEX mode CH INDEX b CH Main screen Main screen Sub screens Sub screens 16 1 2 3 4 12 5 11 6 10 9 8 7 16 1 2 3 7 6 5 4 2 3 1 5 6 4 8 9 7 0 ENTER JUMP TV VIDEO TWIN FREEZE SWAP PIP CH VO...

Page 20: ...e screen of the program you want to watch 2 Press 3 Press again Tip Pressing the number buttons directly displays the program To return to the normal screen Press CH INDEX again or 1 Select CHANNEL INDEX from the MULTI PICTURE menu 2 Press Tip You can also display multiple programs using the menu see Changing the MULTI PICTURE setting on page 31 Note When displaying multiple programs only the soun...

Page 21: ...SRS MONO Manufactured under license from Dolby Laboratories Licensing Corporation DOLBY the double D symbol a and PRO LOGIC are trademarks of Dolby Laboratories Licensing Corporation TM is a trademark of SRS Labs Inc SRS and the SRS symbol are registered trademarks of SRS Labs Inc in the United States and selected foreign countries SRS and TruSurround are incorporated under license from SRS Labs I...

Page 22: ...ng stereo or bilingual programs When receiving Korean stereo or bilingual programs Notes If the stereo signal is very weak the STEREO broadcast sound may become noisy To reduce the noise select MONO You cannot receive a stereo broadcast signal when the TV is in the MONO setting MTS Broadcasting On screen display Selected sound Korean stereo Korean bilingual 2 3 1 5 6 4 8 9 7 0 ENTER JUMP MUTING MT...

Page 23: ...tor to the same position as the setting code If the equipment does not have a certain function the corresponding button on the remote will not operate When you remove the batteries the code number may revert to the factory setting To control DVD VTR1 Beta VTR2 8 mm VTR3 VHS MDP CD MD For example to operate a Sony 8 mm VCR Hold down VIDEO POWER and press 00 01 02 03 04 06 07 VIDEO POWER Video equip...

Page 24: ...h different tracks of a disc Press VIDEO POWER p P Press again to resume normal playback to step forward or to step backward To turn on off play stop pause step through different tracks of an audio disc display the Title menu display the menu select the menu item Press VIDEO POWER p P Press again to resume normal playback to step forward or to step backward TITLE MENU while holding down r V v B b ...

Page 25: ...REBLE t BALANCE t BBE Select the SURROUND mode a VIRTUAL t TruSurround t SIMULATED t OFF Activate or deactivate the digital audio input jack at the rear of your TV Activate or deactivate the PIP feature Change the position of the sub screen Swap the pictures between the main and sub screens Display a TV program or video beside the main screen Display all the preset TV programs at the same time Act...

Page 26: ...c channels Rotate the picture Set favorite channels Preset channels automatically Select ON if you want to watch cable TV Select the desired channel If the TV signal is too strong and the picture is distorted you can adjust the TV reception sensitivity The BBE is manufactured by Sony Corporation under license from BBE Sound Inc It is covered by U S Patent No 4 638 258 and No 4 482 866 The word BBE...

Page 27: ...e MENU ENTER and VOLUME buttons on the TV can also be used for the operations above Note If more than 60 seconds elapse between entries the menu screen automatically disappears Press V B or v b b or B MENU 0 TV VIDEO TWIN FREEZE SWAP PIP CH VOL MENU FAVORITE CH INDEX SURROUND WAKEUP SOUND MODE VIDEO POWER TITLE TV SLEEP PIP CH ZOOM IN LEFT ZOOM IN RIGHT PIP CH DRC MF DRC1050 b A V CONTROL SURROUND...

Page 28: ...is selected the last adjusted picture sound settings from the ADJUST option are received see page 29 MENU Tip For details on the options under the DRC MF PICTURE MODE SOUND MODE SURROUND and DIGITAL IN modes see pages 15 14 21 and 30 respectively To return to the normal screen Press MENU b b For DRC MF PICTURE MODE SOUND MODE SURROUND DIGITAL IN b MENU b b b 0 ENTER JUMP TV VIDEO TWIN FREEZE SWAP ...

Page 29: ... the right speaker s volume V v to select HIGH LOW or OFF BBE can produce clear sound b b b b continued For PICTURE COLOR BRIGHT HUE SHARP Adjusting the ADJUST options under PICTURE MODE 1 Press V or v to select the desired item e g COLOR then press 2 Adjust the value according to the following table then press 3 Repeat the above steps to adjust other items The adjusted settings will be received w...

Page 30: ...IN jack see page 7 Receiving any other format digital signal may cause unwanted noise or no sound from the speakers Tip For details on the menu system and how to use the menu refer to Introducing the menu system on page 25 b To receive digital audio signal through COMPONENT VIDEO DVD IN DIGITAL IN jack receive analog audio signal through COMPONENT VIDEO DVD IN L and R jack Select ON OFF Changing t...

Page 31: ...DRC MF DRC1050 SURROUND OFF DIGITAL IN OFF PICTURE MODE DYNAMIC SOUND MODE DYNAMIC MUL T I P I CTURE OF F SWAP TW I N OFF CHANNE L I NDEX PIP POSITION PIP b MENU b b V v CH INDEX MENU PIP continued 2 3 1 5 6 4 8 9 7 0 ENTER JUMP MUTING MTS VIDEO PIC MODE TV VIDEO TWIN FREEZE SWAP PIP TV DISPLAY DRC MF POWER CH VOL MENU FAVORITE CH INDEX SURROUND WAKEUP SOUND MODE VIDEO POWER TITLE TV PIP CH ZOOM I...

Page 32: ...the main picture Press V or v to select ON then press To cancel press PIP or select OFF then press change the position of the PIP screen Press V or v to select the desired position then press swap the main and PIP screens or right and left pictures of the TWIN pictures display a different TV program or video beside the main picture Press V or v to select ON then press To cancel press TWIN or selec...

Page 33: ...r consumption of your TV 1 Press MENU 2 Press V or v to select then press b MENU b b 2 3 1 5 6 4 8 9 7 0 ENTER JUMP MUTING MTS VIDEO PIC MODE TV VIDEO TWIN FREEZE SWAP PIP TV DISPLAY DRC MF POWER CH VOL MENU FAVORITE CH INDEX SURROUND WAKEUP SOUND MODE VIDEO POWER TITLE TV PIP CH ZOOM IN LEFT ZOOM IN RIGHT PIP CH SLEEP DISPLAY V v continued A V CONTROL DRC MF DRC1050 SURROUND OFF DIGITAL IN OFF PI...

Page 34: ...n on the TV or when you press DISPLAY on the remote see pages 10 and 11 To return to the normal screen Press MENU Tip For details on the menu system and how to use the menu see Introducing the menu system on page 25 Select WIDE MODE ECO MODE GAME MODE To change the size of the picture when receiving wide mode 16 9 picture signal Press V or v to select ON then press To restore the normal picture si...

Page 35: ...ess V or v to select the desired option then press To return to the normal screen Press MENU b b b Select LANGUAGE CHILD LOCK PIC ROTATION FAVORITE CH To change the menu language see page 12 block channels see page 36 adjust the picture position when it is not aligned with the TV screen Press V or b to adjust the position clockwise then press Press v or B to adjust the position counterclockwise th...

Page 36: ...symbol appears on the screen when ON is selected If a locked channel is selected the lock symbol appears on the screen 3 Repeat steps 1 and 2 to lock other channels To return to the normal screen Press MENU Note If you preset the channels automatically again all the locked channels will be unlocked see page 38 b or 2 3 1 5 6 4 8 9 7 0 ENTER JUMP b b b SET UP LANGUAGE EN CH I LD LOCK CH 0 0 6 P I C...

Page 37: ...s To return to the normal screen Press MENU Note If you press the CH buttons or number buttons in step 4 above the TV will display the channel immediately FAVOR I TE CH MODE AUTO AUTO 1 CH0 0 1 MANUA L 2 CH0 0 2 3 CH0 0 6 4 CH0 0 8 FAVOR I TE CH MODE MANUA L 1 CH0 0 1 5 CH0 0 9 2 CH0 0 2 6 CH0 1 1 3 CH0 0 6 7 CH0 1 3 4 CH0 0 8 FAVOR I TE CH MODE MANUA L 1 CH0 0 1 5 CH0 0 9 2 CH0 0 2 6 CH0 1 1 3 CH...

Page 38: ...eturn to the normal screen Press MENU Tip For details on the menu system and how to use the menu refer to Introducing the menu system on page 25 A V CONTROL DRC MF DRC1050 SURROUND OFF DIGITAL IN OFF PICTURE MODE DYNAMIC SOUND MODE DYNAMIC Select AUTO PROGRAM CABLE ADD ERASE SENS To Preset channels automatically Select the cable TV Select the desired channel Adjust the TV reception sensitivity b M...

Page 39: ... will receive cable TV program If there is no cable TV programs you will receive VHF or UHF broadcast channel 2 If you select CABLE OFF you will receive VHF or UHF broadcast channels only A V CONTROL DRC MF DRC1050 SURROUND OFF DIGITAL IN OFF PICTURE MODE DYNAMIC SOUND MODE DYNAMIC b MENU CH PRESET AUTO PROGRAM CAB L E ON ADD ER S A E SENS H I GH H0 C 0 1 ADD CH PRESET AUTO PROGRA ON CA A B L E OF...

Page 40: ...e TV reception sensitivity 1 Press V or v to select SENS then press 2 Press V or v to select LOW then press To return to the normal screen Press MENU Notes The TV reception sensitivity SENS setting is memorized for each program number If you preset the channels automatically again all the locked channels will be unlocked see page 36 CH PRESET AUTO PROGRAON CA A B L E ON CH 1 1 1 ADD ER SE SENS H H...

Page 41: ...s the possible causes 1 Check that the STANDBY indicator flashes red a number of times between 3 second intervals 2 Count the number of times the STANDBY indicator flashes 3 Press MAIN POWER to turn off your TV 4 Inform your nearest Sony service center about the number of times the STANDBY indicator flashed Be sure to note the model name and serial number located on the rear of your TV Front of TV...

Page 42: ...ER Press MAIN POWER on the TV to turn off the TV for about five seconds then turn it on again Troubleshooting If you have any problem while viewing your TV please check the following troubleshooting guide If the problem persists contact your Sony dealer Possible cause Symptom Solutions Snowy picture Noisy sound Distorted picture Noisy sound Good picture Noisy sound No picture No sound Page 4 40 40...

Page 43: ...ler for advice Locate external speakers or other equipment away from the TV Do not move the TV while the TV is turned on Press MAIN POWER on the TV to turn off the TV for about five minutes then turn it on again Press MTS until STEREO appears on the screen The volume level is too low The sound is muted The broadcast signal has a transmission problem The digital audio signal is inappropriate The DI...

Page 44: ...ith your TV For detail see the instruction manual supplied with the video game software Changes in room temperature sometimes make the TV cabinet expand or contract causing a noise This does not indicate a malfunction The TV s demagnetizing function is working This does not indicate a malfunction This is the same static discharge that is felt when touching metal door handles or car doors especiall...

Page 45: ...EL ENTER STANDBY TV VIDEO MENU VOLUME Page Function Button Side panel i AUTO PROGR Front panel MAIN POWER Top panel STANDBY CHANNEL VOLUME TV VIDEO ENTER MENU Headphone jack Preset channels automatically 5 Turn off completely or 10 turn on the TV Turn off temporarily or 10 turn on the TV Select program number 10 Adjust volume 11 Select TV or video input 11 Confirm selected items 27 Display the men...

Page 46: ...urn 10 on the TV Select program number 10 Input numbers 10 Confirm input number 10 Display on screen information 11 Mute the sound 11 Display the TV program 11 Select TV or video input 11 Adjust volume 11 Jump to previous channel 11 Set TV to turn on automatically 13 Set TV to turn off automatically 13 Select sound mode 14 Select picture mode 14 Select DRC MF mode 15 Display favorite channels 16 S...

Page 47: ...ER 0 9 TITLE r p P Menu operations MENU V v B b Display all preset TV programs 19 View next previous 12 TV 20 programs Select desired channel 20 Select surround mode 21 Select stereo bilingual mode 22 Power and set up the remote 23 Set up the remote 23 Display the title menu 24 Play 24 Fast forward Search forward 24 Rewind Search backward 24 Record 24 Stop 24 Pause 24 Display the menu 27 Select ad...

Page 48: ... 75 ohms unbalanced sync negative C 0 286 Vp p 75 ohms Input 1 Phono jacks Y 1 Vp p 75 ohms sync negative CB 0 7 Vp p 75 ohms CR 0 7 Vp p 75 ohms Audio 500 mVrms Input 1 Phono jack 0 5 Vp p 75 ohms Output 1 Stereo minijack 29 in 34 in 72 86 Measured diagonally 68 80 Measured diagonally 722 561 524 859 650 573 56 84 Power requirements Power consumption W Television system Color system Stereo Biling...

Reviews: