background image

46

GB

Switching the front 
speakers

When two front speaker systems are 
connected to the receiver, you can select 
the front speaker system you want to 
operate.

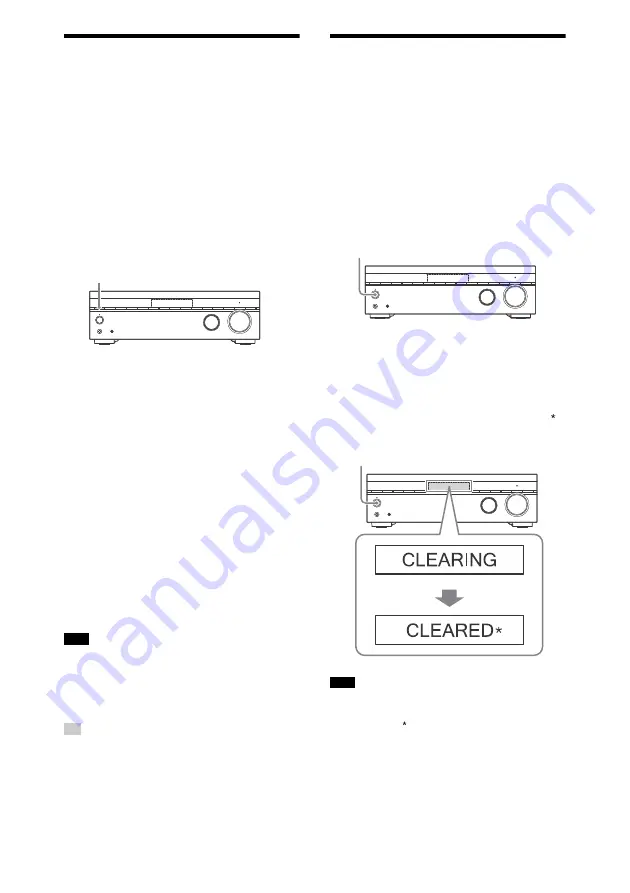
Press SPEAKERS on the receiver 
repeatedly to select the front 
speaker system you want to 
operate.

Each time you press this button, the display 
changes cyclically.

“SPK A”

: Speakers connected to the 

SPEAKERS FRONT A terminals.

“SPK B”

*: Speakers connected to the 

SPEAKERS SURROUND BACK/
HEIGHT(FRONT B/BI­AMP) terminals.

“SPK A+B”

*: Speakers connected to both 

the SPEAKERS FRONT A and SPEAKERS 
SURROUND BACK/HEIGHT(FRONT B/
BI­AMP) terminals (parallel connection).

“OFF SPEAKERS”

: “OFF” and “SPEAKERS” 

appears alternately on the display panel. 
No audio signals are output from any 
speaker terminals.

* You can only select this setting when [Surround 

Back Terminals] is set to [Front B Speakers] in the 
[Speaker Setting] menu.

• This setting is not available when headphones 

are connected.

• Before you perform Auto Calibration, set the 

speaker output to a setting other than “OFF 
SPEAKERS”.

The “SP A” or/and “SP B” indicators on the display 
panel lights up to show which set of terminals are 
selected. “SP A” and “SP B” light off when the 
speaker system is turned off.

Reverting to the Factory 
Default Settings

You can clear all memorized settings and 
restore the receiver to the factory default 
settings by the following procedure. 
Be sure to use the buttons on the receiver 
to perform this operation.

1

Press 

 (power) to turn off 

the receiver.

2

Press and hold 

 (power) for 

5 seconds.

“CLEARING” appears on the display 
panel during initialization. When 
initialization is complete, “CLEARED ” 
appears on the display panel.

It takes a few seconds for the memory to be 
cleared completely. Do not turn the receiver off 
until “CLEARED ” appears on the display panel.

Note

Tip

SPEAKERS

Note

 (power)

 (power)

Summary of Contents for STR-DH790

Page 1: ...STR DH790 Multi Channel AV Receiver Operating Instructions Connection and Preparation Playback Menu Other Functions Troubleshooting Specifications ...

Page 2: ...face where this symbol is displayed FOR UNITED STATES CUSTOMERS NOT APPLICABLE IN CANADA INCLUDING IN THE PROVINCE OF QUEBEC POUR LES CONSOMMATEURS AUX ÉTATS UNIS NON APPLICABLE AU CANADA Y COMPRIS LA PROVINCE DE QUÉBEC For the customers in the USA This symbol is intended to alert the user to the presence of uninsulated dangerous voltage within the product s enclosure that may be of sufficient mag...

Page 3: ...e receiver is connected Consult the dealer or an experienced radio TV technician for help CAUTION You are cautioned that any changes or modifications not expressly approved in this manual could void your authority to operate this equipment Properly shielded and grounded cables and connectors must be used for connection to host computers and or peripherals in order to meet FCC emission limits To re...

Page 4: ...Hand the battery over to the appropriate collection point for the recycling of waste batteries For more detailed information about recycling of this product or battery please contact your local Civic Office your household waste disposal service or the shop where you purchased the product or battery Notice for customers the following information is only applicable to equipment sold in countries app...

Page 5: ...Easy Setup 31 7 Setting for HDMI 35 Playback Playing Back Sound and Images on Connected TV and or Audio Visual Devices 36 Playing Back Sound on a BLUETOOTH Device 37 Selecting Sound Effects 39 Menu Other Functions Operating Menu on the TV Screen 43 Selecting the speaker pattern 44 Switching the front speakers 46 Reverting to the Factory Default Settings 46 Troubleshooting Specifications Troublesho...

Page 6: ... they have the same or similar names as those on the remote control The text enclosed in bracket appears on the TV screen and the text enclosed in double quotation mark appears on the display panel The items displayed on the TV screen may vary depending on the area The Help Guide web based online operating instructions provides information on advanced functions and operations You can view the Help...

Page 7: ...joy surround sound equivalent to that of a 5 1 channel speaker system with only two front speakers page 23 Compatible with BLUETOOTH wireless technology Connect a WALKMAN smartphone or tablet to the receiver via the BLUETOOTH function to play music content on those devices wirelessly page 37 You can turn on this receiver from a paired BLUETOOTH device even when the receiver is in standby mode For ...

Page 8: ...e receiver and BT POWER is set to BT ON If no devices are paired with the receiver or BT POWER is set to BT OFF the indicator turns off SPEAKERS page 46 Switches the speaker system No sound is output from the speakers when you select OFF SPEAKERS Be sure to select setting other than OFF SPEAKERS TUNING MODE Selects auto tuning or preset tuning mode TUNING Scans a FM station or selects preset stati...

Page 9: ... pairing information on the receiver Disconnects the BLUETOOTH device when the receiver is connected to a BLUETOOTH device BLUETOOTH indicator page 37 Remote control sensor Receives signals from remote control PURE DIRECT Activates the Pure Direct function which allows you to enjoy higher fidelity sound from all inputs The indicator above the button lights up when the Pure Direct function is activ...

Page 10: ...s up when the sleep timer is activated Tuning indicator Lights up when the receiver tunes to a radio station MEMORY A memory function such as Preset Memory etc is activated RDS European and Asia Pacific models only Tuned to a station with RDS services MONO Monaural broadcast ST FM stereo broadcast Preset station number The number will change according to the preset station you select D RANGE Light...

Page 11: ...t HDCP 2 2 HDCP 2 2 is newly enhanced copyright protection technology that is used to protect content such as 4K movies SPEAKERS terminals page 16 17 18 19 20 21 22 23 SUBWOOFER OUT jacks page 17 18 19 20 21 22 23 AUDIO IN jacks page 28 30 FM ANTENNA terminal page 31 OPTICAL IN jack page 26 28 COAXIAL IN jack page 30 Receiver rear panel ...

Page 12: ...ge 39 Selects a sound field PURE DIRECT Activates the Pure Direct function which allows you to enjoy higher fidelity sound from all inputs Calibration Type Night Mode Equalizer A P M and D RANGE do not work when the Pure Direct function is selected FRONT SURROUND Activates the Front Surround function which allows you to enjoy theater like surround sound only with two front speakers NIGHT MODE Acti...

Page 13: ... tactile dots as reference when operating the receiver The above explanation is intended to serve as examples Depending on the model of your connected device some functions explained in this section may not work with the supplied remote control To insert batteries into the remote control Insert two R03 size AAA batteries supplied in the remote control Make sure that the and ends are in the correct...

Page 14: ...surround left right channels SR Surround right speaker SBL Surround back left speaker Produces sounds from surround back left right channels SBR Surround back right speaker SB Surround back speaker Produces sounds from surround back channel SW Subwoofer Produces LFE low frequency effect channel sounds and reinforces bass parts of other channels TML Top middle left speaker Produces sounds from top ...

Page 15: ...d Dolby Atmos enabled right speaker FHL Front high left speaker Produces sound from front height left right channels FHR Front high right speaker Tip Speaker systems described in this manual Speaker system For setting connecting speakers see page ASSIGN SURROUND BACK TERMINALS Speaker Pattern PATTERN Front High Top Dolby Speakers HEIGHT 5 1 channel 17 Surround Back Speakers Nothing 5 1ch 5 1 7 1 c...

Page 16: ... the amplifier circuit When you connect a subwoofer with an auto standby function turn off the function when watching movies If the auto standby function is set to on it turns to standby mode automatically based on the level of the input signal to the subwoofer and the sound may not be output If you have one subwoofer connect it to either of the SUBWOOFER OUT jacks If you have two subwoofers you c...

Page 17: ...joy theater like multi channel surround sound you need five speakers two front speakers a center speaker and two surround speakers and a subwoofer 5 1 channel speaker system 30 100 120 Speaker cable not supplied Monaural audio cable not supplied ...

Page 18: ... 1 channel or 7 1 channel format If you connect only one surround back speaker place it directly behind the listening position and connect it to the L terminals 7 1 channel speaker system using surround back speakers Tip 30 100 120 Same angle Speaker cable not supplied Monaural audio cable not supplied ...

Page 19: ...ation You can enjoy vertical sound effects by connecting additional two top middle speakers 5 1 2 channel speaker system using top middle speakers 30 100 120 65 80 100 Speaker cable not supplied Monaural audio cable not supplied ...

Page 20: ...ical sound effects by connecting additional two front Dolby Atmos enabled speakers 5 1 2 channel speaker system using front Dolby Atmos enabled speakers 30 100 120 Speaker cable not supplied Monaural audio cable not supplied ...

Page 21: ...u want to use with the SPEAKERS button page 46 No sound is output from the speakers when you select OFF SPEAKERS Be sure to select setting other than OFF SPEAKERS 5 1 channel speaker system with Front B speakers Note 30 100 120 Room with the receiver installed Another location Speaker cable not supplied Monaural audio cable not supplied Front B speakers in another location Front A speakers ...

Page 22: ...can make the bi amplifier connection Connect each pair of terminals for tweeter and woofer to this receiver as illustrated below You can enjoy higher quality sound playback if you operate the tweeter and woofer using separate amplifiers 5 1 channel speaker system with Bi Amplifier connection 30 100 120 Speaker cable not supplied Monaural audio cable not supplied ...

Page 23: ...nd effects equivalent to that of a 5 1 channel speaker system using only the two front speakers Place the speakers as shown below and change the direction of the front speakers little by little to find the direction that provides the best surround effect Note 2 1 channel speaker system 30 1 5 m 3 m Set the height of a tweeter of the front speaker at the same height as your ears Speaker cable not s...

Page 24: ...lost Connect separate audio cables or digital connecting cables then reassign the input jacks if the sound is not output correctly All HDMI jacks on the receiver support ITU R BT 2020 wide color spaces Deep Color Deep Colour and HDR High Dynamic Range contents pass through The HDMI TV OUT jack supports the eARC or ARC function BT 2020 color space is new wider color standard that is defined for ult...

Page 25: ...y by connecting the receiver with the TV s eARC or ARC compatible HDMI input jack using an HDMI cable you can listen to TV audio from the speakers connected to the receiver For this connection you need to turn the Control for HDMI function on Press AMP MENU then press and to select HDMI CTRL HDMI CTRL ON You also need to set the eARC or ARC function of your TV to on For details refer to the operat...

Page 26: ... 2 2 compatible HDMI jack on the TV using an HDMI cable In this case the TV sound cannot be sent to the receiver using the eARC or ARC function of the TV Connect the optical output jack of the TV and the OPTICAL TV IN jack of the receiver using an optical digital audio cable Audio Video signals HDCP 2 2 compatible HDMI jack Audio signals HDMI cable not supplied Optical digital audio cable not supp...

Page 27: ... the Control for HDMI function on Press AMP MENU then press and to select HDMI CTRL HDMI CTRL ON You also need to set the eARC or ARC function of your TV to on For details refer to the operating instructions of the TV If the HDMI TV OUT jack on your receiver is labeled ARC update the software of the receiver For details refer to Updating the software UPDATE in Help Guide If the HDMI TV OUT jack on...

Page 28: ...ith the eARC or ARC function To output audio and video signals from the receiver to the TV connect the receiver and the TV using an HDMI cable To output TV audio signals to the receiver connect the receiver and the TV using an optical digital audio cable or stereo audio cable Audio signals HDMI cable not supplied Optical digital audio cable not supplied Stereo audio cable not supplied Recommended ...

Page 29: ...ice to any HDMI IN jacks The image quality depends on the type of connecting jack We recommend you connect your devices via an HDMI connection if they have HDMI jacks Connecting devices with HDMI jacks Tip Gameconsole such as PlayStation 4 Ultra HD Blu ray Disc player Blu ray Disc player DVD player Cable box or satellite box Audio Video signals HDMI cable not supplied Media box Audio Video signals...

Page 30: ...o the AUDIO IN jacks You can rename each input so that the name can be displayed on the display panel of the receiver For details refer to Changing the name for each input Name in Help Guide Connecting devices with analog audio jacks and coaxial digital audio jack Note Tip Audio signals Stereo audio cable not supplied Coaxial digital audio cable not supplied Blu rayDisc player DVD player Video sig...

Page 31: ...sible 6 Turning on the Receiver and Performing Easy Setup Turn on the receiver and a TV to perform the initial settings in accordance with the instructions on the Easy Setup screen displayed on the TV 1 Connect the AC power cord mains lead to a wall outlet Note FM wire antenna aerial supplied 1 Displaying the Easy Setup screen on the TV screen HOME AMP MENU Input buttons To the wall outlet ...

Page 32: ...he distance of each speaker from your seating position Measure the speaker size Measure the frequency characteristics EQ The measurement result is not utilized when Direct is selected for the sound field setting and an analog input is selected The speakers emit very loud sound during the measurement and the volume cannot be adjusted Be considerate of your neighbors and any children who are present...

Page 33: ...rophone and the speakers 2 When a subwoofer is connected turn on the subwoofer and turn up the volume Adjust and set the subwoofer as follows Turn the LEVEL to just before the mid point If you connect a subwoofer with a crossover frequency function set the value to maximum If you connect a subwoofer with an auto standby function set it to off deactivated For details refer to the operating instruct...

Page 34: ...d then press The measurement results are saved and the setting process is finished If the measurement fails error codes or warning messages page 53 will be displayed Confirm the message perform necessary adjustments and then select Retry to perform Auto Calibration again To exit the setting process without saving the measurement results select Exit 9 The Auto Calibration is completed Disconnect th...

Page 35: ...TV when you select ON for EARC on the receiver For details refer to the operating instructions of the TV To return to the previous menu press BACK To exit the menu press AMP MENU For details on TV sound troubleshooting see TV sound page 47 Select the appropriate setting for the connected TV and audio visual devices 1 Press AMP MENU then press and to select HDMI SIG FMT 2 Press to select the input ...

Page 36: ...onnected device To enjoy the sound and image of a connected device without turning on the receiver set STBY THRU to ON in the HDMI menu 5 Press to adjust the volume Before you turn off the receiver be sure to turn down the volume level to avoid damaging your speakers the next time you turn on the receiver To turn the volume up or down quickly Turn the MASTER VOLUME knob quickly Press and hold one ...

Page 37: ...play panel Perform step 3 within five minutes otherwise pairing will be canceled If pairing is canceled repeat this step 3 Perform pairing on the BLUETOOTH device to detect the receiver For details refer to the operating instructions of your BLUETOOTH device A list of detected devices may appear on the BLUETOOTH device display depending on the type of BLUETOOTH device The receiver is displayed as ...

Page 38: ...The receiver connects to the last connected BLUETOOTH device and the device name appears on the display panel 3 Start playback on the BLUETOOTH device 4 Adjust the volume Adjust the volume of the BLUETOOTH device first If the volume level is still too low press to adjust the volume level of the receiver To disconnect a BLUETOOTH connection The BLUETOOTH connection will be disconnected when you per...

Page 39: ... fields for MOVIE and MUSIC may not work depending on the input or the speaker pattern you select or with audio formats The receiver may play signals at a lower sampling frequency than the actual sampling frequency of the input signals depending on the audio format Some speakers or the subwoofer may not output sound depending on the sound field setting To reset sound fields to the default settings...

Page 40: ... on the speaker settings or playback content Direct DIRECT Plays back all audio signals without adding any surround effect Auto Format Decoding A F D Decodes and plays back audio signals using the optimal processing method according to the audio signal input MOVIE Dolby Surround DSUR Dolby Surround upmixer expands traditional audio content for playback through any multi channel speaker configurati...

Page 41: ...DSD or AAC 1 Outputs sound when you connect a subwoofer and set the speaker pattern to a setting x 1 that has an active subwoofer 2 Outputs sound when you connect a subwoofer set the speaker pattern to a setting x 1 that has an active subwoofer and Small is selected for Size in Speaker Setting menu Relations between sound fields and speaker outputs Button Sound field Display panel Front speakers C...

Page 42: ...d to the correct speaker terminals page 16 and the correct speaker pattern page 44 is selected Button Sound field Display panel Front speakers Center speaker Surround speakers Surround back speakers Subwoofer Height speaker 2CH MULTI 2ch Stereo 2CH ST Multi Ch Stereo MULTI ST Direct DIRECT Auto Format Decoding A F D MOVIE Dolby Surround DSUR Neural X NEURAL X Front Surround FRT SUR MUSIC Audio Enh...

Page 43: ...en press BACK To exit the menu press HOME to display the home menu and then press HOME again You can set some functions using the display panel on the receiver For details visit the Help Guide Home menu items For details on the Sound Effect and Speaker Setting menu items visit the Help Guide Menu Other Functions Tip OPTIONS BACK HOME Menu Description Watch Select to display video from the connecte...

Page 44: ...GHT and then press 5 Press to select a speaker type and then press Front high speakers top middle speakers and Dolby Atmos enabled speakers are referred to collectively as height speakers Speaker pattern PATTERN AMP MENU Tip Speaker pattern Front left right speaker Center speaker Surround left right speaker Surround back left speaker Surround back right speaker Subwoofer Height speakers 7 1 7 0 6 ...

Page 45: ...speaker pattern to a setting x x 2 that has height speakers page 44 This setting is not available This setting is available 3 1 3 0 2 1 2 2 0 2 2 1 2 0 Tip Speaker pattern Surround Dolby Atmos enabled speakers SRD Front Dolby Atmos enabled speakers FD Top middle speakers TM Front high speakers FH 5 1 2 5 0 2 4 1 2 4 0 2 3 1 2 3 0 2 2 1 2 2 0 2 Speaker pattern Front left right speaker Center speake...

Page 46: ...is set to Front B Speakers in the Speaker Setting menu This setting is not available when headphones are connected Before you perform Auto Calibration set the speaker output to a setting other than OFF SPEAKERS The SP A or and SP B indicators on the display panel lights up to show which set of terminals are selected SP A and SP B light off when the speaker system is turned off Reverting to the Fac...

Page 47: ...press PURE DIRECT to turn off this function Press DIMMER on the receiver to select BRIGHT or DARK No TV sound is output from the receiver When the receiver is connected to a TV compatible with the eARC or ARC function make sure the receiver is connected to an HDMI input jack compatible with the eARC or ARC function page 25 26 27 Make sure that the HDMI input jack of your TV is labeled eARC or ARC ...

Page 48: ...last HDMI device selected before you turned off the receiver If you are enjoying content from another device play the content on the device and perform the One Touch Play operation or turn on the receiver to select the HDMI device from which you want to enjoy content Make sure STBY THRU is set to ON or AUTO in the HDMI menu No sound or only a very low level of sound is heard no matter which device...

Page 49: ...e device Check the IN MODE setting in the INPUT menu Check that the device is correctly connected to the corresponding HDMI jack The HDMI settings of some playback devices need to be configured Refer to the operating instructions supplied with each device Be sure to use a High Speed HDMI Cable with Ethernet when you view images or listen to sound especially for 1080p Deep Color Deep Colour 4K or 3...

Page 50: ...the sound fields see Selectable sound fields and their effects page 40 Dolby Surround and Neural X do not work when the speaker pattern is set to 2 0 or 2 1 Image and sound are not output from the TV when the receiver is in standby mode Set HDMI CTRL HDMI to CTRL ON and then set STBY THRU to ON or AUTO Turn on the receiver then select the input to which the playing device is connected If connected...

Page 51: ...have to connect an HDMI cable to an HDMI jack that supports HDCP 2 2 when you use a playback device for 4K resolution video content etc No image is output from the TV screen when the receiver is in standby mode When the receiver enters standby mode the image from the last HDMI device selected before you turned off the receiver is displayed If you are enjoying content from another device play the c...

Page 52: ...Perform the pairing operation again While connected to a BLUETOOTH device this receiver cannot be detected Erase the pairing registration information of the BLUETOOTH device on the BLUETOOTH device and perform the pairing operation again The sound skips or fluctuates or the connection is lost The receiver and the BLUETOOTH device are too far apart If there are obstructions between the receiver and...

Page 53: ...rn off the receiver disconnect the USB device and then turn on the receiver again Error 30 Headphones are connected Please disconnect the headphones and retry calibration Error 31 The front speakers are not selected correctly Select the front speakers correctly using SPEAKERS on the receiver and perform Auto Calibration again while sound is being output For details on selecting the front speakers ...

Page 54: ...ked by qualified personnel before operating it any further On power sources Before operating the receiver check that the operating voltage is identical with your local power supply The operating voltage is indicated on the nameplate on the rear of the receiver If you are not going to use the receiver for a long time be sure to disconnect the receiver from the wall outlet To disconnect the AC power...

Page 55: ...g purposes Specifications AUDIO POWER SPECIFICATIONS POWER OUTPUT AND TOTAL HARMONIC DISTORTION USA models only With 6 ohm loads both channels driven from 20 Hz 20 000 Hz rated 90 watts per channel minimum RMS power at stereo mode with no more than 0 09 total harmonic distortion from 250 milliwatts to rated output Amplifier section1 Speaker impedance use 6 ohms 16 ohms Minimum RMS Output Power 6 o...

Page 56: ...on Profile AVRCP 1 6 Audio Video Remote Control Profile Supported Codecs3 SBC4 AAC Transmission range A2DP 20 Hz 20 000 Hz Sampling frequency 44 1 kHz Frequency band and maximum output power European models only BLUETOOTH 1 The actual range will vary depending on factors such as obstacles between devices magnetic fields around a microwave oven static electricity cordless phone reception sensitivit...

Page 57: ...DTS Inc All Rights Reserved This receiver incorporates High Definition Multimedia Interface HDMI technology The terms HDMI and HDMI High Definition Multimedia Interface and the HDMI Logo are trademarks or registered trademarks of HDMI Licensing Administrator Inc in the United States and other countries BRAVIA is a trademark of Sony Corporation PlayStation is a registered trademark of Sony Computer...

Page 58: ... may interfere with the operation of some medical devices Since this interference may result in malfunction always turn off the power on this receiver and BLUETOOTH device in the following locations In hospitals on trains in airplanes at gas stations and any place where flammable gasses may be present Near automatic doors or fire alarms This receiver supports security functions that comply with th...

Page 59: ...number of decoded channels Connection with the receiver Dolby Digital DD 5 1 COAXIAL OPTICAL HDMI eARC ARC Dolby Digital Plus DD 1 7 1 HDMI eARC ARC Dolby TrueHD DTHD 1 7 1 HDMI eARC Dolby Atmos Dolby Digital Plus ATMOS 1 2 5 1 2 or 7 1 HDMI eARC ARC Dolby Atmos Dolby TrueHD ATMOS 1 2 5 1 2 or 7 1 HDMI eARC DTS DTS 5 1 COAXIAL OPTICAL HDMI eARC ARC DTS ES Discrete DTSES DSC 6 1 COAXIAL OPTICAL HDM...

Page 60: ...isual devices 29 FM Antenna 31 Speaker 16 TV 24 D Deep Color Deep Colour 24 Default settings Receiver 46 Sound fields 39 Direct 40 Display panel 10 Dolby Atmos enabled speakers 20 Dolby Surround 40 E eARC 7 24 25 26 27 28 35 47 59 Easy Setup 31 Enhanced Audio Return Channel 7 Error messages 53 F FM radio 36 Front B speakers 21 Front speaker 46 Front Surround 23 40 H HDCP 2 2 25 HDMI 24 HDMI signal...

Page 61: ...IRECT 9 12 R Receiver Display panel 10 Front panel 8 Rear panel 11 Remote control 12 Reset Receiver 46 Sound fields 39 S Sound effects 39 Sound field 39 Speaker Cable 16 Pattern 44 Subwoofer 14 Supplied items 6 Supported playable formats Audio 59 Surround back speakers 18 T Top middle speakers 19 TV screen Home menu 43 ...

Page 62: ......

Page 63: ......

Page 64: ... 2018 Sony Corporation Printed in Malaysia 4 726 905 13 1 ...

Reviews: