background image

50

US

Enjoying images/sound 
from the connected 
equipment

1

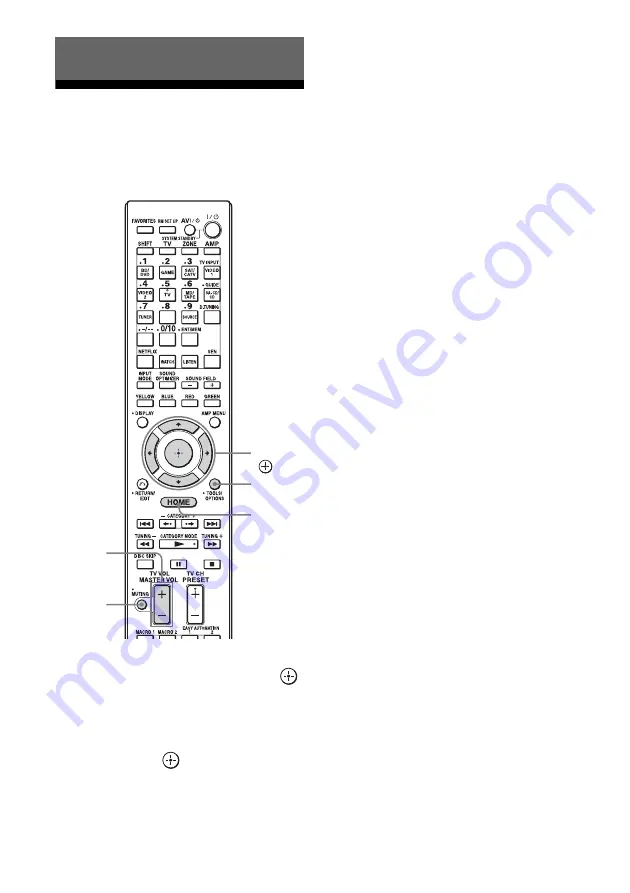
Select “Watch” or “Listen” from 
the home menu, then press 

.

The menu item list appears on the TV 
screen.

2

Select the equipment you want, 
then press 

.

3

Turn on the equipment and 
start playback.

4

Press MASTER VOL +/– to 
adjust the volume.

Tips

You can adjust the volume differently using the 
MASTER VOLUME knob on the receiver or the 
MASTER VOL +/– button on the remote control.
• To turn the volume up or down quickly

– Turn the MASTER VOLUME knob quickly.
– Press and hold the MASTER VOL +/– button.

• To make fine adjustment

– Turn the MASTER VOLUME knob slowly.
– Press the MASTER VOL +/– button and release 

it immediately.

To activate the muting function

Press MUTING on the remote control. To 
cancel, press MUTING on the remote control 
again or press MASTER VOL + to raise the 
volume. If you turn the receiver off while the 
sound is muted, the muting selection is 
cancelled.

To avoid damaging your 
speakers

Before you turn off the receiver, be sure to turn 
down the volume level.

Enjoying images/sound

MASTER

VOL

MUTING

TOOLS/
OPTIONS

HOME

V

/

v

/

B

/

b

Summary of Contents for STR-DA3700ES

Page 1: ... 2011 Sony Corporation Printed in Malaysia STR DA3700ES 4 287 968 11 1 Multi Channel AV Receiver Operating Instructions ...

Page 2: ...vicing instructions in the literature accompanying the appliance For customers in the United States Owner s Record The model and serial numbers are located on the rear of the unit Record these numbers in the space provided below Refer to them whenever you call upon your Sony dealer regarding this product Model No Serial No Important Safety Instructions 1 Read these instructions 2 Keep these instru...

Page 3: ...ions NOTE This equipment has been tested and found to comply with the limits for a Class B digital device pursuant to Part 15 of the FCC Rules These limits are designed to provide reasonable protection against harmful interference in a residential installation This equipment generates uses and can radiate radio frequency energy and if not installed and used in accordance with the instructions may ...

Page 4: ...s at 1 866 635 2349 to cancel See our Customer Agreement for complete terms at www siriusxm com Sirius XM and all related marks and logos are trademarks of Sirius XM Radio Inc All rights reserved The font type Shin Go R installed in this receiver is provided by MORISAWA COMPANY LTD These names are the trademarks of MORISAWA COMPANY LTD and the copyright of the font also belongs to MORISAWA COMPANY...

Page 5: ...his device uses PlayReady technology to access PlayReady protected content and or WMDRM protected content If the device fails to properly enforce restrictions on content usage content owners may require Microsoft to revoke the device s ability to consume PlayReady protected content Revocation should not affect unprotected content or content protected by other content access technologies Content ow...

Page 6: ...er is compatible with Internet video streaming 53 The receiver allows you to play back content on a home network via the DLNA compliant home network function 57 USB You can easily play back iPhone iPod content via the receiver using a USB connection 52 56 You can easily play back content on USB device WALKMAN via the receiver using a USB connection 51 Multi zone You can enjoy music or video from o...

Page 7: ...er function optimizes audio output in accordance with the volume level 72 The Advanced Auto Volume function adjusts the volume to its optimum level automatically 73 The A V Sync function adjusts the time gap between audio output and the visual display 98 The Pass Through function outputs HDMI signals to the TV even when the receiver is in standby mode 80 Feature Description Page Environment friend...

Page 8: ... Listening to FM AM radio 58 Listening to the satellite radio 60 Connecting a satellite radio tuner 61 Preparing to listen to the satellite radio 61 Selecting a channel of the satellite radio 62 Presetting satellite radio channels 63 Restricting access to specific channels Parental Lock 64 Enjoying Sound Effects Selecting the sound field 67 Using the Sound Optimizer function 72 Adjusting the equal...

Page 9: ...es Settings 105 Zone Settings 106 System Settings 107 Network Update 108 Operating without using the GUI 109 Using the Remote Control Operating each equipment using the remote control 117 Turning off all connected equipment SYSTEM STANDBY 118 Programming the remote control 118 Performing several commands in sequence automatically Macro Play 122 Setting remote control codes that are not stored in t...

Page 10: ...n turn TONE to adjust the bass treble level of speakers C MEMORY ENTER TUNING MODE TUNING page 58 D Remote sensor Receives signals from remote control E Display window page 12 F MULTI CHANNEL DECODING lamp Lights up when multi channel audio signals are decoded G ZONE SELECT POWER page 74 Press SELECT repeatedly to select zone 2 or main zone Each time you press POWER the output signals for the sele...

Page 11: ... the input source for zone 2 press ZONE SELECT 7 to select zone 2 first ZONE 2 input name appears on the display window then turn INPUT SELECTOR to select the input source N AUTO CAL MIC jack page 93 Connect the supplied optimizer microphone for Auto Calibration to the this jack O iPhone iPod USB port and VIDEO IN jack page 51 52 56 P VIDEO 2 IN jacks page 35 ...

Page 12: ... is set to Analog or when the 2ch Analog Direct is being selected it also lights up HDMI COAX OPT MULTI MULTI CHANNEL INPUT ARC page 81 D Dolby Digital Surround indicator Lights up with one of the respective indicators when the receiver is decoding the corresponding Dolby Digital format signals D Dolby Digital D Dolby Digital Plus D EX Dolby Digital Surround EX E TrueHD Lights up when the receiver...

Page 13: ...tation CAT The category mode is selected during the satellite radio operation SIRIUS page 60 ST Stereo reception P MEM Lights up when the preset memory function is activated Q DTS HD indicator Lights up when the receiver is decoding DTS HD DTS HD Lights up constantly with the one of the following indicators MSTR DTS HD Master Audio HI RES DTS HD High Resolution Audio R NEO 6 Lights up when DTS Neo...

Page 14: ...14US W LPCM Lights up when Linear PCM Pulse Code Modulation signals are input ...

Page 15: ...e D Control jacks for Sony equipment and other external equipment IR REMOTE IN OUT jacks page 74 Connect an IR repeater not supplied to use the Multi zone function TRIGGER OUT jacks page 106 Connect to interlock on off of the power supply ofother 12V TRIGGERcompliant equipment or the amplifier receiver of zone 2 E LAN ports switching hubs page 42 F AUDIO INPUT OUTPUT section AUDIO IN OUT jacks pag...

Page 16: ...ote Do not expose the remote sensor to direct sunlight or lighting apparatuses Doing so may cause a malfunction Tip When the receiver no longer responds to the remote control replace all the batteries with new ones G VIDEO AUDIO INPUT OUTPUT section page 26 29 30 32 34 AUDIO IN OUT jacks VIDEO IN OUT jacks AUDIO OUT jacks VIDEO OUT jack page 74 H COMPONENT VIDEO INPUT OUTPUT section page 26 29 32 ...

Page 17: ... v B b Press V v B b to select the menu items Then press to enter the selection O TOOLS OPTIONS page 48 54 60 Press to display and select items from option menus P HOME page 48 Press to display the home menu on the TV screen Q m M 1 x 1 X 1 N 1 2 1 Press to operate the DVD player Blu ray Disc Player CD player MD deck tape deck equipment connected to the USB port or to the network or BRAVIA Interne...

Page 18: ...ct the category for satellite tuner B b Press to select an album ed DISC SKIP Press to skip a disc when using a multi disc changer ef MASTER VOL page 50 TV VOL After pressing TV ws you can also adjust and mute the volume level of the TV using these buttons MUTING page 50 eg MACRO 1 MACRO 2 page 122 eh TOP MENU Opens or closes the BD ROM s or DVD s Top Menu AUDIO Press SHIFT wd then press AUDIO to ...

Page 19: ...ction for conversion of video signals page 20 Q Does your monitor have an HDMI jack t No See the connection for a TV monitor without an HDMI jack in 2 Connecting the monitor page 26 and 3 Connecting the video equipment page 28 t Yes See the connection for a TV monitor with an HDMI jack in 2 Connecting the monitor page 26 and 3 Connecting the video equipment page 28 Connecting the audio equipment S...

Page 20: ...s been converted may not be output from the COMPONENT VIDEO MONITOR OUT jacks or the HDMI OUT jacks simultaneously If you connect equipment to both the COMPONENT VIDEO MONITOR OUT jacks and the HDMI OUT jacks priority is given to the output from the HDMI OUT jacks To display Closed Caption Set Resolution to DIRECT in the Video Settings menu when receiving a signal that supports Closed Captions Use...

Page 21: ...details refer to the operating instructions of the playback equipment Digital audio formats supported by the receiver Audio format Maximumnumber of channels Connection between the playback equipment and the receiver COAXIAL OPTICAL HDMI Dolby Digital 5 1ch a a Dolby Digital EX 6 1ch a a Dolby Digital Plus 7 1ch a Dolby TrueHD 7 1ch a DTS 5 1ch a a DTS ES 6 1ch a a DTS 96 24 5 1ch a a DTS HD High R...

Page 22: ...ont high speakers You can enjoy vertical sound effects e g Pro Logic IIz mode AFront left speaker BFront right speaker CCenter speaker DSurround left speaker ESurround right speaker HLeft high speaker IRight high speaker JSubwoofer 5 1 channel speaker system To fully enjoy theater like multi channel surround sound requires five speakers two front speakers a center speaker and two surround speakers...

Page 23: ...ssible to the wall in front of the seating position and behind the speakers The position should be at an angle of 25 to 30 degrees and at a height of 180 to 200 cm 190 cm is recommended When you use a screen arrange them slightly to the side of each end of the screen 6 1 channel speaker system Place the surround back speaker behind the seating position Tip Since the subwoofer does not emit highly ...

Page 24: ...nt high speaker L 3 4 IFront high speaker R 3 4 JSubwoofer5 1 If you have an additional front speaker system connect them to the FRONT B terminals You can select the front speaker system you are using with SPEAKERS on the front panel page 10 2 If you connect only one surround back speaker connect it to the SURROUND BACK FRONT HIGH ZONE 2 L terminals 3 If you use front high speakers connect them to...

Page 25: ...nto standby automatically based on the level of the input signal to the subwoofer and the sound may not be output You can connect two subwoofers to the receiver The same signals are output from each of the SUBWOOFER jacks Tip You can loosen or tighten the SPEAKERS terminal easily using the supplied speaker cord connection tool ZONE 2 connection Only if you do not use surround back speakers and fro...

Page 26: ...t cords according to the jacks of your equipment TV monitor with an HDMI jack A B Audio signals C D E Video signals TV monitor without an HDMI jack Audio signals Video signals or or A If you connect the receiver to an Audio Return Channel ARC compatible TV s HDMI jack via an HDMI cable this connection is not necessary If you connect the receiver to an Audio Return Channel ARC compatible TV connect...

Page 27: ...ect the TV to the receiver using video cord set Playback Resolution to 480i 576i page 101 When connecting optical digital cords insert the plugs straight until they click into place Do not bend or tie optical digital cords Tip The sound of the TV is output from the speakers connected to the receiver if you connect the audio output jack of the TV and the TV IN jacks of the receiver In this configur...

Page 28: ... HDMI jack see page 29 AHDMI cable not supplied We recommend that you use a Sony HDMI cable You can connect any equipment with HDMI output jacks to the HDMI IN jacks of the receiver Connections required for watching content recorded on a Blu ray Disc or DVDs DVD player Blu ray Disc Player Video audio signals A ...

Page 29: ...ing to the jacks of your equipment ACoaxial digital cord not supplied BAudio cord not supplied CVideo cord not supplied DComponent video cord not supplied When you connect equipment with an optical digital jack set Audio Input Assign in the Input Settings menu page 82 Blu ray Disc Player DVD player Audio signals Video signals or or A B C D ...

Page 30: ...ipment When you connect equipment with an optical digital jack set Audio Input Assign in the Input Settings menu page 82 Connections required for playing video games PlayStation 3 video game with an HDMI jack A Video audio signals or B C D Audio signals Video signals Video game without an HDMI jack ...

Page 31: ...from the receiver only by connecting the video game with an HDMI cable If you want to output multi channel surround sound from the receiver use B for the audio connection Notes When connecting optical digital cords insert the plugs straight until they click into place Do not bend or tie optical digital cords Video game type Required cable cord Video Audio HDMI equipped A Non HDMI equipped D B or C...

Page 32: ...t with an optical digital jack set Audio Input Assign in the Input Settings menu page 82 Connections required for watching programs via satellite broadcasting or via a cable TV Satellite tuner Cable box with an HDMI jack Video audio signals or or Audio signals Video signals A B C D E Satellite tuner Cable box without an HDMI jack ...

Page 33: ...ound from the receiver only by connecting the satellite tuner cable box with an HDMI cable If you want to output multi channel surround sound from the receiver use B for the audio connection Notes When connecting optical digital cords insert the plugs straight until they click into place Do not bend or tie optical digital cords Satellite tuner cable box type Required cable cord Video Audio HDMI eq...

Page 34: ...34US AAudio cord not supplied BVideo cord not supplied Connections required for watching content recorded on video tapes VCR A B Audio signals Video signals ...

Page 35: ... AVideo audio cord not supplied BHDMI cable not supplied Connections required for watching content via a camcorder To the VIDEO 2 IN jacks Camcorder without an HDMI jack A B Video audio signals Camcorder with an HDMI jack ...

Page 36: ...ompatible TV and video equipment Blu ray Disc Player Blu ray Disc recorder PlayStation 3 etc to the receiver using High Speed HDMI cables put on 3D glasses and then play back a 3D compatible content Notes on connecting cables Use a High Speed HDMI cable If you use a Standard HDMI cable 1080p Deep Color or 3D images may not be displayed properly Sony recommends that you use an HDMI authorized cable...

Page 37: ...al cord not supplied BAudio cord not supplied Tip All the digital audio jacks are compatible with 32 kHz 44 1 kHz 48 kHz 88 2 kHz and 96 kHz sampling frequencies The COAXIAL IN jack is also compatible with 192 kHz sampling frequency Connections required for listening content recorded on a Super Audio CD or ordinary CDs CD player Super Audio CD player A B or continued ...

Page 38: ...is receiver When you play a Super Audio CD connect the player to the SA CD CD IN jacks or connect a player which can output DSD signals from the HDMI jack to the receiver using an HDMI cable Refer to the operating instructions supplied with the Super Audio CD player If you want to connect several digital equipment but cannot find an unused input See Using other video audio input jacks page 82 ...

Page 39: ...ot supplied Notes When connecting optical digital cords insert the plugs straight until they click into place Do not bend or tie optical digital cords Tip All the digital audio jacks are compatible with 32 kHz 44 1 kHz 48 kHz 88 2 kHz and 96 kHz sampling frequencies Connections required for listening to content recorded on MDs or cassette tapes MD deck Tape deck A B or ...

Page 40: ...om the receiver and other equipment Be sure to fully extend the FM wire antenna aerial After connecting the FM wire antenna aerial keep it as horizontal as possible Connections required for listening to the radio FM wire antenna aerial supplied AM loop antenna aerial supplied ...

Page 41: ...o communicate with the Internet Some of these devices are integrated with the router Router Use a router compatible with 100 Mbps to enjoy content on your home network We recommend that you use a router equipped with the built in DHCP Dynamic Host Configuration Protocol server This function automatically assigns IP addresses on the LAN LAN cable CAT5 We recommend that you use this type of cable fo...

Page 42: ...hat you use a wired connection Note Connect a router to one among ports 1 to 4 of the receiver using only one LAN cable Do not connect the same router to the receiver using more than one LAN cable It may cause a malfunction Configuration example Internet Modem Computer Router LAN cable not supplied LAN cable not supplied ...

Page 43: ...trol for HDMI page 103 Pass Through page 103 Network Standby page 105 and RS232C Control page 108 to Off and turn off the power for zone 2 If Control for HDMI page 103 Pass Through page 103 or Network Standby page 105 is set to On or the power for zone 2 is turned on the lamp above 1 lights up in amber Note The top of the receiver may become hot while the receiver is in standby mode This condition...

Page 44: ... on the display Insert two R6 size AA batteries in the RM AAL041 remote control Observe the correct polarity when installing batteries Notes Do not leave the remote control in an extremely hot or humid place Do not use a new battery with old ones Do not mix manganese batteries and other kinds of batteries If you do not intend to use the remote control for an extended period of time remove the batt...

Page 45: ... may be different from the actual position If you perform Speaker Settings Auto Calibration using the Easy Setup the measurement results will be overwritten and saved on the currently selected position Pos 1 is selected as the factory default setting Tip Depending on the position of the subwoofer the measurement results for polarity may vary However there will be no problems even if you continue t...

Page 46: ...following operations Turning the power off Changing the volume Switching inputs Changing the setting of SPEAKERS A B A B OFF Connecting headphones Operations other than the above are not allowed during the measurement process To set up the receiver manually See Adjusting Settings page 90 Indicators Selected speakers SP A The speakers connected to the FRONT A terminals SP B The speakers connected t...

Page 47: ...udio Output Format Optical Digital are set to Bitstream with system software version 3 70 For details refer to the operating instructions supplied with the connected equipment 9 Preparing a computer to use as a server A server is a device which delivers content music photos and videos to a DLNA device on a home network You can play back content stored on a computer on a home network with this rece...

Page 48: ...creen 3 Press B b repeatedly to select the menu you want then press to enter the menu mode The menu item list appears on the TV screen Example When you select Watch Tip When z Option appears in the lower right portion of the screen you can display the option menus by pressing TOOLS OPTIONS and select a related function without reselecting the menu To return to the previous screen Press RETURN EXIT...

Page 49: ...tent to be delivered via Internet video or a home network page 50 Favorites Displays the Internet content added to the Favorites List You can save up to 18 favorite Internet content items page 54 Easy Automation Enables you to save various settings with the receiver and recalling the settings all at one time page 84 Sound Effects Enables you to enjoy sound development provided by various Sony prop...

Page 50: ... volume up or down quickly Turn the MASTER VOLUME knob quickly Press and hold the MASTER VOL button To make fine adjustment Turn the MASTER VOLUME knob slowly Press the MASTER VOL button and release it immediately To activate the muting function Press MUTING on the remote control To cancel press MUTING on the remote control again or press MASTER VOL to raise the volume If you turn the receiver off...

Page 51: ...e setting for Playback Resolution page 101 4 Select USB Device then press The folders and video music photo files are listed on the TV screen 5 Press V v B b and to select the file that you want to play The image or sound from the USB device is played on the receiver Notes Do not remove the USB device during operation To avoid data corruption or damage to the USB device turn the receiver off when ...

Page 52: ...ge the setting for Playback Resolution page 101 4 Select iPod front then press The video music files are listed on the TV screen If you select iPod front on My Photo select a photo file using the controls on the iPhone iPod you do not need to proceed to step 5 5 Press V v B b and to select the file that you want to play The image or sound from the iPhone iPod is played back on the receiver You can...

Page 53: ...rnet content using the receiver 1 Connect the receiver to a network page 41 2 Select Watch or Listen from the home menu then press 3 Select Internet Video Internet Music or Internet Photo then press The Internet content screen appears Note If no picture is output change the setting for Playback Resolution page 101 4 Select an Internet content provider icon then press If the Internet content list h...

Page 54: ...t then press TOOLS OPTIONS 3 Select Add to Favorites then press To remove content from Favorites List 1 Press FAVORITES The Favorites List appears 2 Select an Internet content provider icon you want to remove from Favorites List then press TOOLS OPTIONS 3 Select Remove from Favorites then press Available options Registering your favorite content Item Details Favorites List Displays the Favorites L...

Page 55: ...ndication page 58 C Preset station list page 59 D Preset station name page 59 SIRIUS You can listen to the satellite radio Before operation make sure you have connected a satellite radio tuner to the receiver and prepare to listen to the satellite radio page 61 61 1 Select Listen from the home menu then press 2 Select SIRIUS then press SIRIUS screen You can select and operate each item on the scre...

Page 56: ... to iPhone iPod is lost or damaged when using an iPhone iPod connected to this receiver This product has been designed specifically to work with iPhone iPod and has been certified to meet Apple performance standards Do not remove the iPhone iPod during operation To avoid data corruption or damage to the iPhone iPod turn the receiver off when connecting or removing the iPhone iPod When you connect ...

Page 57: ...efer to the operating instructions of the equipment To play remote files by operating the receiver Renderer via a DLNA controller You can operate the receiver with a DLNA certified controller such as Windows Media Player 12 when playing files stored on a DLNA server Control this receiver using a DLNA controller For details of operation see the operating instructions of the DLNA controller Note Do ...

Page 58: ... to using Auto Tuning Direct Tuning page 58 or select the preset station you want page 59 2 Press TOOLS OPTIONS The option menu appears 3 Select STEREO MONO then press 4 Select MONO then press Enter the frequency of a station directly by using the numeric buttons on the remote control 1 Press SHIFT then press D TUNING on the FM AM screen 2 Press the numeric buttons to enter the frequency then pres...

Page 59: ...h the FM reception mode page 58 2 Press TOOLS OPTIONS The option menu appears 3 Select Set Preset then press 4 Select a preset number then press The station is stored as the selected preset number 5 Repeat steps 1 to 4 to program another station You can store stations as follows FM band FM1 to FM30 AM band AM1 to AM30 1 Select Listen from the home menu then press 2 Select FM AM then press 3 Select...

Page 60: ...azz to Classical and much more You also get the best professional and college sports including play by play and expert sports talk and analysis plus exclusive entertainment talk comedy family programming and news from your most trusted sources After you purchase a Sirius tuner you ll need to activate and subscribe to the service to listen to satellite radio Easy to follow installation and set up i...

Page 61: ...s receiver be sure to connect the AC power adaptor supplied with the tuner to a wall outlet Keep the SiriusConnect Home tuner antenna and AC power adaptor away from the speaker cords and the power cord to avoid picking up noise Preparing to listen to the satellite radio 1 Select Listen from the home menu then press 2 Select SIRIUS then press 3 Select All Categories then press 4 Select the channel ...

Page 62: ...ion To exit the menu Press RETURN EXIT O or HOME Selecting a channel of the satellite radio You can select a channel from one category or all the categories 1 Select Listen from the home menu then press 2 Select SIRIUS then press 3 Select the category then press All Categories You can select a channel from all the categories category name You can select a channel from one category Checking receivi...

Page 63: ...t the channels you want directly by presetting them using the preset numbers You can preset up to 30 Sirius satellite radio channels 1 Select a channel you want to preset using Category Mode page 62 or Direct Tuning page 63 2 Press TOOLS OPTIONS The option menu appears 3 Select Set Preset then press The preset number selection screen appears 4 Select the preset number you want to use as the preset...

Page 64: ...en you select a channel using Category Mode locked channels are skipped The lock code is set to 0000 as the default Change the lock code before you use this function for the first time See To change the lock code Lock Code page 65 1 Select a channel you want to lock using Category Mode page 62 or Direct Tuning page 63 2 Press TOOLS OPTIONS The option menu appears 3 Select Parental Lock then press ...

Page 65: ...want to listen to using Direct Tuning page 63 Enter your 4 digit lock code appears 2 Press SHIFT then enter your 4 digit lock code using the numeric buttons The channel is tuned in To cancel the Parental Lock 1 Select a channel you want to unlock using Direct Tuning page 63 2 Press TOOLS OPTIONS The option menu appears 3 Select Parental Lock then press 4 Select OFF then press Enter your 4 digit lo...

Page 66: ...ystem on again Also make sure if the AC adaptor supplied with the SiriusConnect Home tuner is connected to a wall socket Invalid Channel INVALID CHANNNEL You have entered an invalid channel number The channel to be tuned in is void due to the change by the broadcast service or the receiving condition is not good Locked Channel LOCKED CH The selected channel is locked Sub Updated SUB UPDT The subsc...

Page 67: ...no sound from the subwoofer Standard 2 channel stereo sources completely bypass the sound field processing and multi channel surround formats are downmixed to 2 channels 2ch Analog Direct You can switch the audio of the selected input to 2 channel analog input This function enables you to enjoy high quality analog sources When using this function only the volume and front speaker level can be adju...

Page 68: ... details see About the effect type for HD D C S page 69 PLII Movie Performs Dolby Pro Logic II Movie mode decoding This setting is ideal for movies encoded in Dolby Surround In addition this mode can reproduce sound in 5 1 channel for watching videos of overdubbed or old movies PLIIx Movie Performs Dolby Pro Logic IIx Movie mode decoding This setting expands Dolby Pro Logic II Movie or Dolby Digit...

Page 69: ...bing theater is emphasized and a unique acoustic field is created x Theater Factory default setting The Theater setting is suitable for a general living room This setting reproduces the reverberation of sound just like in a movie theater dubbing theater It is most appropriate for watching content recorded on a Blu ray Disc when you want the atmosphere of a movie theater x Studio The Studio setting...

Page 70: ... of a 300 seat live house Stadium Reproduces the feeling of a large open air stadium Sports Reproduces the feeling of sports broadcasting Portable Audio Reproduces a clear enhanced sound image from your portable audio device This mode is ideal for MP3 and other compressed music PLII Music Perform Dolby Pro Logic II Music mode decoding This setting is ideal for normal stereo sources such as CDs PLI...

Page 71: ... front high speakers Note Depending on the setting or audio format sound may not be output from the front high speakers even if you set Sound Field Mode to Front High You cannot select 2ch Analog Direct when you play back content via a USB device a home network or Internet video Multi Stereo does not work when multi channel audio signals are being received The sound fields for movie and music may ...

Page 72: ...nction does not work in the following cases 2ch Analog Direct is being used Headphones are being used The receiver may play back signals at lower sampling frequency than the actual sampling frequency of the input signals depending on the audio format Adjusting the equalizer You can use following parameters to adjust the tonal quality bass treble level of front center surround surround back and fro...

Page 73: ... is louder than the TV programs 1 Select Settings from the home menu then press 2 Select Audio Settings then press 3 Select Advanced Auto Volume then press 4 Select On then press Notes Be sure to reduce the volume level before you turn off this function The Advanced Auto Volume function may not work depending on the audio format This function does not work in the following case 2ch Analog Direct i...

Page 74: ...e an IR repeater when you install the receiver in a place where signals from the remote control cannot reach Making a multi zone connection Only signals from equipment connected to the analog input jacks are output through the ZONE 2 OUT jacks No signals are output from equipment connected to only the digital input jacks 1 Outputs sound from speakers in zone 2 using the SURROUND BACK FRONT HIGH ZO...

Page 75: ...using the receiver and another amplifier AIR repeater not supplied BSpeakers CSony Amplifier Receiver You can also connect to the ZONE 2 COMPONENT VIDEO OUT jack Main zone Zone 2 TV monitor ZONE 2 AUDIO OUT A B B C STR DA3700ES Remote control IR REMOTE IN ZONE 2 VIDEO OUT ...

Page 76: ...one2 then press 5 Select the parameter you want then press Operating the receiver from another zone ZONE 2 operations The following operations are described for connecting an IR repeater and operating the receiver in zone 2 When an IR repeater is not connected use this receiver in the main zone Set the volume control for zone 2 Parameter Explanation Variable The volume control is set to 40 dB init...

Page 77: ...g the receiver in zone 2 If you set Line Out for Zone2 to Variable you can also adjust the volume in zone 2 using MASTER VOL on the remote control page 76 To finish the zone 2 operation Press ZONE then press 1 Notes TV can be selected in the main zone only Content via a USB device iPhone iPod a home network or Internet video is available in zone 2 only when SOURCE is selected You can select either...

Page 78: ...connection We recommend that you connect the receiver to products featuring BRAVIA Sync Notes The following features may operate with non Sony equipment However compatibility with all non Sony equipment is not guaranteed System Power Off One Touch Play System Audio Control The following features are Sony proprietary functions They can not operate with non Sony equipment Scene Select Home Theater C...

Page 79: ...le the receiver remains in standby mode Start playback on the playback equipment To use the One Touch Play function of the camcorder 1 Turn the Control for HDMI function on for both the receiver and your camcorder 2 Connect your camcorder to one of the HDMI IN 1 IN 2 or IN 3 jacks page 35 If you use a Sony camcorder the TV is turned on in conjunction with the receiver then the camcorder starts pla...

Page 80: ...rs on the connected TV You can switch an input of the receiver or switch sound fields by using your TV s remote control You can also adjust the level of the center speaker or the subwoofer or adjust the settings of Sound Optimizer page 72 Dual Mono page 97 or A V Sync page 98 To use the Home Theater Control function your TV must be able to access a broadband service For details refer to the operat...

Page 81: ...nections If there are no digital audio signals analog audio signals are selected When TV input is selected priority is given to the Audio Return Channel ARC signals If your TV is not compatible with the Audio Return Channel ARC the digital optical audio signals are selected If the Control for HDMI functions of both the receiver and the TV are not activated the Audio Return Channel ARC does not wor...

Page 82: ...n press 4 Select the audio and or video signals you want to assign to each input Notes If you assign an input to any of the HDMI IN 1 to IN 5 jacks in Video Input Assign or Audio Input Assign the same HDMI input jack is assigned to both the video input and audio input If you want to assign an HDMI IN jack to either the video input or audio input first assign an input to any of the HDMI IN 1 to IN ...

Page 83: ...ame HDMI IN jack However if you use the One Touch Play function on the equipment connected to the HDMI IN jack the previous input in its original input sequence is preferentially selected Input name BD DVD GAME SAT CATV VIDEO 1 VIDEO 2 TV MD TAPE SA CD CD Assignable video input jacks Component1 BD DVD a a a a a a a Component2 SAT CATV a a a a a a a HDMI1 GAME a a a a a a a HDMI2 SAT CATV a a a a a...

Page 84: ...g those settings all at one time Easy Automation You can save various settings with the receiver all at one time and recall the settings and apply them to the receiver easily For example by saving the settings in the 1 Movie scene as follows you can switch the settings of the receiver all at one time by a simple one touch operation without switching each setting for Input Calibration Type and Soun...

Page 85: ... No Change No Change No Change No Change Sound Field HD D C S Berlin Philharmonic Hall Multi Stereo No Change Sleep No Change No Change Off 30 min Volume No Change No Change 10 dB 30 dB Speaker No Change No Change No Change No Change Party Mode No Change No Change On No Change A V Sync No Change No Change No Change No Change Calibration Type No Change No Change No Change No Change Digital Legato L...

Page 86: ... holding down EASY AUTOMATION 1 or EASY AUTOMATION 2 for 3 seconds in the same way as you do when you select Import Current Settings from the menu Using the sleep timer You can set the receiver to turn off automatically at a specified time 1 Press AMP The receiver can be operated using the remote control 2 Press SHIFT then press SLEEP Each time you press SLEEP the display changes cyclically as fol...

Page 87: ...back equipment You can record with an audio equipment using the receiver Refer to the operating instructions supplied with your MD deck or tape deck 1 Select Listen from the home menu then press 2 Select the playback equipment then press 3 Prepare the playback equipment for playing For example insert a CD into the CD player 4 Prepare the recording equipment Insert a blank MD or tape into the recor...

Page 88: ... the display When the command mode is set to AV1 C MODE AV1 appears on the display 1 Press 1 while pressing RM SET UP The AMP and ZONE buttons flash 2 Press AMP The ZONE button goes off the AMP button keeps flashing and the SHIFT button lights up 3 Press the numeric button 1 or 2 while the AMP button is flashing When you press 1 the command mode is set to COMMAND MODE AV1 When you press 2 the comm...

Page 89: ...o avoid receiver malfunction To set up speakers For details see Speaker Connection in the Speaker Settings menu page 94 Notes You cannot use the FRONT B terminals for a bi amplifier connection Make the bi amplifier settings before you perform the Auto Calibration function If you make the bi amplifier settings the speaker level balance and equalizer settings of the surround back speakers become inv...

Page 90: ... press to enter the menu mode The setting menu list appears on the TV screen 2 Select the menu item you want then press to access the menu item Example When you select Audio Settings 3 Select the parameter you want then press to enter To return to the previous screen Press RETURN EXIT O To exit the menu Press HOME Adjusting Settings V v B b HOME RETURN EXIT O TOOLS OPTIONS ...

Page 91: ...age 97 Digital Legato Linear Sound Optimizer Equalizer Advanced Auto Volume Subwoofer Muting Dual Mono Dynamic Range Compressor Input name A V Sync Decode Priority Sound Field Sound Field Mode Video Settings page 100 Resolution Playback Resolution 3D Output Settings TV Type Screen Format HDMI Settings page 102 Input name Subwoofer Level Subwoofer Low Pass Filter Audio Out Control for HDMI Pass Thr...

Page 92: ...vices Settings page 105 Parental Control Password Parental Control Area Code Internet Video Parental Control Internet Video Unrated Zone Settings page 106 Zone Control Zone Setup System Settings page 107 Language Auto Standby Settings Lock RS232C Control Software Update Notification Initialize Personal Information System Information EULA Network Update page 108 ...

Page 93: ...l and measuring the distance of each speaker from your seating position automatically Note The measurement results will be overwritten and saved on the currently selected position Lets you register three patterns for Position depending on the seating positions listening environment and measurement conditions You can also select a calibration type to compensate the each speaker Position You can reg...

Page 94: ...93 x OFF Does not activate the A P M function x AUTO Switches the A P M function on or off automatically Notes This function does not work in the following cases OFF is selected for the calibration type page 93 Analog audio signals are input 2ch Analog Direct is being used The receiver may play back signals at a lower sampling frequency than the actual sampling frequency of the input signals depen...

Page 95: ...eft right surround back left right front high left right size 1 Select the speaker on the screen for which you want to adjust the size then press 2 Select a Size then press Large If you connect large speakers that will effectively reproduce bass frequencies select Large Normally select Large Small If the sound is distorted or you feel a lack of surround effects when using multi channel surround so...

Page 96: ... you output the test tone sequentially from adjacent speakers Some items may not be displayed depending on the setting of the speaker pattern 3 Adjust Level then press To output the source sound from adjacent speakers You can output the source sound from adjacent speakers so that you can adjust the balance between the speakers 1 Select Phase Audio then press The Phase Audio screen appears 2 Adjust...

Page 97: ... TrueHD DTS 96 24 DTS ES Matrix 6 1 DTS HD Master Audio or DTS HD High Resolution Audio signals are being received Lets you turn the sound optimizer function on or off page 72 x Off x On Lets you adjust the bass and treble level for each speaker page 72 Lets you turn the Advanced Auto Volume function on or off page 73 x Off x On Lets you prevent signals from being output via the SUBWOOFER jacks x ...

Page 98: ...ng used The receiver may play back signals at lower sampling frequency than the actual sampling frequency of the input signals depending on the audio format Lets you specify the input mode for the digital signal input to the DIGITAL IN jacks or HDMI IN jacks You can set the function for each input independently x PCM When signals from the DIGITAL IN jack are selected PCM signals are given priority...

Page 99: ...99US Adjusting Settings Lets you set whether or not to output sound from the front high speakers For details see Sound Field Mode page 71 Sound Field Mode ...

Page 100: ...cally depending on the connected monitor b When the TV is connected to jacks other than the HDMI jacks 480i 576i signals are output when Resolution is set to Auto Resolution Converting video signals Resolution menu setting HDMI OUT jacks MONITOR COMPONENT VIDEO OUT jacks MONITOR VIDEO OUT jack Direct COMPONENT VIDEO IN jacks a VIDEO IN jacks a Auto factory default setting COMPONENT VIDEO IN jacks ...

Page 101: ...utput the image at low resolution or a warning message which informs that the video signals cannot be output may appear Notes If the warning message Video cannot be output from this jack appears perform the following procedure 1Select BD DVD as the input for the main zone 2Set Playback Resolution to 480i 576i or 480p 576p If no picture is output when you play back content via a USB device a home n...

Page 102: ...required settings for equipment connected to the HDMI jacks Lets you set the level of the subwoofer to 0 dB or 10 dB when PCM signals are input via an HDMI connection You can set the level for each input to which an HDMI input jack is assigned independently x 0 dB x Auto Automatically sets the level to 0 dB or 10 dB depending on the audio stream x 10 dB Lets you turn the low pass filter for the su...

Page 103: ...put HDMI signals to the TV even when the receiver is in standby mode For details see Outputting the HDMI signals even when the receiver is in standby mode Pass Through page 80 x Off x On Input Settings You can adjust the settings for the connections of the receiver and other equipment Lets you set the following items for each input x Watch Listen Sets whether an input is displayed on the Watch men...

Page 104: ...Address DNS Proxy Server Connect the receiver to the network beforehand For details see 5 Connecting to the network page 41 Lets you set whether or not to display the connected DLNA server x Renderer Name Shows the renderer name of the receiver x Auto Access Permission Sets whether or not to allow automatic access from newly detected DLNA controller Lets you set whether or not to accept commands f...

Page 105: ...k of some Internet videos can be limited according to the age of the users Scenes may be blocked or replaced with different scenes Set the function in accordance with the on screen instructions Lets you set whether or not access to allow playback of unrated Internet videos x Allow Allows the playback of unrated Internet videos x Block Blocks the playback of unrated Internet videos Network Standby ...

Page 106: ...n press 2 Select Volume then press 3 Adjust the volume then press To preset the volume for main zone zone 2 You can preset the volume of turning the power on for each zone 1 Select the zone for which you want to preset the volume then press 2 Select Preset Volume then press 3 Adjust the volume then press During the adjustment the sound is output at the volume level to which you have adjusted it re...

Page 107: ...select the language for the messages on the screen x English x Español x Français x Deutsch Lets you turn the function that switches the main zone to standby mode automatically if you do not operate the receiver for a specific period of time or when there is no signal input to the receiver on or off x Off Does not switch to standby mode x On Switches to standby mode after approximately 30 minutes ...

Page 108: ...video such as the Internet content list Favorites List etc Displays the software version of the receiver Displays the EULA screen on the TV screen Network Update You can update and improve the functions of the receiver For information about update functions refer to the following website http www sony com essupport The GUI and display window of the receiver are turned off and the MULTI CHANNEL DEC...

Page 109: ... is displayed in the display window of the receiver Example When you select SPEAKER 3 Press V v repeatedly to select the menu then press 4 Press V v repeatedly to select the menu item then press The parameter appears 5 Press V v repeatedly to select the parameter you want then press The parameter is entered To return to the previous step Press RETURN EXIT O Using the menu in the display window V v...

Page 110: ...XIT W xxx 4Y Warnig code FL FR CNT SL SR SBR SBL SW LH RH 0 1 2 3 4 NO WARN No Warning xxx xxx Phase Information FL FR CNT SL SR SBR SBL SW LH RH OUT IN xxx xxx Distance Information FL FR CNT SL SR SBR SBL SW LH RH xxx xxxx Level Information FL FR CNT SL SR SBR SBL SW LH RH E xx 3Y Error code F SR SB 0 1 2 3 4 RETRY xxx YES NO CANCEL CAL TYPE Calibration Type FULL FLAT ENGINEER FRONT REF OFF A P M...

Page 111: ...EL Center speaker level CNT 20 0 dB to CNT 10 0 dB 0 5 dB step SL LEVEL Surround left speaker level SL 20 0 dB to SL 10 0 dB 0 5 dB step SR LEVEL Surround right speaker level SR 20 0 dB to SR 10 0 dB 0 5 dB step SB LEVEL Surround back speaker level SB 20 0 dB to SB 10 0 dB 0 5 dB step SBL LEVEL Surround back left speaker level SBL 20 0 dB to SBL 10 0 dB 0 5 dB step SBR LEVEL Surround back right sp...

Page 112: ... 32 9 1 inch step SR 1 0 to SR 10 0 m 1 cm step SB DIST Surround back speaker distance SB 3 3 to SB 32 9 1 inch step SB 1 0 to SB 10 0 m 1 cm step SBL DIST Surround back left speaker distance SBL 3 3 to SBL 32 9 1 inch step SBL 1 0 to SBL 10 0 m 1 cm step SBR DIST Surround back right speaker distance SBR 3 3 to SBR 32 9 1 inch step SBR 1 0 to SBR 10 0 m 1 cm step LH DIST Left high speaker distance...

Page 113: ...NT HIGH STANDARD HD DCS TYP HD D C S effect type DYNAMIC THEATER STUDIO H GAIN PLIIz Height Gain Control HIGH MID LOW EQ settings EQ FRT BASS Front speakers bass level FRT B 10 dB to FRT B 10 dB 0 5 dB step FRT TREBLE Front speakers treble level FRT T 10 dB to FRT T 10 dB 0 5 dB step CNT BASS Center speaker bass level CNT B 10 dB to CNT B 10 dB 0 5 dB step CNT TREBLE Center speaker treble level CN...

Page 114: ... L L D L L AUTO2 D L L AUTO1 D L L OFF OPTIMIZER Sound Optimizer ON OFF AUTO VOL Advanced Auto Volume ON OFF SW MUTING Subwoofer Muting ON OFF A V SYNC Synchronizes audio with video output HDMI AUTO 0 ms to 300 ms 10 ms step DUAL MONO Digital broadcast language selection MAIN SUB MAIN SUB DEC PRIO Digital audio input decoding priority DEC AUTO DEC PCM D RANGE Dynamic range compressor COMP ON COMP ...

Page 115: ...ng Settings System settings SYSTEM R S232C RS232C Control Mode R S232C ON R S232C OFF NET STBY Network Standby STBY ON STBY OFF AUTO STBY Auto Standby STBY ON STBY OFF VER x xxx Version Menu Item Parameter continued ...

Page 116: ...t Volume level t Stream information t Input name you entered Stream information may not be displayed When listening to FM and AM radio Station name t Frequency t Sound field type t Volume level Index name appears only when you have assigned one to the input or preset station Index name does not appear when only blank spaces have been entered When tuning in a channel from the Sirius satellite radio...

Page 117: ...be able to operate some functions for the equipment you are using Table of buttons used to control each equipment Using the Remote Control Operating the equipment connected to the receiver Equipment Button TV VCR DVD player DVD VCR combo Blu ray Disc Player HDD Recorder PSX Video CD player LD player Digital CATV terminal DSS Tape deck A B DAT deck CD player MD deck AV 1 z z z z z z z z z z z Numer...

Page 118: ...am the remote control to operate non Sony equipment and also Sony equipment that the remote control is normally unable to operate The procedure below uses as an example a case in which a VCR made by a company other than Sony is connected to the VIDEO 1 IN jacks on the receiver 1 Press AV 1 while pressing RM SET UP The RM SET UP button flashes TOP MENU POP UP MENU z z z AUDIO z z z z z z z SUBTITLE...

Page 119: ...bles below to program non Sony equipment and also Sony equipment that the remote control is initially unable to operate Since the signal from the remote control received by the equipment differs by its model and the year more than one numeric code may be assigned to an equipment If you fail to program your remote control using one of the codes try using other codes Notes The numeric codes are base...

Page 120: ...SHI 419 ORITRON 417 PANASONIC 406 408 425 PHILIPS 407 PIONEER 409 410 RCA 414 SAMSUNG 416 422 Maker Code s TOSHIBA 404 421 ZENITH 418 420 Maker Code s SONY 411 Maker Code s SONY 401 402 403 Maker Code s SONY 501 AIWA 501 536 539 AKAI 503 AOC 503 CENTURION 566 CORONADO 517 CURTIS MATHES 503 551 566 567 DAYTRON 517 566 DAEWOO 504 505 506 507 515 544 FISHER 508 545 FUNAI 548 FUJITSU 528 GOLDSTAR LG 5...

Page 121: ... 515 534 556 VIZIO 576 577 Maker Code s SONY 601 602 603 PIONEER 606 Maker Code s SONY 605 Maker Code s SONY 701 702 703 704 705 706 AIWA 710 750 757 758 BLAUPUNKT 740 EMERSON 750 FISHER 717 720 GENERAL ELECTRIC GE 722 730 GOLDSTAR LG 723 753 Maker Code s HITACHI 722 725 729 741 ITT NOKIA 717 JVC 726 727 728 736 MAGNAVOX 730 731 738 MITSUBISHI MGA 732 733 734 735 NEC 736 PANASONIC 729 730 737 738 ...

Page 122: ...o lists MACRO 1 and MACRO 2 You can specify up to 20 commands for each macro list Maker Code s SONY 821 822 823 HAMLIN REGAL 836 837 838 839 840 JERROLD G I MOTOROLA 806 807 808 809 810 811 812 813 814 819 JERROLD 830 831 OAK 841 842 843 PANASONIC 816 826 832 833 834 835 PHILIPS 830 831 PIONEER 828 829 RCA 805 SCIENTIFIC ATLANTA 815 816 817 844 TOCOM PHILIPS 830 831 ZENITH 826 827 RM SET UP Input ...

Page 123: ...ton lights up and then turns off 2 Press MACRO 1 or MACRO 2 to start the macro The macro starts and execute the commands in the order you assigned them While the commands are being sent the AMP button flashes and the RM SET UP button lights up When the commands have been sent the RM SET UP and AMP buttons turn off To erase a programmed macro 1 Press MACRO 1 or MACRO 2 for more than 1 second while ...

Page 124: ... on which you want to store the new command For the buttons with an asterisk in the illustration above press SHIFT then press the button The input button you selected in step 2 lights up The RM SET UP button remains lit When the learning process fails the RM SET UP button flashes five times If you fail to store the new command make sure that a command has not already been stored on the button on w...

Page 125: ...n this case after leaving the remote control untouched for 10 seconds press RM SET UP to cancel the settings When selecting a learned input press the button used to learn that function To erase the learned code 1 Press FAVORITES while pressing RM SET UP 2 Press the input button for which you want to clear the setting The input button flashes The RM SET UP button remains lit 3 Press 1 for more than...

Page 126: ...n 1 while pressing MASTER VOL then press AV 1 all at the same time The RM SET UP button flashes three times 2 Release all buttons All the contents of the remote control s memory e g all the programmed data are cleared ...

Page 127: ...only at a qualified service shop On heat buildup Although the receiver heats up during operation this is not a malfunction If you continuously use this receiver at a large volume the cabinet temperature of the top side and bottom rises considerably To avoid burning yourself do not touch the cabinet The top of the cabinet may become too hot to touch On placement Place the receiver in a location wit...

Page 128: ...ition occurs because current is flowing in the internal circuits of the receiver and this is normal There is no picture or an unclear picture appears on the TV screen or monitor regardless of type of picture Select the appropriate input on the receiver page 50 Set your TV to the appropriate input mode Move your TV away from the audio equipment Assign the component video input correctly page 82 The...

Page 129: ...e Watch Listen menu no picture is output Select BD DVD using INPUT SELECTOR on the receiver once then set Playback Resolution to 480p 576p in the Video Settings menu using the GUI page 101 and select the content again There is no sound no matter which equipment is selected or only a very low level sound is heard Check that the speakers and equipment are connected correctly Check that both the rece...

Page 130: ...peaker pattern is set so that there are no surround back speakers the input signals to the SUR BACK jacks is invalid because the receiver cannot down mix the surround back channels Subwoofer Check that the subwoofer is connected correctly and securely Make sure you have turned on your subwoofer There is no sound from a specific equipment Check that the equipment is connected correctly to the audio...

Page 131: ...t you want when you watch a program from the equipment connected to the TV When using the Control for HDMI function you cannot control the connected equipment using TV s remote control Depending on the connected equipment and TV you may need to set up the HDMI setting of the equipment and TV Refer to the operation instructions supplied with each equipment and TV Change the input of the receiver to...

Page 132: ...ignals can be output only from the analog output jacks Digital audio input signals can be output only from the OPTICAL OUT jack You may not make recordings using an SCMS compliant recording deck Copyright protection to prevent recording is contained in the sources In this case you may not be able to record from the sources A test tone is not output from the speakers The speaker cords may not be co...

Page 133: ...tart playback When 2ch Analog Direct is being used the sound is not output Use other sound field page 67 The music data itself contains noise or the sound is distorted Depending on the file format there may be files that sometimes cannot be played back For details see Playable types of files page 140 USB device formatted with file systems other than FAT12 16 32 VFAT or NTFS are unsupported If you ...

Page 134: ...g Connection Server Settings in the Network Settings menu page 104 Check the following Is the router turned on If there is another device between the receiver and the router check that device is turned on Are all of the cables connected correctly and securely Is the settings to make sure that they match the router s settings DHCP or fixed IP address When using a computer check the following The bu...

Page 135: ... in Cannot play back content Some Internet content requires registration via a computer before it can be played The Control for HDMI function does not work Check the HDMI connection page 26 28 30 32 Make sure Control for HDMI is set to On in the HDMI Settings menu Make sure the connected equipment is compatible with the Control for HDMI function Check the Control for HDMI settings on the connected...

Page 136: ...ee the following table to solve the problem If any problem persists consult your nearest Sony dealer PROTECTOR The receiver is covered and ventilation holes are blocked The receiver will automatically turn off after a few seconds Remove the object covering the upper panel of the receiver and turn on the power again SPEAKER SHORTED Irregular current is output to the speakers due to a short circuit ...

Page 137: ...nly one surround back speaker connect it to the SURROUND BACK FRONT HIGH ZONE 2 L terminals Only one front high speaker is connected Connect the front high speaker to each of the SURROUND BACK FRONT HIGH ZONE 2 terminals Front high speakers are connected even though surround speakers are not connected Connect the surround speaker s to the SURROUND terminals Warning 40 The measurement process has c...

Page 138: ...on from 250 milliwatts to rated output Amplifier section POWER OUTPUT 1 2 Rated Power Output at Stereo Mode 8 ohms 20 Hz 20 kHz THD 0 09 100 W 100 W Reference Power Output at Stereo Mode 4 ohms 20 Hz 20 kHz THD 0 15 85 W 85 W Reference Power Output 8 ohms 1 kHz THD 0 7 FRONT 110 W 110 W CENTER 110 W SURROUND 110 W 110 W SURROUND BACK 110 W 110 W Reference Power Output 4 ohms 1 kHz THD 0 7 FRONT 10...

Page 139: ... Hz HDMI Video 3D Input Output HDMI Repeater block 1280 720p 59 94 60 Hz Frame Packing Side by Side Half Over Under Top and Bottom 1920 1080i 59 94 60 Hz Frame Packing Side by Side Half Over Under Top and Bottom 1920 1080p 59 94 60 Hz Side by Side Half Over Under Top and Bottom 1280 720p 50 Hz Frame Packing Side by Side Half Over Under Top and Bottom 1920 1080i 50 Hz Frame Packing Side by Side Hal...

Page 140: ... files in a single tree The receiver can recognise the following files or folders stored in the DLNA server up to folders in the 18th tree up to 999 files in a single tree Some USB devices may not work with this receiver The receiver can recognise Mass Storage Class MSC devices such as flash memory or an HDD Still Image Capture Device SICD class devices and 101 keyboard front USB jack only To avoi...

Page 141: ...plied accessories Operating Instructions this manual Quick Setup Guide 1 Software License Information 1 Optimizer microphone ECM AC2 1 FM wire antenna aerial 1 AM loop antenna aerial 1 AC power cord mains lead 1 Remote control 1 R6 size AA batteries 2 Speaker cord connection tool 1 Design and specifications are subject to change without notice Standby power consumption 0 5 W ...

Page 142: ...er 28 C Cable box 32 Calibration Type 94 Camcorder 35 Category Mode 62 CD player 37 Changing the display 116 Clear receiver 43 remote control 125 Connection Server Settings 104 Connections antenna aerial 40 audio equipment 37 monitor 26 Network 41 speakers 24 video equipment 28 Control for HDMI 103 Crossover Frequency 95 D D C A C Digital Cinema Auto Calibration 93 Decode Priority 98 Digital Legat...

Page 143: ... Music 70 Muting 50 N Name In 94 Name Input 59 Neo 6 Cinema 68 Neo 6 Music 70 Network Settings 104 Network Standby 105 Network Update 108 O One Touch Play 79 P Parental Control Area Code 105 Parental Control Password 105 Parental Lock 64 Pass Through 80 103 Phase Audio 96 Phase Noise 96 PHONES 10 Playback Resolution 101 PlayStation 3 30 PLII Movie 68 PLII Music 70 PLIIx Movie 68 PLIIx Music 70 PLI...

Page 144: ...6 SPEAKERS A B A B OFF 10 46 Sports 70 Stadium 70 STEREO MONO 58 Subwoofer Level 102 Subwoofer Low Pass Filter 102 Subwoofer Muting 97 Super Audio CD player 37 System Audio Control 79 System Information 108 System Power Off 79 System Settings 107 SYSTEM STANDBY 118 T Tape deck 39 Test Tone 96 TONE 10 TONE MODE 10 44 Treble 10 72 True Concert Mapping A B 70 Tuner 58 Tuning 58 59 TV Type 102 U Up co...

Page 145: ...145US Additional Information ...

Page 146: ...146US ...

Reviews: